| Dec 1, 2010 - 7:17 PM | Forum: Interior/Audio/Electrical/Wiring · Post Preview: #888286 · Replies: 4 · Views: 1,772 |
|
Enthusiast  Joined Jun 9, '09 From Saint Louis Currently Offline |
Your going to need two heavy paper clips and jumper cables to reset your air bag warning light. The reset procedure is on the site somewhere. You reset it on your test module onder the hood. Here's the reset procedure I used to reset mine. To clear the SRS air bag error code do the following: Connect the two wires (straightened out paper clips) to terminals Tc and Ab Turn the ignition switch to on and wait at least six seconds Starting with the tc terminal, apply body ground alternately to tc and ab twice each in cycles of about one second Finally keep applying body ground to tc after a few seconds the air bag light will start to blink and cancellation of the codes is complete. |
| Nov 24, 2010 - 1:06 AM | Forum: Interior/Audio/Electrical/Wiring · Post Preview: #887280 · Replies: 10 · Views: 2,323 |
|
Enthusiast  Joined Jun 9, '09 From Saint Louis Currently Offline |
Thereís a hard soldered limiter on the back of the cigarette lighter socket. When it overloads it blows and has to be replaced. Youíll see it soldered to the power line on the back of the socket when you pull it out. You can solder in a heaver limiter if you want to run higher amp accessories, but I chose to install a high load accessories socket just for accessories. Now there are much better looking ones available at auto parts stores. I put this in years ago. Takes about twenty minutes to wire up. 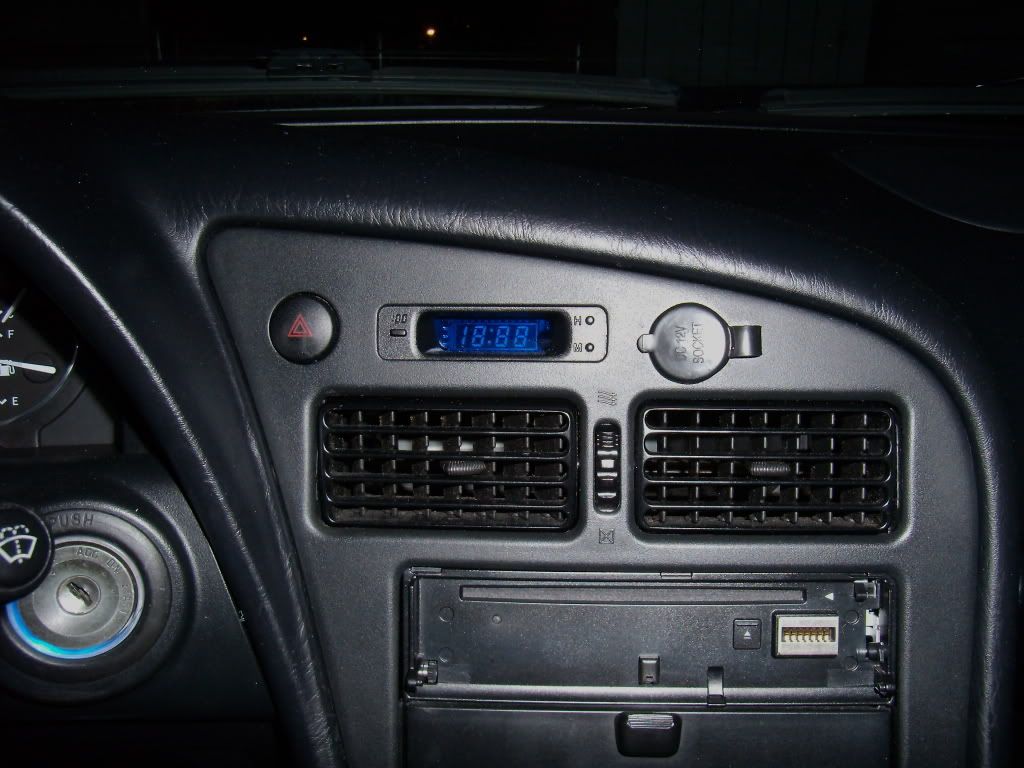 |
| Nov 16, 2010 - 9:23 PM | Forum: Interior/Audio/Electrical/Wiring · Post Preview: #886323 · Replies: 9 · Views: 2,963 |
|
Enthusiast  Joined Jun 9, '09 From Saint Louis Currently Offline |
Here's the trouble shooting guide from the Toyota Factory Manual, but mine only covers US & Canada. The codes to the right of the trouble shoot guide show a detailed breakdown of the system if you need further detail. It sounds like the control switch from your description. 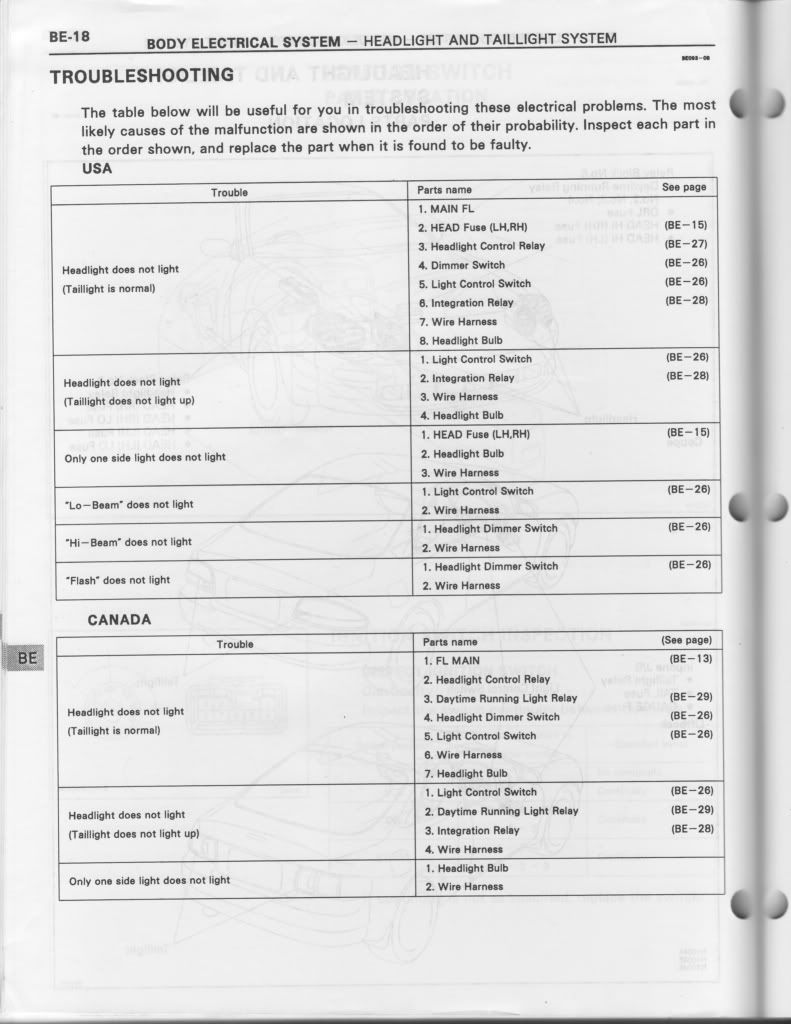 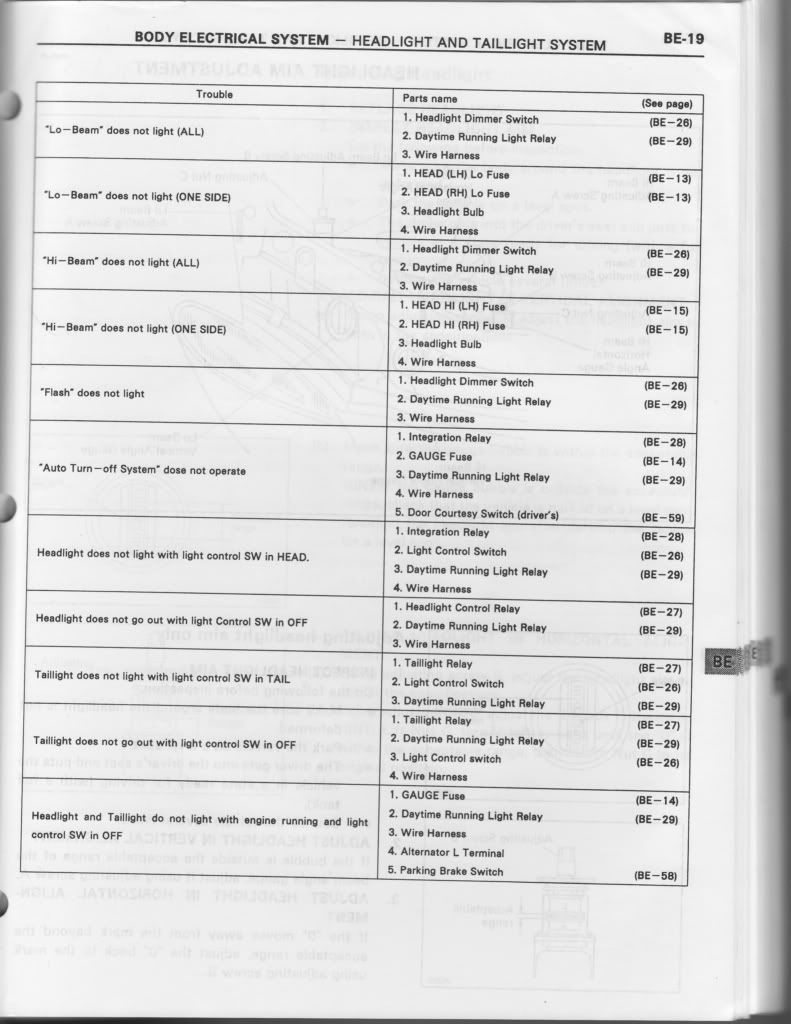 |
| Nov 7, 2010 - 6:18 PM | Forum: Interior/Audio/Electrical/Wiring · Post Preview: #884849 · Replies: 15 · Views: 3,782 |
|
Enthusiast  Joined Jun 9, '09 From Saint Louis Currently Offline |
Mine is just like the conlight above. It seems the actual light sensor is the same for all of them. I have a friend that has a four runner that's exactly the same as well. The only difference is the cable adapter. I paid my local dealer $14 for the celica adapter and my friend had the dealer install his for $40 extra. I'll take a photo of where it's mounted and I think I still have the box for the adapter with the diagram in it. I'll take a look. |
| Nov 7, 2010 - 2:02 PM | Forum: Interior/Audio/Electrical/Wiring · Post Preview: #884813 · Replies: 15 · Views: 3,782 |
|
Enthusiast  Joined Jun 9, '09 From Saint Louis Currently Offline |
Works perfect on mine! |
| Nov 7, 2010 - 11:59 AM | Forum: Interior/Audio/Electrical/Wiring · Post Preview: #884790 · Replies: 15 · Views: 3,782 |
|
Enthusiast  Joined Jun 9, '09 From Saint Louis Currently Offline |
Or you can buy them new from any Toyota parts dept. part number: 89121-30010 |
| Oct 19, 2010 - 4:11 AM | Forum: Interior/Audio/Electrical/Wiring · Post Preview: #881454 · Replies: 2 · Views: 1,162 |
|
Enthusiast  Joined Jun 9, '09 From Saint Louis Currently Offline |
Part number = 86120-33110 FUJITSU TEN, TYPE D |
| Oct 14, 2010 - 12:05 AM | Forum: Interior/Audio/Electrical/Wiring · Post Preview: #880515 · Replies: 4 · Views: 1,388 |
|
Enthusiast  Joined Jun 9, '09 From Saint Louis Currently Offline |
The 94-95 hatchback suck for noise! I tried the expensive Dynamat behind the side panels and didn't get much bang for the buck. So, I went back to old school. There's not enough room for much insulation in the floor so I coated the entire floor board & side walls including under the spare with Quite Car coating and added open cell sheet insulation to the bottom of the boot mat. Then I bought a roll of Johns Manville R25 insulation and packed the side walls. I spent over a hundred on the Dynamat that didn't do much and a whole 19 bucks for the roll of Manville. Also, I used a roll of aluminum tape to get the fiberglass to conform to the panels and it killed the sound far better than the Dynamat. You can take the roll of Manville and strip it down to any size thickness you want to work with. I had half a roll left after covering both side panels and the back panel. Good thing as I was still getting too much suspension noise and found we have no insulation at all under the carpet. Just the rubber carpet mat. So I pulled the carpet and used the rest of the roll under the carpet at the way back under the rear seat. Nice quite ride now. The Dynamat might work well in the doors but haven't tried that as She's quite enough now. |
| Oct 10, 2010 - 4:56 PM | Forum: Interior/Audio/Electrical/Wiring · Post Preview: #879775 · Replies: 15 · Views: 3,782 |
|
Enthusiast  Joined Jun 9, '09 From Saint Louis Currently Offline |
Mines a 94 gt and has the same plug as the MR2. You can splice it in without it, but I opted to use the factory harness so I didn't have to splice anything. |
| Oct 10, 2010 - 2:49 PM | Forum: Interior/Audio/Electrical/Wiring · Post Preview: #879745 · Replies: 15 · Views: 3,782 |
|
Enthusiast  Joined Jun 9, '09 From Saint Louis Currently Offline |
You need a harness to fit your car. See this link. http://www.sw20.jp/20/My_Parts_Collection/...t/conlight.html |
| Sep 16, 2010 - 9:30 PM | Forum: Interior/Audio/Electrical/Wiring · Post Preview: #875743 · Replies: 7 · Views: 1,704 |
|
Enthusiast  Joined Jun 9, '09 From Saint Louis Currently Offline |
Unfortunately SpuraKid is correct and itíll get worse. If you keep diving it with a heater core leak itíll coat everything with the oily antifreeze mist not to mention your carpet. If you have to use your defroster itíll coat your windshield and top liner! |
| Sep 3, 2010 - 4:33 PM | Forum: Interior/Audio/Electrical/Wiring · Post Preview: #873584 · Replies: 2 · Views: 1,055 |
|
Enthusiast  Joined Jun 9, '09 From Saint Louis Currently Offline |
67492-20330 |
| Aug 12, 2010 - 4:01 AM | Forum: General Discussion · Post Preview: #869865 · Replies: 2 · Views: 967 |
|
Enthusiast  Joined Jun 9, '09 From Saint Louis Currently Offline |
I know a lot of you guys & gals have been looking for what seems to be the holy grail of Celica accessories, especially if you drive a manual and there's one up for grabs on Yahoo Auction Japan. Now if you're from the US keep in mind that since Obama Care, Stimulus one two & three and bail out one two & three the dollar just took another dive against the yen. So what shipped yesterday by EMS for 20 bucks now will be $70. No kidding! But if you really want one here's a preview of the actual item and the auction ID: e106607733 or search under celica console. Keep in mind that if you have a 94 or 95 with the raised leather console box cover you'll have to replace it with the vinyl flat cover for this to work! Those are cheap & easy to get, but just so you know! Good luck! 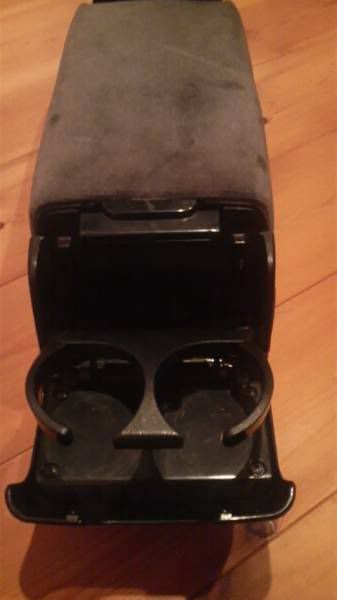 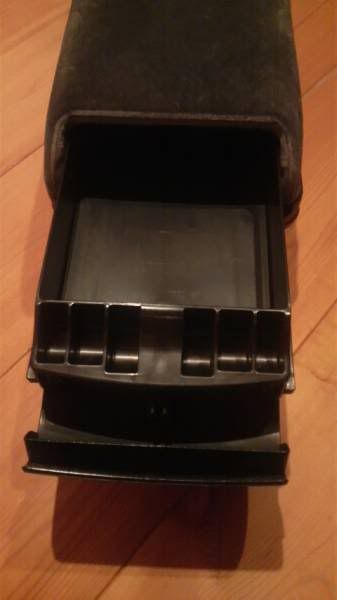 |
| Aug 11, 2010 - 9:19 PM | Forum: Interior/Audio/Electrical/Wiring · Post Preview: #869801 · Replies: 4 · Views: 1,933 |
|
Enthusiast  Joined Jun 9, '09 From Saint Louis Currently Offline |
It's probably your reverse switch under the shifter boot. If you need a diagram let me know, but it's easy to find. Pull the boot bezel and move the shifter to reverse, you'll get it! |
| Aug 11, 2010 - 6:07 PM | Forum: Interior/Audio/Electrical/Wiring · Post Preview: #869752 · Replies: 10 · Views: 2,898 |
|
Enthusiast  Joined Jun 9, '09 From Saint Louis Currently Offline |
Nope, with an HID kit your main lights are ready to go. The accent lights can be used without the plugs if you get some electrical spades and make your own connections. It's only two wires and you can use something like stereo speaker spades to connect them up to any light source you want. Just make sure you seal the back of the plug so water doesn't get in. I used shrink tubing to seal the back of mine with no trouble. I hooked mine up to run whenever the car is running like modern cars have, but a lot of members have them running on a seperate switch or running with the parking lights. |
| Aug 11, 2010 - 4:53 PM | Forum: Interior/Audio/Electrical/Wiring · Post Preview: #869742 · Replies: 10 · Views: 2,898 |
|
Enthusiast  Joined Jun 9, '09 From Saint Louis Currently Offline |
You're going to need HID ballasts and wiring to make the projectors work! Most get a kit that comes with the lamps you want to use. The small light in the corner of the projectors can be wired to your running lights or where ever you want them to come on. You'll have to get plugs with a pigtail of wiring if you didn't get them with the lights. These are the ones I use, but there are a lot of choices!  |
| Aug 8, 2010 - 9:49 AM | Forum: Interior/Audio/Electrical/Wiring · Post Preview: #869069 · Replies: 2 · Views: 1,036 |
|
Enthusiast  Joined Jun 9, '09 From Saint Louis Currently Offline |
Door Jam Switch: 84231-30110 Trunk Switch: 84231-20370 |
| Aug 5, 2010 - 7:36 PM | Forum: Interior/Audio/Electrical/Wiring · Post Preview: #868596 · Replies: 3 · Views: 1,410 |
|
Enthusiast  Joined Jun 9, '09 From Saint Louis Currently Offline |
I think what you're talking about is the teeth on the gator rib coming out of the mast. It's part of the mast and you can replace the mast. Part 86337-2B200 Also, before you put the cover back on coat the inside with white lithium greese. Make the new mast rib last for good! |
| Aug 4, 2010 - 6:08 AM | Forum: Interior/Audio/Electrical/Wiring · Post Preview: #868287 · Replies: 5 · Views: 1,763 |
|
Enthusiast  Joined Jun 9, '09 From Saint Louis Currently Offline |
To start with do you need a whole new antenna or just the mast? If the motor is still running and it's just the mast not going up and down, you only need a new mast. |
| Jul 30, 2010 - 12:39 AM | Forum: Interior/Audio/Electrical/Wiring · Post Preview: #867389 · Replies: 2 · Views: 1,112 |
|
Enthusiast  Joined Jun 9, '09 From Saint Louis Currently Offline |
The first thing you're going to want to check is the Freon level. If there's a leak the gas level will fall and the compressor pressure switch will keep the compressor from kicking in. A leak could be something small such as the o rings on the receiver/dryer or the compressor block, to a bigger pain of a leak in the condenser. If the compressor is locked up usually it'll make a slapping sound before it goes completely out. Rarely you can have a bad compressor clutch, but that's very rare on our compressors. Check to make sure that the lead didn't get knocked off the clutch. Again rare, but it happens. 99% of the time if the compressor is good itís the gas level. |
| Jul 24, 2010 - 7:18 AM | Forum: General Discussion · Post Preview: #866382 · Replies: 1 · Views: 1,108 |
|
Enthusiast  Joined Jun 9, '09 From Saint Louis Currently Offline |
Guys, is there a way to change the lamps in the A\C control unit without taking it all the way out of the console? No upgrade, just a bulb out that needs to be replaced! Thanks, Phil |
| Jul 19, 2010 - 7:55 PM | Forum: Interior/Audio/Electrical/Wiring · Post Preview: #865641 · Replies: 3 · Views: 1,185 |
|
Enthusiast  Joined Jun 9, '09 From Saint Louis Currently Offline |
You probably wouldn't want to have them come on every time you hit the lights, but can wire them to go off with the lights so you never have them kill your battery if you forget to turn them off. Every thing else depends if you want them to look and run like OEM or just have aftermarket. As for me I don't do anything aftermarket, it always looks aftermarket! You can add a light stalk with fog switch or like me and others went the UK route. That is to put in an OEM rear fog light switch in your drivers side vent knock out. You'll find the how to in the forum! You can get a set of OEM fogs for around $60 and the relay & wiring kit for about $10. |
| Jul 17, 2010 - 12:53 PM | Forum: Interior/Audio/Electrical/Wiring · Post Preview: #865272 · Replies: 11 · Views: 2,972 |
|
Enthusiast  Joined Jun 9, '09 From Saint Louis Currently Offline |
These are my gauges. The rings are polished aluminum not chromed plastic. They could be a little thicker, but these are the only ones I've ever found in metal rather than plastic. Very simple to put on! |
| Jul 17, 2010 - 9:07 AM | Forum: Interior/Audio/Electrical/Wiring · Post Preview: #865251 · Replies: 11 · Views: 2,972 |
|
Enthusiast  Joined Jun 9, '09 From Saint Louis Currently Offline |
Is this what you're talking about? 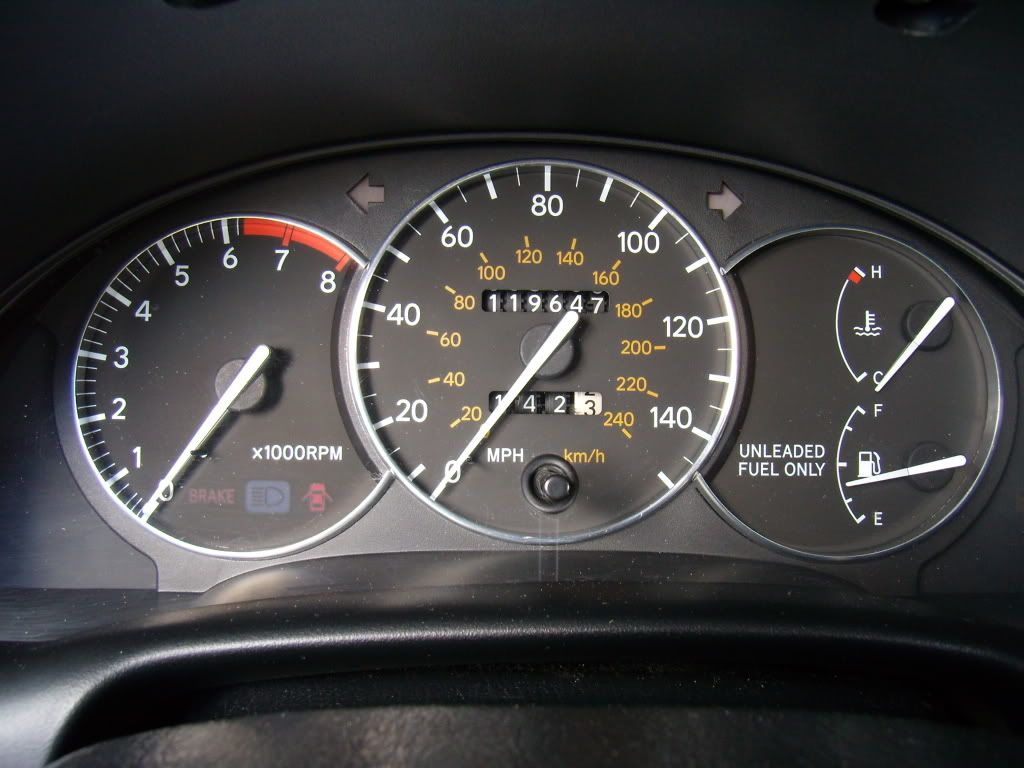 |
| Jul 17, 2010 - 8:47 AM | Forum: Interior/Audio/Electrical/Wiring · Post Preview: #865249 · Replies: 19 · Views: 5,226 |
|
Enthusiast  Joined Jun 9, '09 From Saint Louis Currently Offline |
This is the type I use http://www.v-leds.com/Interior-LED/Gauge-C...638587-1-2.html Don't forget to not remount the cluster until you check to see if the led are in right! Otherwise you're going to really be ticked! |
 New Replies New Replies No New Replies No New Replies Hot Topic (New) Hot Topic (New) Hot Topic (No New) Hot Topic (No New) |
 Poll (New) Poll (New) Poll (No New) Poll (No New) Locked Topic Locked Topic Moved Topic Moved Topic |
| Lo-Fi Version | Time is now: January 10th, 2025 - 6:09 AM |


