Printable Version of Topic
Click here to view this topic in its original format
6G Celicas Forums _ My Project _ ST205 Total Rebuild
Posted by: Nial Dec 16, 2012 - 1:28 PM
I was certain I started a build thread on here, but for the life of me I can not find it so forgive me if I start again and its old news.
About a year and a half ago my current GT4 failed its yearly inspection (MOT) with rusty sills, they were fixed and it subsequently passed but it set alarm bells ringing in my head that the poor things days were numbered.
I decided that I would buy a shell and swap everything onto it. so I hunted for a reasonable shell to start work on.
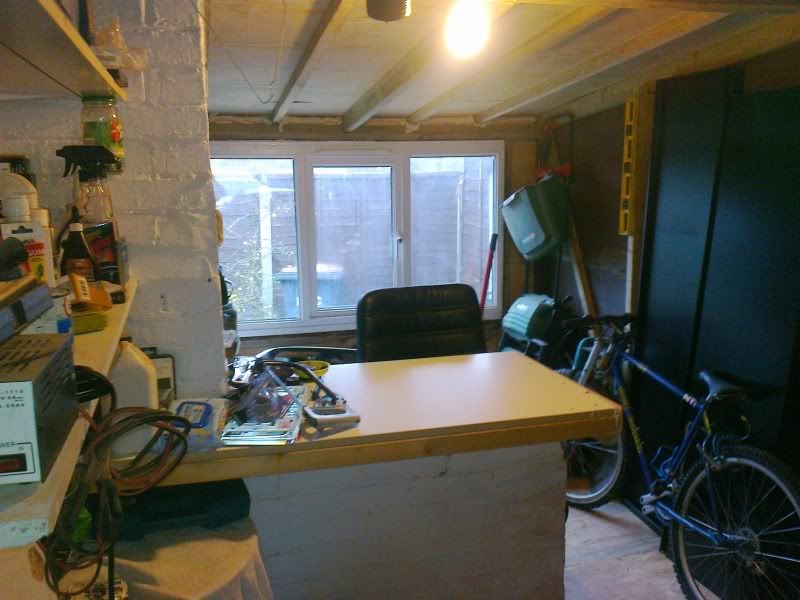
While I was looking, I had to extend my garage. I only had a single car garage so not enough space to work or store stuff.
So I decided to extend my garage backwards a bit
Work started.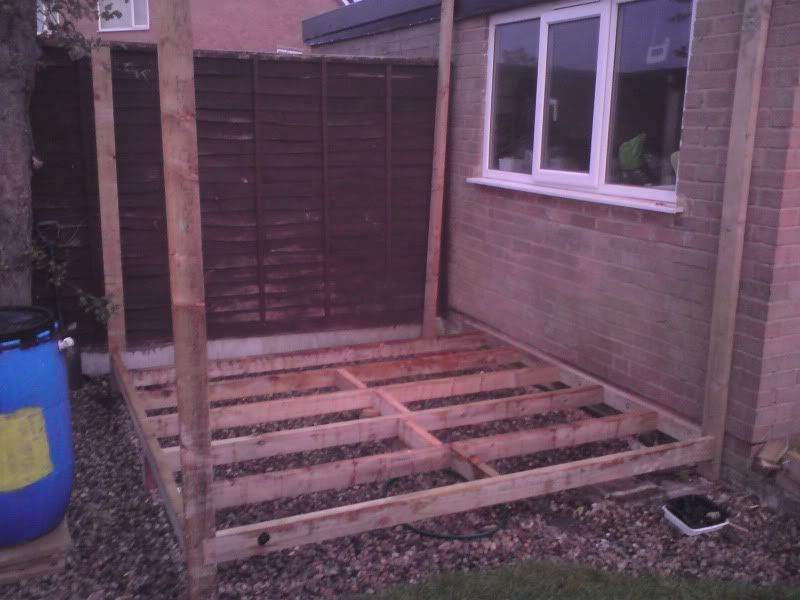
and after a few weeks, finished ;0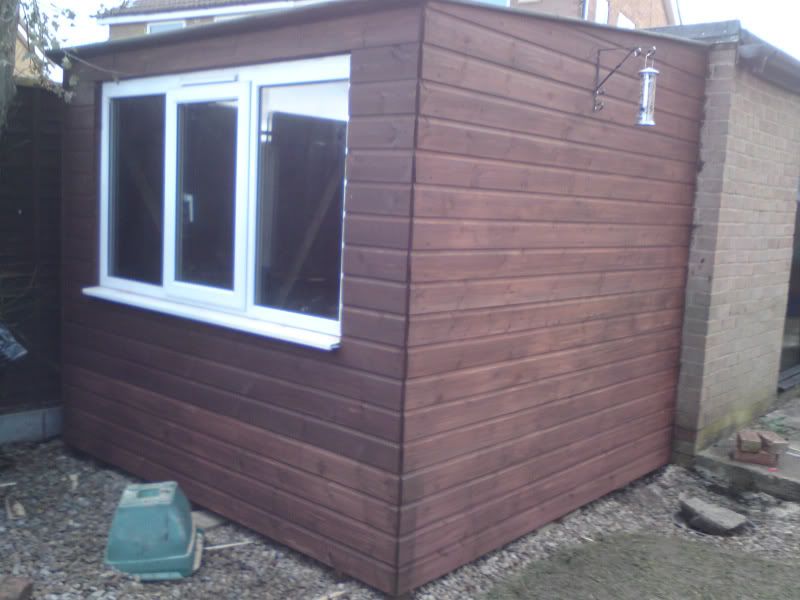
About the same time a shell turned up, well it was sold as a shell, but it was more or less a complete car minus the engine and gearbox.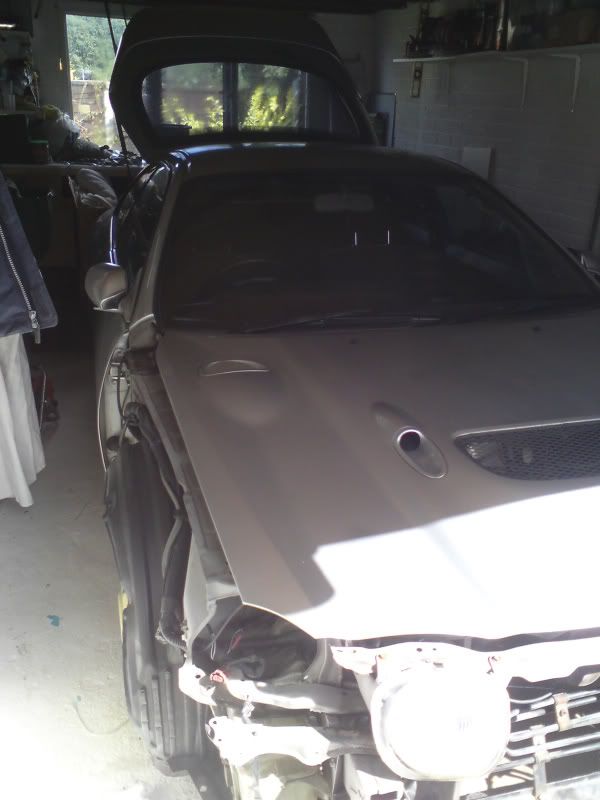
It was in good condition with no rust, even the interior was in pretty much spot on condition, not that I need much of it
I set to wrok more or less straight away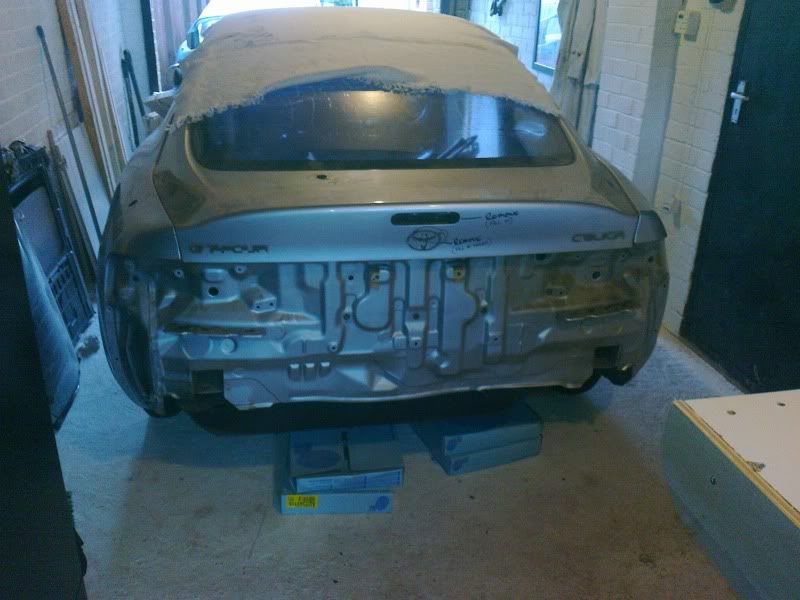
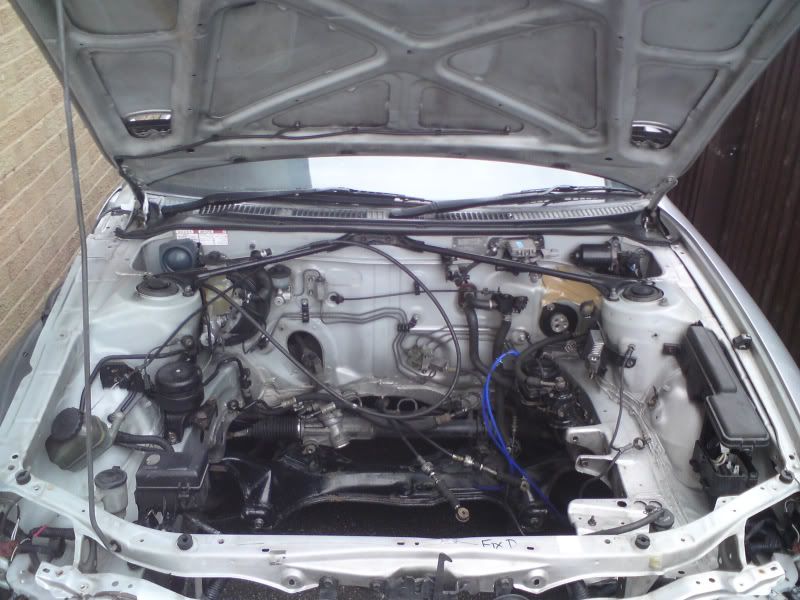
First job was to strip everything off the car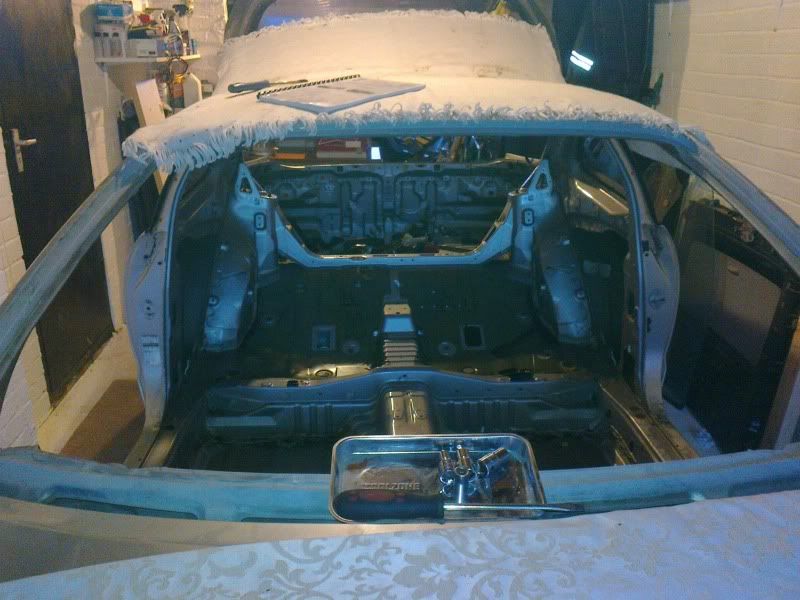
everything went, all the looms, glass, suspension the works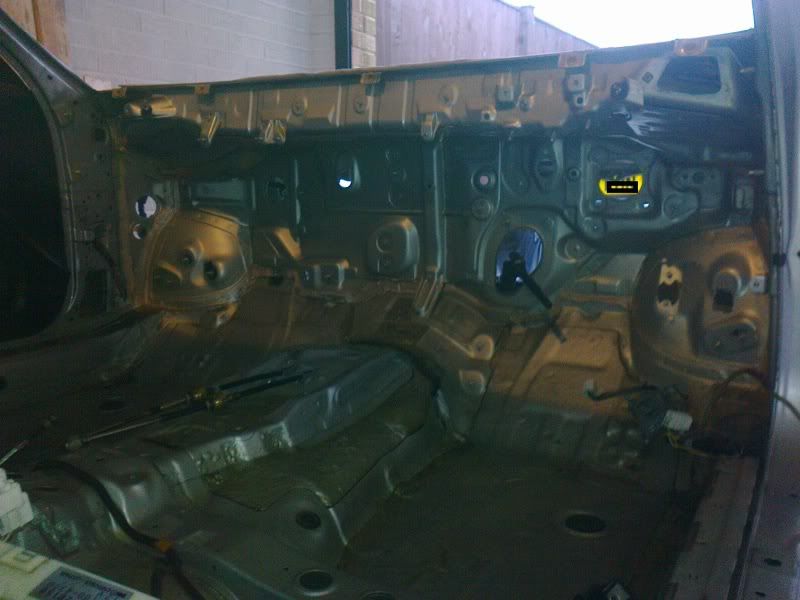
Next job was to remove the sound deadening material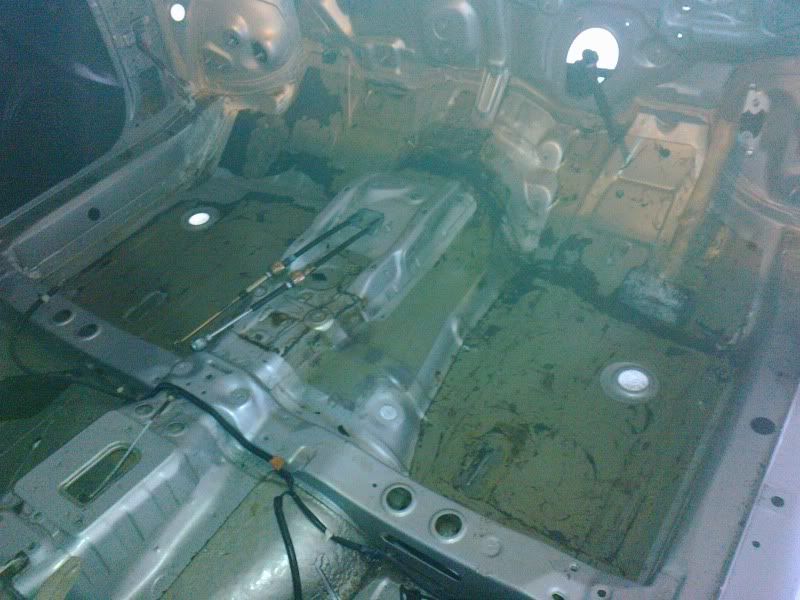
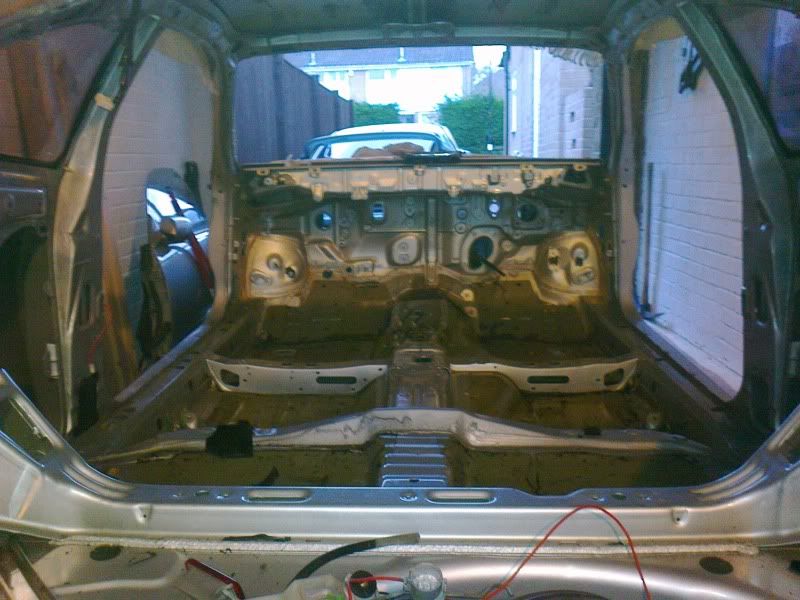
it then went outside for a thorough jet wash go get rid of all the years of crap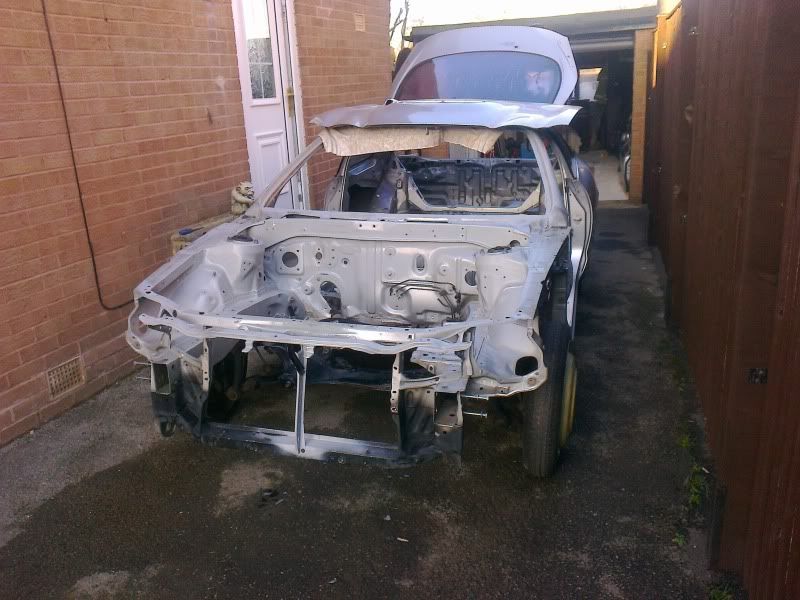
As I was moving the battery to the inside I could remove the battery tray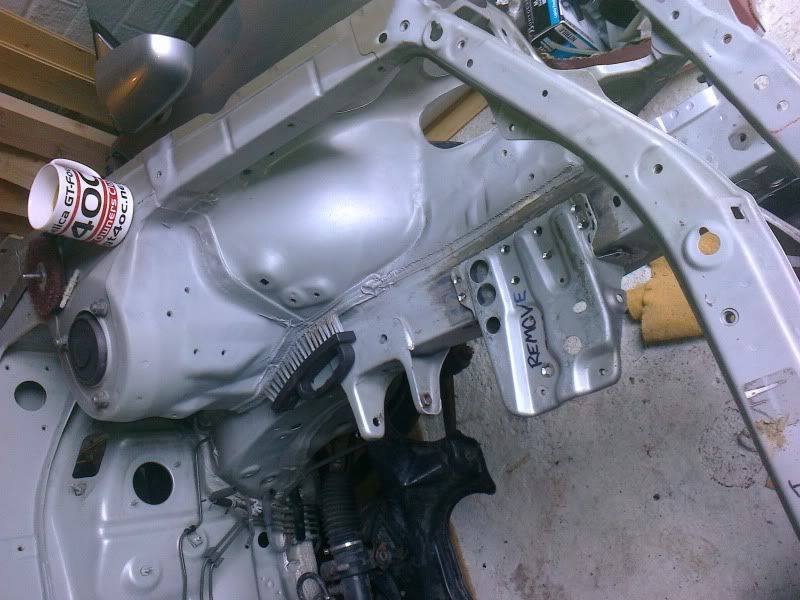
which I did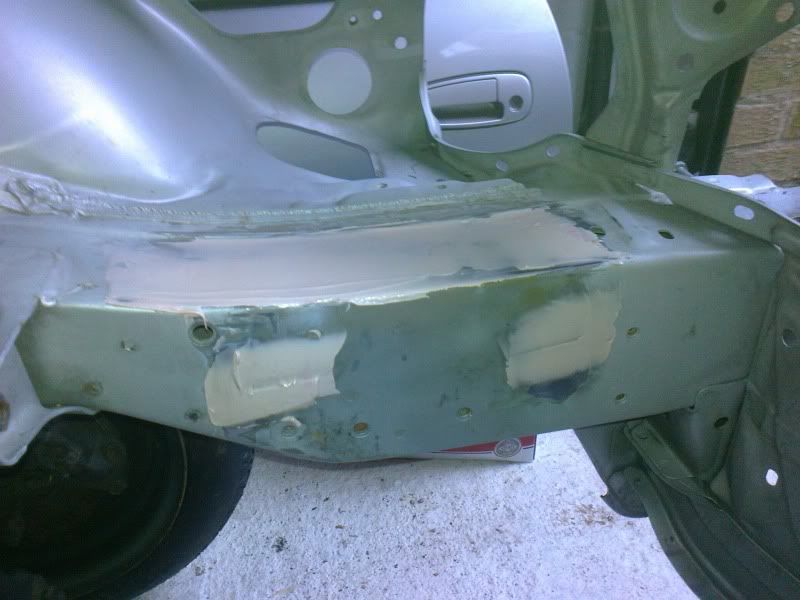
Next up I needed to get to the bottom of the car....this was going to require some ingenuity.
Posted by: Nial Dec 16, 2012 - 1:38 PM
I was going to have to make my own rotisserie.
So ack off to the wood yard, a few lengths of 2x4 and I made this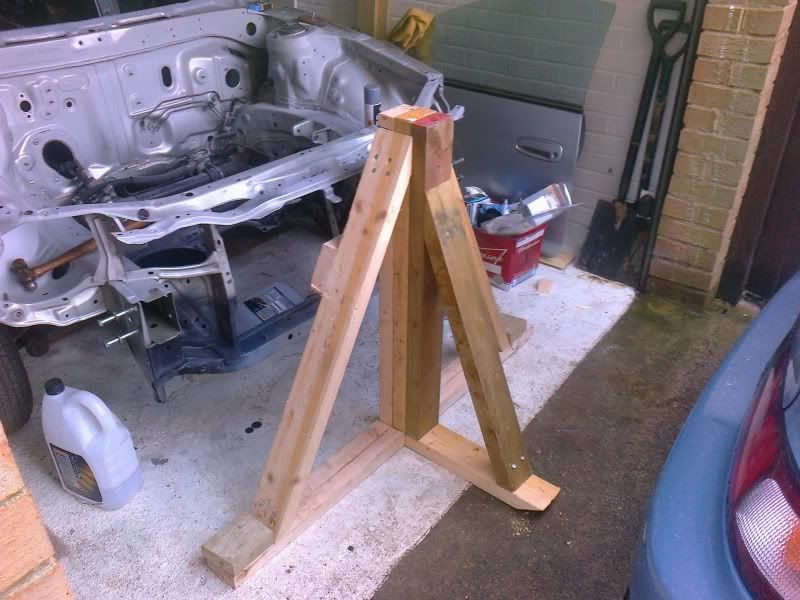
It was about now I realised two things. One I was going to have to learn to weld and two..my plans for this car were changing quite dramatically......a fancied making a cross between a rally car and a GT car...no idea how I was going to achieve this, but the seeds had been set in my mind and for once they stayed there.
So I rushed out and purchased a MIG welder....learning to weld was pretty easy to be honest, by no means as neat as the pros but not bad for a complete novice.
So I made a rotisserie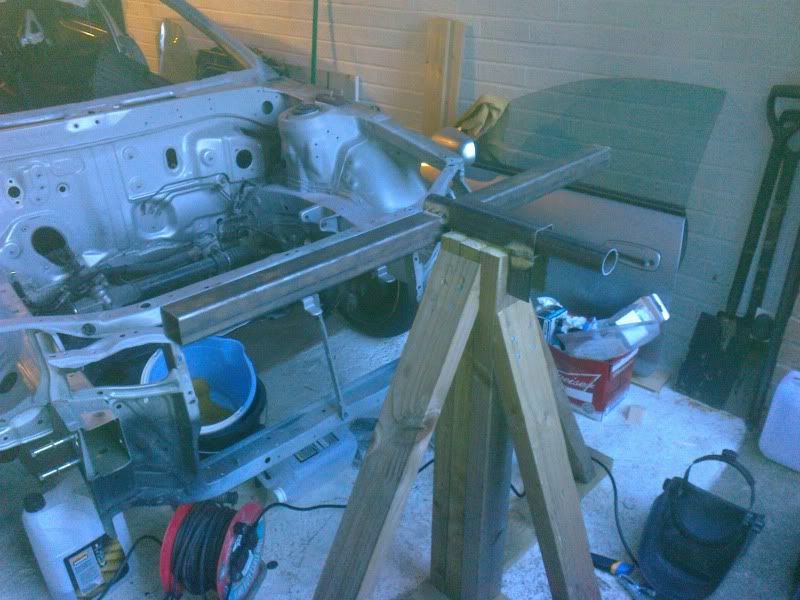
It fitted like a glove and worked perfectly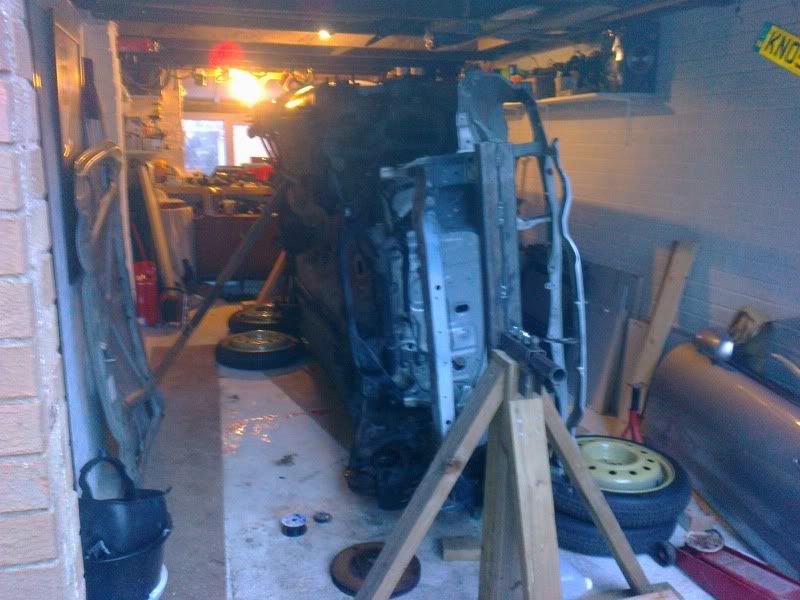
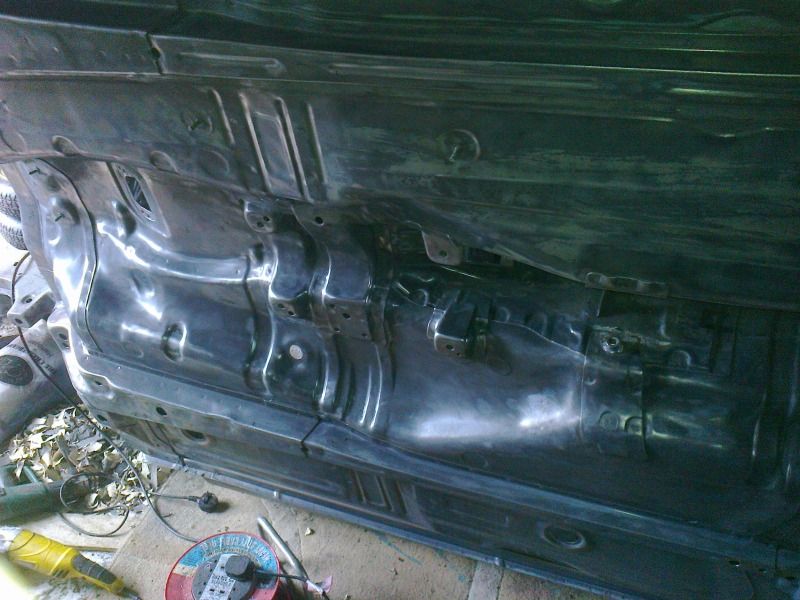
A quick look revealed the sills were pretty mangled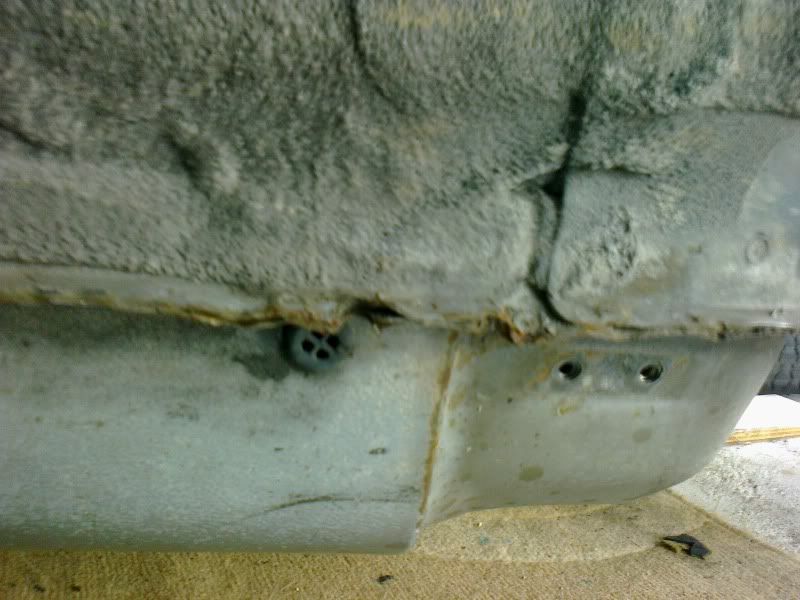
so I had to fix them up as best I could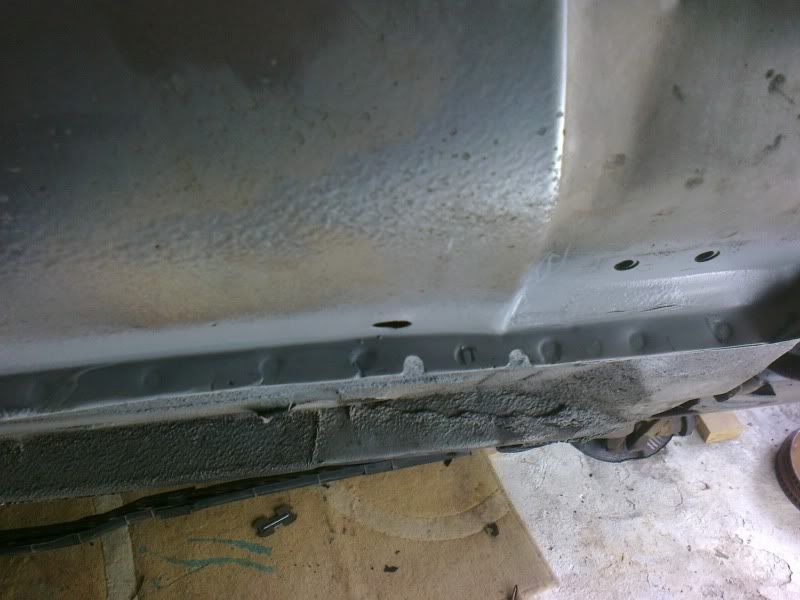
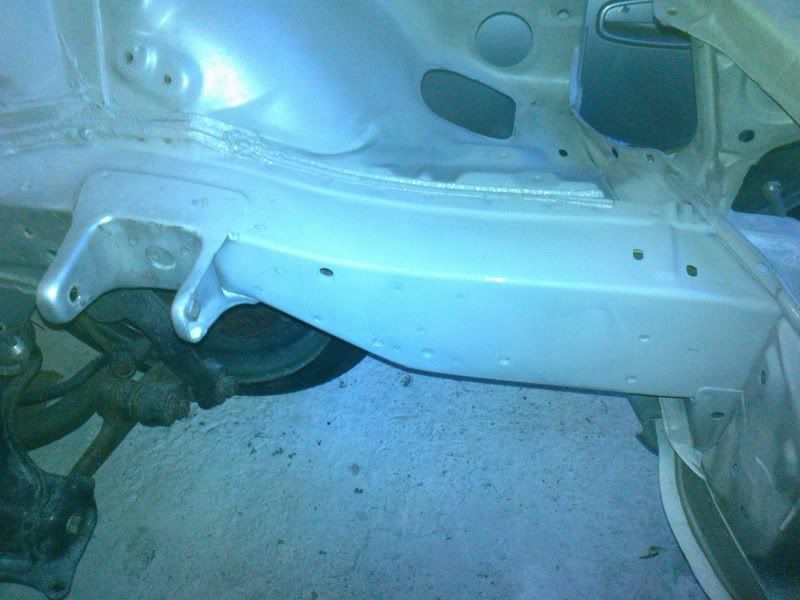
At the same time I started blasting and painting with good old POR15 the subframes and suspension parts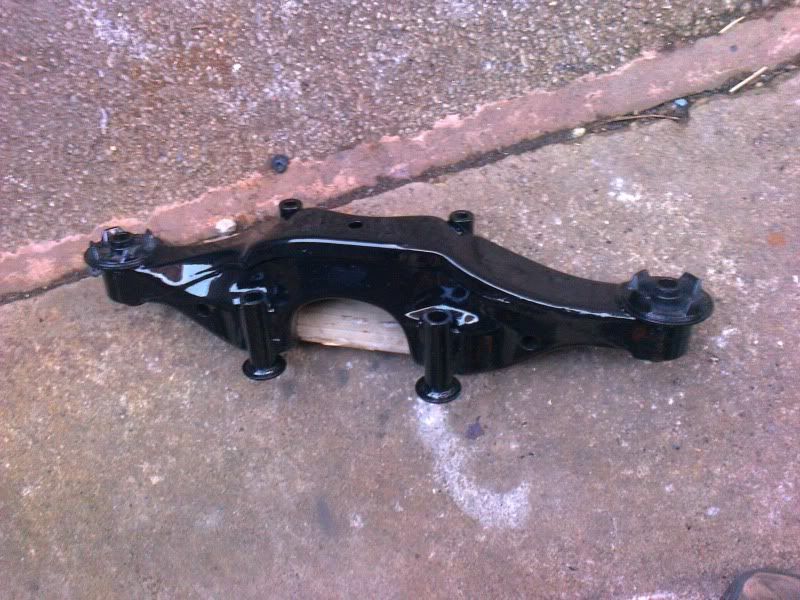
The came out quite nice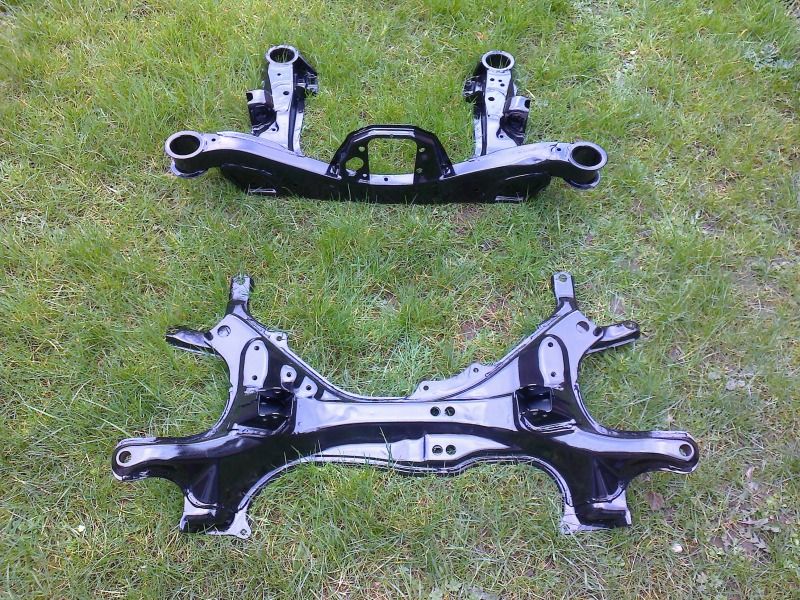
did the prop shaft too, started a bit rough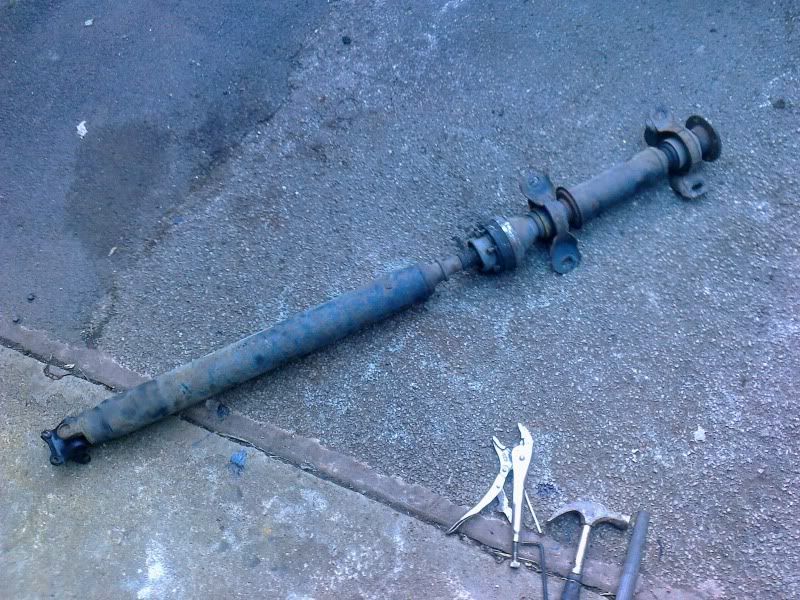
came up well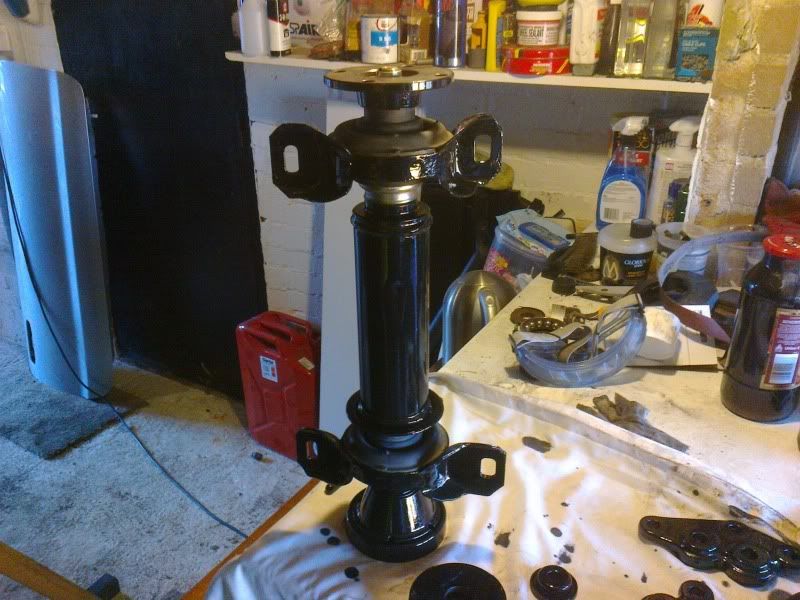
also cleaned up the steering rack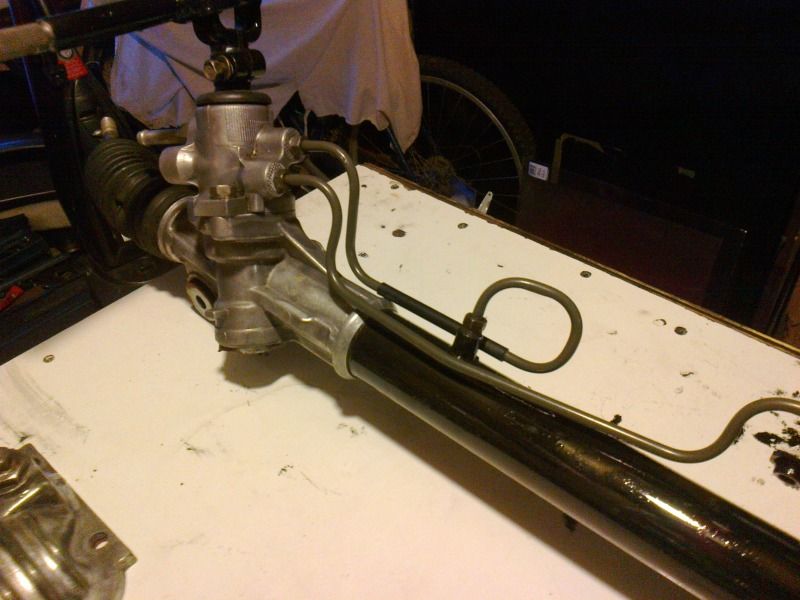
and the alloy diff end plate....gave it a good polish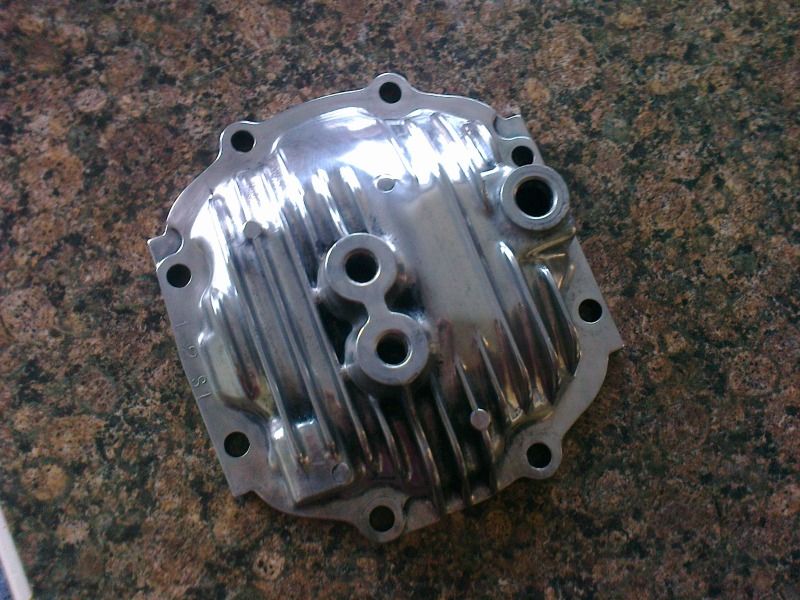
Next up I started the worst job I have ever attempted
Posted by: Nial Dec 16, 2012 - 1:45 PM
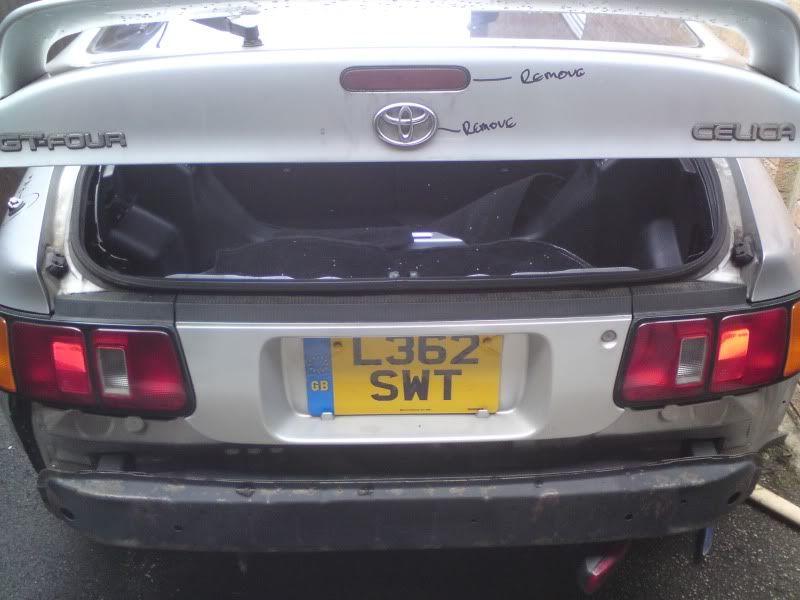
Tackling the stone guard on the bottom of the car.
I cant count the amount of drill & angle grinder wire brush attachments I have gone through.
it makes alot of dust and takes what seems like forever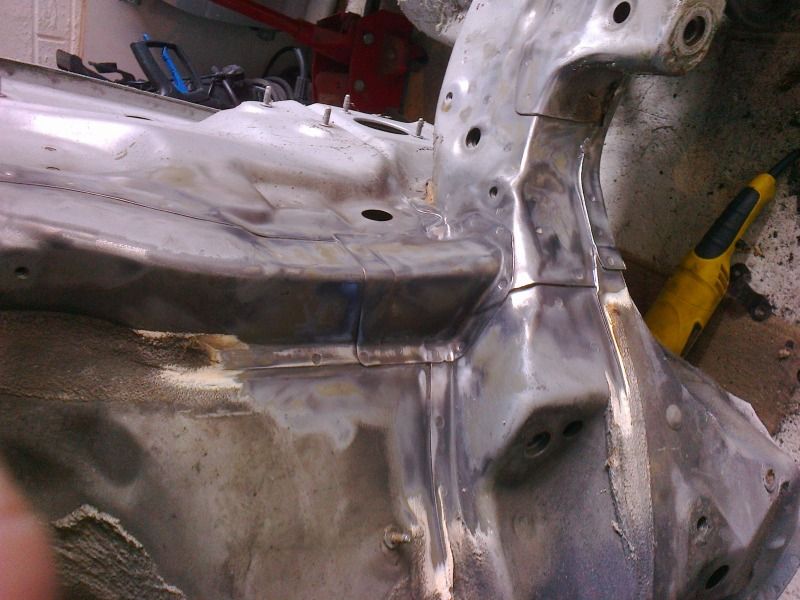
slow slow work
this stage took about a month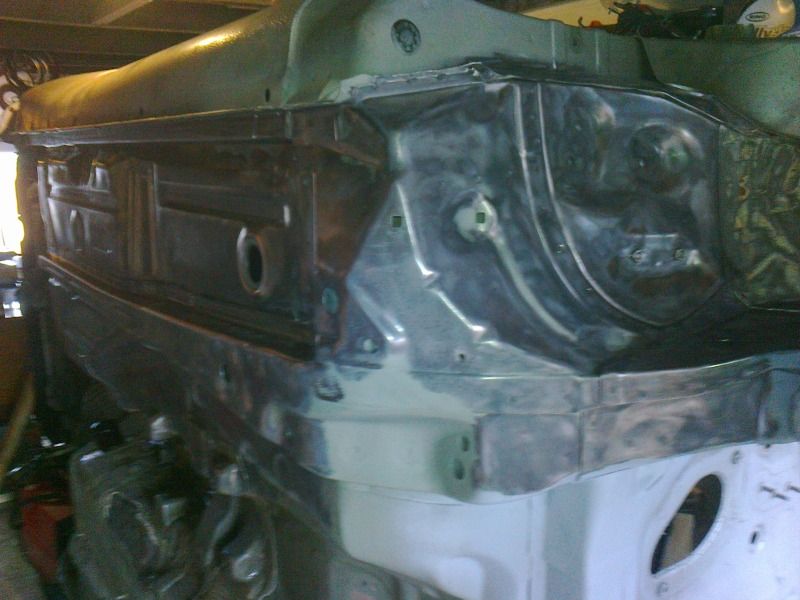
at last, more or less done
I then painted it with more POR15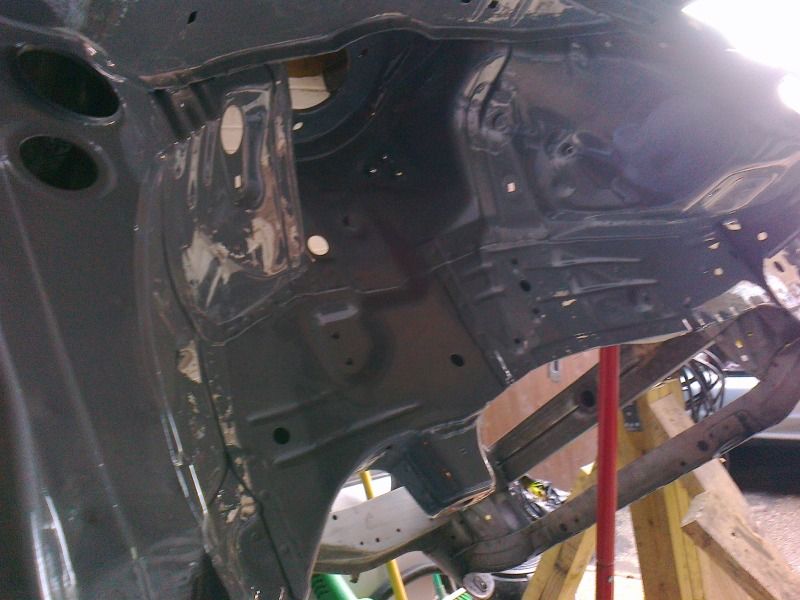
More or less at the time I was ready to slit my wrists due to constant wire brushing the roll cage turned up (I still havnt finished under the car....I am going to get the rest sand blasted....i just cant face it any more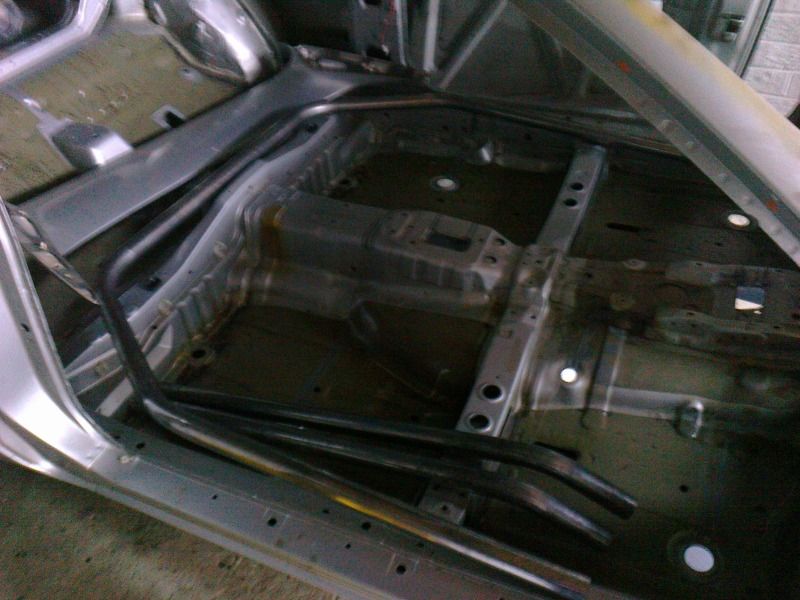
A brief test fitting and I was starting to get excited.....I was going to have to break out the welder again 
Posted by: Nial Dec 16, 2012 - 1:54 PM
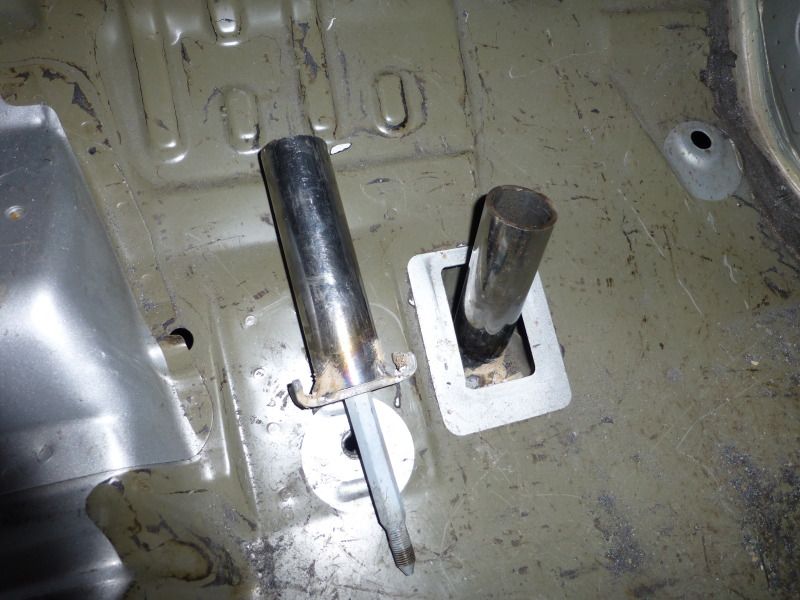
First job was to add some strengthening to the top of the rear suspension tops, so i removed the odd metal bracing off them (i think its used to just hold the rear plastics in place?)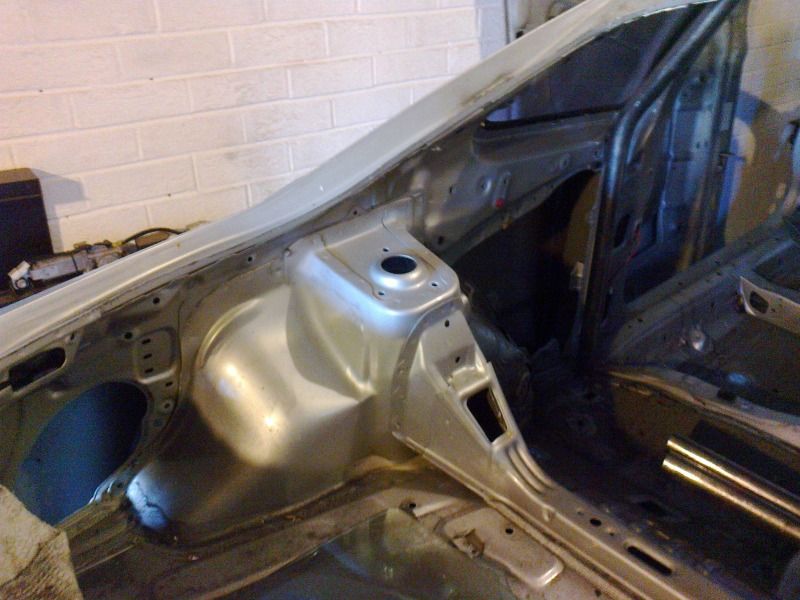
I then made a template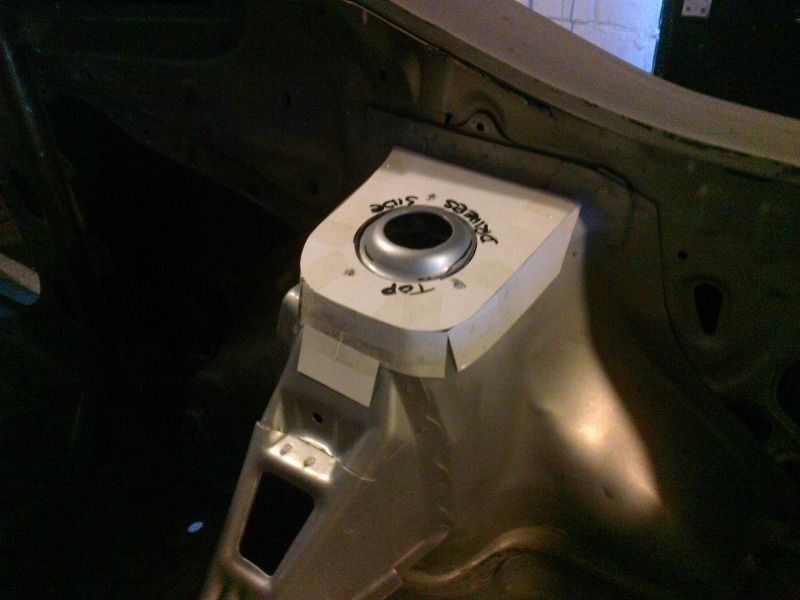
and then a metal top (3mm mild steel)
and one for the other side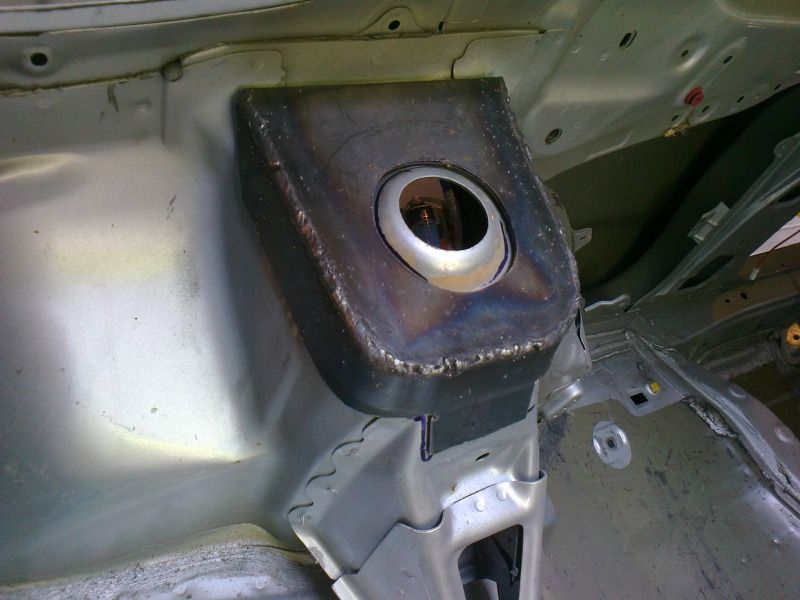
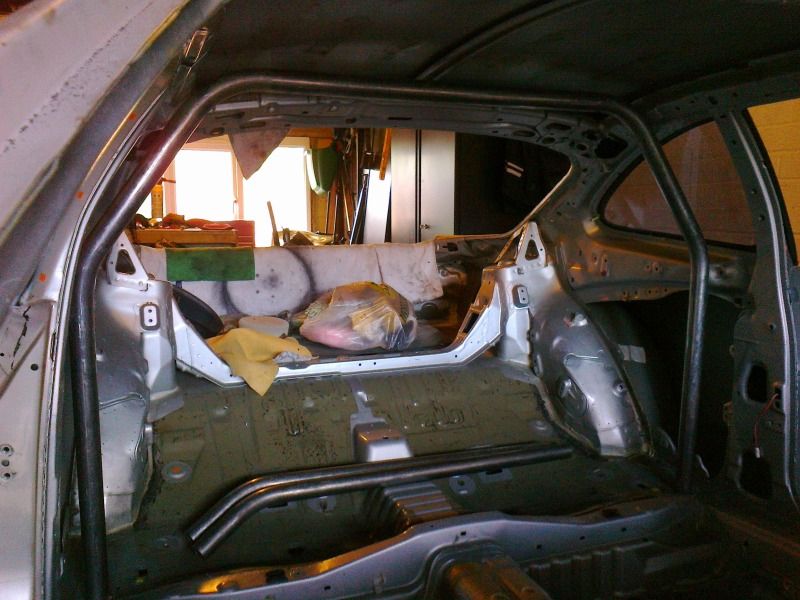
Once I had welded these to the car it was time to start getting the roll cage in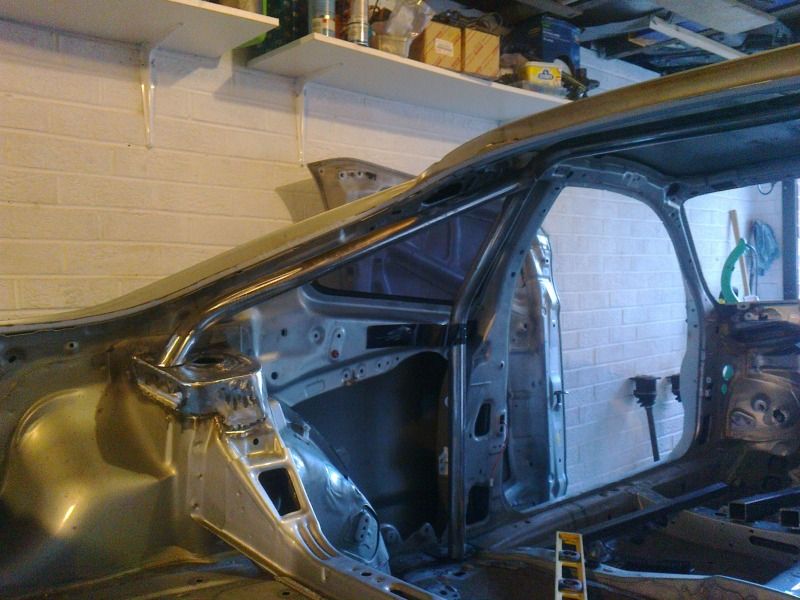
I filled the aerial hole whilst I was at it
Anyway, back to the cage, more bits turned up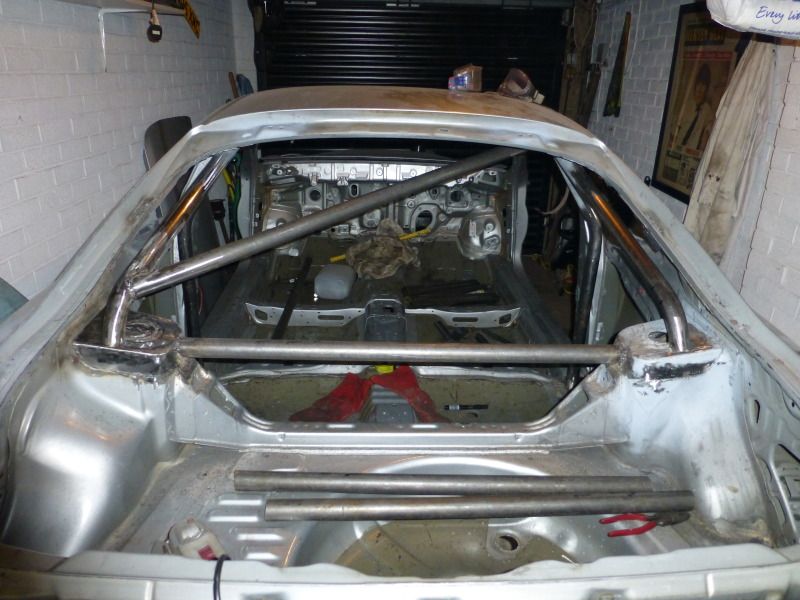
this was starting to get serious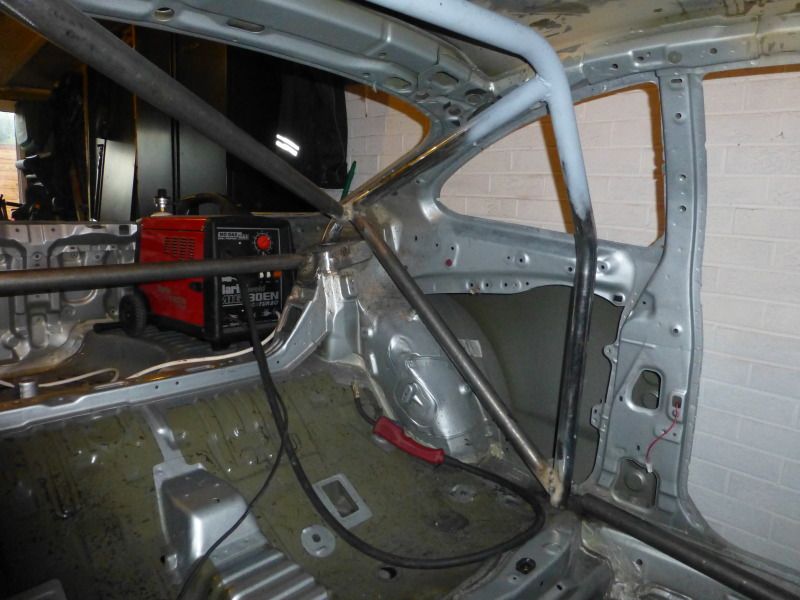
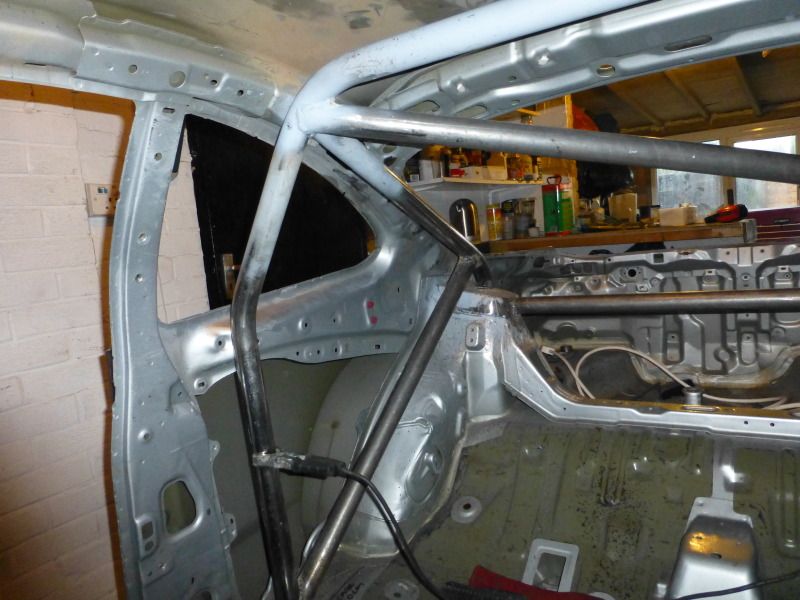
this ties in the rear sub frame to the cage, helps keep things stiff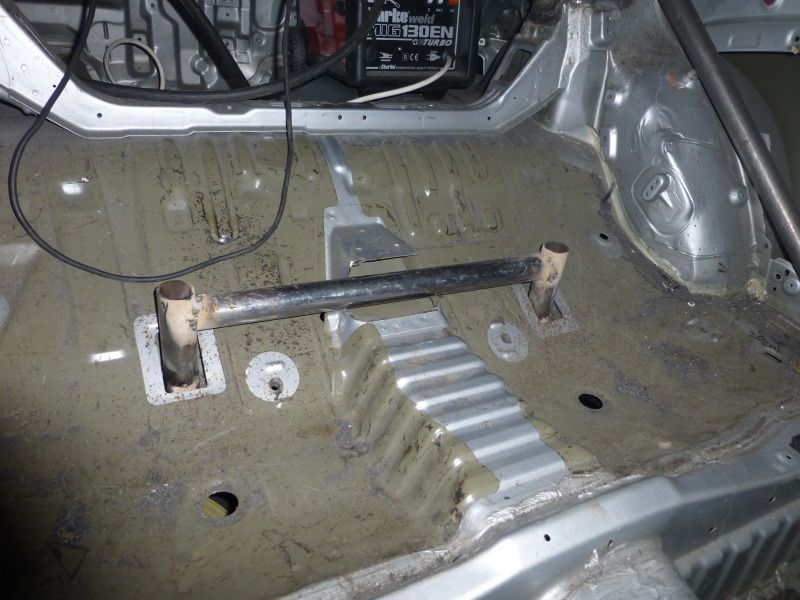
nearly there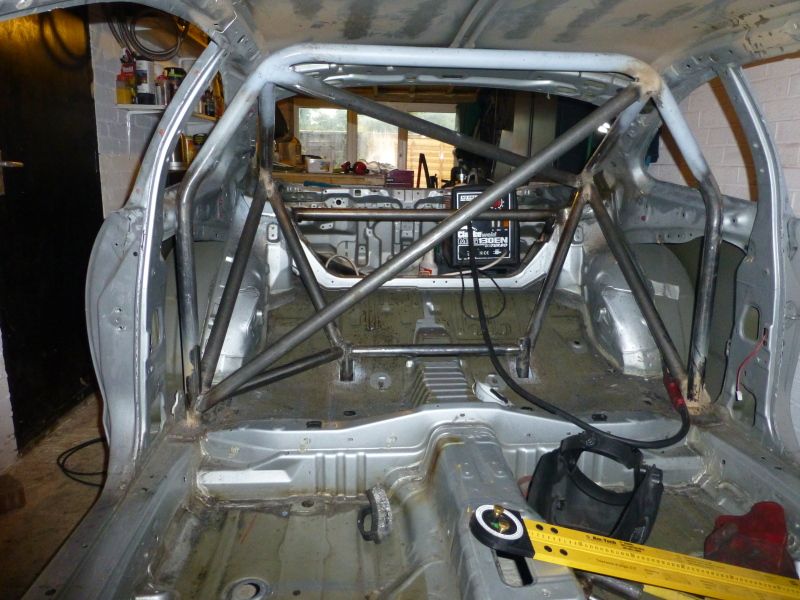
as you can see my welding isnt great, but as its more or less the seond thing I have ever welded in my life i was mildly pleased with it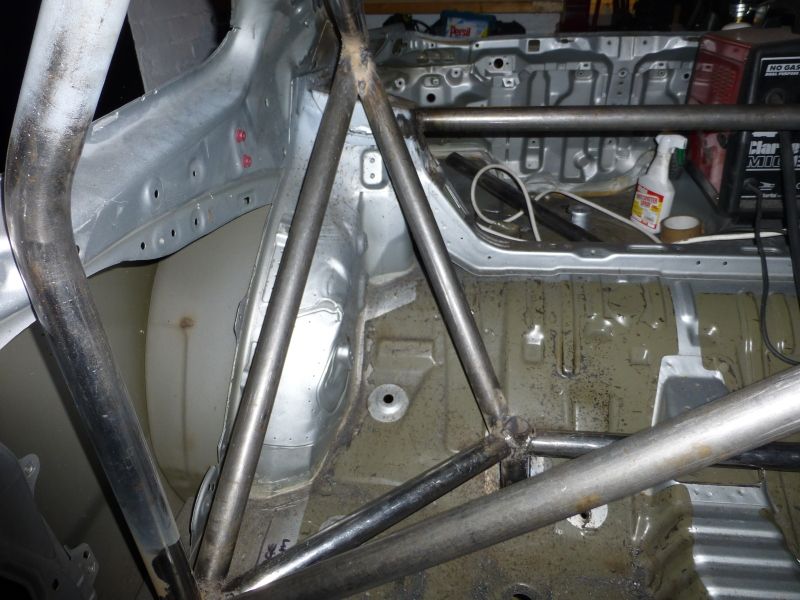
Done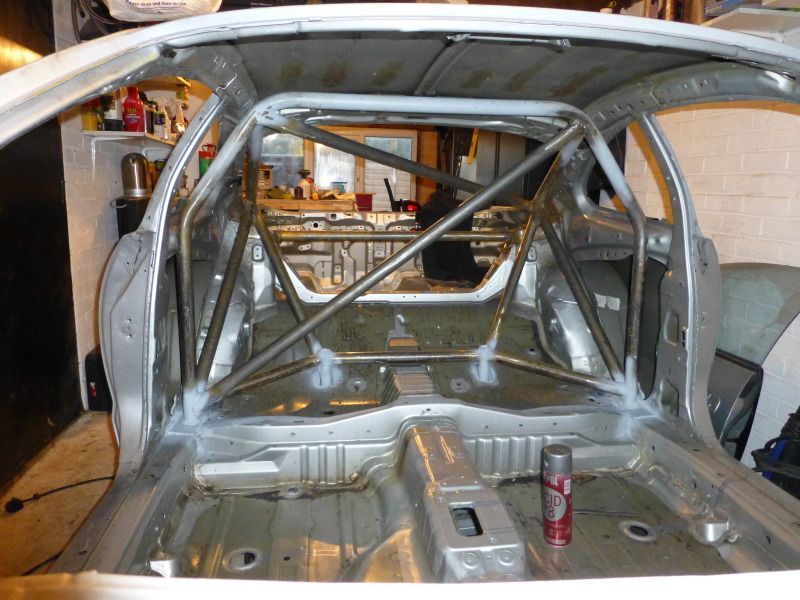
i had decided that I didnt want a full cage, at the end of the day it will be just a road car so getting in and out easily is a priority
Next up I decided it was about time to learn how to cast new metal parts, as for what I had in mind the parts do not exist, I was going to have to make them.
Posted by: Nial Dec 16, 2012 - 1:59 PM
I was going to have to make myself a mini blast furnace...and learn how to cast metal
I needed these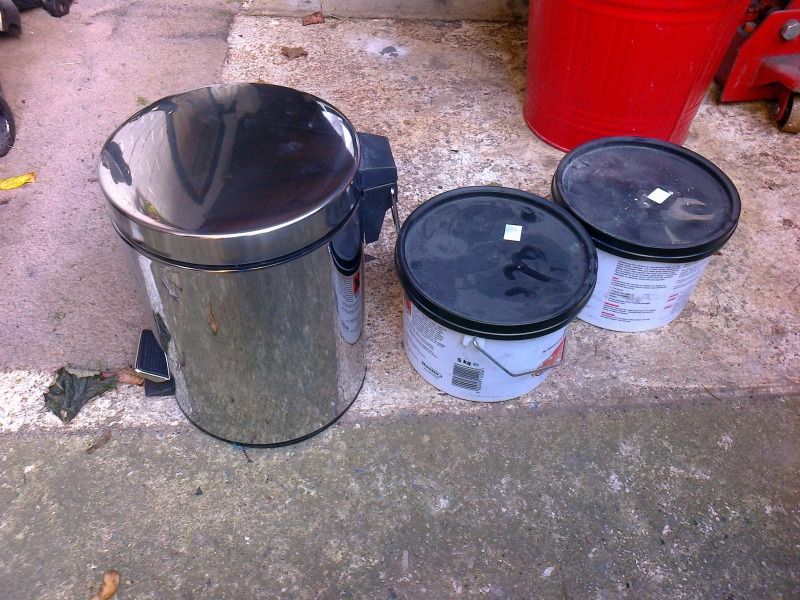
I turned the bin into a furnace with the use of some fire cement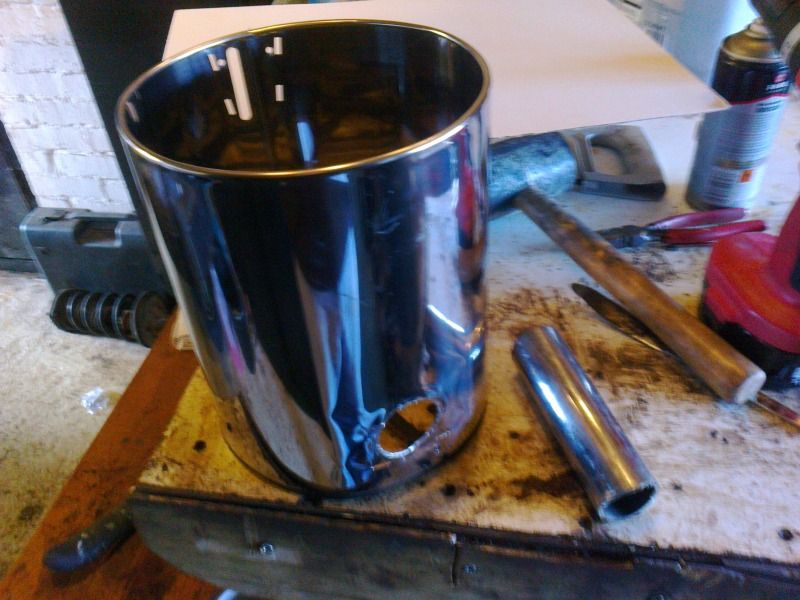
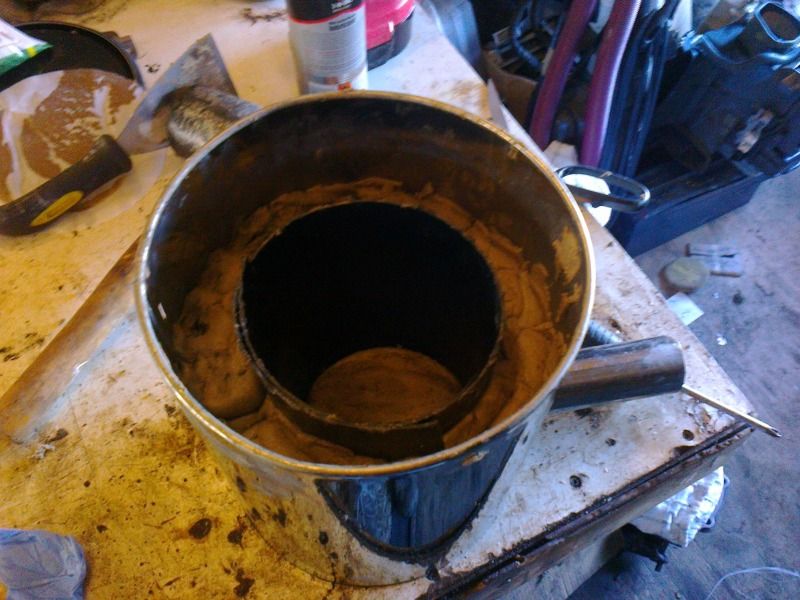
fill it with charcol, attach a heat gun, ignite and stand back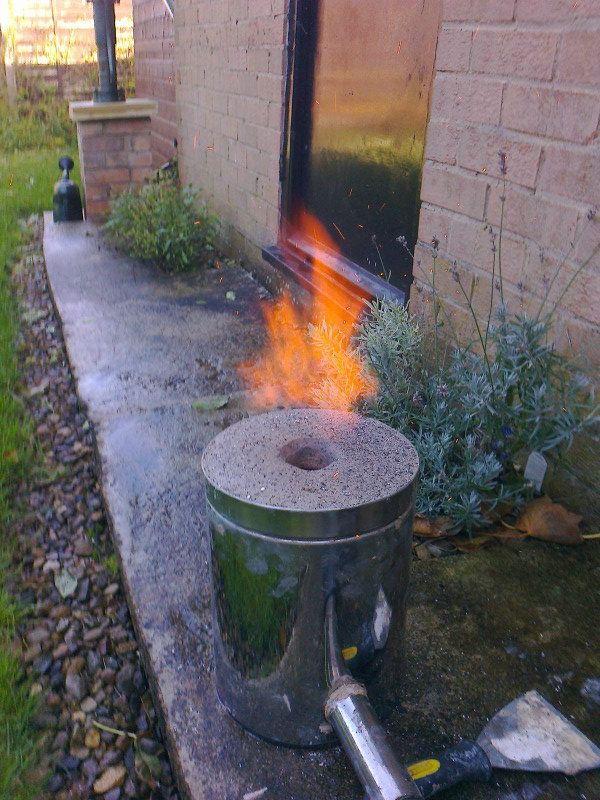
I made a vessel from a spare piece of square tube...it gets pretty hot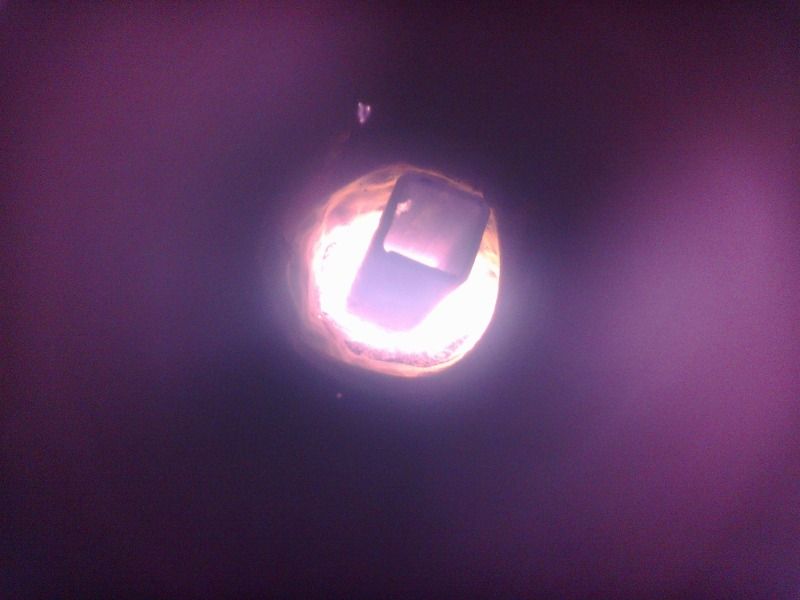
hot enough to melt alloy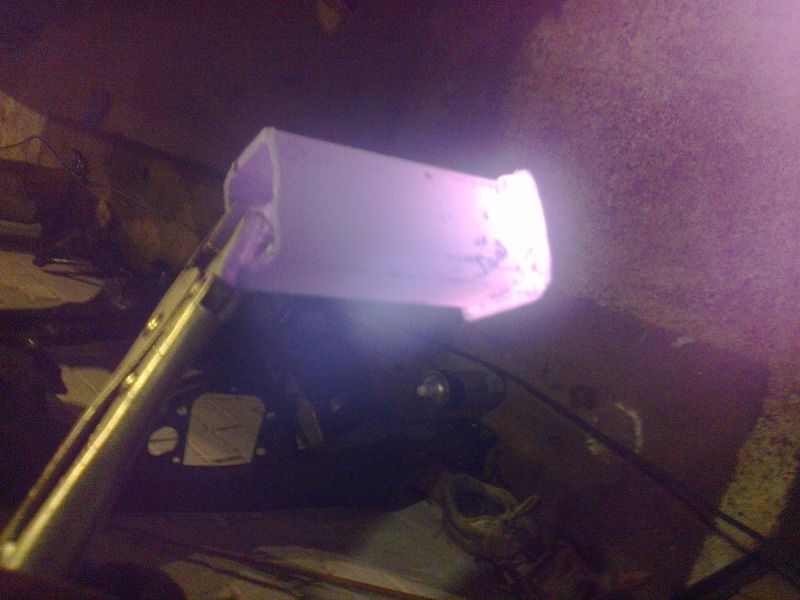
I still needed to learn how to make sand moulds so stopped there for the time being, I will pick that up again later.
Posted by: Nial Dec 16, 2012 - 2:06 PM
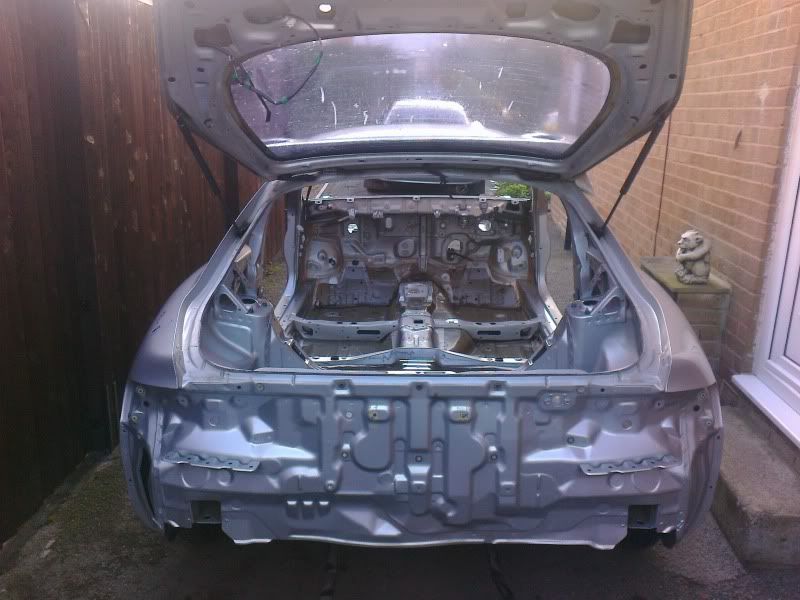
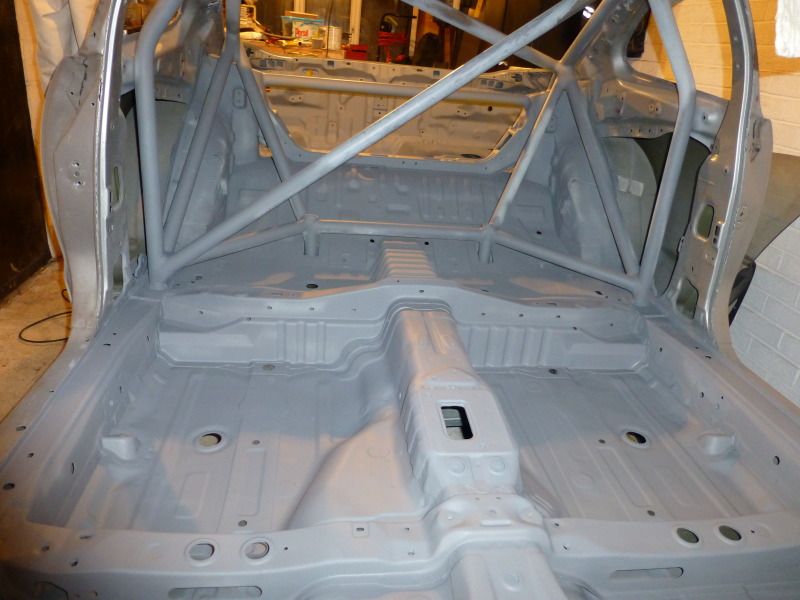
Taking a long look at my roll cage, I was not happy with the welds. so i decided to dress them, smooth them out, add a little body filler and make them smooth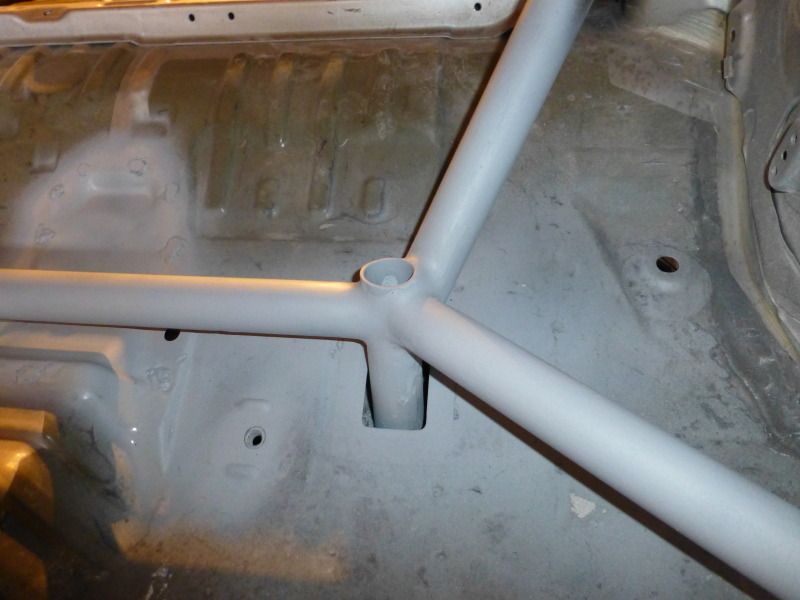
started looking much better although I did have to remove the main hoop cross member for access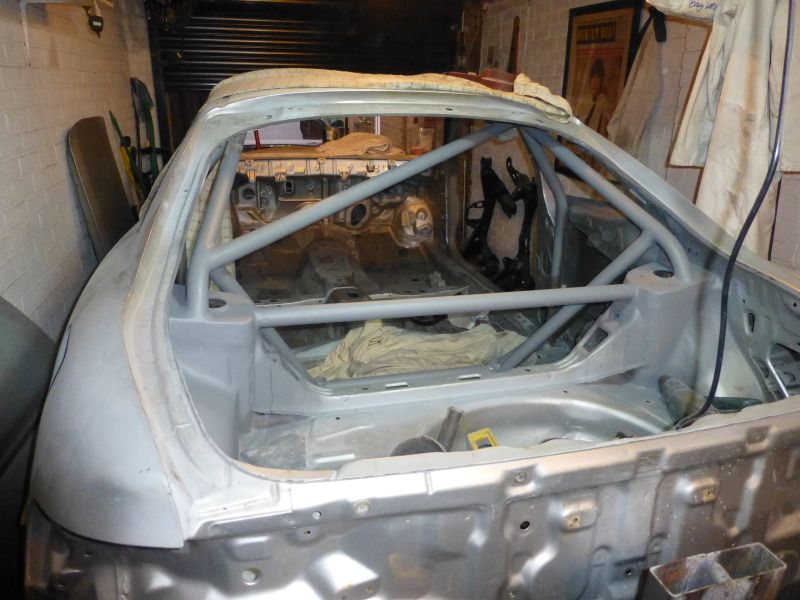
dont worry its not going to be that colour, thats just filler primer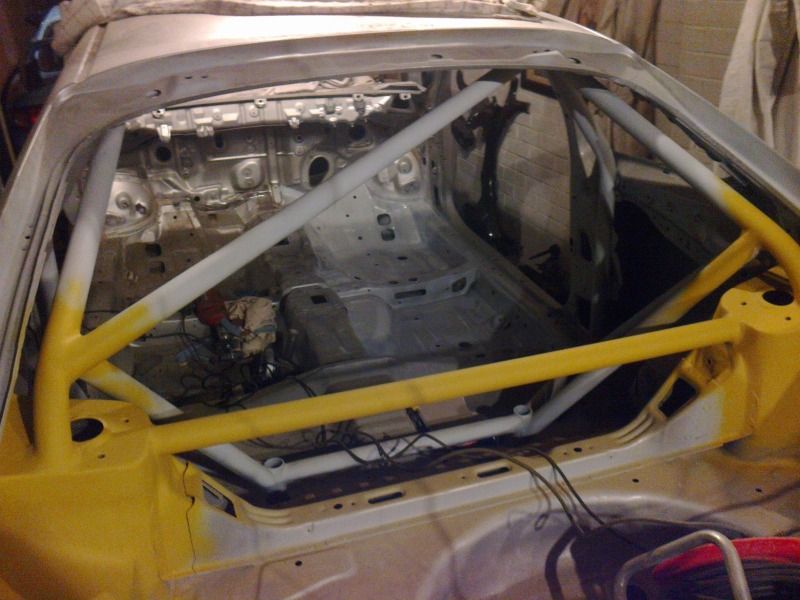
at the same time I cleaned up the floor and primed that ready for paint
the boot aswell....I also welded the cross member back in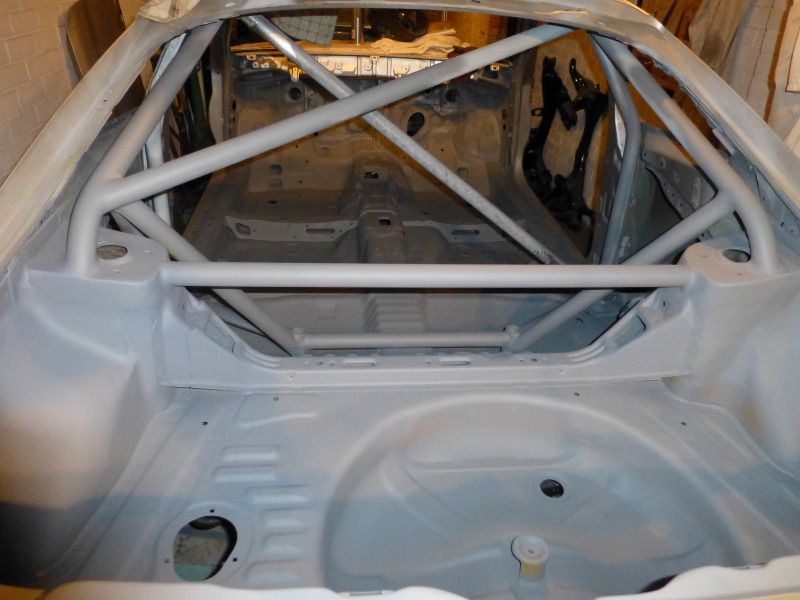
Next up was the seam sealer, so I masked off the areas I was going to apply it to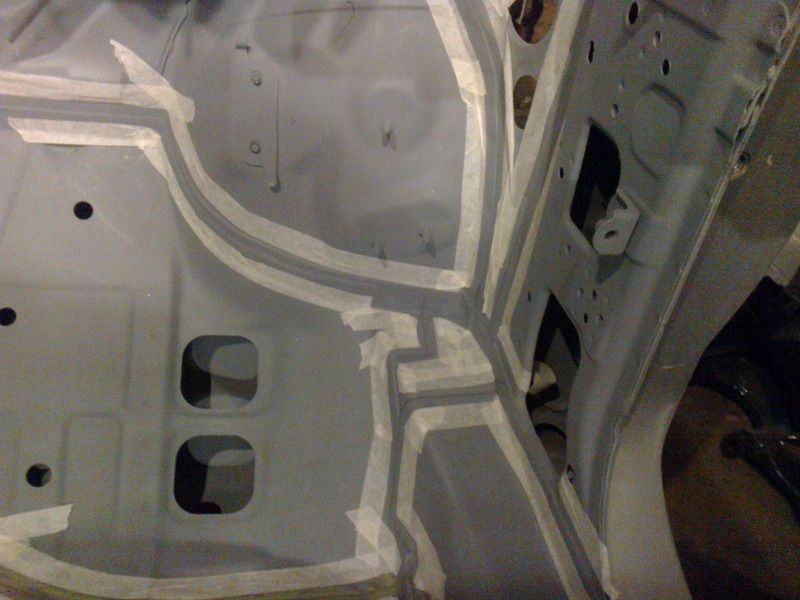
then applied the U-Pol grey stripe seam sealer (nasty stuff)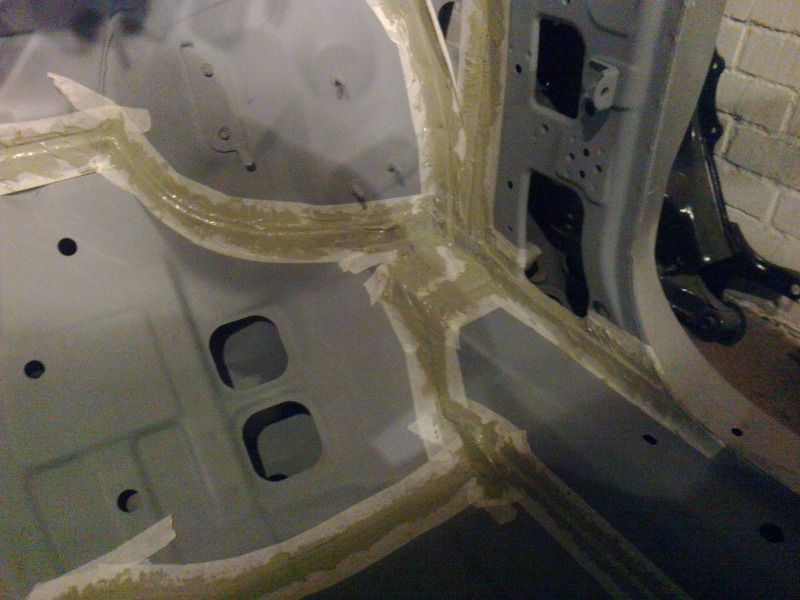

and that is about where I am up to today. Just been out into the garage to remove the masking tape. it looks a bit messy, but when its primed over the top you can hardly tell its there. I will add more pictures when I have taken them.
I will update when I get a chance but I work pretty slowly so dont expect much.
hope I havnt bored you to death
more to come
Nial
Posted by: Batman722 Dec 16, 2012 - 2:19 PM
Great job.
That's a ton of work, impressive.
Posted by: Ted95 Dec 16, 2012 - 10:18 PM
Not your everyday build, excellent job so far man.
Posted by: Tigawoods Dec 16, 2012 - 10:43 PM
super diy!!
Posted by: SwissFerdi Dec 17, 2012 - 12:47 AM

Quite the contrary. Excellent.
Posted by: malpaso Dec 17, 2012 - 5:06 AM
You are unbelievable Nial . You are true faffer 
Posted by: Nial Dec 17, 2012 - 5:32 AM
Thanks all, glad you like it
. You are true faffer Cheers. means alot from a fellow faffer
I hope the end result looks as nice as your car.
Posted by: Edser Dec 17, 2012 - 6:28 AM
Looks great! It'll be like new!
Just one thing I was wondering about. I don't know much about roll cages, but it is my understanding that if you put in racing seats and harnesses you'll need a horizontal shoulder height beam to attach the harnesses to (the reason being, to avoid spinal compression in the event of an accident). Have you considered this?
Posted by: Nial Dec 17, 2012 - 6:41 AM
Just one thing I was wondering about. I don't know much about roll cages, but it is my understanding that if you put in racing seats and harnesses you'll need a horizontal shoulder height beam to attach the harnesses to (the reason being, to avoid spinal compression in the event of an accident). Have you considered this?
I will be using normal belts, If I want to use a racing harness I will attach it to the rear strut brace as the Rally Cars did. as they lie within the tollernece angles to avoid such injuries.
Posted by: richee3 Dec 17, 2012 - 10:36 AM
Great work so far! I can't wait to see where this goes.
Posted by: S8S8 Dec 18, 2012 - 4:45 AM
Nice work! Can't wait to see the finished product.
Posted by: Nial Dec 18, 2012 - 2:23 PM
I dont know if you guys like small regular updates, or big updates every yew months?
well here is a little update. I just about finished the seam sealer today but to show you a comparison, one side of the car is finished and the seam sealer has been primed, the other side it has just been applied.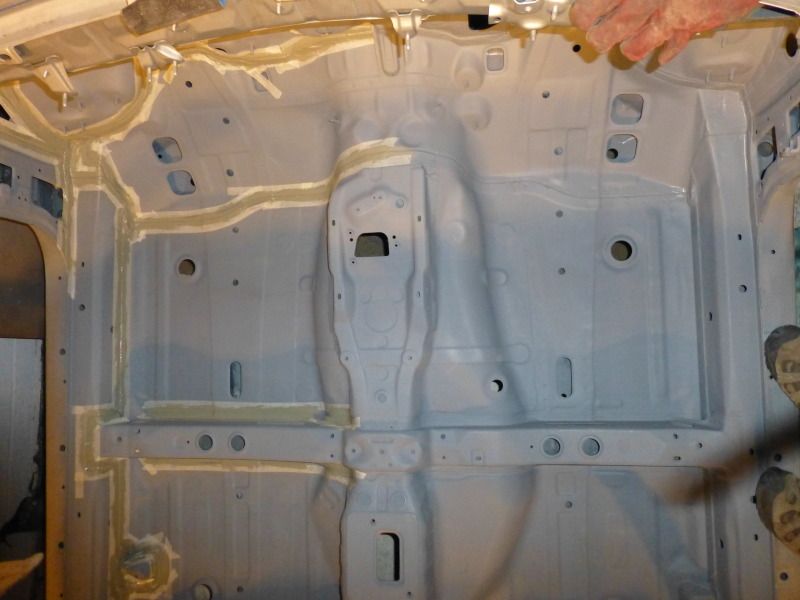
Left side it has just been applied, right side has had two coats of seam sealer and had primer sprayed over the top. I am pleased that you can hardly see anything despite the fact it will all be covered over with sound mat.....just because you cant see it dosent mean it cant be right.
cheeky shot of the cage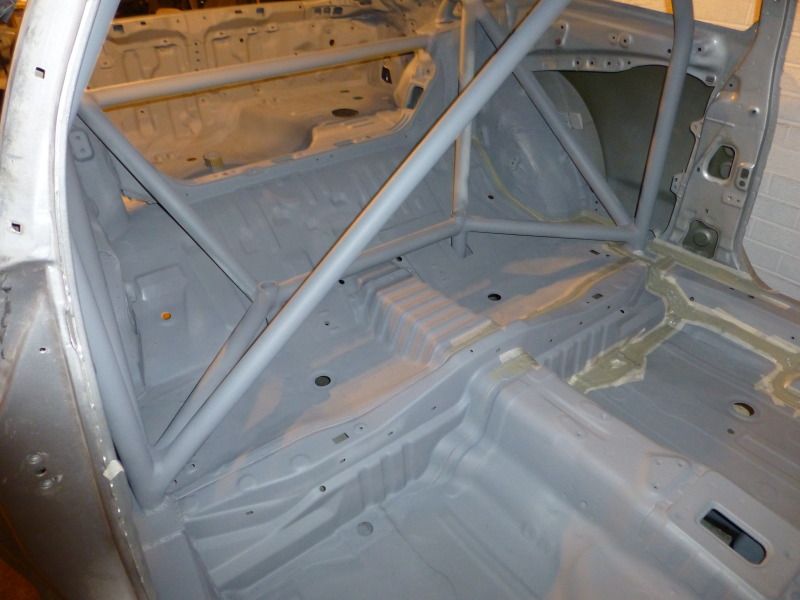
Posted by: enderswift Dec 18, 2012 - 6:00 PM
This is how I know this thread will be good
Posted by: Nial Feb 25, 2013 - 3:47 PM
I have been busy recently, but have found some time to spend on this project.
I stripped down the petrol tank
gave it a good paint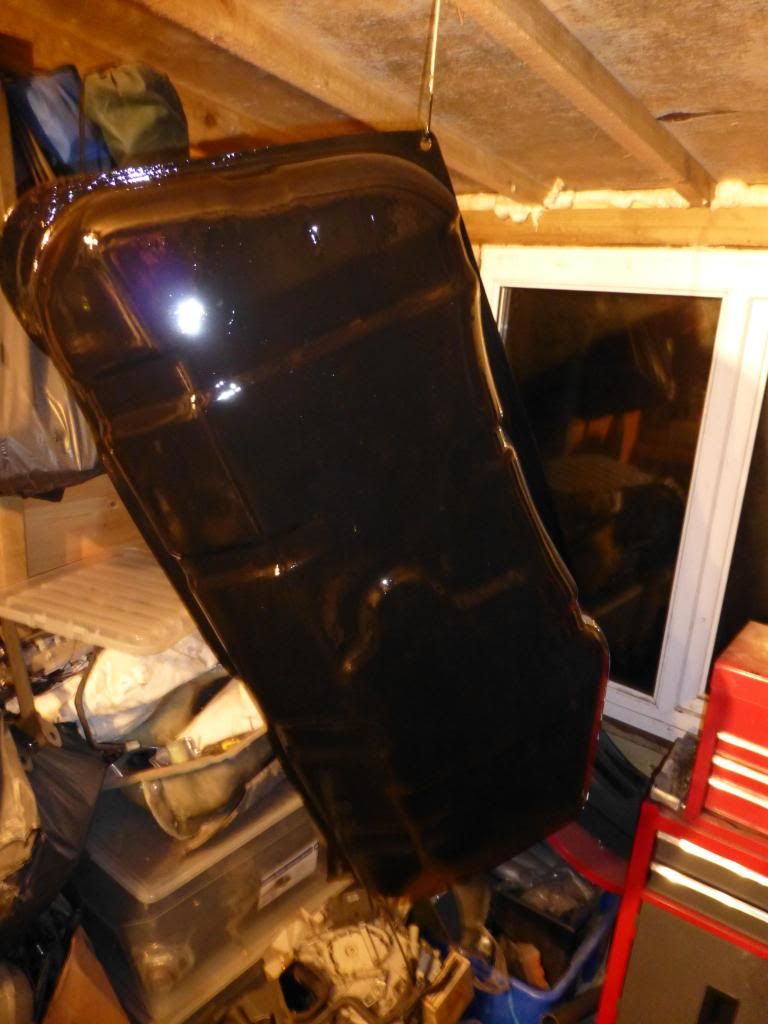
the obligatory walbro fuel pump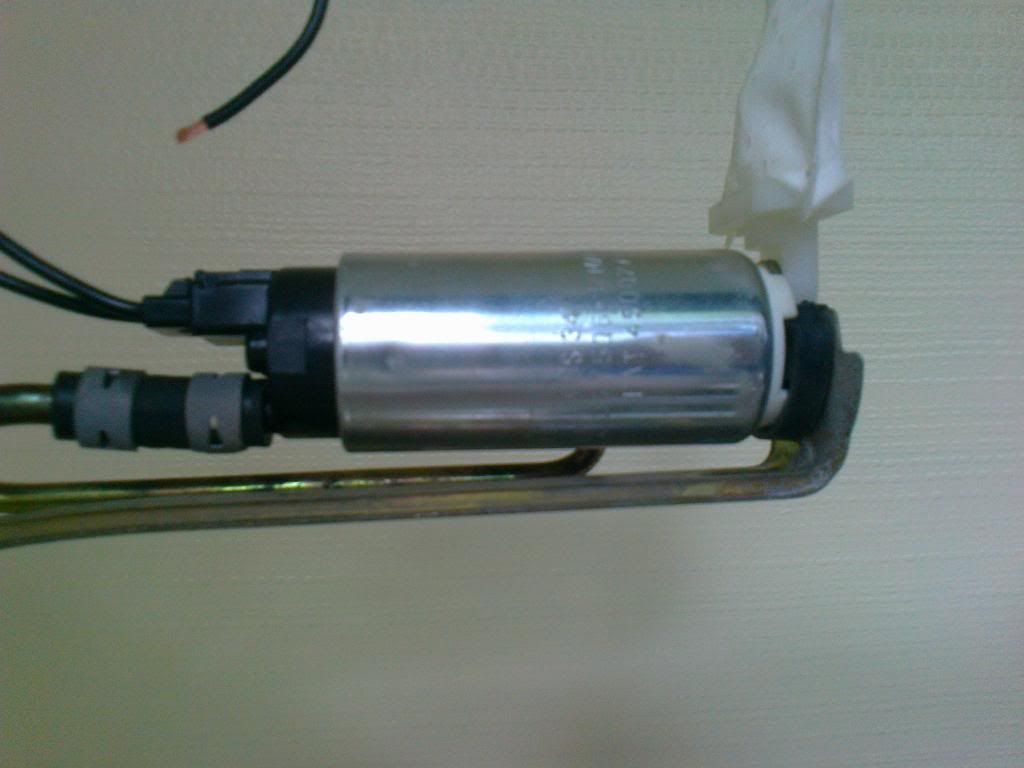
all back together with some stainless steel bolts
rejuvenated the fuel tank straps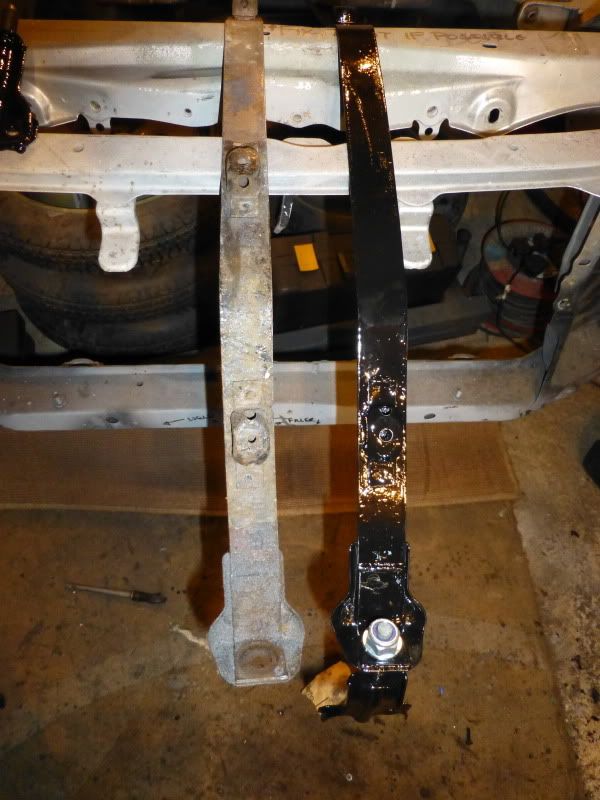
started rebuilding the rear axels
managed to rescue the rear brake disc backing plates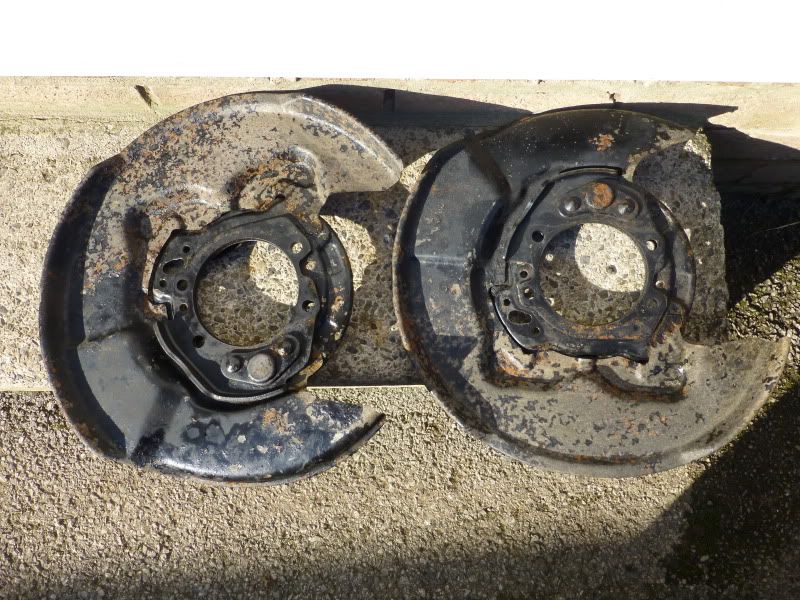
they came up well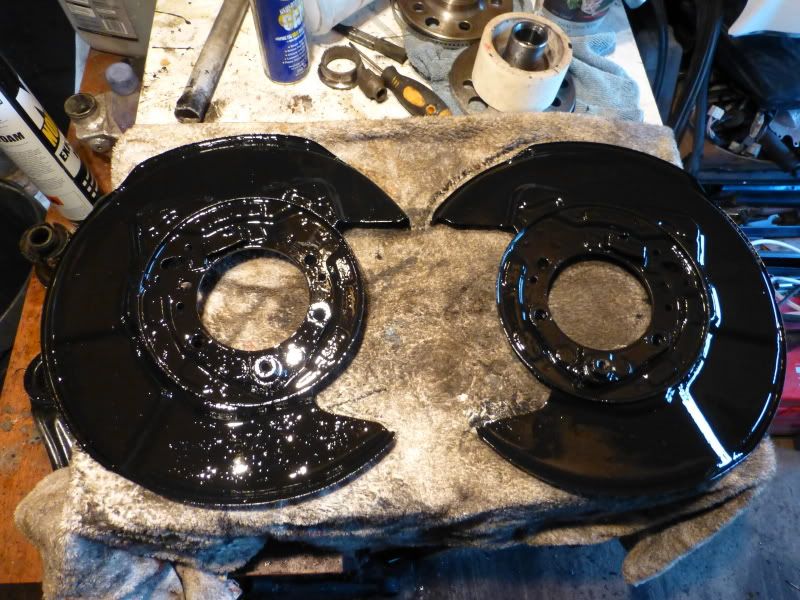
Found a product called Deox C which is great at getting rid of rust, bought the rear hub carriers up a treat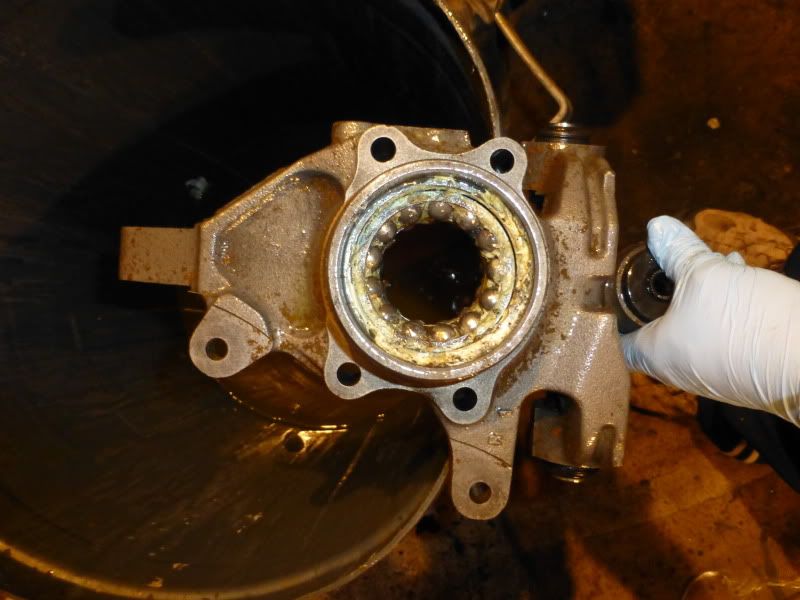
and I got alot of bolts zinc plated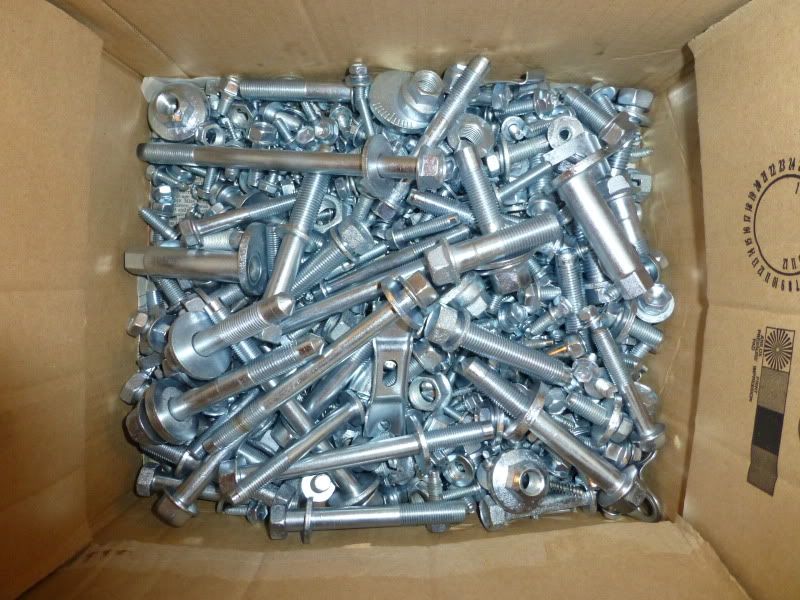
and the door catches chromed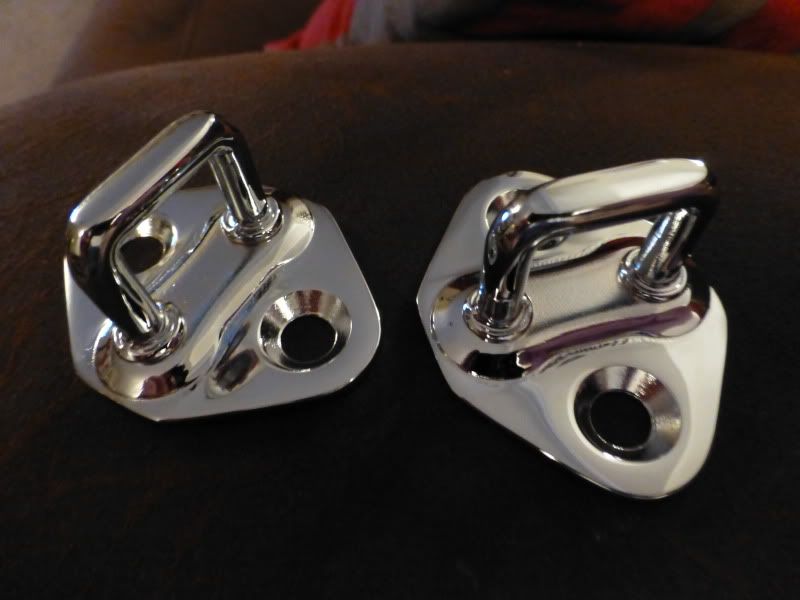
things are starting to go back together now, the rear subframe and suspension parts are all half built, just waiting for the paint on the rear hubs to dry and cure and they can go back together, need some snap rings for the rear axels, then they can go back on. Rear diff can be completed tomorrow if I get time.
Posted by: paulgtt Feb 25, 2013 - 4:10 PM
absolutely epic Nial, top work.
fancy doing my car when your done with this one? 
Posted by: Nial Feb 25, 2013 - 4:28 PM
fancy doing my car when your done with this one?
Hahaha...errr no thanks, this one has taken long enough.....if you dont mind loosing your car for about 4 years and costing...well this will probably cost me the thick end of £30,000 by the time I am done.
Posted by: delusionz Feb 25, 2013 - 5:53 PM
f**k yeah! I want to reshell into yours!!!
Posted by: Legen-dary Feb 25, 2013 - 10:28 PM
Wow, just wow. I truly admire your attention to detail. I've done some detailed builds over the years but it really falls short of the amount of work you're putting in here. Really looking forward to future updates. I've gotta ask though...what on earth do you want to make that requires you cast your own metal parts??
Posted by: Nial Feb 26, 2013 - 3:28 AM
I was going to make an alloy version of the bracket that holds the alternator in place but it prooved too difficult. I kind of knew from the start it would be, I just wanted to make fire
and a noise like a jet engine. The insides have now been completed, all the seam sealing has been done and painted. roll cage is ready for a coat of colour, I think I am going to go for a satin black finish.
Posted by: delusionz Feb 26, 2013 - 4:25 AM
Ahhh is that what that was, I was thinking of just grinding off the humps from the radiator and making a flat L bracket, either that or getting some alloy stumps welded on and using brackets from another car. just some ideas.
of all the chinese copy alloy rads out there I'm guessing some line up the brackets others dont, i had to carve out the rubber bush from mine to fit
Posted by: Nial Feb 26, 2013 - 4:31 AM
I will be building my radiator from scratch so will be doing something similar...TTE used this method so it must be effective.
Posted by: delusionz Feb 26, 2013 - 4:50 AM
do you know what the pre-rad thing is on the TTE car, i cant work it out, is it transfering engine heat with oil, or cycling water for the turbo or what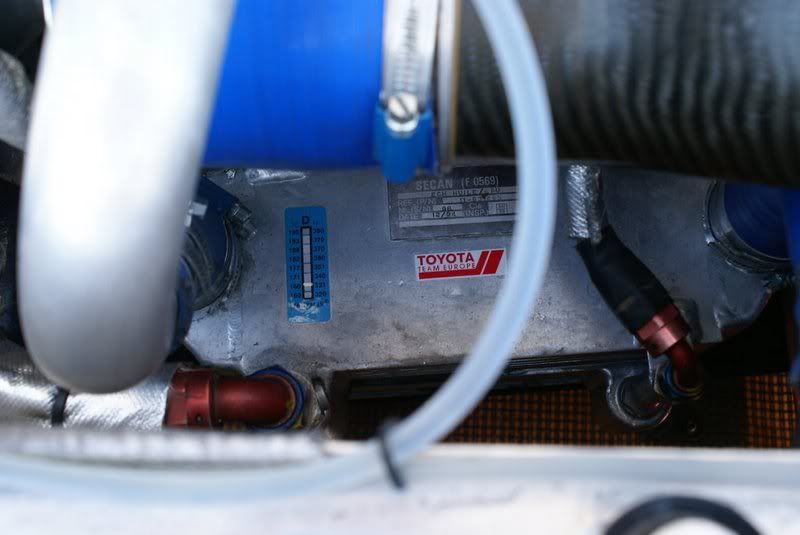
as im sure your well aware of engine bay temps, i think were on the same page when it comes to cooling system design, i tried to follow TTE too
Posted by: Nial Feb 26, 2013 - 4:53 AM
as im sure your well aware of engine bay temps, i think were on the same page when it comes to cooling system design, i tried to follow TTE too
Thats an engine oil cooler (it replaces the one on the front of the block). I have one similar to that sat on the shelve in the garage although you can still buy TTE ones, but they cost about £1500
Posted by: Nial Jun 4, 2013 - 2:57 PM
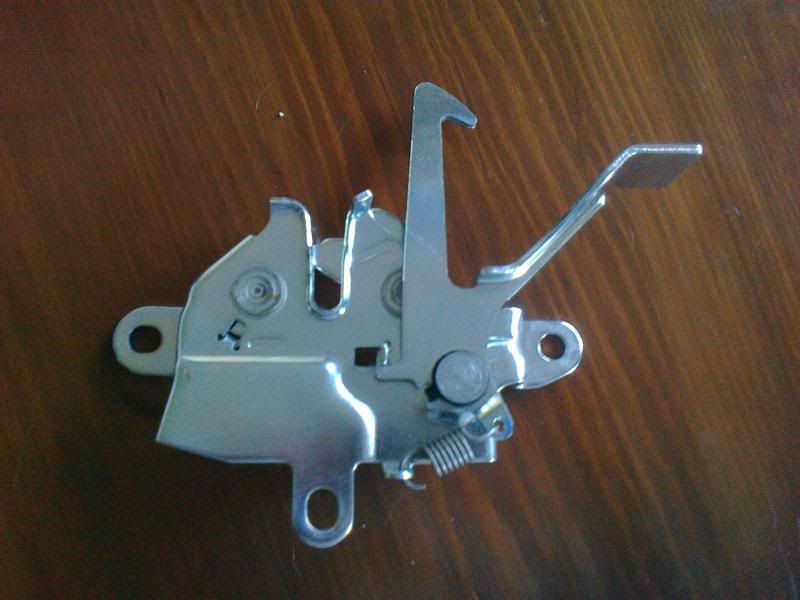
Well, it's been a while, haven't done much on the car really. I have taken the bonnet catch apart which I am going to get chromed, then I have had to have custom stepped rivets made so I can put it all back together again. I have also been working on the interior, a few ideas which have fallen by the wayside and a few new ideas.
I started rebuilding the interior plastics to work around the roll cage, a bit more complex than I bargained for, but its going to challenge my fibreglassing skills.
http://smg.photobucket.com/user/nialusa/media/Celica%20Rebuild/P1010068_zps84c9e400.jpg.html
Now that I have finally taken the other Faff off the road I can start transferring bits over.
After talking to some rally boffins and TTE experts I have decided on two options for the engine rebuild. Initially I am going to use a 185 block and head as these are stronger than the 205 block, the head isn't as good but is more workable...or some am told. Also there are more bits available for the 185 blocks like moroso sumps etc will re using my Link G3 ECU with a brand new engine loom. Plans are afoot for a TTE charge cooler.
Posted by: Dennisthe10 Jun 6, 2013 - 4:26 AM
Love this thread, your car is going to be epic!
Posted by: Nial Sep 8, 2013 - 2:38 PM
Its been a while, but a bit of progress this weekend.
I got hold of an ST202 front bumper, an old knackered GT4 front bumper, both of which I have cut up to make into one. I also managed to get hold of a TOMs front lip which I think suits the car very well.
had to use the parts car to line the bumper up.
http://smg.photobucket.com/user/nialusa/media/Celica%20Rebuild/Photo0407_zpse8528355.jpg.html
still so much to do and it seems like two steps forward one step backwards all the time. i might have retired by the time I finish this rebuild.
Posted by: richee3 Sep 8, 2013 - 2:49 PM
Love that bumper.
Posted by: JoshuaM Sep 8, 2013 - 4:11 PM
Oh, so not content with a perfectly rebuilt st205.... have to go and make it an amazingly awesome SS-FOUR whilst you're at it... 
Posted by: SwissFerdi Sep 8, 2013 - 5:34 PM
Very funny, I actually had that idea myself (SS-FOUR + TOM's lip) a few months ago. I was wondering if anyone else had done it. Nice job Nial!
Posted by: Nial Sep 9, 2013 - 12:27 AM
Thanks just need to start sanding it all smooth now....anyone want to lend me a spare arm? I think I am going to need it.
Posted by: kurt95gt Sep 9, 2013 - 1:38 AM
Good to see an update on such a sweet build
Posted by: Nial Sep 9, 2013 - 2:12 PM
Hahaha,I was thinking instead of SS-Four, how about GT4 Evolution? But then I thought everyone would think I was copying the Mitsubishi Evo name.
Posted by: Nial Sep 17, 2013 - 10:19 AM
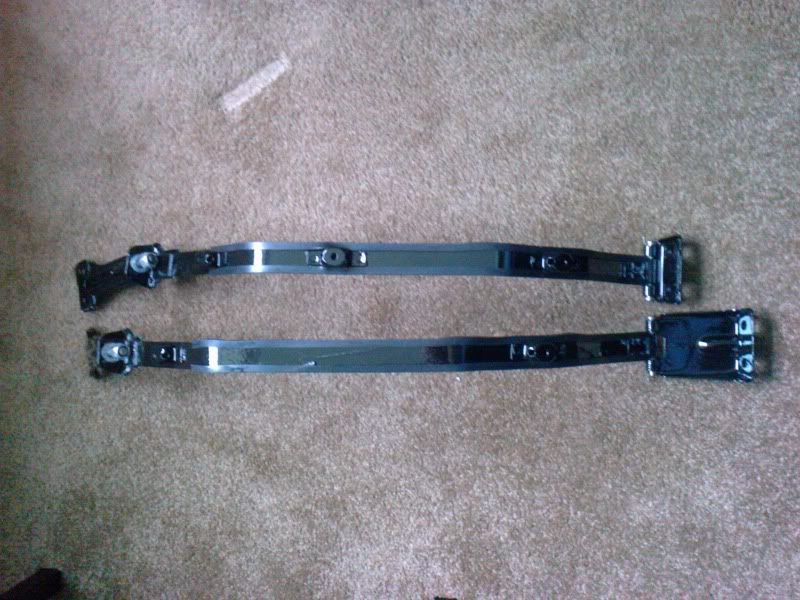
Hmmmm shiny bits
http://smg.photobucket.com/user/nialusa/media/Celica%20Rebuild/Photo0411_zps30c563ca.jpg.html
Posted by: cjh4l22 Sep 17, 2013 - 12:18 PM
Wow, most impressive sir. Keep up the good work! And if you ever decide to take the motor mounts out and make copies, I would be happy to buy a set. haha Thanks.
Posted by: Nial Sep 17, 2013 - 12:34 PM
Thanks
i will just be using standard motor mounts!.....i think!
Posted by: onnaj Sep 18, 2013 - 4:35 AM
Really really impressive! Nice work!
Posted by: rentaspace Sep 22, 2013 - 11:46 PM
Just read through this whole build... I am so jealous it is not funny man.
I wish I had the time, money, patients and skill to pull this off...
Make us some of those bumpers?
Posted by: KAOS Sep 25, 2013 - 12:16 PM
Excellent!
Posted by: Nial Sep 25, 2013 - 3:58 PM
Thanks.....have been busy paint stripping and underseal stripping today as I will be repainting the chassis with epoxy paint and redoing all the seam sealer. Will be so glad when its done, stripping it all off with a wire wheel is a nightmare, especially trying to get into all the nooks and crannies. Then I can start rebuilding the bottom of the car. Will be ordering some BC coilovers...then the expensive bit......buying all new suspension arms.......why are the damn things so expensive??
Posted by: Nial Sep 30, 2013 - 3:12 PM
Still removing paint and underseal......sigh. Just the fiddle bits left to do which is no fun at all.
Beginning to wish I had a compressor and sand blaster.
http://smg.photobucket.com/user/nialusa/media/Celica%20Rebuild/P1010166_zps11759e45.jpg.html
As you can see there isn't a great deal more on the GT4 than the normal celica for the rear sub frame. For those wishing to do a proper GT4 conversion you should be able to get the extra bits to weld to a non GT4 to allow for fitment of the rear subframe. Would need looking into it in a bit more detail just to make sure there isn't any hidden parts, but it shouldn't be a difficult task. It would make it as close as possible to a GT4 without buying one.
I can check part numbers for those wishing to investigate.
http://smg.photobucket.com/user/nialusa/media/Celica%20Rebuild/P1010165_zps1739a5d8.jpg.html
As you can see, I don't have much room to work in 
Posted by: Nial Oct 10, 2013 - 2:43 PM
I could do the chassis welding route, but for two reasons, one, my welding isn't very good, and two, there is an art to chassis welding to get it right, It's easy to balls it up and ruin a good chassis....but mainly my welding isn't very good :lol:
Managed to put the bonnet catch back together after I dismantled it to get it zinc plated
http://smg.photobucket.com/user/nialusa/media/Celica%20Rebuild/Photo0425_zpsc82f01b2.jpg.html
I also got some of this
http://smg.photobucket.com/user/nialusa/media/Celica%20Rebuild/c892fa42-f88b-43b2-aaca-bb63602422fe_zpsa2b84595.jpg.html
So I can make a mould of and replicate the rear high level brake light in clear plastic instead of the standard red, it's only practice as I will be filling in the standard high level brake light and rebuilding the trailing edge of the spoiler out of clear plastic and LEDs for a different type of brake light 8)
I pick up the BC coilovers on saturday, and another gt4 front bumper to use the small slot intake on the hybrid 202/205 bumper.
Posted by: malpaso Oct 11, 2013 - 2:54 AM
FYI it is called "ss-four bumper"
. Official name for it .btw.: you are more crazy than expected... unbeliveable

Posted by: Nial Oct 12, 2013 - 12:25 PM
Well, not much being done today, spent a large portion of the day driving around the country picking up bits n pieces.
Did pick up these though
the obligatory suspension in a box shot....some nice BC coilovers
http://smg.photobucket.com/user/nialusa/media/Celica%20Rebuild/P1010169_zps4b94ddfe.jpg.html
The castings are in the garage currently painted in grey self etching primer.
I picked up yet another GT4 front bumper to finish off the SS4 front bumper.....that will be 3 GT4 front bumpers that have bitten the dust thanks to me ....oh well.
Tomorrow, hopefully I will complete the cleaning off of the bottom of the car so I can do the final derust and clean ready for applying the paint next weekend.
Posted by: Nial Oct 13, 2013 - 10:07 AM
Finally getting round to finishing the SS4 front bumper
http://smg.photobucket.com/user/nialusa/media/Photo0428_zps3b7b253e.jpg.html
Posted by: Nial Oct 27, 2013 - 10:42 AM
Well finally got to apply some paint instead of stripping it off.
http://smg.photobucket.com/user/nialusa/media/Celica%20Rebuild/P1010175_zps4a14601f.jpg.html
still some stripping to do in the engine bay area, but I have to get this painted before the weather gets too cold.....paint dosent like being applied in the cold....paints a wuss :lol: :lol: :lol:
After another coat of epoxy mastic, I will apply some seam sealer in a few areas, then some POR high build tie coat primer as the epoxy mastic has load of brush marks, it will then get a smoothing rub down before I apply some POR15 flex coat for a silky smooth glossy finish 
Posted by: enderswift Oct 27, 2013 - 10:54 AM
So much epicness
Posted by: bsamps4 Oct 27, 2013 - 11:33 AM
That is ridiculously epic!
Posted by: mi645 Oct 27, 2013 - 2:20 PM
I am really impressed with the amount of work just in ur garage or back yard. Seriously impressed, and I really like how ur going over every detail it makes me wish I can do that with my car but unfortunately I can not.
And also Are you gonna be ok putting everything back right?
Posted by: Nial Oct 27, 2013 - 2:44 PM
Thanks........now there's a question!! the only thing that is going to be a problem (I think) is the dashboard loom which my memory instantly forgot the second I removed it from the car. Luckily I can just use my other GT4 for reference as I transfer the parts from one to the other. Or just muddle through until I get it right. Logic dictates though that I am bound to forget something.
Posted by: dudeofchaos Nov 8, 2013 - 12:50 PM
Will you post how to mod the BC coils? 
I plan to get a pair of these (Not sure yet which model to go for, ER RA or RH)
Posted by: Nial Nov 8, 2013 - 5:13 PM
There is no modding of BC coilovers required, simply weld them together which any welder could do easily.
which ones you go for depends on what you are going to use the car for. For road use, just buy the basic ones that I go wthich will also manage track use. The expensive ones are for expert use really and offer more function & adjustability than you would be ever likely to use.
Posted by: qatar11 Nov 9, 2013 - 7:10 AM
I plan to get a pair of these (Not sure yet which model to go for, ER RA or RH)
They were ~$1K USD shipped.
Posted by: qatar11 Nov 9, 2013 - 7:32 AM
.
Posted by: dudeofchaos Nov 10, 2013 - 3:33 PM
which ones you go for depends on what you are going to use the car for. For road use, just buy the basic ones that I go wthich will also manage track use. The expensive ones are for expert use really and offer more function & adjustability than you would be ever likely to use.
I'm just not sure I'll be able to explain the welder where it needs to be cut though.
The car will see some track days but mostly be a summer DD and the roads here are absolutely horrible, I can't drive around with the same setup than on track.
Not sure I'll get the ER model though, I guess it'd be too overkill.
Except for the fact that I wanted to get the 9kg front/6kg rear model which is only available for the ER's and I'd rather have pillowball top mounts for the rear which the RA's don't have.
As for now, the RH will be my final choice.
Posted by: qatar11 Nov 10, 2013 - 7:11 PM
As for now, the RH will be my final choice.
This is incorrect... when ordering directly from BC (via phone) you can specify pillowball top mounts for the rear...
Posted by: dudeofchaos Nov 10, 2013 - 7:51 PM
As for now, the RH will be my final choice.
This is incorrect... when ordering directly from BC (via phone) you can specify pillowball top mounts for the rear...
Really?
On their site it states that RA model does not come with pillowball top mounts.
Well.. thanks for the info then!
Posted by: Nial Nov 16, 2013 - 1:36 PM
Well a bit more progress, some high build primer into the engine bay, the epoxy mastic is so rough its going to take several coats of primer, sand down, more primer etc etc to get an even half flat finish.
http://smg.photobucket.com/user/nialusa/media/Celica%20Rebuild/Photo0438_zpsb83c30e9.jpg.html
Somethings missing.....oh yea, everything
http://smg.photobucket.com/user/nialusa/media/Celica%20Rebuild/Photo0441_zps473959ec.jpg.html
Posted by: Nial Nov 22, 2013 - 4:57 PM
adding some seam sealer now. need more masking tape
http://smg.photobucket.com/user/nialusa/media/Celica%20Rebuild/Photo0446_zps97ae2f03.jpg.html
Posted by: RoyO Nov 22, 2013 - 5:31 PM
Awesome rebuild, very impressive!
Posted by: Nial Nov 27, 2013 - 2:58 PM
Only about a million hors of sanding left to go
http://smg.photobucket.com/user/nialusa/media/Celica%20Rebuild/P1010190_zpsacf62056.jpg.html
Posted by: SwissFerdi Nov 27, 2013 - 3:41 PM
Yes!
I almost feel bad for Martin that his design is copied so much, but damn if it's not the best-looking use of a facelift bumper.
Posted by: delusionz Nov 28, 2013 - 7:12 AM
I looked back and noticed martin didn't transfer the little mini grill in the middle, I would prefer to keep that too
Posted by: Nial Nov 28, 2013 - 2:35 PM
Not that I have been following all others that have don't this little hybrid bumper build, but I can't recall anyone else keeping the little letterbox vent, it would be nice to claim to be the first but someone somewhere is bound to have done it long before now.
Posted by: malpaso Nov 29, 2013 - 4:20 AM
No need to mate
. For it is prove I had great idea In terms of improvement. In fact I wanted that vent on my bumper as well but unfortunately "teeth" were broken on my donor bumper so decided to not using it in the end... it is bit visible (two in the middle) in picture below: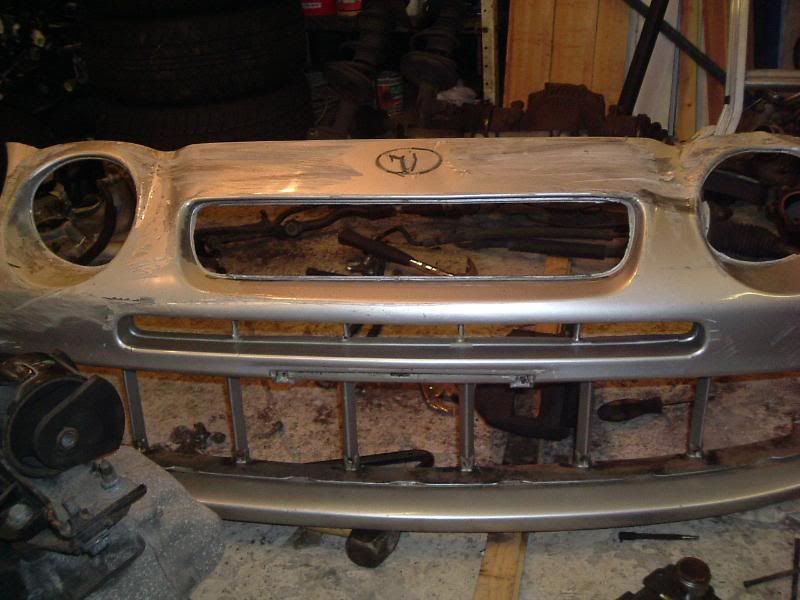
I am really glad I can see result how it would look like with that vent as well
Posted by: 6G96GT Nov 29, 2013 - 4:11 PM
Everything you are doing is effing incredible.
Posted by: Nial Nov 29, 2013 - 6:14 PM
Thanks.
More sanding today, managed to get a nice smooth finish. Sorting out the brake lines and fuel lines this weekend as well as the front sub frame. Still the engine bay to finish cleaning and painting but as the cars in the rotisserie it's difficult tote to.
I think I have managed to find myself a 5sfe engine so it looks like a 5sgte might be in order. 5sfe' see hard to come by here.
Then I can start overhauling and rebuilding the front hubs, brake callipers and remaining suspension arms,
So much to do...will it ever end?
Posted by: Nial Nov 29, 2013 - 6:26 PM
Any 6gc club meets in Florida in April next year? As guess where I will be for a few weeks
Posted by: Box Nov 29, 2013 - 6:26 PM
DISNEY WORLD!!!!
Posted by: Nial Nov 29, 2013 - 6:28 PM
Yep
On my honeymoon.....but if you can't attend the odd car meet or two on your honeymoon then what's the world coming to eh
Posted by: Box Nov 29, 2013 - 6:39 PM
What do I win for getting it right?
Posted by: Trodai Nov 29, 2013 - 7:11 PM
More sanding today, managed to get a nice smooth finish. Sorting out the brake lines and fuel lines this weekend as well as the front sub frame. Still the engine bay to finish cleaning and painting but as the cars in the rotisserie it's difficult tote to.
I think I have managed to find myself a 5sfe engine so it looks like a 5sgte might be in order. 5sfe' see hard to come by here.
Then I can start overhauling and rebuilding the front hubs, brake callipers and remaining suspension arms,
So much to do...will it ever end?
yea i like it.. i was looking into the 5sfe for a conversion in the future.. it seems like the "better" method, will be a overall better performance from the 5sgte less lag and more torque, they are getting rare over here too.. great job on the bumper lad.. im loving this build!
Posted by: Nial Dec 16, 2013 - 3:47 PM
Taking a break from this project while I decide what to do, the latest layer of paint looks terrible, no matter how carefully you apply it, it runs everywhere and looks like a child painted it on. To top it all off it then reacted with the other paint so it all has to come off. Back to square one, options are spend more months wire brushing the paint off, sending it away to get sand blasted, buy a sand blaster and do t myself or give up, right this very second the giving up option is mighty appealing, I can't afford to keep throwing money at this project for it to keep going wrong. Might be time to call it a day!
Posted by: Tigawoods Dec 16, 2013 - 3:50 PM
yup! time to call it a day! Fly it over to me. Itll give me something to do in the afternoons.....chances are you wont get it back though
Posted by: enderswift Dec 16, 2013 - 4:22 PM
you wouldn't happen to be having trouble with POR paint are you? Because I just went through numerous attempts applying POR chassis coat black only to have it look absolutely horrible no matter what I tried. Foam brushes, bristle brushes, lots of mixing, little mixing, high temperature, low temperature, various humidities, anything and everything. It always came out exactly like you described, as though a child did the painting

Posted by: Nial Dec 16, 2013 - 4:37 PM
It is a POR paint yes. Sick of it. It runs no matter how thinly you apply it. I know it's under the car and no one will see it, but I would know and it would annoy me constantly. Frustrated.
Posted by: enderswift Dec 16, 2013 - 8:33 PM
I know the feeling. All that prep work only to have it messed up in the end. I think it suffices to say that POR wont be getting my money again. Stay strong and seriously consider blasting. Once you blast there really is no other alternative haha
Posted by: Nial Dec 17, 2013 - 1:17 AM
I know the feeling. All that prep work only to have it messed up in the end. I think it suffices to say that POR wont be getting my money again. Stay strong and seriously consider blasting. Once you blast there really is no other alternative haha
POR won't be getting any of my money either, rustbuster is pretty good, but my favourite so far is a paint from the US called eastwood, nice to apply, forgiving, a nice finish, a bit on the pricey side, but considering the amount that POR has cost me!!
Today will be spent pricing up air compressors and finding out just how feasible it is to sand blast in the garage.
Posted by: Nial Dec 28, 2013 - 11:25 AM
Well, a bit of work today, decided to refurbish a set of spare brake Calipers I had, they are in mint condition so didnt need much fettling, I took them to bits, removed all the seals etc, the bolts will be sent away to get zinc plated.
The callipers were painted with Eastwood chassis black extreme, a beautiful paint that goes on very nicely and has a great finish.
http://smg.photobucket.com/user/nialusa/media/Celica%20Rebuild/Photo0479_zps0a89a508.jpg.html
and a hint as to what the finished callipers will look like
http://smg.photobucket.com/user/nialusa/media/Celica%20Rebuild/Photo0478_zpsd655b9af.jpg.html
Posted by: Smaay Dec 28, 2013 - 11:45 AM
keep up the good work!!! This is what I want to do to my Supra
Posted by: Nial Mar 23, 2014 - 12:44 PM
Well after getting over a rather mild winter, i have ventured back into the garage.
I have finally stripped my pride and joy down to a bare shel and it has been shipped off to the great B road in the sky.
After saying goodbye to it I have been trying to find space for all the parts I now have, the garage is full to the brim with car parts, plus I had to buy a small wooden shed to store more stuff in....so the garage is a bit of a mess.
i manged to clear myself a small patch of surface to resume work on.
First off was the clutch master cylinder, i know its only small and probably not of much interest but its a step in the right direction. I could have done with sending the shaft away to get zinc plated as I am not happy with its finish, but i guess as it will never be seen it will have to do.
http://smg.photobucket.com/user/nialusa/media/Celica%20Rebuild/P1010265_zps85e357bd.jpg.html
I have replaced the insides with a brand new piston and seals. Painted the body black and cleaned up the reservoir.
Then i made a start on the brake master cylinder and vacuum cylinder. it was a bit rusty so after a soak in Bilt Hamber Deox C rust remover and a quick wire brushing I have primered it and this is where I could do with your help.......
Baring in mind everything in the car will be either black, silver or the colour of the car, what colour shall i paint the vacuum housing? as i want to paint the cylinder black to match the clutch master cylinder I was thinking about painting it the same colour as the car so that there is a bit of contrast...or should I go with standard black?
Currently primered and waiting for me to make my mind up....excuse the mess.
http://smg.photobucket.com/user/nialusa/media/Celica%20Rebuild/P1010267_zps2f3d53a8.jpg.html
coming to the US in a couple of weeks for a few weeks, any car meets in florida from the 6th april? Going to Disney for my honeymoon
cheers all
Nial
Posted by: JoshuaM Mar 23, 2014 - 1:13 PM
I would personally go black because it will look the most sophisticated and original and your car is going to be MINT! I am a bit boring like that though, and a bit of colour might spice things up... so I'm no help I guess
Posted by: Nial Mar 30, 2014 - 1:26 PM
So, i went with black, looks ok. Will contrast well against the silver of all the braided hoses.
Another box of bits (mostly bolts) arrived back from the electroplaters.
http://smg.photobucket.com/user/nialusa/media/Celica%20Rebuild/P1010272_zps7121a5bb.jpg.html
should be fun trying to remember where all the bolts go...i give myself about an 80% chance of getting it wrong
I also managed a few smaller jobs, put the ignitor assembly back together along with the nice shiny dipstick holed, wiper motor which i finally managed to get the bolts for, and the steering shaft gaiter.
http://smg.photobucket.com/user/nialusa/media/Celica%20Rebuild/P1010269_zps6e294c92.jpg.html
it should look nice on the bulkhead
http://smg.photobucket.com/user/nialusa/media/Celica%20Rebuild/image_zps31fdf6aa.jpg.html
Nearly got the front driveshafts finished, just need to locate a replacement vibration damper for the right side drive shaft.
http://smg.photobucket.com/user/nialusa/media/Celica%20Rebuild/P1010275_zpsa2129329.jpg.html
The brake stopper polished up well
http://smg.photobucket.com/user/nialusa/media/Celica%20Rebuild/P1010273_zps146491b5.jpg.html
front hubs also came back from the electroplaters.
http://smg.photobucket.com/user/nialusa/media/Celica%20Rebuild/P1010271_zps9fde6bea.jpg.html
A box of parts ready to be sent off to the electroplaters when i get back rom Florida
http://smg.photobucket.com/user/nialusa/media/Celica%20Rebuild/P1010277_zps4d1454ef.jpg.html
still nothing of much substance really, just all little jobs that make the big jobs easier.
A few weeks of nothing now while I go on my honeymoon
should be big progress when I get back as i will be putting the suspension back on etc
Posted by: Langing May 14, 2014 - 10:34 AM
Nial, reading about your Celica build is like reading a 'pot boiler' or 'page turner'; I had to read the whole thing from beginning to end without stopping! I offer a sincere congratulations on your work, and your wedding.
You have inspired me sir, although I stand on the shore of the lake dipping my toes into the icy cold waters you seem to be thriving in, I am afraid to make the jump. I started working on my 94 ST Coupe (1.8L) over a month ago by saying to myself it was only fair to give her a completely all-new or rebuilt brake system since she was fast approaching her 20th birthday, and that would keep her safe, and then changed out the rear wheel bearings "while I was at it.' Once started, it is hard to stop, because I keep seeing more things that need to be done. I think I'm being bit by the bug in a more 'bottom up' fashion, in comparison with your 'top down' all out attack.
Most of your description makes sense to me, and I feel I kind of understand how much effort you have put into the job, since it is so well written and photo documented. If you don't mind, I would like to ask a silly question, however. You sent a lot of hardware, many nuts, bolts, etc. to the electroplater's to get them zinc plated. I am wondering if that is an expensive proposition? I don't see many shops that do that here in NC and wonder if there are many in the UK.
Posted by: Nial May 18, 2014 - 9:55 AM
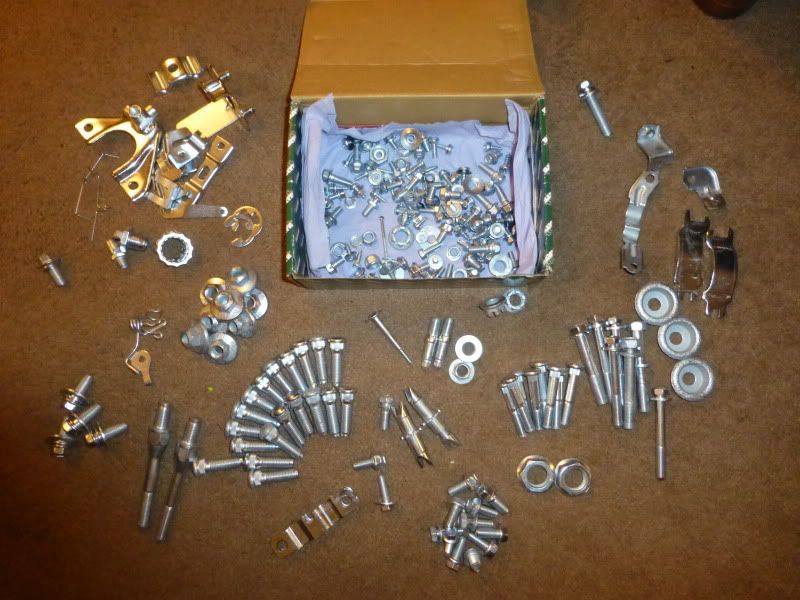
Well got a bunch of tstuff back from the zinc platers and got a few more things back together.
http://smg.photobucket.com/user/nialusa/media/Celica%20Rebuild/imagejpg1_zps378e6bdf.jpg.html
The brake and clutch pedals refurbished and ready to be refitted
http://smg.photobucket.com/user/nialusa/media/imagejpg2_zps607b60ff.jpg.html
I took the power steering pump apart, there's quite a few bits inside that all decide they want to head in many different directions when you open the thing up.
http://smg.photobucket.com/user/nialusa/media/Celica%20Rebuild/imagejpg2_zpsb9e9ca12.jpg.html
And the tensioner for the alternator belt
http://smg.photobucket.com/user/nialusa/media/Celica%20Rebuild/imagejpg5_zps284838e6.jpg.html
The next task is building a new dolly to help transport the shell around as it doesn't fit on a car transporter with the current dolly, time to break out the welder again.
Posted by: Smaay May 18, 2014 - 9:14 PM
such an awesome build...
How much do you think you have spent already?
Posted by: Nial May 19, 2014 - 12:25 AM
I dread to think how much I have spent.....probably edging towards £10,000 if you include tools, mistakes and building the little extension. I recon it's going to cost me about another £20,000 to finish it all..but that's everything, tools, consumables, paint, engine fuel etc.
Posted by: Smaay May 20, 2014 - 8:25 AM
stick with it man, its going to be worth it when its all done
Posted by: Nial May 20, 2014 - 11:52 AM
I hope so, the number of things to do seems endless, every day something new crops up. The next task is making a transport device for the shell that doubles as a rotisserie. That's going to be fun, better dust off the welder, break out the design hat and order some steel.
Posted by: Nial May 23, 2014 - 12:55 PM
It's about time I had a new rotisserie, so I have made this one to be very strong, to be able to rotate the car, obviously, but also to enable it to be transported it's wheel width will match that of a car transporter ramps, it's adjustable in both length and height a step up from the wooden supports I was using :lol:
http://smg.photobucket.com/user/nialusa/media/Celica%20Rebuild/imagejpg1_zpsef2940fb.jpg.html
http://smg.photobucket.com/user/nialusa/media/Celica%20Rebuild/imagejpg2_zps08df153b.jpg.html
Should finish it tomorrow
Posted by: Nial Jun 20, 2014 - 10:44 AM
Sent the shell away for Media blasting at last, and it's done.
http://smg.photobucket.com/user/nialusa/media/20140620_141151_zpsc1eda88d.jpg.html
Along with a super tough primer/undercoat....not the final colour, but quite a nice colour, not sure if it would suit a celica or not.....think I will stick with me original colour
Posted by: Langing Jun 20, 2014 - 3:04 PM
http://smg.photobucket.com/user/nialusa/media/20140620_141151_zpsc1eda88d.jpg.html
Along with a super tough primer/undercoat....not the final colour, but quite a nice colour, not sure if it would suit a celica or not.....think I will stick with me original colour
That shot was taken at the place that did your blasting?
Nial, I'm interested in getting more information about your designs for your rotisseries, both of them. Basic idea is clear. Could you show close up detail about how it is made and how you bolted the shell to it?
Posted by: Nial Jun 20, 2014 - 3:36 PM
Nial, I'm interested in getting more information about your designs for your rotisseries, both of them. Basic idea is clear. Could you show close up detail about how it is made and how you bolted the shell to it?
Yes that picture was taken at the unit John uses to do the blast cleaning, it's just a shed on an old farm.
I get the car back home tomorrow so I will take some pictures of the rotisserie for you. The old wooden rotisserie has been cut up now and utilised for something else but I will see if I can dig out some old pictures.
The rear of the rotisserie I used an old rear bumper crash bar, welded some steel and a pivot to it, the front bit of the rotisserie that holds the car is just 2inch box section welded together.
Posted by: Nial Jun 20, 2014 - 3:42 PM
This s one of the wooden supports kinda three quarters built
http://smg.photobucket.com/user/nialusa/media/Celica%20Rebuild/Photo0059.jpg.html
You can see the use of the box section to hold the shell at the bumper support points, with the bumper supports removed obviously.
http://smg.photobucket.com/user/nialusa/media/Celica%20Rebuild/Photo0063.jpg.html
I reused this part on the second metal rotisserie.
Posted by: Langing Jun 20, 2014 - 5:28 PM
To set my reference: The last two photos show the vehicle first looking from the front and second looking from the rear?
The first photo shows the open end of a rectangular cross section frame member where a bumper support has already been removed (lower left, with plastic bottle beneath, with two bolts protruding at the left)), and when you bolted the box section steel cross member of the rotisserie to the vehicle, you bolted it at those two bumper support positions?
I've never taken a bumper off, so I got out my BGB. Exactly two pages of drawings and that's it! For the front I believe I can see the bumper supports. On the back I see three points where an "upper retainer" ties in, and I see a "lower back finish center panel," and after that is a strong steel "reinforcement" bar. I'm guessing that's what you call the "crash bar?"
Beyond that are the energy absorbers which are covered by the "bumper covers"?
I'm looking forward to some more detailed photos. It is interesting to see what you did.
"
Posted by: Nial Jun 21, 2014 - 12:55 AM
That is correct yes
No, both the last photos are the front of the car. The rear is a bit more complicated as the bumper/crash bar is set lower down so it would make the pivot point too low, it will be clear with photos but slightly more fabrication is needed.
Excuse the crappy welding but it was the first thing I ever welded in my life.
Posted by: Langing Jun 21, 2014 - 7:49 AM
"Excuse the crappy welding but it was the first thing I ever welded in my life."
You've got to be kidding, Nial. . . I've read your complete story four times, so I know you taught yourself how to weld because you HAD to weld in order to move your build along. I can't weld even though I want to and have some welding equipment sitting around and, for some reason, believe I need someone to teach me. . . quite different than you; puts me to shame. I must tell you how very much I admire your work, so you know where I am coming from with my questions. You are an inspiration to me. You've learned by trial and error at times, but look at all that practical knowledge you have gained and the level of skill you have gotten yourself up to at this point, not to speak of doing all that in such cramped quarters!
BTW: Did you do all of your work by yourself, alone, or did you have a friend (or friends; or loved ones) who gave you at least moral support, if not technical advice? Your story doesn't mention anybody else, so a reader could get the impression that it was just you, all by yourself. That conveys a somewhat lonely image, considering the months and months of grinding it out, yet makes your work all the more admirable.
Posted by: Nial Jun 21, 2014 - 8:41 AM
Unfortunately I have had no help everything I have done I have had to do pretty much alone, dropping an engine on your own is a nightmare. I have had things done by friends away from the car, such a bending pipe work for me or giving advice here and there. Plus there's no room in my little garage for anyone else
Posted by: Langing Jun 21, 2014 - 9:48 AM
everything I have done I have had to do pretty much alone, dropping an engine on your own is a nightmare. I have had things done by friends away from the car, such a bending pipe work for me or giving advice here and there. Plus there's no room in my little garage for anyone else Thinking of you dropping that engine by yourself gave me a major sense of real back pain! Well, at least you have a bunch of hungry readers constantly waiting to see the results of each next step you take on your journey. Should be come consolation. Maybe this kind of work is supposed to be solitary -- thinking of your grinding away with wire wheels for days on end when working on the underside of your shell. . .
Posted by: Nial Jun 21, 2014 - 11:08 AM
cheers bud, in a strange way it's good to know people are interested in what I do, I know it shouldn't matter but somehow it helps
Back to the rotisserie......this is the front, you can see how the box sections fit together and hold the car
http://smg.photobucket.com/user/nialusa/media/imagejpg1_zpsc0ff3554.jpg.html
The front again,
http://smg.photobucket.com/user/nialusa/media/imagejpg3_zps366e4a4b.jpg.html
http://smg.photobucket.com/user/nialusa/media/imagejpg2_zpsee2a4ef7.jpg.html
And the rear, I needed to do this so the pivot point was at the cars centre of balance
http://smg.photobucket.com/user/nialusa/media/imagejpg5_zps83f7f194.jpg.html
http://smg.photobucket.com/user/nialusa/media/imagejpg4_zpsfdc125da.jpg.html
And what I am doing right now
http://smg.photobucket.com/user/nialusa/media/imagejpg6_zps0c588452.jpg.html
Posted by: Langing Jun 21, 2014 - 11:58 AM
Superb photos of your rotisserie, Nial!
What I think I see on the front is that, on each end, you have welded a pair of box section lengths together and then welded them to the double boxes of the rotisserie. Then all you did was slide both into openings on frame ends you made when you took off the bumper supports. But, then you bolted them securely.
On the back it looks like you have done something similar, except the double boxes of the rotisserie are oriented perpendicular to their equivalent in the front, and they are much shorter in length. To achieve balance, you welded your rotisserie double boxes to what you call the crash bar, but at a point that is offset from the center of the length of the double boxes. Looks like they are welded to the crash bar some 6" to 8" below the rotisserie axis. Then, you must have made two similar dual box attachment short lengths (just like in the front) and welded them to each end of the crash bar. Then, I suppose, you simply inserted the whole thing into rear frame member ends and bolted them down exactly as in front.
That is what I see. . . but could be wrong. . .
How did you determine the longitudinal axis of symmetry (longitudinal center of gravity) of the vehicle so you could know exactly what offset was required?
Can you rotate the vehicle about its axis a full 360 degrees? Does it take much effort?
How much weight does your rotisserie carry when your current vehicle is loaded on?
Do you know the maximum capacity of the rotisserie, or did you "eye-ball" it?
If I remember correctly, you had some holes in the rotisserie frame below and I think there were some on the uprights, maybe just at the back? Were these to somehow permit you to raise/lower and extend/retract so you could re-use the device on some other car in the future? Or am I simply mistaken about seeing holes? I haven't looked for one, but I guess somebody sells a product that performs the same function? Are they expensive?
You have done quite a bit of complex thinking and doing on this long project, Nial, and I congratulate you on your accomplishments. Have you thought of writing a book about your journey once you are finished? I would read it; don't know how many others would also. But, anyway, thanks for showing me what you did to make your rotisserie. Maybe just driving your perfectly crafted and lovingly "hand-built" Celica around the country will be its own reward. There is still just a little left to do.
You are now sipping on a delicious glass of wine. I'm some 5 hours earlier than you, so I've still got to finish my day of work before I can join you.
Posted by: Nial Jun 21, 2014 - 12:38 PM
It sounds like you pretty much have it figured out
To figure out the centre of gravity I guessed to be honest, it was spot on until I added the roll cage, now it's slightly top heavy. It's easy to turn, you can do it with one hand, the only time it gets difficult is when you get past vertical, then the car wants to fall on it's back, but it's still possible to control with little effort.
Thanks for the kind words.
My next task is figuring out a way to vacuum all the sand out of the various holes, internal voids etc, some 12mm tubing attached to a vacuum cleaner might do it, but that's tomorrow's task
And I am on the lookout for an air compressor so I can learn to spray paint.....and perhaps do some media blasting?
Oh, and yes you were right about the holes, various holes have been drilled so I can adjust the height and length of the rotisserie.
Posted by: Langing Jun 21, 2014 - 2:09 PM
I've had a little Campbell Hausfeld 8 Gallon, 125 psi max air compressor that I have used for the past 6 years or so mostly for carpentry applications but more recently to die grind on metal when doing the car work. I've used it with a air ratchet on the car, but it cannot break free anything that is stuck. Of course it is great to keep tire inflation set properly, and so nice to blow stuff out of hard to get at places (like your blasting media, for example). It's been so nice to have and use. There are so many air tools today you cannot believe!
Still, I've wanted to sand blast for a long time (first old port holes I brought back from sunken ships in the Pacific, now rusted car parts), and spray paint (the house, the fence, whatever else), as well as use powerful pneumatic impact drivers on the car. 
My 8 gallon compressor just cannot come close to keeping up with those kinds of tasks. I've been looking as well, but for something around 30 gallons, which when watching YouTube videos about using the Harbor Freight enclosed sand blasting cabinets (don't know if you have any over there; its a cheap tool company; Chinese) have come to believe is necessary from the get go.
The problem is for those applications (sand blasting, paint spraying, mechanics impact drivers, etc.) you need a lot of air flow at a sustained pressure (over time), else all the compressor does is stay running continuously, or cannot do the job, period. Constant running is what I get whenever I die grind.
The air storage (gal) is one parameter you need to worry about, but then you must know maximum pressures (psi) and what flow rates you will need for your applications (cfm). Once you tie those down, it is just a matter of learning about the quality of the various makers.
Finally, I don't know about your climate, but if you have much humidity the compressor will make water for you inside its tank (you need to empty it frequently). There are moisture filters and the such that you can investigate.
Hope this is useful to you.
Posted by: Nial Jun 21, 2014 - 2:24 PM
Very helpful thanks I have been looking at an Ingersoll Rand compressor on ebay that's a 100 litre (26 US Gallons) 14 cfm which should do pretty much all I want it to. Shame it's the other end of the country.
Posted by: Nial Jul 6, 2014 - 8:21 AM
Well, I have managed to sort myself out with a compressor. Got myself a reasonable compressor to start off with and a few bits n bobs.
First off because I have no space in the garage I built a little shed to house the compressor.
http://smg.photobucket.com/user/nialusa/media/Celica%20Rebuild/imagejpg5_zps516bd528.jpg.html
It is well ventilated and sound proofed so it dosnt annoy the neighbours too much.
http://smg.photobucket.com/user/nialusa/media/Celica%20Rebuild/imagejpg4_zpse4905bfc.jpg.html
Feeds through to a filter and extendable hose
http://smg.photobucket.com/user/nialusa/media/Celica%20Rebuild/imagejpg1_zpscd5d85a8.jpg.html
I need to add more filters though as the one I have dosnt remove all the moisture out of the airline.
I went back to the good old epoxy mastic 121 from rustbusters, thinned out the full 15% it goes on quit nicely and easily.
I am sure Manny will take one look at this and shake his head with shame with the conditions I have to work in, but there is an Old Scottish Expression
which goes........"You can only piss with the cock you've got" unfortunately I dont have a nice big garage.....yet, plans are to build one eventually
http://smg.photobucket.com/user/nialusa/media/Celica%20Rebuild/imagejpg9_zps9ba49f31.jpg.html
http://smg.photobucket.com/user/nialusa/media/Celica%20Rebuild/imagejpg8_zps4a3e1e4c.jpg.html
As its the first thing I have ever sprayed in my life (with a proper air gun, done plenty with aerosols) I will plastic sheet out the garage when it comes to applying the top coat but as all I am doing is the underside it dosent matter too much, I will leave the top side to the professionals
http://smg.photobucket.com/user/nialusa/media/Celica%20Rebuild/imagejpg1_zpsc6278b73.jpg.html
http://smg.photobucket.com/user/nialusa/media/Celica%20Rebuild/imagejpg2_zps4fd84f71.jpg.html
This needs to dry now for at least a week I will then do a coat of undercoat, final colour, then some ultra tough high gloss clearcoat.
Posted by: Smaay Jul 6, 2014 - 10:24 AM
once again, total awesomeness in your build. I cant wait to see the final product. im going to do the same thing with my st185
Posted by: Nial Jul 6, 2014 - 11:49 AM
Thanks
I have certainly learned a lot about paint and how it's quality effects the job, I certainly won't be buying cheap paint anytime soon.
I can't wait to see the final product either although I will be scared to drive it, I might just leave it on the driveway and look at it, at least it will be safe from car park dents and other foolish road users.
Posted by: Langing Jul 6, 2014 - 9:02 PM
Nial, you are, indeed, an impressive "man of action." Seems when stopped by anything you just go to school and then build your way to the next level. You started by extending your garage, you taught yourself how to weld, how to paint, how to remove anything from metal surfaces, how to utilize what little space you had. My god man, what can't you do when you set your mind to it? That's a lovely, and almost complete, solution to the air compressor problem, so now you are on your way again!
When you get the time, could you say a little more about the air compressor you acquired, and could you say more about how you are going about spray painting with the new compressor. I would like to know details (specific apparatus and parameters) because I am on the cusp of attempting to learn how to be good at spray painting, and also want to sand blast, but have not yet upgraded my air compressor. You are giving me ideas (if I can charm my wife). I am certain that you are enjoying your new tool; it's a WORKHORSE!
Posted by: Langing Jul 6, 2014 - 9:07 PM
I have certainly learned a lot about paint and how it's quality effects the job, I certainly won't be buying cheap paint anytime soon.
I can't wait to see the final product either
although I will be scared to drive it, I might just leave it on the driveway and look at it, at least it will be safe from car park dents and other foolish road users.I imagine it is going to be similar to the "Mona Lisa." Hope I won't need to pay to get in to see it!
Posted by: Nial Jul 7, 2014 - 12:28 AM
Thanks I am a firm believer that you should never let anything stand in your way that isn't family.
The air compressor I got is this one
http://www.machinemart.co.uk/shop/product/details/clarke-raider105-v-twin-compressor
It's a twin cylinder 14.5cfm with a 100 litre tank. I am having one problem with the set up as it stands, and that's there is too much water in the system, I need another filter, in fact I think I am going to need more than one, I am going to add another three, two more filters in line with the one I already have, then another mini filter just before the gun. If you are going to spray paint from what I have gathered so far, getting the water out the compressed air is going to be the hardest obstacle to overcome, eventually and before I do anymore spray painting, I will have the compressor, a good few meters of airline, then two filters, then another good few meters of airline, then another filter, then feed that to the main airline, then the mini filter at the paint gun, hopefully that will do the trick.
Oh and buy some anti vibration feet for the compressor, I was surprised how noisey the thing is. I sware if it wasn't boxed in it would vibrate it's way across the garden.
Posted by: Langing Jul 11, 2014 - 9:40 AM
I am a firm believer that you should never let anything stand in your way that isn't family.The air compressor I got is this one
http://www.machinemart.co.uk/shop/product/details/clarke-raider105-v-twin-compressor
It's a twin cylinder 14.5cfm with a 100 litre tank. I am having one problem with the set up as it stands, and that's there is too much water in the system, I need another filter, in fact I think I am going to need more than one, I am going to add another three, two more filters in line with the one I already have, then another mini filter just before the gun. If you are going to spray paint from what I have gathered so far, getting the water out the compressed air is going to be the hardest obstacle to overcome, eventually and before I do anymore spray painting, I will have the compressor, a good few meters of airline, then two filters, then another good few meters of airline, then another filter, then feed that to the main airline, then the mini filter at the paint gun, hopefully that will do the trick.
Oh and buy some anti vibration feet for the compressor, I was surprised how noisey the thing is. I sware if it wasn't boxed in it would vibrate it's way across the garden.
https://www.youtube.com/watch?v=A8JwN0l-_pA
Does anybody make a water filter that removes water from the compressor input air, so it never gets into the tank in the first place? Maybe that is as lame a thought as trying to cool down my garage using house A/C by opening the door to the garage?
I'm always bad about emptying water from the compressor tank. I should do it regularly, but leave it in the tank too long; have to reduce the pressure to zero first. But, when the air gets compressed, I wonder if it might be that the pressure separates the air and water, which if true means that water is normally sitting on the bottom of tank? Then when that air is expanded through your air lines going to your tool, that's when some of the water turns back into water vapor? I'm not at all sure of the physics involved, but I'm trying to imagine a better way to handle moisture in compressed air than how we normally do it, mainly because I think it could be shortening the life of the tank.
When I empty my tank, I exhaust the compressed air, then bleed with a screw on the bottom of the tank. I then jiggle the tank and raise and lower the whole thing several times, until water no longer comes through the valve. So, at least when the air inside the tank has returned to ambient, whatever excess water vapor that has been condensed into water during long term operation is on the bottom. What you are doing with your in-line filters is eliminating excess moisture than what collects in the tank, so the total amount of water entering the tank would be the sum of the two filters (tank and in-line).
Maybe you can correct my thinking.
Posted by: Nial Jul 11, 2014 - 12:23 PM
Ok I will try......The vapour in the tank is caused by the compression process, it's basically removing humidity from the air, a combination of heat and pressure. There's physics behind it but I just looked it up there isn't much you can do to stop this apart from maybe move to Arizona?
I empty the tank every time I use it, I leave it with about 3 bar inside then I open the tank drain, this helps blast out the water from the tank, I also open the valve on the water traps, this blasts air through them helping to dry them out, I leave the valves open until next time I use them so any liquid remaining can evaporate naturally. Seems to do the job, the best thing I got was the mini filter attached to the gun, this removes loads of water, I got a cheap one from amazon which was plastic, the plastic is starting to crack already so I will get a metal one to replace it. Well worth the investment.
Posted by: Langing Jul 11, 2014 - 5:28 PM
How about that water separator in the YouTube video?
https://www.youtube.com/watch?v=A8JwN0l-_pA
That seemed to remove water pretty efficiently.
Posted by: Nial Jul 12, 2014 - 1:40 AM
I have a similar one fitted, seems to do the job. I might get another one just to make sure.
The trouble with stuff like this is, unless you are going to do a lot of spraying, is it worth all the expenditure? It's kind of one of those dilemmas, you need to remove the moisture to do any spraying really as you could end up with micro blisters in the paint or whatever you call them. But if you only spray one or two things it's expensive!
One thing I am going to do is have another line for air tools as you need to include a lubricator (adds oil into the air) to help preserve the air tools insides but the last thing you want in a paint line is oil. It's a good job the lines aren't expensive.
Posted by: Nial Jul 20, 2014 - 8:25 AM
A bit of an interlude from working on the car all the time.......a mornings driving through the forrest in an Evo.
http://smg.photobucket.com/user/nialusa/media/40th%20Birthday/P1010682_zps058d8f83.jpg.html
Although you can't see, I am driving, great fun, can't wait to do it again.
Posted by: Langing Jul 20, 2014 - 7:09 PM
The trouble with stuff like this is, unless you are going to do a lot of spraying, is it worth all the expenditure? It's kind of one of those dilemmas, you need to remove the moisture to do any spraying really as you could end up with micro blisters in the paint or whatever you call them. But if you only spray one or two things it's expensive!
One thing I am going to do is have another line for air tools as you need to include a lubricator (adds oil into the air) to help preserve the air tools insides but the last thing you want in a paint line is oil. It's a good job the lines aren't expensive.
A good friend uses air tools all the time doing handy-man work. He puts several drops of special air tool oil in the air inlet of the tool both before and after working with any of his air tools, to prevent rusting of the tool's insides. He's never had a problem that could be traced to moisture. I had been putting oil in before working w ith my tools, but will change to his before/after technique. I really don't know if this is better or worse than running oil continuously.
Posted by: Nial Jul 22, 2014 - 9:50 AM
Probably as good as anything! It's just that I have a combination of forgetfulness and laziness so would probably not do it, having an inbuilt auto oiler at least helps protect the tools from my neglect if nothing else
This is the last and final time I have a go at making a hybrid front bumper, mkIII, hopefully this will live up to my expectations before I use up the worlds supply of excess gt4 & late spec 6gem front bumpers
http://smg.photobucket.com/user/nialusa/media/Celica%20Rebuild/imagejpg1_zpsacb0ca45.jpg.html
Posted by: HaysoosKreesto Jul 27, 2014 - 2:01 PM
I literally read every word of this thread and it is absolutely unbelievable!
You now have a fan of your INCREDIBLE work across the pond, or another one I should say
Posted by: Nial Jul 27, 2014 - 2:22 PM
Thanks it is always nice to know that someone enjoys my thread and hard work Would love to be able to bring the GT4 to the US for a road trip, that would be the ultimate:)
Looks like I will be having to take a little step backward, after giving it some thought I need to do a bit of custom fabrication on the shell, a bit of additional support bars on the front to accommodate oil coolers for the gearbox and power steering, I also need to try to design a new radiator and FMIC set up that will get rid of the stupidly long set up that usually gets used on GT4s. Of course custom fabrication means that the painting will have to stop until the fab is complete so I can repaint everything at once.......gotta stop that rust from ever coming back
Trying to design a suitable FMIC has been a nightmare, spent an hour just staring at the from of the car today trying to come up with a solution, those designers at Toyota sure didn't have a FMIC in mind when they designed the structure of the GT4.
Posted by: Langing Jul 27, 2014 - 3:18 PM
it is always nice to know that someone enjoys my thread and hard work Would love to be able to bring the GT4 to the US for a road trip, that would be the ultimate:)Looks like I will be having to take a little step backward, after giving it some thought I need to do a bit of custom fabrication on the shell, a bit of additional support bars on the front to accommodate oil coolers for the gearbox and power steering, I also need to try to design a new radiator and FMIC set up that will get rid of the stupidly long set up that usually gets used on GT4s. Of course custom fabrication means that the painting will have to stop until the fab is complete so I can repaint everything at once.......gotta stop that rust from ever coming back
Trying to design a suitable FMIC has been a nightmare, spent an hour just staring at the from of the car today trying to come up with a solution, those designers at Toyota sure didn't have a FMIC in mind when they designed the structure of the GT4.
On Wikipedia I found this:
"Cars such as the Subaru Impreza WRX, MINI Cooper S, Toyota Celica GT-Four, Nissan Pulsar GTI-R, Mazdaspeed3, Mazdaspeed6, and the PSA Peugeot Citroën turbo diesels, use air-to-air top mounted intercoolers (TMIC) located on top of the engine. Air is directed through the intercooler through the use of a hood scoop."
http://en.wikipedia.org/wiki/Intercooler
Posted by: Nial Jul 27, 2014 - 3:32 PM
The 185 uses what is basically a FMIC mounted on top of the engine......they are hopeless, suffer badly from heat soak and are generally not very good.
Posted by: Langing Jul 27, 2014 - 7:08 PM
ST205/185 are Toyota frame design designations for the GT-4? If so, was the 205 an improvement over the 185? Is there more room in the engine compartment of your 205? What years were they produced?
My Celica is an ST Coup (94), and my frame is AT200. That's also my frame of reference as I'm trying to imagine your predicament and I think I'm having as bad a time doing that as you in figuring out how to squeeze ten pounds of stuff into a nine pound bag, volumetrically speaking.
I'm wishing you the best of luck because I don't want this thread to stop.
Posted by: njccmd2002 Jul 27, 2014 - 7:31 PM
The difference is like the diference between the 93 celica and the 96 celica..
Posted by: Smaay Jul 27, 2014 - 11:00 PM
ST205/185 are Toyota frame design designations for the GT-4? If so, was the 205 an improvement over the 185? Is there more room in the engine compartment of your 205? What years were they produced?
My Celica is an ST Coup (94), and my frame is AT200. That's also my frame of reference as I'm trying to imagine your predicament and I think I'm having as bad a time doing that as you in figuring out how to squeeze ten pounds of stuff into a nine pound bag, volumetrically speaking.
I'm wishing you the best of luck because I don't want this thread to stop.
the ST205 is an improvement over the 185 in all aspects
Posted by: Langing Jul 28, 2014 - 6:11 AM
ST205/185 are Toyota frame design designations for the GT-4? If so, was the 205 an improvement over the 185? Is there more room in the engine compartment of your 205? What years were they produced?
My Celica is an ST Coup (94), and my frame is AT200. That's also my frame of reference as I'm trying to imagine your predicament and I think I'm having as bad a time doing that as you in figuring out how to squeeze ten pounds of stuff into a nine pound bag, volumetrically speaking.
I'm wishing you the best of luck because I don't want this thread to stop.
the ST205 is an improvement over the 185 in all aspects
IYO, Will Nial have enough space?
Posted by: Nial Aug 3, 2014 - 10:34 AM
Finally got this glued together, if you want to have a go yourself, this is how I did it.
Once you have cut the two halves of the bumper and matched them up you need to start by drilling a series of holes about an inch from the join about three or four inches apart.
I then zip tied the two ends together and then started zip tying towards the middle, as I went I put the wire mesh on the back
The front
http://smg.photobucket.com/user/nialusa/media/Celica%20Rebuild/imagejpg1_zps8538f0b7.jpg.html
The back before the glue is applied
http://smg.photobucket.com/user/nialusa/media/Celica%20Rebuild/imagejpg4_zpsb8a233a9.jpg.html
And with the glue applied and pressed into all the mesh and holes
http://smg.photobucket.com/user/nialusa/media/Celica%20Rebuild/imagejpg5_zpsd0b93e42.jpg.html
http://smg.photobucket.com/user/nialusa/media/Celica%20Rebuild/imagejpg6_zps0fccb344.jpg.html
There is more to do but I need to let the glue fully cure overnight at least. I will then add a bit more glue into the bits I missed and fill in any holes in the join.
A bit of scratch fabrication today, it's still a bit rough and needs finishing off, but it's a...........well, can you guess what it is :confuse: :confuse: :confuse:
http://smg.photobucket.com/user/nialusa/media/Celica%20Rebuild/imagejpg2_zpsbe46ae00.jpg.html
Posted by: JoshuaM Aug 3, 2014 - 11:02 AM
http://smg.photobucket.com/user/nialusa/media/Celica%20Rebuild/imagejpg2_zpsbe46ae00.jpg.html
Short answer... no
My guesses would be cooling duct for something, but very narrow, or replacement support for something with room to run small pipes around.Nice work on the bumper too, hopefully it finishes up well for you this time
Posted by: Nial Aug 3, 2014 - 11:24 AM
Nearly finished
http://smg.photobucket.com/user/nialusa/media/Celica%20Rebuild/imagejpg1_zps89b93393.jpg.html
Posted by: Nial Aug 8, 2014 - 11:16 AM
http://smg.photobucket.com/user/nialusa/media/Celica%20Rebuild/imagejpg2_zpsbe46ae00.jpg.html
Short answer... no
My guesses would be cooling duct for something, but very narrow, or replacement support for something with room to run small pipes around.Nice work on the bumper too, hopefully it finishes up well for you this time
A support is a pretty spot on guess, it's going to go right behind the bonnet catch, mounted vertically it will hold two oil coolers
http://smg.photobucket.com/user/nialusa/media/Celica%20Rebuild/imagejpg2_zpsbbafafa3.jpg.html
Started putting stuff together now, just a question....what grade of threadlock to use on the rear diff bolts.....remembering that the rear diff plate is alloy
Posted by: richee3 Aug 8, 2014 - 12:06 PM
There's nothing in this thread that falls short of excellent. When it's finished, this will be by far one of the cleanest T20's in the world.
Posted by: enderswift Aug 8, 2014 - 1:28 PM
X2
Posted by: Smaay Aug 9, 2014 - 12:38 AM
loctite blue will work just fine
Posted by: mandrek Aug 9, 2014 - 2:27 PM
WOW!!! looking great!!!!
and great job on that front end!!! i just got all of my parts together to do the EXACT same setup on the front end (rail vents and all) though i suspect that my grafting will be a bit more dificult as i just got a cut out with the bump-up and the vents... but OH DAMN!!!! awesome!!!
Posted by: Nial Aug 11, 2014 - 11:56 AM
Hub tastic
http://smg.photobucket.com/user/nialusa/media/Celica%20Rebuild/imagejpg2_zpsf17776c4.jpg.html
Brand new backing plates that I have painted to give extra protection just need to get the bearings pressed in now then I can start putting the suspension back together :clap:
Posted by: Nial Aug 29, 2014 - 8:16 AM
More from allenchrome electroplating, sadly the one part from Toyota, the drive shaft damper, cost more than double the cost of the elctroplating :? Oh well, thems the breaks.
http://smg.photobucket.com/user/nialusa/media/imagejpg1_zps26764027.jpg.html
Posted by: Batman722 Aug 29, 2014 - 8:31 AM
You should have made your own dampener
Things look great !
Posted by: enderswift Aug 29, 2014 - 9:41 AM
Pressing in bearings and hubs without damaging the dust shields is an enormous pita.
Posted by: Nial Aug 29, 2014 - 10:33 AM
Things look great !
Thanks
I should have, but to be honest it's a lot easier to just buy one. Too busy fabricating annoying little parts at the moment to hold on various coolers and the FMIC which I hate doing.
Yes you are probably right, which is why I am going to get someone else to do it
Posted by: Nial Sep 2, 2014 - 1:42 PM
A bit of minor fabrication, the centre beam copying of treadles car for mounting oil coolers, the two (yet to be welded) fron supports for the FMIC, I hope they are long enough as I had to guess the size and position.
http://smg.photobucket.com/user/nialusa/media/imagejpg1_zps20ac4254.jpg.html
http://smg.photobucket.com/user/nialusa/media/imagejpg2_zps63501452.jpg.html
Posted by: Nial Sep 5, 2014 - 10:57 AM
This has to be a first.......Can't decide if I like it or not, a GT4 letterbox vent on the back bumper.
:clap:
http://smg.photobucket.com/user/nialusa/media/imagejpg1_zpsd630577a.jpg.html
Posted by: kurt95gt Sep 5, 2014 - 1:14 PM
This build is insane
Love every bit of it!
Posted by: Nial Sep 5, 2014 - 1:19 PM
Cheers Kurt every step is a step closer to getting it finished.
Ordered paint, undercoat and stone guard yesterday to get the colour put on the bottom so I can start putting things together. Also ordered a deatschworks DW300 fuel pump, that should cover all fuel needs although it was more difficult finding one in the UK than I thought, the only Deatschworks pump I could find in the UK was from an Evo 8 so I will have to make it fit.....shouldn't be a problem though.
Posted by: Batman722 Sep 5, 2014 - 3:56 PM
The vent seems to be in the wrong bumper
Seems a bit pointless but with everything else you have done you're allowed
Posted by: Nial Sep 5, 2014 - 5:09 PM
Thanks
Oh it is pure pointlessness, I wanted to see what it would look like, break up the back bumper a little bit, nothing beyond aesthetics.
Posted by: Tigawoods Sep 5, 2014 - 5:20 PM
it could reduce drag! but you have a big ol gas tank right there so I doubt much air gets there haha
i cant wait to see it on!
Posted by: Nial Sep 8, 2014 - 11:59 AM
Guess what I will be learning to do next.........
http://smg.photobucket.com/user/nialusa/media/Celica%20Rebuild/imagejpg1_zps87f6a5af.jpg.html
Posted by: Langing Sep 8, 2014 - 12:50 PM
:clap:
http://smg.photobucket.com/user/nialusa/media/imagejpg1_zpsd630577a.jpg.html
All of a sudden. . . voila. . . it appeared! No one but you knows how to do that. I guess you will keep it secret so you will have the only one in existence?
Posted by: Nial Sep 8, 2014 - 1:16 PM
That would be nice having the only one, but I don't mind sharing after all it's what forum are all about
I have to figure out a way to attach the vent to the bumper first and at the moment it's only held on with sticky tape, but I bet it involves glue, possibly some zip ties too unless I can come up with a better way....it's kinda on the back burner for a while now as I have to sort out the paint on the underside so I can start putting stuff back together.
Posted by: Langing Sep 8, 2014 - 1:24 PM
Harbor Freight sells a toolkit that permits one to hand press wheel bearings out/in, so you don't have to buy a 20-ton stand up press. It takes a good deal of hard manual work, but is doable. Here is a picture of the toolkit:
http://s1273.photobucket.com/user/GuiermoVilla/media/1994%20Toyota%20Celica%20ST/Pressing%20Wheel%20Bearings/IMG_0998_zps25d26db7.jpg.html
The tool description said it was for front wheel bearings, and should allow you to replace wheel bearings without having to remove the steering knuckle. I had taken my steering knuckles off so used my vice to hold the knuckle in place while pressing the bearing out, as shown:
http://s1273.photobucket.com/user/GuiermoVilla/media/1994%20Toyota%20Celica%20ST/Pressing%20Wheel%20Bearings/IMG_0980_zps86146033.jpg.html
And, as can be seen in the following photo, since the tool is entirely in line with the axis of the bore, it could be used without having to remove the dust shield.
http://s1273.photobucket.com/user/GuiermoVilla/media/1994%20Toyota%20Celica%20ST/Pressing%20Wheel%20Bearings/IMG_0982_zps02ec754b.jpg.html
One might still consider this method to be an enormous PITA, however it would not damage the dust shield if you choose not to remove it first. My experience tells me this tool is quite good for someone who is on an economy budget, cannot afford a stand up press or -- like Nial and myself -- doesn't have the space, and doesn't mind using muscle power (along with brain power; you gotta get to know the tool and how to best use it). Instead of using a hydraulic press, you are turning a large screw!
Posted by: Nial Sep 8, 2014 - 1:33 PM
Hmmm that looks interesting, would be good to be able to do it myself so with any damage I can only blame myself, or take it to the local garage and get them to do it and take a risk!!!
Thanks for the advice,
Posted by: Langing Sep 8, 2014 - 5:33 PM
after all it's what forum are all about I have to figure out a way to attach the vent to the bumper first and at the moment it's only held on with sticky tape, but I bet it involves glue, possibly some zip ties too unless I can come up with a better way....it's kinda on the back burner for a while now as I have to sort out the paint on the underside so I can start putting stuff back together.
Yeah, I saw that you were preparing to finish the underside. But, then I thought about something you had done to its underside long back, and then had the sand blaster blow it all away. I guess this time you know how good it is going to turn out before you start? Or did I miss-remember what you had done previously?
I know you are anxious to get the re-assembly process underway so you can actually see it beginning to look like a fully fledged car again. I think all the wait and the work has been well worth it, cause it is looking really good at this point.
Posted by: enderswift Sep 8, 2014 - 9:48 PM
That press kit indeed looks perfect for the job
Posted by: Nial Sep 9, 2014 - 12:17 AM
after all it's what forum are all about I have to figure out a way to attach the vent to the bumper first and at the moment it's only held on with sticky tape, but I bet it involves glue, possibly some zip ties too unless I can come up with a better way....it's kinda on the back burner for a while now as I have to sort out the paint on the underside so I can start putting stuff back together.
Yeah, I saw that you were preparing to finish the underside. But, then I thought about something you had done to its underside long back, and then had the sand blaster blow it all away. I guess this time you know how good it is going to turn out before you start? Or did I miss-remember what you had done previously?
I know you are anxious to get the re-assembly process underway so you can actually see it beginning to look like a fully fledged car again. I think all the wait and the work has been well worth it, cause it is looking really good at this point.
At the moment the bottom is just painted with a tough primer followed by a 2 pack epoxy, next I need the stone guard which I originally wasn't going to use, but nearly everyone has recommended that I do, that will be followed by the colour and finally the lacquer. That should (fingers crossed) be enough to protect it for the rest of its days.
Posted by: Langing Sep 9, 2014 - 9:27 AM
after all it's what forum are all about I have to figure out a way to attach the vent to the bumper first and at the moment it's only held on with sticky tape, but I bet it involves glue, possibly some zip ties too unless I can come up with a better way....it's kinda on the back burner for a while now as I have to sort out the paint on the underside so I can start putting stuff back together.
Yeah, I saw that you were preparing to finish the underside. But, then I thought about something you had done to its underside long back, and then had the sand blaster blow it all away. I guess this time you know how good it is going to turn out before you start? Or did I miss-remember what you had done previously?
I know you are anxious to get the re-assembly process underway so you can actually see it beginning to look like a fully fledged car again. I think all the wait and the work has been well worth it, cause it is looking really good at this point.
At the moment the bottom is just painted with a tough primer followed by a 2 pack epoxy, next I need the stone guard which I originally wasn't going to use, but nearly everyone has recommended that I do, that will be followed by the colour and finally the lacquer. That should (fingers crossed) be enough to protect it for the rest of its days.
On the BOTTOM of your car, where no one but your closest mechanic friends will ever get to see, you will have 5 levels of undercoating:
tough primer
epoxy
stone guard
paint
lacquer
That says to me you fully intend to put this baby on the road, where it must live in a harsh environment that warrants all that protection. And all its metal parts are zinc plated! Personally, I would not be capable of demonstrating so much bravery; instead I would be thinking of encapsulating my work of art in an environmentally controlled glass viewing case so it could be appreciated on into eternity by visitors to the 'car' or 'art' museum, or so it could be truck carried from showplace to showplace.
On the other hand, since I see you mind is made up, it strikes me that you will have a tremendous advantage when some thoughtless XC#S0B opens his/her car door into the side of yours. YOU will be able to fix your paint job in short order all by yourself cause you will have had all the experience you could ever need for handling such situations.
All joking aside, Nial, there is only one way to do any job. . . the right way. And, your work always meets that criterion, so, you are an inspiration to all who read this thread. Can't wait to see the end product; it's getting close.
Posted by: Nial Sep 9, 2014 - 11:18 AM
Thanks very much to be honest I knew this was going to be a big job, didn't realise quite how much interest it would spark, I must admit I thought very few would be interested as it's slow and not very exciting work, I thought you would all be bored by now.
Some more goodies turned up today.
A complete superstrut system which I must say is F'in expensive, I hope never to have to buy all this lot in one go ever again. I hate saying goodbye to £1300 ($2095) at once. Less free cash this month
http://smg.photobucket.com/user/nialusa/media/imagejpg2_zps7797763e.jpg.html
Also this which should more than handle my fuelling needs
http://smg.photobucket.com/user/nialusa/media/imagejpg3_zps7959f3d9.jpg.html
Awaiting more tomorrow, hopefully some steel tube for some more fabrication, a special stone guard paint gun so I can try and apply some of that stuff, oh and some plastic sheet so I can burry the bodies....err err I mean protect the car when spraying it.
Posted by: Nial Sep 10, 2014 - 4:46 PM
Well, after a lot of research and long hours of looking, I have finally found an exhaust for my project.
http://m.youtube.com/watch?v=WpRbqLnMoiw
Posted by: HaysoosKreesto Sep 11, 2014 - 10:08 AM
http://m.youtube.com/watch?v=WpRbqLnMoiw
If I actually saw someone on the road with that, I'd probably follow them for a while and laugh.
Posted by: Nial Sep 14, 2014 - 7:32 AM
Well today has been a turning point, firstly, it's nice painting brand new things, the susperstrut parts have been given two coats of POR15 to help protect them, they are now nice and shiny
I have also been getting to grips with my new spray gun, top feed guns are sooooo much better, hardly any waste at all, the Max Meyer paint is a pleasure to use, the two pack filler primer has gone on great, the stone guard has gone on, although I need a couple more litres to finish it to the standard I want., not the ultra smooth finish I was wanting. But I am happy knowing it has the added protection, started spraying the inside and the engine bay, will finish underneithe once the extra stone guard turns up....the. It's onto colour and putting stuff back on, if I get the interior, underside and engine bay done I can start putting it all back together, get the wiring done, interior fitted, suspension text on, tank refitted, brakes etc all sorted out, that leaves just the engine and exterior to do which will be up to someone else as I will get pros to do those parts.
Bearing press should turn up Wednesday so I can get the wheels on, just need to be quick so I can get this bit of painting done before the weather turns and it's too cold to paint........it's going to be a long winter if I don't do it in time
Posted by: Nial Sep 14, 2014 - 12:37 PM
Not really much to show, but it keeps record of my progress.
Under the front arches, nice and thick stone guard, but not too thick
http://smg.photobucket.com/user/nialusa/media/Celica%20Rebuild/imagejpg4_zps9d041038.jpg.html
The engine bay nicely primered,
http://smg.photobucket.com/user/nialusa/media/Celica%20Rebuild/imagejpg1_zps06174f44.jpg.html
you can just make out the line where the stone guard stops.
http://smg.photobucket.com/user/nialusa/media/Celica%20Rebuild/imagejpg2_zpsbd9b7292.jpg.html
The bulkhead primered, but needs more work to get it right, and about a million threaded holes need the threads cleaning too, which is going to be a fun job one day.
http://smg.photobucket.com/user/nialusa/media/Celica%20Rebuild/imagejpg3_zps4ee72d38.jpg.html
Posted by: enderswift Sep 14, 2014 - 2:57 PM
A part of me wants you to throw this thing into the ocean for a year. Just to see how rust free it is when pulled out again lol
Posted by: Nial Sep 16, 2014 - 2:56 PM
Guess what tonight's job is
http://smg.photobucket.com/user/nialusa/media/Celica%20Rebuild/imagejpg1_zps65b6f8a7.jpg.html
And done...........
http://smg.photobucket.com/user/nialusa/media/imagejpg1_zps12b7014d.jpg.html
Posted by: radioinactive Sep 18, 2014 - 1:19 AM
1st post here on the forums and id like to say that u sir, are a boss. thank you
Posted by: Nial Sep 21, 2014 - 10:58 AM
Thanks
Some colour at last
http://smg.photobucket.com/user/nialusa/media/Celica%20Rebuild/imagejpg2_zps4430773c.jpg.html
http://smg.photobucket.com/user/nialusa/media/Celica%20Rebuild/imagejpg3_zps0de3793c.jpg.html
http://smg.photobucket.com/user/nialusa/media/Celica%20Rebuild/imagejpg4_zps7a6460c4.jpg.html
http://smg.photobucket.com/user/nialusa/media/Celica%20Rebuild/imagejpg1_zpsa0a0707a.jpg.html
Only one coat, needs a couple more to get a nice even finish. A bit more work for the engine bay before I spray that.
Posted by: 4-eyed-freek Sep 21, 2014 - 2:18 PM
fantastic work!
Posted by: Nial Sep 22, 2014 - 6:34 AM
Thanks
It could be better, but I am learning as I go. This paint spraying lark is fun though, if I ever get sick of my current job its something I wouldnt mind doing
Posted by: Langing Sep 22, 2014 - 9:09 AM
It could be better, but I am learning as I go. This paint spraying lark is fun though, if I ever get sick of my current job its something I wouldnt mind doing
Hi Nial, you do seem to be making giant leaps at this point, and it looks fantastic, considering everything you've been through!
I'm wanting to know more about spraying paint as it's something I have never done, and won't until I get the new compressor. Since you are finding it one of the better new things you have learned on this project, I'm wondering if you have any time to explain what you've learned about spraying a bit more deeply, to talk about and show your tooling, what kind of respirator you use, how you prevent overspray getting everywhere, etc. And tell me how well your air compressor's water filtering system has been working.
Then there's the enclosure you built around your compressor to keep the neighbors under control. How is it working? Any advice?
Don't need to respond now, since you are hard at it, but when you get a little down time. TX. I am amazed at your tenacity!!
Posted by: Nial Sep 22, 2014 - 11:38 AM
It could be better, but I am learning as I go. This paint spraying lark is fun though, if I ever get sick of my current job its something I wouldnt mind doing
Hi Nial, you do seem to be making giant leaps at this point, and it looks fantastic, considering everything you've been through!
I'm wanting to know more about spraying paint as it's something I have never done, and won't until I get the new compressor. Since you are finding it one of the better new things you have learned on this project, I'm wondering if you have any time to explain what you've learned about spraying a bit more deeply, to talk about and show your tooling, what kind of respirator you use, how you prevent overspray getting everywhere, etc. And tell me how well your air compressor's water filtering system has been working.
Then there's the enclosure you built around your compressor to keep the neighbors under control. How is it working? Any advice?
Don't need to respond now, since you are hard at it, but when you get a little down time. TX. I am amazed at your tenacity!!
Thanks very much
I will try and write something up tonight, it may not be technically correct from a professional spray painters perspective, but I will put down what I have learned so far and post pictures up of my system etc.......oh that reminds me, I am supposed to measure a ball joint for someone. I will just service the Civic and be right back
I will start a new thread for it so keep an eye out
Posted by: Nial Oct 3, 2014 - 12:23 PM
Today is a good day.
Definitely a great day.
At last I have put colour to car and I must say it looks f'in brilliant, I so love the colour. It goes on very well, is very forgiving and is the perfect colour, love it, very happy bunny today. Well chuffed.......and it's only the engine bay, imagine how happy I cam going to be when I paint the topside I will be smiling so much the top of my head will fall off
http://smg.photobucket.com/user/nialusa/media/imagejpg1_zpsf6b946f5.jpg.html
Only the first layer, a small amount of flating to do, then more colour.
Posted by: Langing Oct 3, 2014 - 12:53 PM
Nial,
It is freaking scary how beautiful it is beginning to look!!! I know you say it's just the engine compartment, but WOW! Whatever you are doing to apply that paint, whatever paint it is, is like raising a Phoenix from ashes. And, it seems to me, the farther along you get, the more you are getting done at each step. Do you also feel that? I mean, if you can answer without your head popping off.
Posted by: Nial Oct 3, 2014 - 12:58 PM
Thanks
I think it does seem like that it is jumping in big steps, but I think it's because as I have done loads of prep so it's all finally coming together.......at last
Ooooops, there goes the top of my head
Posted by: enderswift Oct 3, 2014 - 4:59 PM
That is one sexy engine bay. Can't wait to see you attach all the zinc-plated shiny bits to this thing!
Posted by: Nial Oct 11, 2014 - 3:13 AM
http://smg.photobucket.com/user/nialusa/media/Celica%20Rebuild/imagejpg5_zps41d4288f.jpg.html
Well that's the rear sub frame in....not easy to lift that in on your own.....sore back today.
Posted by: njccmd2002 Oct 11, 2014 - 5:50 AM
i can eat off of that. that is amazing. beautiful. all the way down to the bolts. Unfortunately that could get expensive here. lol.... electroplating bolt here can cost an arm.
Posted by: enderswift Oct 11, 2014 - 6:40 AM
That looks amazing!
get a better camera!
Posted by: Nial Oct 11, 2014 - 10:03 AM
get a better camera!
Yes sir, will do. It's just taken with my iPad, the light isn't very good hence the grainy shot. I will endeavour to do better next time.
Posted by: Nial Oct 11, 2014 - 3:21 PM
A small bit of progress today.
Fitting the front coilovers
http://smg.photobucket.com/user/nialusa/media/Celica%20Rebuild/P1010839_zps325269fc.jpg.html
Took a bit of fettling but its all sorted now
http://smg.photobucket.com/user/nialusa/media/Celica%20Rebuild/P1010849_zps030bc291.jpg.html
rear coilovers fitted
http://smg.photobucket.com/user/nialusa/media/Celica%20Rebuild/P1010842_zpsb7a8c4f4.jpg.html
http://smg.photobucket.com/user/nialusa/media/Celica%20Rebuild/P1010843_zps9e6a99d5.jpg.html
as you can see, i dont have much space to work in...need to build myself a bigger garage.
http://smg.photobucket.com/user/nialusa/media/Celica%20Rebuild/P1010845_zps9a7faa48.jpg.html
Posted by: Edser Oct 11, 2014 - 4:39 PM
Wow!!! That looks awesome!
Posted by: enderswift Oct 11, 2014 - 5:39 PM
amazing
Posted by: Langing Oct 12, 2014 - 9:10 AM
What is the order of assembly? You are starting with suspension. What's next? Wnen do drop in the engine?
Posted by: Nial Oct 12, 2014 - 1:23 PM
The engine is about a year or so away. interior next along with electrics and braking system.
Well, its on its own wheel at last (the other three i had to borrow )
Its alot lower than i remember it :lol:
http://smg.photobucket.com/user/nialusa/media/Celica%20Rebuild/P1010852_zps7c76e8c2.jpg.html
its alos alot easier to move around
http://smg.photobucket.com/user/nialusa/media/Celica%20Rebuild/P1010855_zpsdaa29de4.jpg.html
interior next....oh joy, not looking forward to the next lot of work at all, maybe i will take a break for a while
Posted by: Nial Oct 19, 2014 - 11:48 AM
A whole lot of fun today, i still hate fibreglassing things. Whos daft idea was it to install a roll cage???? :lol: :lol: the top half of the plastics that frames the window will get flocked, the lower half, after a lot more work will get painted a high gloss black, along with the front door lower sections and the bottom half of the dash, dash inserts will get painted a silver.
http://smg.photobucket.com/user/nialusa/media/Celica%20Rebuild/P1010862_zps79717ab2.jpg.html
http://smg.photobucket.com/user/nialusa/media/Celica%20Rebuild/P1010860_zpsc2342d37.jpg.html
Posted by: njccmd2002 Oct 19, 2014 - 7:48 PM
wow, this is dedication to a car.
Posted by: Langing Oct 20, 2014 - 12:01 AM
http://smg.photobucket.com/user/nialusa/media/Celica%20Rebuild/P1010862_zps79717ab2.jpg.html
http://smg.photobucket.com/user/nialusa/media/Celica%20Rebuild/P1010860_zpsc2342d37.jpg.html
Without the 'roll cage' the initial excitement might not have carried you through. OMG, to see her up on tires was a magic moment, at least for me. I hope you are getting lots of photos of WIP to pass along for us 'learners' to emulate.
Everything you post is so appreciated!
Posted by: Bitter Oct 20, 2014 - 7:46 AM
But will it pass inspection when you're done?
Posted by: Nial Oct 20, 2014 - 8:01 AM
What inspection?
Posted by: 4-eyed-freek Oct 20, 2014 - 8:41 AM
he is most likely referring to the MOT
Posted by: Nial Oct 20, 2014 - 8:47 AM
It`ll pass an MOT no worries. The only time you need anything more is if you make a new chassis from scratch.
Posted by: luka Oct 20, 2014 - 10:26 AM
I wish the rules were like that where I live.
If we change the suspension, we have to get an alignment to show it's still within OEM range and pass a more in-depth inspection.
Welding on the frame is considered a straight up fail.
Posted by: Nial Oct 20, 2014 - 12:49 PM
Luckily we can do more or less what we want to, any suspension, any engine, more or less any modification you want as long as it isn't dangerous and as long as the engine passes emissions then your good to go, a few silly things would mean a fail such as having a sticker on the front screen that is within the wiper arch, or non OEM tinted windows on the front. Exhausts can't be ear bleedingly loud, some garages are stricter than others but interpretation of the rules is pretty open.
Posted by: Nial Oct 20, 2014 - 2:45 PM
A small bit of progress tonight.
Inspired by someone on here I figured its was a good idea to remove the casting marks from the rear lights.
You can see the casting marks.....the dam things always get gunked up with wax polish.
http://smg.photobucket.com/user/nialusa/media/Celica%20Rebuild/P1010865_zpsba9433df.jpg.html
after a rub down with 600 grit wet n dry.
http://smg.photobucket.com/user/nialusa/media/Celica%20Rebuild/P1010866_zps93aae520.jpg.html
Test fitted to the car along with the rear bumper to check its new duct clears the crash bar
http://smg.photobucket.com/user/nialusa/media/Celica%20Rebuild/P1010868_zps9b4b10c6.jpg.html
Posted by: enderswift Oct 20, 2014 - 6:56 PM
crazy attention to detail
Posted by: DST94 Oct 21, 2014 - 8:12 PM
I love you. I'm just saying.
Nothing but respect for your build sir.
Posted by: Nial Oct 22, 2014 - 12:32 AM
thanks. I always said you can feel the love on 6gc
Off to Toyota today to order some new brake hard lines, and a few other minor bits n bobs. Not looking forward to it as they will inevitably make purchasing parts as hard as possible.
Deliveries of paint and filler didn't come yesterday so nothing done last night on the interior. I think the next few weeks will be spent just sanding and filling and sanding prepping for a humongous paint day when I will paint the interior plastics and the interior of the shell. But as the weather is getting cold that might have to wait.
Posted by: BonzaiCelica Oct 22, 2014 - 3:17 AM
casting marks what? casting marks who?
Posted by: Edser Oct 22, 2014 - 3:05 PM
Inspired by someone on here I figured its was a good idea to remove the casting marks from the rear lights.
Yeah I did that too, and they really polish up nicely. No more ugly numbers! I'm unsure of the legalities but meh. It looks great!
Posted by: luka Oct 22, 2014 - 5:05 PM
At least in the USA, the housing needs to have a DOT stamp to be "legal"
I'm not even sure the JDM tail lights even have that stamp.
Posted by: Nial Oct 23, 2014 - 12:14 AM
No they dont, the only marks on these were "STANLEY" and RPT 826 or something like that
I don't know who Stanley is but I wish he'd stop it.
Ordered new brake lines, and master cylinder overhaul kit so theoretically I could start building up the braking system soon.
Also the plastic filler and plastic primer arrived and some high gloss black.
Posted by: Box Oct 23, 2014 - 12:33 AM
Stanley is an O.E. manufacturer of automotive lighting assemblies. Or they were, new cars aren't stamped like old ones.
Posted by: JoshuaM Oct 23, 2014 - 9:46 AM

I've been keeping up to date on FB, but its looking good!
Posted by: Box Oct 23, 2014 - 12:03 PM
He asked who he was, so I told him.
Posted by: Nial Oct 24, 2014 - 12:44 PM
Test fit of the brake master cylinder, complete with brand new internals, the last stage of the brake jigsaw, everything is / will be brand new apart from the callipers and the master cylinder body.
I wonder how many leaks I will have first go?
http://smg.photobucket.com/user/nialusa/media/Celica%20Rebuild/P1010870_zpsb9bf2c78.jpg.html
Posted by: enderswift Oct 24, 2014 - 5:46 PM
hopefully none considering all the work you put into the paint!
Posted by: GT-FOURpl Oct 25, 2014 - 8:48 AM
I've just saw this topic and can't say a word
I also made a ST205 rebuild, but yours is just pure porn!!! Nice job!
Posted by: Nial Oct 25, 2014 - 12:21 PM
I also made a ST205 rebuild, but yours is just pure porn!!! Nice job!
Thanks, but your builds were one of the major inspirations that made me start this in the first place
I hope mine turns out as nice as your two.
Posted by: Nial Nov 1, 2014 - 12:07 PM
A simple update today, other things going on too but another win for Bilt hamber Deox C.
The steering column was rusty, dirty and complicated, it also dosnt break down too easily so I thought bugger it, made a bath of deox C up, removed the electrical bits and left it submersed overnight. well today without doing anything else other than dry it with compressed air and a squirt or two with WD40. Came out amazingly well.
http://smg.photobucket.com/user/nialusa/media/Celica%20Rebuild/P1010872_zps3164a85c.jpg.html
http://smg.photobucket.com/user/nialusa/media/Celica%20Rebuild/P1010873_zpsfdcd76b9.jpg.html
Not a very exciting update, sorry.
Posted by: Batman722 Nov 1, 2014 - 2:28 PM
got a before pic ?
Posted by: Nial Nov 1, 2014 - 5:09 PM
No, unfortunately not, imagine the same picture, just more brown at some point the steering column got wet, probably when I was storing it in a shed and a lot of it had got rusty. I was dreading having to restore it, I was expecting to spend a lot of time with various size wire brushes.
Posted by: Langing Nov 2, 2014 - 7:09 AM
The steering column was rusty, dirty and complicated, it also dosnt break down too easily so I thought bugger it, made a bath of deox C up, removed the electrical bits and left it submersed overnight. well today without doing anything else other than dry it with compressed air and a squirt or two with WD40. Came out amazingly well.
http://smg.photobucket.com/user/nialusa/media/Celica%20Rebuild/P1010872_zps3164a85c.jpg.html
http://smg.photobucket.com/user/nialusa/media/Celica%20Rebuild/P1010873_zpsfdcd76b9.jpg.html
Not a very exciting update, sorry.
Actually, I appreciate seeing the example of how Deox C works on rust. To me it's the small thimgs and techniques that help the most. It's great to watch your progress, but I want to know 'how' you are doing things, like the painting, etc. MORE, not less! TX, Nial, for your posts, however insignificant you may feel they are.
Posted by: Langing Nov 2, 2014 - 7:16 AM
Didn't strike me what you were saying first time round. Brake fluid ruins paint! Sure hope Nial is ready with a towel to catch any that might leak on his amazing paint job when he first adds the fluid
Posted by: Nial Nov 2, 2014 - 7:28 AM
Didn't strike me what you were saying first time round. Brake fluid ruins paint! Sure hope Nial is ready with a towel to catch any that might leak on his amazing paint job when he first adds the fluid
Towels, kitchen paper, blue roll, baby wipes, the misses best dress, you name it it will be at the ready. luckily the clear coat i am using is brake fluid resistant so at least I stand half a chance if there is a leak.
Theres no real secret to painting, its more about the paint really. luckily in the US the quality of paint is better than here in the UK which is why I am using mostly paint from the US or Europe. Next time I paint something iwill try to add more detail but I dont have much spare time at the moment, but will do what I can, or remember to do
Theres details of using the Bilt Hamber earlier in the post somewhere. Just mix it up in a bucket or trash can, submerse item in it over night or longer if needed..... job done.
Posted by: Nial Nov 20, 2014 - 5:37 PM
Things are starting to get interesting.
http://www.turbodynamics.co.uk/shop/179388-genuine-borg-warner-efr-turbo-p-4894.html
Better start saving.
Posted by: Nial Nov 25, 2014 - 8:47 AM
Future Progress can be followed on my Facebook page
https://www.facebook.com/nial.evans
Posted by: 2bcelica Dec 31, 2014 - 10:55 AM
https://www.facebook.com/nial.evans
sorry to bring this back up - but i couldn't find any updates on your facebook page. Really wanted to follow up on the process as like most this is awesome porn.
Posted by: Nial Dec 31, 2014 - 11:42 AM
That is very true. Unfortunately I am stuck at an awkward stage of the project. I can do anything more really until I have done some painting, but it's currently too cold to paint so progress has frustratingly been about zero. Any progress will be very minor until then, hence not bothering to update this thread or any other build thread across various forums. It will be about March I guess before the weather warms up enough for me to be able to break out the spray gun.
Normal service will resume once I have done something of interest......or in fact just something at all.
I have built a Lego "tumbler" if that counts?.
Posted by: 2bcelica Dec 31, 2014 - 12:02 PM
Normal service will resume once I have done something of interest......or in fact just something at all.
I have built a Lego "tumbler" if that counts?.
no worries - i just didn't want to miss anything. it's like reading a book and not having an ending to it yet. THanks for the response and good luck with everything.
Posted by: Nial Dec 31, 2014 - 12:07 PM
Thanks:) I will make sure nobody misses anything.
Posted by: Nial Dec 31, 2014 - 8:04 PM
Well, as it's now 2015 over this side of the Atlantic I would like to wish all my 6gc friends a great new year and a fantastic 2015.
Posted by: Langing Jan 4, 2015 - 7:36 AM
Hello Nial, and Happy New Year!
I am with that last fellow, waiting 'on pins and needles' for your next installment. I don't, however know how to find your facebook page. Can you reveal your fb name, or provide some other way that I can access your page, or send you a friend request? Also might like to chat with you a bit about my getting up to speed on things like welding and spray painting that are fundamental to 'following in your footsteps'.
You have my respect and best regards for the new year,
Langing (Bill)
Posted by: Langing Jan 4, 2015 - 7:41 AM
Also, Nial, you mentioned maintaining build threads on other forums. Would you care to name them? Especially if you have more documentation on the build you are documenting on this website?
Thanks,
Langing
Posted by: Nial Jan 4, 2015 - 8:54 AM
I decided to keep up two website updates, here and celica-club.co.uk. Although most stuff goes on my facebook page.
Posted by: Langing Jan 4, 2015 - 9:02 AM
Thanks, now how do I get to your fb page?
Langing
Posted by: Nial Jan 4, 2015 - 10:00 AM
Bill.......Oops, yes missing a fundamental bit of info there EH! My personal facebook page is
https://www.facebook.com/JWPepper1
Although I now have a specific build page https://www.facebook.com/groups/EONRacing/
But as 6gc is one of my favourite forums, and possibly the first forum I joined in celica ownership I will dutifully maintain the thread on here......just not much happening at the moment.
Posted by: Nial Feb 8, 2015 - 12:02 PM
Right, things are getting underway again.
Firstly I have started a new Facebook page just for the project if any of you are interested feel free to join, although I will continue to post on this thread.
https://www.facebook.com/groups/EONRacing/
I changed my name on Facebook to JW Pepper if that confuses people . (It's the Louisiana sheriff from the James Bond movies if you didn't know )
As it's still cold I am trying to find things to do. In my wisdom I decided to tackle the rocker cover and rebuild it. It was dirty , messy and painted with crap paint that didn't cope with the heat of the engine very well.
I tackled it with some chemical warfare which removed 99.9% of the paint, a bit of wire brushing should see off the rest quite nicely
http://smg.photobucket.com/user/nialusa/media/Celica%20Rebuild/imagejpg2_zpse7daf5d5.jpg.html
I have ordered some aeroquip hose adaptors etc, a one way valve and some aluminium weld on adaptors.
http://smg.photobucket.com/user/nialusa/media/Celica%20Rebuild/imagejpg3_zps7348bb2a.jpg.html
The thermostat housing will be receiving some attention too......some alloy welding to do here too with the addition of an aeroqip adaptor
Not very exciting, but its all I got at the moment......enthusiasm is returning
Posted by: enderswift Feb 8, 2015 - 5:24 PM
glad to see this thread will not be abandoned
standing by for updates!
Posted by: Langing Feb 9, 2015 - 6:21 AM
standing by for updates!
I second that emotion!
Posted by: Nial Feb 20, 2015 - 1:41 PM
So I managed to arrange a trip to the aluminium welders today, I took the rocker cover and thermostat housing to get done.
sorry for the crappy pictures, its dark, better pictures to come
The thermostat housing with the AN fitting welded onto it.
http://smg.photobucket.com/user/nialusa/media/Celica%20Rebuild/P1010917_zps30ab5bec.jpg.html
this is to allow for fitting a return pipe from a header tank as I will be fitting a sealed system to the faff.
and with an AN fitting attached
http://smg.photobucket.com/user/nialusa/media/Celica%20Rebuild/P1010918_zps8dbe4c73.jpg.html
Similar storey for the rocker cover, AN fittings welded on for pipework to a breather system of some kind....yet to be designed.
http://smg.photobucket.com/user/nialusa/media/Celica%20Rebuild/P1010919_zps52e62337.jpg.html
an with the AN fittings in place
http://smg.photobucket.com/user/nialusa/media/Celica%20Rebuild/P1010920_zpsd4be47dc.jpg.html
Posted by: Nial Mar 1, 2015 - 11:42 AM
I have been preparing some more for starting work again, built myself a new heavy duty work bench, tidied the garage ready for spraying, done some throwing out to make space. Just need to wait for things to warm up. Getting a bit bored waiting for things to happen so I have decided to buy myself a GT to play with, see how fast I can make it without adding a turbo and give me something to tinker with when not working on the faff. It might amount to nothing more than a commuter car but we will see. Found a couple of GTs worth looking at, neither perfect so might keep on looking. One project is never enough:)
Posted by: Nial Mar 5, 2015 - 5:39 PM
It looks like I will be joining the ranks of the GT owners soon, I am going to view a Celica GT at the weekend so fingers crossed it's what I am looking for.....then to begin with some minor modifications
Posted by: enderswift Mar 5, 2015 - 9:33 PM
prepare to be thoroughly disappointed by a GT
Posted by: Nial Mar 6, 2015 - 1:07 AM
Will see, I am not expecting it to be anywhere near as quick as the faff, but it has to be more inspiring than the Honda Civic that currently gets me to work each day.
I used to have a 1.6litre Corolla that was one of the most fun cars to drive, embarrassingly under powered but after playing with the suspension it could out handle most things on the road, it was great fun. I am hoping to do something similar to the GT. At the very least i can use it for measurements and some clue as to re wiring the interior.
Posted by: yellowchinaman Mar 6, 2015 - 10:20 AM
Why so? I used to own a GT (ST202) and it was great. Yeah its not as powerful as a GT four but for what it was it was brilliantly balanced and punchy.
Certainly better then the gen 7 IMO.
Posted by: Nial Mar 6, 2015 - 11:42 AM
Going to view a nice original (more or less) one tomorrow so fingers crossed.
Posted by: malpaso Mar 9, 2015 - 2:26 AM
I knew it... You are not crazy. You are 6gc hard core enthusiast.
Posted by: Nial Apr 10, 2015 - 2:30 PM
Back to the project now the weather has warmed up'
the second coat of primer.
http://smg.photobucket.com/user/nialusa/media/Celica%20Rebuild/P1010940_zpsvpl2inzu.jpg.html
http://smg.photobucket.com/user/nialusa/media/Celica%20Rebuild/P1010933_zpsv4bo3vwx.jpg.html
http://smg.photobucket.com/user/nialusa/media/Celica%20Rebuild/P1010934_zpsp3jtj05f.jpg.html
hopefully the first layer of colour tomorrow
Posted by: Langing Apr 10, 2015 - 2:56 PM
Looking very nice, Nial. Glad to see you are back in business.
Posted by: Box Apr 10, 2015 - 3:54 PM
Wooo half-cage!
Posted by: Nial Apr 13, 2015 - 3:43 PM
Got some colour put on the other day, managed to hand paint on some extra tough 2K lacquer. its not perfect but to be honest I am not that bothered, its just for protection as it will be covered by carpet etc......the engine bay is better. Some more of the 2K lacquer will arrive in the next day or so, I will then spray it onto the rest of the engine bay and finish the interior. Then i will be ready to install the brake lines, wiring and interior. Busy weeks ahead
My little garage with my cramped working space
http://smg.photobucket.com/user/nialusa/media/Celica%20Rebuild/P1010947_zpsuakzrle0.jpg.html
http://smg.photobucket.com/user/nialusa/media/Celica%20Rebuild/P1010945_zpswwfx62uc.jpg.html
the interior - front
http://smg.photobucket.com/user/nialusa/media/Celica%20Rebuild/P1010944_zpss4evj29a.jpg.html
and the back
http://smg.photobucket.com/user/nialusa/media/Celica%20Rebuild/P1010948_zpsrhb0jdyg.jpg.html
the boot...slight problems in the wheel well, but again it will be covered by sound deadening etc so as long as the rust protection is there i aint bothered.
http://smg.photobucket.com/user/nialusa/media/Celica%20Rebuild/P1010949_zpsmgnr7jyy.jpg.html
hopefully by the end of the week it will be all shiny
http://smg.photobucket.com/user/nialusa/media/Celica%20Rebuild/P1010946_zpsj4c9zu6l.jpg.html
Posted by: Langing Apr 14, 2015 - 11:14 AM
Great looking work, Nial!
Looks like 'Spring has Sprung', you are moving speedily along, and the slow, tedious stuff is behind you. I'd bet you are feeling a bit giddy at this point?
I've been watching your build for almost the duration, pulling for you when you were about ready to give up, cheering for you when you got married, moaning for you when you had to redo so much at one point. This latest series of photos shows me that you are way beyond the half-way point and are heading down the home stretch.
Here is a comment on the presentation of your build. It is for a person like me who hasn't had the experience of doing the kind of work you are doing, your pictures have the effect of going from one kind-of final state to another final state, as if by magic (the work you do between picture sets is missing). It is obvious that you have applied paint (and looks beautiful). Knowing that you have your hands full in reconstructing your vehicle, I hate to ask anything of you that imposes extra work, however, I thought I would at least broach the following question/idea.
Do you have any more information you could post, such as action videos that show how you go about applying (spraying) the paint, and could you provide detailed information (pics?) on which paints, undercoatings, etc. that you use, as well as info on the painting equipment you utilize (pics)? I remember once that you listed out the many levels of paint (coatings) that you had planned to apply and I haven't taken the time to go back and dig that out, but will if you could show or describe the products you use and what's the best way you have found to apply them, especially in such tight quarters (how the heck do you do that?). I check out YouTube whenever I have to do a task that I have never done before because people show pretty clearly, using video, how they go about doing what they do. Whether good, fair, excellent, or even poor, I often get a quick introduction/education. If it is too much to ask, or you can't stomach even thinking of doing more extraneous crap, that is OK. . . REALLY OK! It is just a thought about how you might make your build come across 'maybe' a little better than it already does, but that's a suggestion from someone who isn't in the direct line of fire.
BTW: Here is an aside: I'd hate to see this build thread slowly degenerate over time as photos get removed from whatever website they link from, like I have seen on some others whenever i have tried to check out older threads. The information is much too important to people like myself to let it be treated with such disrespect, and I hope this website will figure out a better way to maintain information into perpetuity. Maybe that should be directed to someone else. Maybe it is different now and I just haven't caught up?
All that said, I still have my hat off in your honour of the magnificent effort you have mounted! And I wish you the best going forward.
Posted by: Nial Apr 14, 2015 - 12:12 PM
Langing........Cheers pal, as ever your words of appreciation and encouragement are appreciated. I post what phots I can, "action" shots may prove difficult as I am always the one holding the camera so it's awkward to shoot myself doing something
Paints wise, it's certainly been a challenge. I have gone through how I did it at each stage, Generally I have spray painted everything, a confined space isn't so much of a problem.....yet. I have ordered some wheel trollies so I can move the car from side to side when it comes to spray painting the outside. The only thing I would apply with a brush was the POR15 clear coat....it used to be called Glisten PC which I think it still is in the US, over here it has been renamed 2X Urethane, all POR15 products brush on well, be careful with the engine enamel, hard nose and top coat paints, they really need a thinners adding as they go on real thick and run like a bugger. But dry with no visible brush marks. I will be spray painting the 2X Urethane paint for the first time at the weekend, mixed probably about 15% thinners. The 121 Epoxy Mastic dosnt brush on well, it's easy, but it leaves horrible brush marks that stay and often looks like a ploughed field ., spray it with about 10% thinners! it goes on well and is very forgiving. The Undercoat used was a high build 2 pack primer from Max Mayer (3011 HS) IIRC ......it needs a hardener, it also needs about 10% thinners, but not essential. The colour coat I have tried also from Max Mayer......with 0% thinners up to 50% thinners. 0% thinners has better coverage but the finish is orange peely ( is that even a word?) 50% thinners gives a smoother finish but needs more coats to get the coverage but as I am in no rush I recon I will stick with 50%. I have mixed feelings about the Eastwood paints, some can be great, others terrible, but the terrible ones can be good on certain surfaces, while the good ones can be crap on other surfaces......it seems very hit and miss. I have avoided the usual household paints, there is a popular one in the UK called Hammerite, it's tough, but brittle and not massively impact resistant, it also smells bad when it gets hot....ie if you use it on brake calipers.
Thats about it for paint, I havnt finished yet, but to sum up, spray where ever possible. For the inaccessible parts I generally point, spray and hope for the best, you can set the paint gun up to shoot a more or less lazer like spray patern, but you have to be careful, although chances are in those areas you would never see it anyway if the paint did run a little.
I will on one occasion take detailed photos, I will wait until I get to the outside of the car so its easier to see, but if I do that too often it will just annoy me an I will lose interest in maintaining the thread. I also don't have much spare time so most of my efforts go towards actually doing the work and not accurately recording the process of doing it
I will also take some pictures of the compressor set up, I have changed it and don't recal posting the new photos.
Posted by: Langing Apr 14, 2015 - 1:35 PM
Thanks for that good information, Nial. I do understand your situation. Just continue on the way you have so well so far and I will stay happily engaged.
When you get around to posting pics of your compressor setup, you might also include some of the spray painting equipment you use?
I remember back to 'In The Beginning. . ." when you said you were going to have to learn how to weld and (I think, spray paint), and I remember being amazed at how fast you took to the unfamiliar whenever needed, seemingly 'all by yourself': adding on to your garage, adding an enclosure in the back to house your air compressor and deaden its sound, installing water filters in your air lines so the water wouldn't mess the paint, slapping on those roll bars, constructing a rotisserie, and grinding down all the imperfections in the metal to make the surface PERFECT for reception of the paints. And I cannot forget all those pieces of hardware coming back from the zinc platers, or the hybrid bumper you invented! So, it is not just your persistence that I admire, it is your ability to just tell yourself WHAT YOU INTENDED TO DO and then you actually did it! You took a dream and made it become a reality!! Your whole build is an inspiration and I hope many people will find their way to enjoy and learn from your build thread.
Posted by: Nial Apr 18, 2015 - 10:18 AM
Another coat of lacquer...i have to resist the temptation to touch it for four days now for it to fully harden (That sounds wrong )
I gave it a liberal squirt with cavity wax and fitted the front crash bar.
http://smg.photobucket.com/user/nialusa/media/Celica%20Rebuild/P1010952_zpsbyqk3uhq.jpg.html
http://smg.photobucket.com/user/nialusa/media/Celica%20Rebuild/P1010954_zpsjddp1g8a.jpg.html
http://smg.photobucket.com/user/nialusa/media/Celica%20Rebuild/P1010958_zpsi4dgij8n.jpg.html
http://smg.photobucket.com/user/nialusa/media/Celica%20Rebuild/P1010953_zpsfeqsez4h.jpg.html
http://smg.photobucket.com/user/nialusa/media/Celica%20Rebuild/P1010957_zpsvchqom0o.jpg.html
My compressor set up, working well so far. no water in the lines
http://smg.photobucket.com/user/nialusa/media/Celica%20Rebuild/P1010955_zpssplpo8f2.jpg.html
Posted by: 4-eyed-freek Apr 18, 2015 - 11:50 AM
Looks really good! Must resist the temptation to touch!
Posted by: Box Apr 18, 2015 - 3:56 PM
You should run the donut on all corners.
Posted by: Nial Apr 18, 2015 - 5:02 PM
I have got four space savers fitted........gets space free and stops me ruining proper alloy wheels. Would be interesting to drive it like that.
Posted by: Box Apr 18, 2015 - 5:24 PM
I think it'd be fun in a giant open space, probably like skating on ice.
Posted by: Nial Apr 20, 2015 - 1:50 PM
A few more parts added........
Brake & Clutch Pedals & Dash beam thing (whatever its called)
http://smg.photobucket.com/user/nialusa/media/Celica%20Rebuild/P1010964_zpse4tha197.jpg.html
http://smg.photobucket.com/user/nialusa/media/Celica%20Rebuild/P1010961_zpssliorgdx.jpg.html
From the engine bay
http://smg.photobucket.com/user/nialusa/media/Celica%20Rebuild/P1010959_zps5r0gtlnp.jpg.html
http://smg.photobucket.com/user/nialusa/media/Celica%20Rebuild/P1010965_zps0zvjp2c0.jpg.html
Posted by: enderswift Apr 20, 2015 - 9:40 PM
how are you gonna bring yourself to actually drive this thing? At this point it should go into a helium filled glass case...
edit:
forgot to mention that the zinc plating is sexy
Posted by: Tigawoods Apr 21, 2015 - 5:59 AM
this is a museum piece for sure
Posted by: Nial Apr 22, 2015 - 2:09 PM
Fitted the first layer of sound deadening, similar to dynomat but lighter and not so thick, other than the boot floor this is the only area I will be putting this stuff. the second layer will be a light closed cell foam which will go all over the floor, roof, boot etc.
http://smg.photobucket.com/user/nialusa/media/Celica%20Rebuild/P1010970_zpslq4nqo9e.jpg.html
fitted the refurbished wiper motor and wiper mech...what a horrible job.
http://smg.photobucket.com/user/nialusa/media/Celica%20Rebuild/P1010969_zpsoftbpiiy.jpg.html
ID plate re-rivetted in place.
http://smg.photobucket.com/user/nialusa/media/Celica%20Rebuild/P1010967_zps22j5l2yi.jpg.html
the wiper arm pivot and those little hook things that catch the back of the bonnet
http://smg.photobucket.com/user/nialusa/media/Celica%20Rebuild/P1010968_zpsbafrqv1t.jpg.html
still all clean......for now
http://smg.photobucket.com/user/nialusa/media/Celica%20Rebuild/P1010966_zpsd0edzonc.jpg.html
tonight i will start recovering the wiring loom.....i hate electrics.
Posted by: 4-eyed-freek Apr 22, 2015 - 2:32 PM
Wiring is always my biggest fear, no worries. A lot of people here can help if need be!
Posted by: Box Apr 22, 2015 - 2:55 PM
I think everyone hates electrics, even electricians.
Posted by: antoine64 Apr 22, 2015 - 9:51 PM
I actually prefer electronics but I'm an electrical engineer/programmer so that stuff interests me unless I have an intermittent connection that I can't find in some sensor. I'm fixing all the wiring on my Celica project currently. The previous owner did a number on it.
Posted by: PrimeLuxeZ Apr 23, 2015 - 12:17 AM
I love all the attention to detail that you are putting towards the Celica.
Posted by: Langing Apr 23, 2015 - 7:59 AM
Your comment regarding the difficulty of reinstalling the wiper motor and mechanism. What made that job particularly troublesome?
Posted by: Nial Apr 23, 2015 - 8:09 AM
Access to the nut on the back of the wiper motor that attaches it to the wiper mechanism....trying to do it with out scratching the new paint was difficult.
Posted by: Langing Apr 23, 2015 - 10:56 AM
Sorry, Box, unless you were being 'tongue in cheek', what you think true is not. In the first place, rarely is any absolute (everyone) going to be true. Then, there does exist a small but reasonably sized class of people who do like electrics, electronics, etc.(I am one), else we would not have so much of that stuff filling our lives. Also, to believe that electricians, people whose job is to wire up electrical systems, hate electrics is ridiculous on its face. They don't all hate their jobs! Nonetheless, I think I understand what caused your remark, and it is like math, so many people do not have any understanding of it, which leads to a kind of fear. The best path to take is to keep your mind open to learning whatever you are capable of about everything (i.e. love learning).
That being said, troubleshooting electrical problems in automobile wiring can be difficult and is sometimes very frustrating, even when you have a full schematic diagram. But, then the approach should be methodical and systematic, using the small amount of knowledge of electricity that is required, and which can be found in most good repair manuals. There is no witchcraft involved, so nothing to 'hate'.
Posted by: Nial Apr 23, 2015 - 1:57 PM
There should be a bit of progress every day now
Todays fun and games....brake lines. it dosent look like i have done much, but alot of time is spent retapping bolt holes and cleaning threads up.
http://smg.photobucket.com/user/nialusa/media/Celica%20Rebuild/P1010972_zpsmwss5loc.jpg.html
I am having to rebend the brake lines as they dont quite run parallel to each other, but thats an easy fix.
http://smg.photobucket.com/user/nialusa/media/Celica%20Rebuild/P1010973_zpsxnwjxwfl.jpg.html
I also started to fit the closed cell foam (sound deadening) to the roof, its very light, weighs almost nothing, but its a bit expensive for what it is. the floor, bulkhead, roof door insides, boot floor will all get covered in it
http://smg.photobucket.com/user/nialusa/media/Celica%20Rebuild/P1010974_zpsgvpayjid.jpg.html
Posted by: Nial Apr 25, 2015 - 10:41 AM
tackled the recaros today....well one of them. i tried one of the ebay bolster suppliers and the quality is spot on, so i will purchase the other bolster for the other seat later.
You can see the split in the foam.
http://smg.photobucket.com/user/nialusa/media/Celica%20Rebuild/P1010976_zpslibb4qcd.jpg.html
Under the foam there is a metal support ring, it is this that cuts through the foam making the split. The bolster has this bit re-inforced but i guess old age has taken its toll.
with the bolster replaced
http://smg.photobucket.com/user/nialusa/media/Celica%20Rebuild/P1010977_zpsvpc8rgsd.jpg.html
its a pretty easy job to do to be honest, i was expecting it to be harder, about ten mins to do a bolster from start to finish.
I think thats it for today...i had planned on doing more but Jo has bought me some beers and the last Hobbit DVD so its feet up time
back on with it tomorrow
Posted by: Box Apr 25, 2015 - 1:59 PM
I want your seats. 
Posted by: Nial Apr 27, 2015 - 11:26 AM
Painting the roll cage...this is hopefully the last bit of major painting to do until i decide to tackle the outside. Its a rubberised & textured enamel, goes on with some force, but dries nicely.
The roll cage in all its masked off glory
http://smg.photobucket.com/user/nialusa/media/Celica%20Rebuild/P1010978_zpsxwwwadgs.jpg.html
http://smg.photobucket.com/user/nialusa/media/Celica%20Rebuild/P1010980_zpsw12k7zdl.jpg.html
http://smg.photobucket.com/user/nialusa/media/Celica%20Rebuild/P1010979_zpsspkjp0fd.jpg.html
tomorrows task is to finish a bit more sound deadening on the firewall then start refitting the loom which i started refurbishing at the weekend.
Posted by: Nial May 1, 2015 - 12:03 PM
Having trouble getting photobucket to work so there's an update on my facebook page
https://www.facebook.com/groups/EONRacing/477269302436573/?notif_t=like
Posted by: Batman722 May 1, 2015 - 6:57 PM
Ha ! You made a page for the rebuild !
That's awesome.
Posted by: Nial May 2, 2015 - 4:38 AM
That's awesome.
It's only basic, but it keeps the constant car updates off my normal facebook page.....my non car friends complained all I ever posted was car stuff
Posted by: Nial May 2, 2015 - 12:11 PM
Aaaaaaaargh I hate wiring.......where's a beer!?
Posted by: Box May 2, 2015 - 12:24 PM
*air lifts crate of Crabbie's Ginger Beer*
Posted by: Nial May 2, 2015 - 12:55 PM
Had some of that yesterday
Tiger beer tonight
Posted by: Langing May 3, 2015 - 9:08 AM
Are you salvaging the old wiring harness, or building a new one because it has to accomodates a different engine than the GT4 'stock', and if new, does that info exist in the shop manuals, or some other place? Wondering why you 'hate' wiring, considering that you take whatever time is necessary to do EVERY job on your rebuild. I can imagine reasons to dislike wiring, but wonder what it is to you that makes it an unpleasant job, other than your desire to 'get her done'.
Also, I wonder how others approach the job of creating a new harness, since there are so many wires and connectors involved, and it must require a systematic approach.
Posted by: Nial May 3, 2015 - 10:52 AM
I decided it was cheaper and easier to use the old harness, purely because I know it works and there are no faults. A small bit of soldering which I don't mind. The only reason I hate wiring is when things go wrong.....faults can be hard to detect.
Posted by: Nial May 4, 2015 - 9:56 AM
Seats and carpet in
http://smg.photobucket.com/user/nialusa/media/Celica%20Rebuild/P1010995_zps1msgierb.jpg.html
I can sit in it now and make "brum brum psssssst" noises.
There will be a full dash going back in, just need to get it all painted etc now.
http://smg.photobucket.com/user/nialusa/media/Celica%20Rebuild/P1010992_zpshikmgqeu.jpg.html
Looking good.
http://smg.photobucket.com/user/nialusa/media/Celica%20Rebuild/P1010991_zpsznsqtjal.jpg.html
Good clearence with the roll cage, even with the seats as far back as they will go
http://smg.photobucket.com/user/nialusa/media/Celica%20Rebuild/P1010994_zpsowlivbpk.jpg.html
Brum brum.........yes yes, dont laugh, I hate having my photo taken at the best of times.....but theres a face that says "If my wife takes any longer to take this photo, my smile muscles are going to give up"
http://smg.photobucket.com/user/nialusa/media/Celica%20Rebuild/P1010993_zpskogkx35s.jpg.html
Time for a well earned rest, got some decorating to do. might give this project a rest for a couple of weeks and catch up on the household chores.
Posted by: Box May 4, 2015 - 2:58 PM
*borrows Recaros*
>.>
<.<
Posted by: enderswift May 4, 2015 - 3:02 PM
Coming together fast. Good job!
Posted by: doory100 May 10, 2015 - 1:56 AM
Time well spent!!
Posted by: Nial May 21, 2015 - 11:20 AM
Well that's been a frustrating couple of weeks. I managed to retro fit an OEM alarm from my GT loom onto my GT4 loom which was a right pain to do. .....but I decided after all of that (2 weeks work) to scrap it, find a normal loom and fit a modern alarm with a proximity sensor, auto unlock, total closure system etc...sigh. At least I learned how to rewire things and repin Toyota plugs......and never again
I also got a load of zinc plating parts back, just waiting on a delivery from the Toyota dealers to arrive so I can crack on.
http://smg.photobucket.com/user/nialusa/media/Celica%20Rebuild/image.jpg1_zpshl55hrrm.jpg.html
I have approached MK Autos https://www.facebook.com/pages/Mk-Auto-Repairs-and-Tuning-Ltd/121507894641634 about getting a 5sgte built in the not too distant future so getting towards the final steps and spraying the outside
Posted by: Langing May 21, 2015 - 1:02 PM
Re: Your comment about your photo:
"Brum brum.........yes yes, dont laugh, I hate having my photo taken at the best of times.....but theres a face that says "If my wife takes any longer to take this photo, my smile muscles are going to give up" "
The look I see in your face is that you are proud, pleased, and a little tired! That thought of taking time off might be a really good idea, considering how far you have come, how little you have yet to do, and not wanting to let yourself get sick from the stress of seeing that end point always coming, coming, coming. What you have accomplished in the past month is extraordinary. Take a little time off to replenish your vital energies so you can savor each next step and stay in the process just a little longer. Once you are done, you are done, with nothing to do but look back at the result of all that work, as you move forward to total your costs. There is something soul-satisfying about the work itself, right? When you are close to the finish line, you may want to speed things up, and that can lead to frustration.
Posted by: antoine64 May 21, 2015 - 4:34 PM
So that's what you look like.
I'm dealing with messed up wiring from the previous owner in my Celica. Throttle position sensor supply voltage was hooked up to an unused pin on my ECU. Fixing that made a huge difference it engine happiness. I also re-wired the stock boost controller so I could mount it in a more accessible location. Why did Toyota put that thing on the back of the engine? Of course, now I thinking about replacing it with an electric controller. I preferred the rush of power from the unlimited boost I was getting from my broken manual boost controller. I want that feeling without hitting the fuel cutoff.
I've learned a lot about the how these cars are wired so if you have any questions, feel free to ask.
Posted by: Nial May 21, 2015 - 5:01 PM
Thanks Antoine, I will do if I get stuck. Moving away from electrics for the time being. I won't be able to collect a new dash loom until the week after next, hopefully in the meantime other parts will arrive, and I will put the fuel tank on, finish the brake lines, fit some new discs and pads. Although I think tomorrow's task I will be a carpet layer or seamstress when I re carpet the rear of the car which arrived yesterday.
Placed an order for some moulding latex so I can have another go at making a clear high level brake light lense and I also need to break out the fibreglass matting as I need to make some speaker boxes for the rear to help with the sound quality and to help relocate the speakers as I had to move them because of the roll cage.
Also do some more sanding on the front and rear bumpers as I made a start on them at the weekend.
Posted by: antoine64 May 21, 2015 - 6:48 PM
bit of a note about the front flexible brake lines. there is a right and left line. I put mine on backwards then realized and had to swap them. the part connecting to the caliper bends at a different angle for each side. it's a tiny difference that's easy to miss.
Posted by: Nial Jun 13, 2015 - 2:59 PM
The odd but of progress, I have been doing some design and preparing stuff for the engine rebuild. Getting more parts zinc plated, redoing wiring, battery relocation and basically waiting for the dashboard to get finished.
More parts in the engine bay, pretty much only missing the engine now, and a few radiators
http://smg.photobucket.com/user/nialusa/media/Celica%20Rebuild/image.jpg3_zpsf848qqhg.jpg.html
http://smg.photobucket.com/user/nialusa/media/Celica%20Rebuild/image.jpg2_zpscags80vh.jpg.html
http://smg.photobucket.com/user/nialusa/media/Celica%20Rebuild/image.jpg1_zpss2s3njp9.jpg.html
Posted by: Tigawoods Jun 13, 2015 - 3:17 PM
Is that a TRD engine mount?
Posted by: Nial Jun 13, 2015 - 3:20 PM
No, it's just the standard ST205 engine mount.
Posted by: Batman722 Jun 13, 2015 - 3:55 PM
What's the bracket above the mount for ?
Posted by: Nial Jun 13, 2015 - 4:07 PM
Its a brake stopper, helps reduce the flex on the vacuum chamber under heavy braking.
Posted by: Nial Jun 19, 2015 - 5:04 PM
time to refurb my spare rear diff, although i have fitted one to the car already, i am not happy with the amount of effort i gave to refurbish it, basically just a coat of paint over the top. I decided i needed to completely break one down, de-rust it, ft new seals etc. get it as good as i can before fitting it to the project car.
Mid breakdown, plenty of rust to go around
http://smg.photobucket.com/user/nialusa/media/Celica%20Rebuild/image.jpg3_zpsduegknbo.jpg.html
the insides look pretty clean and not too worn out
http://smg.photobucket.com/user/nialusa/media/Celica%20Rebuild/image.jpg2_zpskdvq5scl.jpg.html
Broken down ready to be either wrapped up to avoid contamination, or to sit is Deox C rust eater.
http://smg.photobucket.com/user/nialusa/media/Celica%20Rebuild/image.jpg4_zpsl7ic17va.jpg.html
as well as some parts being sent away to the zinc platers 8)
Posted by: Box Jun 19, 2015 - 7:30 PM
So much rust for such a young car.
Posted by: Nial Jun 19, 2015 - 11:57 PM
The diff came off my old faff, it is 21 years old, remember the UK isn't the sunniest of places and they salt the roads at winter time which doesn't help the longevity of any car
Posted by: Box Jun 20, 2015 - 12:20 AM
Yeah, salt is killer on cars. I'm glad the stuff never hits the roads around here, even when it does ice over they use sand. You'd think in this day and age they could invent some kind of coating to put on roads that'd make them hydrophobic.
Posted by: Langing Jun 20, 2015 - 8:18 PM
Oil?!
Posted by: Box Jun 20, 2015 - 10:08 PM
That's not permanent or safe. I'm sure there're people that've dedicated their life to finding something, but it's either too impractical or too expensive.
Posted by: Smaay Jun 21, 2015 - 12:33 AM
bravo for such an awesome job. how much power are you planning on making? are you upgrading injectors?
I got rid of this resistor pack and re-wired the engine harness to support high impedance top feed injectors. 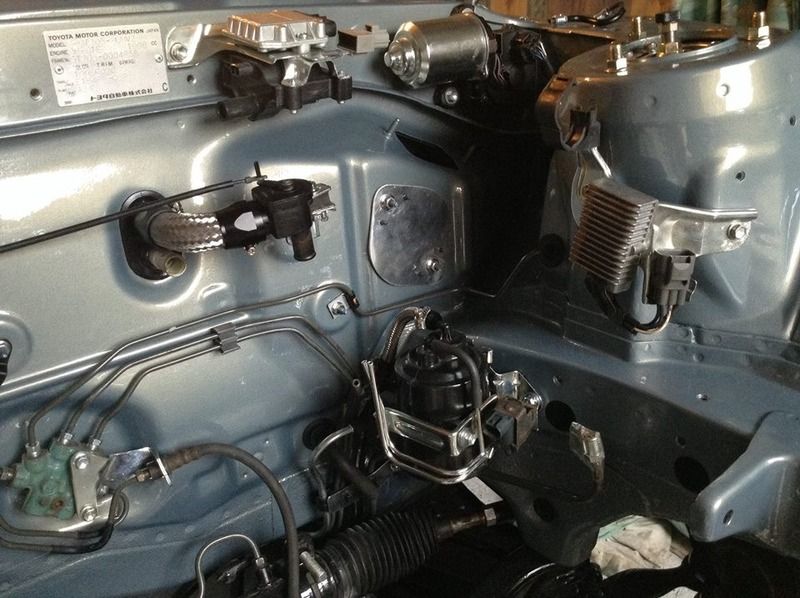
I bought one of the 3rd gen rails on ebay and it worked perfectly. just an idea. engine bay will be cleaner with less clutter in there.
Posted by: Nial Jun 21, 2015 - 1:38 AM
Not sure what I will do with injectors? It there for the time being so I know where it goes, if I go with high imp injectors then I will remove the resistor pack. How easy is it to rewire?
Posted by: Langing Jun 21, 2015 - 9:38 AM
Which component is the resistor pack, and can you please explain the two different injector configurations to me. I am learning and love watching this thing go back together.
Posted by: Smaay Jun 21, 2015 - 10:26 AM
it was actually really easy. if you look at the wiring diagram, the resistor pack is a single wire in and 4 hot wires out. all you have to do is take that single wire in, and use a jumper block and split it to the 4 wires, removing the resistor pack.
Posted by: Nial Jun 21, 2015 - 11:00 AM
Oh. That does sound easy...even I could manage that 😀
Posted by: Nial Jul 3, 2015 - 11:37 AM
I dont like to harp on about Bilt Hambre Deox C.......but by god its good stuff.
Before
http://smg.photobucket.com/user/nialusa/media/Celica%20st205/image.jpg1_zpsjfkdxuvs.jpg.html
235000 miles of crud and salt etc
and after 2 or so weeks in a bath of Bilt Hambre Deox C (and some minor wire brushing to help it along.
http://smg.photobucket.com/user/nialusa/media/Celica%20st205/image.jpg2_zpsi1lgzkmp.jpg.html
http://smg.photobucket.com/user/nialusa/media/Celica%20st205/image.jpg3_zpsvz4zw9lj.jpg.html
Posted by: Box Jul 3, 2015 - 2:09 PM
You know what also works, vinegar. From reading the specs on the stuff it sounds like it's just super concentrated acetic acid, which is what vinegar is comprised of. Since any other acid I can think of off the top of my head is toxic and isn't bio-degradable.
Posted by: Nial Jul 3, 2015 - 2:39 PM
I tried vinegar, it works on mildly rust parts but nowhere near as good as this stuff,, plus this stuff isn't acidic as you can put your hands in it and cuts don't sting. If it is acidic it's very mild.
I also tried coka cola, pickling vinegar, 5% acetic acid, all the things that people recon works "just as well" and non of them do. It's also cheap, buying 20 litres of vinegar wouldn't be that much cheaper.
Although vinegar does taste better. Sprinkling Deox C on your chips would probably taste revolting.
Hmmmmm chips.
Powered by Invision Power Board (http://www.invisionboard.com)
© Invision Power Services (http://www.invisionpower.com)