Printable Version of Topic
Click here to view this topic in its original format
6G Celicas Forums _ My Project _ The Progression of KAOS
Posted by: KAOS May 20, 2011 - 11:52 AM
I've made so much progress in the past few weeks with my car (thanks mostly to local board members) that I thought I would jump on the band wagon & start my progress thread too.
This thread, just like the car; is a work in progress. 
My Car was purchased back in 2006 and was meant to be a project car right away, but unfortunately I was busy with my career at the time and she was quickly neglected.
1994 Celica GT-S w/ ~224K kms on it (approx 139187 miles)
Interior was in great condition, nothing special done to it...


Exterior was in decent shape, except for the driverside fender, which was mashed in, punched back out, and rattle canned. The most unique feature of this car, was the dual exhaust.


http://youtu.be/3nisz-mXi9w

Posted by: KAOS May 20, 2011 - 12:00 PM
Then I caught the mod bug.
The first modification I did, was to upgrade to the JDM Taillights.
The company I worked for at the time was nice enough to give me a vehicle for personal & work use, so the Celica was parked for the better part of 3 years.
In 2007, I was promoted and moved to Calgary Alberta to work for the companies Corporate office.
That's when I met WALKER and the rest of the 6GC members from that time.
(I had also just purchased the 7th Gen rims the day before this picture was taken)
Posted by: KAOS May 20, 2011 - 12:12 PM
After becoming more comfortable with the 6GC, and where to source parts from... I had the mod bug baaaaad:
In 2008; I purchased my first suspension mods; Tanabe D210 Lowering Springs & a GT-Four Rear Strut Bar:

And in 2009 decided to spice up the interior...
From this:
To this:


aaaaand somewhere in there a 7th Gen Short Throw Shifter was installed... 
Also purchased some headers, a cooling panel and Hotwires spark plug wires:
Before:
During:
And After:


Posted by: KAOS May 20, 2011 - 1:02 PM
Later that summer I managed to get my hands on a set of Custom Projectors w/ Clear lenses (from Rayme via WALKER)
I had to tear them apart and rebuild them myself as the brackets were loose and the projectors would bounce around inside the housings. I also took this opportunity to mount some Halo rings onto the projectors as well.


It was also around this time that I installed the JDM rain guards JDM Rear Visor & removed the amber piece from the JDM Taillights.
I decided to try a little tint as well to match the CF License Bezel:

After the headers were installed and the stock cat was removed - I could no longer stand the sound of my exhaust... so I took it in to get modified.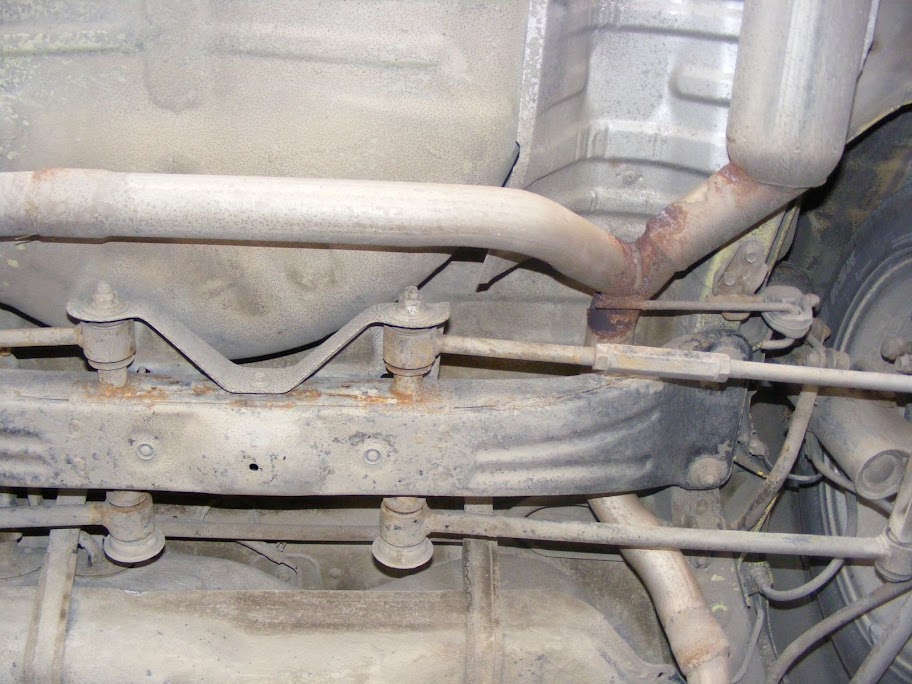

To this:

The sound is much better, but I do miss the unique-ness of the dual exhaust...
Then the worst happened... the timing belt snapped mid-commute one day. IIRC it was around the same time I was installing the projectors, etc. I can't seem to find any pictures of that event, but long story short; with the help of WALKER & ZenAutoworks I was able to tear apart the engine, replace the timing belt & Water pump and then redo all the seals on my way in/out.
The car was back on the road again!! Yay! But at the end of the fall season in 2009, the clutch went, and left me stranded again at the side of the road. Not just 500KMs after I just finished the timing belt!! Argh!
So the car has been parked since then; waiting to roll again and finally this year I was able to make some progress with it again. (Busy/Cold 2010 year)
Posted by: KAOS May 20, 2011 - 1:17 PM
My 3rd gear had always given me grief while shifting, so I decided to get a whole new bell housing/tranny along with a temp clutch and pressure plate.
In the prep process I was a little distracted and decided to test fit some new body panels. (ie 404 Skirts, JDM fenders, and ST205 hood) 

This past weeks worth of work revealed the problem with the clutch;
DESTROYED
See the link in my signature "Project- Tranny Swap" for more details...
But this brings us up to date so far in my progress (or lack-thereof, LOL  ) and this is how she sits until I can get back underneath her...
Resurfaced Flywheel ready to install, lightened and machined down...
Hope you enjoyed so far, and I will update when more work is done...
Thanks!
Posted by: delusionz May 21, 2011 - 3:38 AM
I love your Celica, especially your dash
Posted by: mak5603 May 21, 2011 - 11:36 AM
Great project, very unique! I look forward to updates in this thread.
Posted by: whatthe May 21, 2011 - 10:19 PM
C-ONE !!!!!!! Hell-yeh!
Posted by: KAOS May 21, 2011 - 11:35 PM

Riiiiight!? I cant wait to get it done and mounted!!
... So pumped!
Posted by: NYp8tBaller07 May 21, 2011 - 11:46 PM
how loud is the exhaust from inside the car at around 3,000 rpm?
Posted by: KAOS May 21, 2011 - 11:54 PM
The new exhaust, or the old dual exhaust?
Posted by: NYp8tBaller07 May 22, 2011 - 12:17 AM
new exhaust
Posted by: KAOS May 22, 2011 - 12:45 AM
I'll be completely honest with you; the car has been sitting for so long that I don't really remember what the sound was like

I do remember that the dual had an amazing sound at 3000
The new exhaust is a little quieter, even with the headers, but its more of a deeper throaty sound, IIRC.
Posted by: NYp8tBaller07 May 22, 2011 - 6:40 PM
also whats the outlet size on the new muffler?
Posted by: KAOS May 22, 2011 - 6:57 PM
2.5" in -> 3" out I believe.
Posted by: NYp8tBaller07 May 22, 2011 - 7:35 PM
I love your new exhaust and am going to do the same but with a little mor tilt to it so thats why im asking so many questions
Posted by: SupraKid May 23, 2011 - 12:53 AM
As I was looking at the clutch picture I thought to myself "wtf, it looks fin..O ****" Thats quite a skill to do that to the spring. Looks great man, this will be one of the few builds ill be sure to follow!!
Posted by: KAOS May 30, 2011 - 3:31 PM
LOL - yeah this picture might have been better to post:

As soon as WALKER removed the pressure plate, the spring fell out.
Posted by: NYp8tBaller07 May 30, 2011 - 4:30 PM
I remember my uncles turbo rx7 ripped the metal from the pucks on his clutch
Posted by: SupraKid May 30, 2011 - 9:52 PM
Cool story bro
Posted by: johnyboy1976 Jun 4, 2011 - 2:24 AM
do like a nice yellow 6 - my mrs has one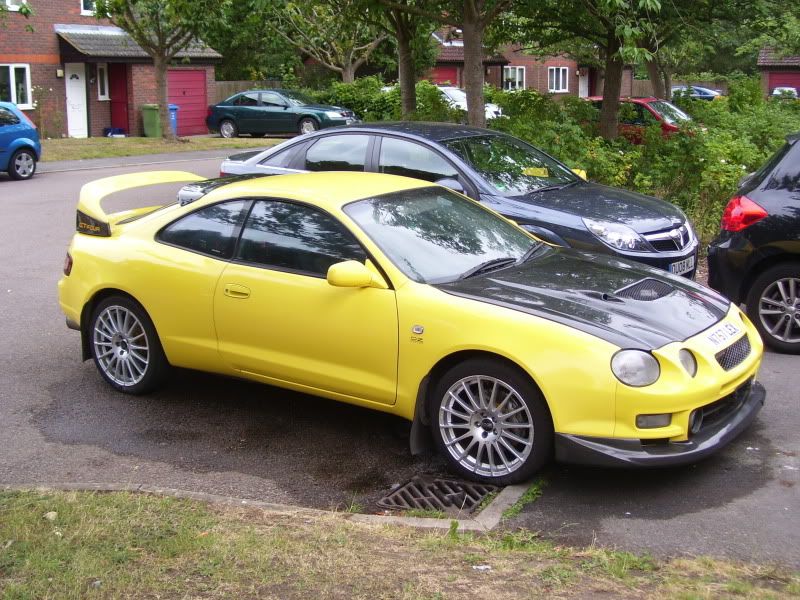
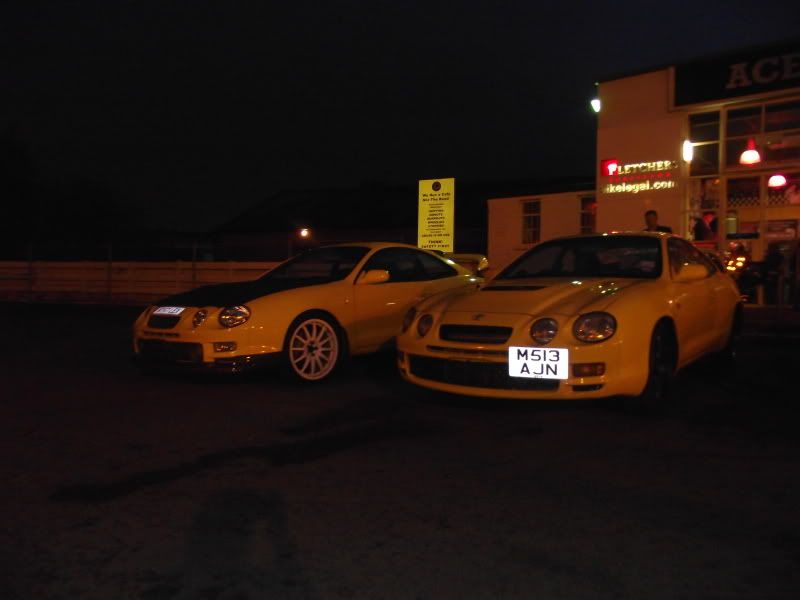
Posted by: KAOS Jun 4, 2011 - 9:44 AM
OMG - those are sexy 6's mate.
Where did your wife get that bonnet from? RTP? (yellowchinaman) kinda looks like his product.
I wants it over here on mine car, but thats a lot of coin for me.
Thanks for sharing those pics tho! Very nice!
Posted by: johnyboy1976 Jun 4, 2011 - 10:24 AM
Yer the cf bonnet is off Ray - as is the lip
Just need to finish it off with a cf rear spoiler and mirror covers as it has a cf rear number plate surround on the way
Also thinking of a cf rear diffuser too so it will match my grey 205 in appearance
Posted by: KAOS Jul 27, 2011 - 10:49 PM
Update - I really hate myself right now.
Getting distracted and started 7 different projects at once is really coming back to bite me in the @$$.
I'm slowly trying to get back on track and took the week off to get back underneath my car - and slowly start putting it back together.
The rear suspension/brake assembly is finally complete, here are some teaser pics (iphone pics/flash - sorry for $hitty quality):

Had to reassemble the coilovers (I missed washers on the original install), finally installed my Stainless Steel Braided Lines, and Coated the brake calipers RED. 
Also, finished the install of the 7th gen steering wheel, w/ retrofited 6gc cruise stalk... didn't snag pics of that however.
Posted by: KAOS Oct 20, 2011 - 12:45 AM
Decided to give my baby a little more juice than the 5S could offer... 
Went and checked it out after work today - 3rd Gen 3SGE w/ 98K on it. My mechanic was shocked at how clean it was. We opened up the TB valve and looked inside the intake plenum and we were both amazed at how clean it was...
Can't wait to get it home and start tearing into it. YAY!
Posted by: richee3 Oct 20, 2011 - 5:35 PM
Any expected swap date?
Posted by: Lil-Joe101 Oct 20, 2011 - 6:15 PM
Great build, cant wait to see her finished. I got my eye on u sir, lol.
Posted by: SupraKid Oct 26, 2011 - 1:48 PM
Nice man!! That should def give the car some more perk.
Posted by: KAOS Oct 26, 2011 - 1:59 PM
Soon - I pick up the engine on Saturday, plan on working on it over the winter - then probably drop it in come spring time.
Sooo... not soon enough I guess.
Thanks Andrew - I'm looking forward to it... its no 3SGTE - yet - but it might be later on.
Hows the Supra game?
The chasm that awaits my new engine...

Posted by: Lil-Joe101 Oct 28, 2011 - 1:36 PM
Hopefully I will be right behind you in this part of the build as soon as I start working and saving up. MOORRRREEEE PROGRESS UDATES SIR!!!!!!
Oh yeah, now woud be the best time to clean ur engine bay since its free of the engine. Deff try using armorall wheel cleaner, gunk engine degreaser, and a pressure washer or water hose. Then to shine her up armor all tire shine or gunk engine shine. Ive used these two methods for years (since my accord in high school 2003) and hasnt failed me yet.
Posted by: KAOS Oct 29, 2011 - 12:43 AM
Update.
Tonight I installed the front coilovers, driverside JDM fender, and reinserted the driveshafts so the front hub washer wouldn't crush under the pressure. The I reattached the GTFOUR hood, put the wheels back on, and pushed it out of the garage onto the driveway where it now sits under a car cover...
Didn't reinstall the newly painted front calipers... don't have a brake system right now anyways, so I figured, "Why Bother...?"
Here are some shatty update pics for yall... new 3rd Gen 3SGE comes tomorrow morning! YAY!


A height that Jon would be proud of... - I actually had troubles getting my 4" floor jack out from underneath the car... :S

Posted by: NYp8tBaller07 Oct 30, 2011 - 8:35 PM
new exhaust with the swap?
Posted by: KAOS Oct 30, 2011 - 9:01 PM
Yeah I don't think I have a choice in the matter... I haven't had a lot of time since the engine was brought home to look at the downpipe, but I don't think it'll match up to the 5S's piping...
yay for me!
Posted by: NYp8tBaller07 Oct 30, 2011 - 9:34 PM
what size are you thinking of and will we be seeing a tilted can :-D
Posted by: richee3 Oct 31, 2011 - 11:39 AM
You can use stock piping. I did with my BEAMS. But the 5S uses 2" piping and the 3S uses 2.25", so it would be better to upgrade.
Posted by: KAOS Oct 31, 2011 - 12:23 PM
Thinking about uping the piping diameter to 2.25", tossing a resonator on the line and keeping the piping as straight as possible, under the rear axels and "tilting the can", yes.
Don't tell my wife that! I was hoping to redo the entire pipe set up...
Posted by: Lil-Joe101 Oct 31, 2011 - 12:32 PM
Tonight I installed the front coilovers, driverside JDM fender, and reinserted the driveshafts so the front hub washer wouldn't crush under the pressure. The I reattached the GTFOUR hood, put the wheels back on, and pushed it out of the garage onto the driveway where it now sits under a car cover...
Didn't reinstall the newly painted front calipers... don't have a brake system right now anyways, so I figured, "Why Bother...?"
Here are some shatty update pics for yall... new 3rd Gen 3SGE comes tomorrow morning! YAY!

Is that a c-one front bumper I see? By golly I think it is. Should be a worthing something later on down the years since there is no more c-one

Posted by: KAOS Oct 31, 2011 - 12:37 PM
LOL - yeah - its made for the ST202-204 chassis... so my front end will look like your front end (the hood to bumper gap).
I don't think its genuine C-One tho - I can't find the stamp on the inside of the bumper, but I didn't look that hard either. I did fit it to the front end when I first got it and the fitment was great, so very little body work will be needed. (I do plan on modifying the vents on it).
Posted by: Lil-Joe101 Oct 31, 2011 - 12:42 PM
Very nice. Ive heard from a few people that the hood gap is actually quite functional when it comes to cooling the engine bay. As the air is pushed in thru the gap it also pushes the hot out from the top cowl and the two rears. But the gap can be an eye sore to a lot of folks too, lol
Posted by: KAOS Oct 31, 2011 - 12:44 PM
I could see that... the gap looks sexy on some cars, but the bumper already has that vent right there... so as far as adding function for airflow; I don't think that gap is going to be sticking around on mine.
Posted by: stephen_lee Oct 31, 2011 - 12:49 PM
I don't mind the gap really. 
Posted by: KAOS Oct 31, 2011 - 12:58 PM
Exactly what I meant when I said the gap looks sexay on some cars..
Posted by: czwalga Oct 31, 2011 - 1:45 PM
Ehh that gap is way to obvious to me.
You can reuse the stock exhaust however you'll have to put the stock manifold back on versus using the header that comes on the 3sge. I end taking the midpipe and modifying it to mate up with the 3sge header.
Posted by: richee3 Oct 31, 2011 - 2:26 PM
^^ Exactly what I did. I had a reducer mated to the BEAMS b pipe so the car isn't obnoxious. Wifey is only half the reason I kept the factory GT exhaust. Neither one of us appreciates a loud car. Overall, the exhaust only cost me $30 as opposed to what it could have cost to have it all replaced. But you know 2" piping is going to hold the 3S back.
Posted by: Lil-Joe101 Oct 31, 2011 - 2:37 PM
Fall into the "GAP" son, lol
Posted by: KAOS Feb 21, 2012 - 12:43 PM
I had a surprisingly productive weekend.
Sold the 5S engine & wrapped headers; bought my own Engine Crane & Engine stand and assembled them both.
Cleared out a bit of space in the garage to work, and now its time to mount the 3SGE to the stand and get to work.
Posted by: KAOS Feb 22, 2012 - 11:45 AM
Sold the 5SFE over the weekend, so I decided to get to work on the 3S last night.
Started to remove the heat shield, alternator, and upper T-Belt cover... lookit those extractors! W00t!

Decided to mark the t-belt/cams for easy replacement.... and noticed the idler/tensioner pulley. 


The T-Belt seems healthy... which begs the question; was it recently replaced, or are the kms on this engine really that low?


Question: Does this sticker mean the t-belt was changed @ 100,000kms? Or that it needs to be done at 100,000kms? Translator please! 
Posted by: Lil-Joe101 Feb 23, 2012 - 7:39 AM
It needs to be done
Posted by: KAOS Feb 25, 2012 - 10:17 AM
The other night I was unbuttoning the engine harness from the block, etc and I found this just lying in a pile of wires on the transmission, under the dizzy. Not connected to anything; and it looks like it was snapped off at one point.
I'm hoping this isn't part of the 96+ EGR system
... can anyone help verify for me?


Posted by: Batman722 Feb 25, 2012 - 11:03 AM
That's part of the egr system but that's not 96+, it's early 90s.
No 6 gen has a connector like that, that's 5th gen.
Probably a repair/replacement part for something that broke. I wouldn't even worry about it.
Posted by: KAOS Feb 25, 2012 - 11:32 AM
Oh ok. So maybe it came from the guy I bought it from. He had a 5th gen he was going to swap this engine into. Probably a spare part of his that got tossed into the pile.
Phew. Thanks Dustin!
Posted by: Rusty Feb 25, 2012 - 11:49 PM
yeah looks foriegn/old to me aswell
good photos though so you can see the part number
89570-20230
a vsv from mid 80's Corona, Camry, ST161 Celica's etc
engine looks good btw, did you manage to get the LHD harness?
Posted by: KAOS Feb 26, 2012 - 1:26 AM
No not yet... but here's what I'm thinking:
I have a POS harness that has been un-loomed (lets call it that for lack of better terminology at this point), and I've just purchased a mint one from 3WayStunna (so you won't have to keep an eye out for me anymore Rusty) - I'll just extend the loom myself... or pull a Dustin and make a new hole in the firewall.
... I haven't really decided yet, but I have options.
Posted by: KAOS Mar 13, 2012 - 11:48 PM
New harness came in the mail today - finally, Canada Customs had it for about a week.
3WayStunna - you're a life saver dude! Thanks for the hook up!
Side by side: (see the mess I had to deal with, ugh)

Fusebox Included:
New ECU:
Can anyone tell me the differences between these two?
Posted by: cheela Mar 15, 2012 - 12:37 AM
can't wait to see this done.
Posted by: Rusty Mar 15, 2012 - 1:45 AM
Very 'Mint' harness 
89661-17480 ecu is from the MR2
still trying to figure out where the other one comes from
Posted by: KAOS Mar 15, 2012 - 8:57 AM
89661-17480 ecu is from the MR2
still trying to figure out where the other one comes from
Thanks! So... would that MR2 ECU have worked!?
Posted by: KAOS Mar 15, 2012 - 11:11 AM
Got some more work done last night - removed the BENT tensioner from the Timing belt assembly - must've gotten bent in transport.
Started with the Intake Manifold and the Throttle Body:
Not sure what this is, but I figured I would document it anyways:
IM off:
This was quite the juggling act to get this IM off... had to un fasten the TB first, then remove the engine hook; only then would the IM come off without a fuss... interesting set up this 3SGE is... 
Gasket appears to be in decent shape - but there was a bit of oil on it, is that norm?:
I also unbolted the fuel lines from the rail before removing the IM - I just re inserted the banjo bolt so I don't lose it. 

Now to finish with that old nasty wire harness...:

Now for the driveshaft pulley (or harmonic balancer??):
Also, here's a decent shot of the bent tensioner pulley bracket - see how close it is to the exhaust cam gear? Thats not good... it was actually a tight squeeze to remove it. I felt the cam gear afterwards and there seems to have been a bit of scoring/marking... but I could be imagining things too.
It looks pretty beat up... maybe some of it was from me :???: - I swear I was gentle:


Here's where I left off last night before packing it in:


So far the engine has been a dream to work with - no signs of leaking, the block doesn't have any cracks that I can see, and aside from the bent tensioner bracket & the MR2 ECU, I haven't seen anything visually alarming...
Hopefully tonight I can drain the oil, remove the valve cover, the distributor, and the water pump.
Posted by: kurt95gt Mar 15, 2012 - 11:19 AM
Lookin good man keep it up
Posted by: BonzaiCelica Mar 15, 2012 - 11:38 AM
great work, wish i could do that!
Posted by: Outsider Mar 20, 2012 - 9:37 PM
Amazing work.
As for my exhaust, I just made a $30.00 adapter to mate the BEAMS b-pipe to my original exhaust.
The open wiring harness pictures brings back memories of mine
Yes, I hope to be at the meet this summer. (work permitting)
You gonna have the car done for the meet?
Posted by: enderswift Mar 20, 2012 - 9:47 PM
lol at flicking off the old harness. I know that kind of rage, but mine was towards the superstrut balljoints
Posted by: KAOS Mar 20, 2012 - 9:49 PM
As for my exhaust, I just made a $30.00 adapter to mate the BEAMS b-pipe to my original exhaust.
The open wiring harness pictures brings back memories of mine
Yes, I hope to be at the meet this summer. (work permitting)
You gonna have the car done for the meet?
The plan is to have it back on the road late may early June - that'll give me a couple months to iron out the bugs and get it ready for the long trip out to BC in August.
So far so good!
To be honest, I almost didn't want to go through with the swap looking at that ****ing rats nest of wiring... LOL. I'm so glad I was able to find a whole one instead.
Posted by: kurt95gt Mar 20, 2012 - 9:50 PM
Cant wait to see this done
Should be a sweet lookin celi
Posted by: KAOS Mar 21, 2012 - 11:18 PM
Trying to order some bits and pieces for the rebuild; will these work on a 3SGE head?
http://arp-bolts.com/images/releases/Images.News/203-4207.html
Posted by: Rusty Mar 22, 2012 - 1:50 AM
yes they should work as the Gen 3 3S-GE and 3S-GTE are the same
Posted by: delusionz Mar 22, 2012 - 11:25 AM

A/C idle up VSV?
Posted by: Rusty Mar 22, 2012 - 7:38 PM
yup A/C idle up valve
Posted by: 3WayStunna Mar 22, 2012 - 9:25 PM
3WayStunna - you're a life saver dude! Thanks for the hook up!
Side by side: (see the mess I had to deal with, ugh)


Fusebox Included:

New ECU:

Can anyone tell me the differences between these two?

Your welcome mate....also the ECU i sent you was either from a 96 curren, or celica...not sure of the celica year though, but they had the same part numbers....
Posted by: bsamps4 Mar 27, 2012 - 6:33 PM
I'd better see a dope paint job on that valve cover sir!
Posted by: czwalga Mar 27, 2012 - 6:39 PM
FYI, do you have a separate? The coil is separate from the distributor unlike the 5sfe, also doesnt bolt the engine bay so it most likely didnt come with one.
Posted by: KAOS Mar 27, 2012 - 6:56 PM
Crap - youre probably right...
Pics and part numbers? (if you have them)
Challenge accepted good sir.
... actually I have something decent in the mix.
Posted by: SwissFerdi Mar 28, 2012 - 9:21 AM
^ Hah...paint...in the mix...I see what yon did there.
Good luck with the rest of the progress.
Posted by: KAOS Mar 28, 2012 - 11:08 PM
Good luck with the rest of the progress.
Pft, nicely done Ferd.
So - I had to hook up a battery directly to my driverside window motor on Sunday. Long story short, I didn't roll up the driverside window prior to starting the engine swap; so for the past few months the shell has been sitting on my driveway with a huge piece of cardboard taped over the open window and then a car cover, followed by 2 tarps... some friends needed some parts that I just happened to keep in the car when I "sealed" it up, so this weekend I tore it all off and didn't want to put it all back on again and there was bad weather coming THAT night...
*breathe* ...whew!
So I hooked up a battery with the help of "sodap0p" and we were able to get the window up. Yay!
Tonight when the weather was decent I put the door card back on and installed the TRD (knockoff, doesn't bother me) shift knob...
The knob needs to be polished (yeah, I said it
) and the interior is a mess from the swap right now. I also took a pic of the 7th gen steering wheel to add to this archive. Not much, but enjoy!


Posted by: KAOS Apr 24, 2012 - 10:16 AM
Does anyone know where I could find an aftermarket charcoal canister? I'd like to dress up the engine bay a little bit with one... but can't seem to find any.
I've tried Summit and a few other places, but maybe I'm using the wrong keywords?
LMK
Posted by: KAOS Apr 25, 2012 - 11:54 PM
Took off the oil pan today to reveal this:
Most likely from sitting too long.
Tonight I was able to get the oil pan, the distributor assembly and the valve cover off.
Oil pump looks to be in decent shape:

Look at the special treat that welcomed me when I took the Valve cover off:
CLEANLINESS!!! YAY!


Posted by: kurt95gt Apr 26, 2012 - 2:05 AM
Oooooh she be purty lol
Least the head makes up for the oil pan
Posted by: bsamps4 Apr 26, 2012 - 7:17 AM
Brings back memories of mine! I too had a very clean motor!
Posted by: KAOS Apr 27, 2012 - 7:31 PM
Kurt/Brent; it was such a relief when I saw the internals... I was so happy!
Picked this up off the Calgary Kijiji today:
Dirt cheap. The guy was just trying to get rid of it... sold his MR2 awhile ago and just had it lying around. Pity.
Posted by: KAOS Apr 28, 2012 - 8:41 PM
Took the water pump off:
Whats the best way to remove the rust deposits from the coolant lines, etc while the engine is OUT of the car?
This rust deposit shouldn't concern me too much, right? I already know the engine had been sitting for awhlie...
THOUGHTS??
Posted by: KAOS Apr 30, 2012 - 4:12 PM
Bump - no thoughts? LOL
Posted by: mandrek Apr 30, 2012 - 11:57 PM
how much work are you planning on doing to the motor wile its out? and as far as the lines go, if it were me (and it just was. LOL) swap all of your lines to new 4-ply silicone hoses, and a new rad....
with new parts and the motor out the only real part that you will need to thoroughly clean is the heater core... i have seen it done with a 5 gal bucket, a full bottle of CLR, and a cheap in bucket water pump and garden hose..
fill the bucket, put in the CLR, hook up the pump and dump tube to pour back into the bucket.. and let it cycle for about 30 min.. or until no more sh!t comes out of the core.
if you are not going to pull the block all the way apart you can use a similar system... the key though is that you then will HAVE to flush the core and the system in the motor with fresh water (just hook it up to the water hose, and let it flow till it is clear, and no more junck coming out) good luck bro!
Posted by: KAOS May 1, 2012 - 1:08 AM
with new parts and the motor out the only real part that you will need to thoroughly clean is the heater core... i have seen it done with a 5 gal bucket, a full bottle of CLR, and a cheap in bucket water pump and garden hose..
fill the bucket, put in the CLR, hook up the pump and dump tube to pour back into the bucket.. and let it cycle for about 30 min.. or until no more sh!t comes out of the core.
if you are not going to pull the block all the way apart you can use a similar system... the key though is that you then will HAVE to flush the core and the system in the motor with fresh water (just hook it up to the water hose, and let it flow till it is clear, and no more junck coming out) good luck bro!
Thanks man!
Made some more progress tonight;


Posted by: Box May 1, 2012 - 1:44 AM
Vinegar is good for removing rust, and for cheap.
Posted by: KAOS May 5, 2012 - 1:46 AM
I finally got sick of all my procrastination and fear of taking the block apart on my own; so I locked myself in the garage tonight until it was done.
Overall not bad. I pussy'd out and didn't take apart the head properly, I just removed the assembly from the block and set it off to the side. Suprisingly enough seperating the block from the head was not the daunting task I thought it would be. Yay.
Examining the chambers, it would appear there was some debris in there and I can see some marking, but over all the chambers are in decent shape. Regardless, this engine has been sitting for awhile and the block is going for a day at the spa. Hot tanked, cylinders honed, and possibly machined if needed.
Anyways, the pictures should speak for themselves. The block is completely stripped and ready to go (aside from a few bolts that I still need to document before I take it somewhere.
Enjoy! I sure did. 


What sensor is this??
Posted by: Box May 5, 2012 - 2:16 AM
That is strange. Coolant temp senor maybe...? Only thing I could think of that'd be on the side of the block. That or oil pressure, but that'd seem like an odd place for one.
Posted by: KAOS May 5, 2012 - 2:17 AM
Def not oil pressure - I've unscrewed it from the block and beyond the threads, there's nothing... lol. I dunno. Figure it out later I guess.
Posted by: Box May 5, 2012 - 2:49 AM
Hmm... Block temperature sensor? No idea, this is quite the conundrum.
Posted by: KAOS May 5, 2012 - 2:49 AM
Sorry - its the knock sensor. A buddy of mine from town settled it for me.
Posted by: Box May 5, 2012 - 3:20 AM
Ahh, thought it might've been that. All the ones I've know are located on the top of the engine and not the side though. Good thing to know.
Posted by: Rusty May 5, 2012 - 3:40 AM
great progress
and yes knock sensor
Posted by: sodap0pWRC May 5, 2012 - 4:04 AM
that pitting is from detonation, not from debris bro.
Posted by: KAOS May 5, 2012 - 10:14 AM
Thanks Steve. are those detonation pits repairable or do I need to replace the parts?
Posted by: DKGT4 May 5, 2012 - 10:41 AM
Very nice. Great work so far.. This will be done very soon as I need to replace the valve cover gasket... I think I'm getting some oil leak and therefore the exhaust spewing out some smoke.... But we'll see.
Posted by: sodap0pWRC May 5, 2012 - 1:19 PM
It should be ok bro, that pitting could have weakened the ringlands below, but I doubt it. I'd check on a price for a set of pistons, if they are cheap enough, I'd go that route. The head should be fine too, not a lot of pitting
Posted by: KAOS May 18, 2012 - 12:18 AM
Got the block and the pistons back from the machine shop today - CLEAN BILL OF HEALTH.
Block looks great... needs a little bit of a pressure wash to get rid of the flaking paint on the block (from the hot tank, I'm assuming). I didn't realize how much gunk/build up there actually was in the cooling chambers of the cylinders until it wasn't there anymore. The chambers look great now, could probably use a little pressure washing themselves. (I can still see a few rust chips inside... )
The block came back with what appears to be some pretty big scratches in the cylinders... I'm a little concerned because they weren't there before I took the block to the shop and now I'm worried that the block might not be usable.
Unfortunately, I'm heading out of town for the long weekend and won't be able to take pictures, etc until I get back.
...or maybe I'll try to snap a few in the sunlight in the morning before we leave, get your opinion(s).
The shop said the cylinder walls and pistons were still well within specs, so I can reuse them for the rebuild.
Posted by: Box May 18, 2012 - 1:02 AM
Maybe do a light honing on them? Just enough to smooth things out some.
Posted by: KAOS May 21, 2012 - 1:59 PM
Took a vid:
http://vid208.photobucket.com/albums/bb199/KAOS2K8/CARS/1994%20Celica%20GT-S/3SGE%20Swap/CLIP0016.mp4
Looks like scratches from the honing tool - doesn't seem like a crack, but I might do a dye test just in case.
Looks like they're high enough in the cylinder wall that it might be higher than the TDC. 
Posted by: bsamps4 May 21, 2012 - 3:28 PM
Looks like some tooling marks from the machine shop. I'd take that **** back and have them fix it!
Posted by: Rusty May 21, 2012 - 6:23 PM
dang I hope its not a crack. Wasn't there before was it?
one thing you could look at further down the rebuild, is getting some of the heat reflective wrap and putting it on the underside of the intake manifold to prevent heat soak. (GT-4/3S-GTE owners do the same on their factory intercooler) I'm looking at doing the same, but can't find it for sale here in NZ.
Posted by: KAOS Jun 8, 2012 - 1:05 AM
one thing you could look at further down the rebuild, is getting some of the heat reflective wrap and putting it on the underside of the intake manifold to prevent heat soak. (GT-4/3S-GTE owners do the same on their factory intercooler) I'm looking at doing the same, but can't find it for sale here in NZ.
That's a good idea, but you think it'll make a noticeable difference?
Posted by: Rusty Jun 8, 2012 - 2:26 AM
When I made and installed my cold airbox, my intake manifold was cooler to touch afterwoods. So I'm sure this would help a bit with keeping intake temperatures down - seems to work for 3S-GTE guys. I dont think its too expensive and its pretty easy to install.
Posted by: mkernz22 Jun 18, 2012 - 3:45 PM
What exactly do you have to do wiring wise to put this into a GT? I know everything is basically bolt in with mounts, transmission, etc.
I don't know how much longer my engine is going to last, still running strong, but I have my doubts. I'm not spending the money to put my other 5s block back together if it's going to cost about the same, or a little less, than it would for this engine. I'd rather have the tad bit more HP and more respect from teh friends lol
Posted by: NYp8tBaller07 Jun 19, 2012 - 11:25 PM
Great work. Can't wait to see it running :-)
Posted by: KAOS Jun 21, 2012 - 10:25 AM
Some key components to the rebuild finally came in:

Cometic Gaskets (including metal headgasket) and ACL Race Bearings.
Posted by: NYp8tBaller07 Jun 21, 2012 - 5:08 PM
nice =)
Posted by: KAOS Jul 4, 2012 - 10:46 AM
Managed to clean up the surface rust and run a quick wire wheel along the block.
... THEN PAINT!
BEFORE:
AFTER:

Posted by: enderswift Jul 4, 2012 - 7:47 PM
good work dude, block looks good.
Posted by: sodap0pWRC Jul 6, 2012 - 12:10 PM
done yet? you now have less than 1 month
just thought I'd remind you
Posted by: jcbass7 Jul 6, 2012 - 5:08 PM
Engine work is looking good, I wish I could have tore my block down to the ground and built her back up. Maybe next summer haha, keep the updates coming!
Posted by: HerCelica95 Jul 8, 2012 - 12:33 PM
[quote name='KAOS' date='May 20, 2011 - 12:12 PM' post='917217']
After becoming more comfortable with the 6GC, and where to source parts from... I had the mod bug baaaaad:
In 2008; I purchased my first suspension mods; Tanabe D210 Lowering Springs & a GT-Four Rear Strut Bar:

And in 2009 decided to spice up the interior...
From this:
To this:


aaaaand somewhere in there a 7th Gen Short Throw Shifter was installed...
...Where do you find the JDM gauge faces??? i have been looking all over and cant find them do you have a website i can go to so i can order them??
Posted by: bsamps4 Jul 8, 2012 - 12:55 PM
lower oil pan gasket? You just use FIPG???
Posted by: KAOS Jul 8, 2012 - 3:41 PM
LOL - i didnt actually see a gasket in the kit there... Was totally planning on FIPG on the lower oil pan.
Love that stuff.
Speaking of the lower oil pan; I took it off and cleaned it out real good and it looks like it got dinged in a previous life and the paint on the INSIDE of the pan is flaking away in one spot... Something to worry about if i reuse it?
As for the gauges; they're the furthest thing from JDM you can get - they're simply custom reverse glow gauges from SpeedHut.com.
Posted by: HerCelica95 Jul 8, 2012 - 5:53 PM
LOL - i didnt actually see a gasket in the kit there... Was totally planning on FIPG on the lower oil pan.
Love that stuff.
Speaking of the lower oil pan; I took it off and cleaned it out real good and it looks like it got dinged in a previous life and the paint on the INSIDE of the pan is flaking away in one spot... Something to worry about if i reuse it?
As for the gauges; they're the furthest thing from JDM you can get - they're simply custom reverse glow gauges from SpeedHut.com.
i dont see celica on the site for speedhut... do supra gauges work? or what did you use?
Posted by: KAOS Jul 8, 2012 - 6:16 PM
LOL - i didnt actually see a gasket in the kit there... Was totally planning on FIPG on the lower oil pan.
Love that stuff.
Speaking of the lower oil pan; I took it off and cleaned it out real good and it looks like it got dinged in a previous life and the paint on the INSIDE of the pan is flaking away in one spot... Something to worry about if i reuse it?
As for the gauges; they're the furthest thing from JDM you can get - they're simply custom reverse glow gauges from SpeedHut.com.
i dont see celica on the site for speedhut... do supra gauges work? or what did you use?
Oh noes, doesn't look like they sell the overlays for the Celica anymore. I'm sorry for misleading you.
Posted by: mkernz22 Jul 8, 2012 - 6:33 PM
I don't know how much longer my engine is going to last, still running strong, but I have my doubts. I'm not spending the money to put my other 5s block back together if it's going to cost about the same, or a little less, than it would for this engine. I'd rather have the tad bit more HP and more respect from teh friends lol
Any word on what you have to do to wire this bad boy in? It is literally plug and play or are there a few things that need to get changed around?
Posted by: KAOS Jul 8, 2012 - 6:35 PM
I don't know how much longer my engine is going to last, still running strong, but I have my doubts. I'm not spending the money to put my other 5s block back together if it's going to cost about the same, or a little less, than it would for this engine. I'd rather have the tad bit more HP and more respect from teh friends lol
Any word on what you have to do to wire this bad boy in? It is literally plug and play or are there a few things that need to get changed around?
Sorry brother. I haven't gotten that far yet.
Posted by: KAOS Jul 11, 2012 - 4:29 PM
ENTIRELY the reason I'm doing the swap. That, and its still going to be my DD - I don't want to worry about forced induction components at this time.I'll gladly take the ~50HP bonus for less than the cost of ground cams or any other mod that would make that much HP in a 5SFE without going forced induction.
Posted by: mkernz22 Jul 26, 2012 - 10:06 AM
Exacttlyyyyy haha
Does this engine have a MAF sensor or is it the same as the 5s?
Posted by: KAOS Jul 26, 2012 - 5:10 PM
Does this engine have a MAF sensor or is it the same as the 5s?
No MAF.
Posted by: KAOS Oct 13, 2012 - 8:39 PM
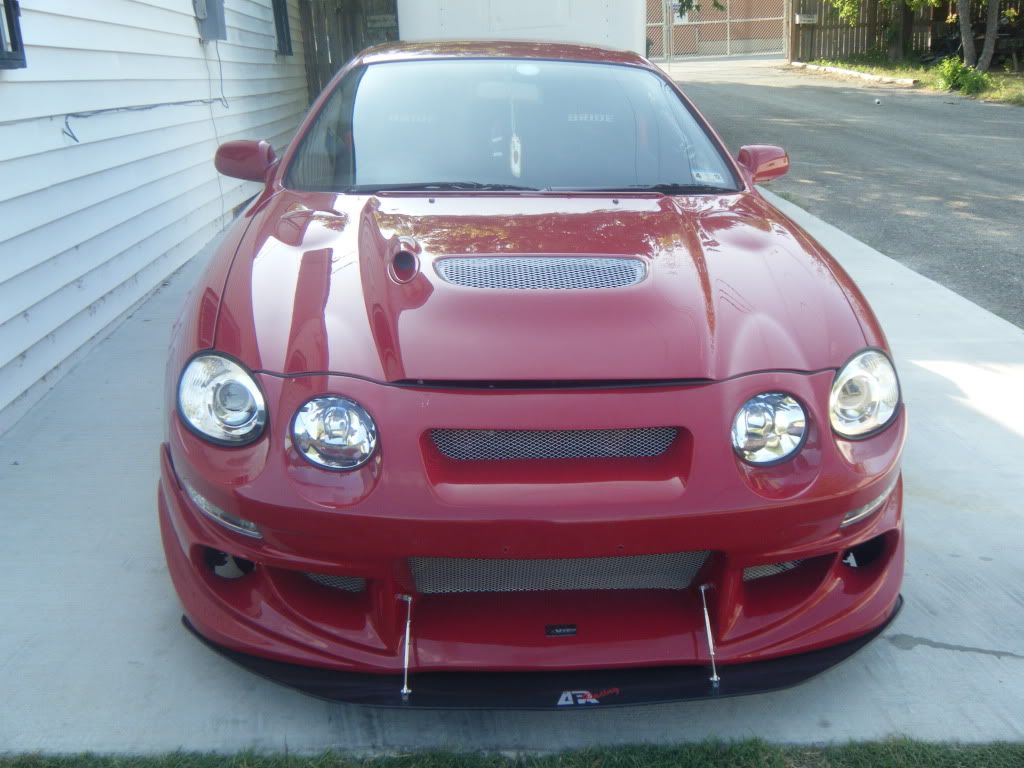
Minor updates... wanted to get the projectors and C-One replica installed today...
Fitment on the bumper was decent, not oem fit by any means, but its what I expected given what was paid for it. 


Posted by: kurt95gt Oct 13, 2012 - 8:41 PM
Sweet!!
Now get it running!!
Posted by: rave2n Oct 13, 2012 - 10:05 PM
Liking this...
has facebook made me so lazy I just want to hit like =P
Posted by: KAOS Oct 18, 2012 - 11:16 PM
Just a quick question for you guys...
NON:
~ OR ~
GENUINE TRD:  ERMAHGERD!!


Posted by: kurt95gt Oct 18, 2012 - 11:18 PM
Trd ftw!!!
Posted by: Box Oct 18, 2012 - 11:22 PM
TRD yes, fart can NO.
Posted by: BonzaiCelica Oct 19, 2012 - 12:48 AM
to pull off trd wing you need oem sideskirts and rear trd splitters
Posted by: Ted95 Oct 19, 2012 - 7:45 AM
it needs 404 sides and trd rears thing will look badd bro i like the wing man do it up
x2 for the fart can
Posted by: KAOS Oct 19, 2012 - 10:20 AM
These I have. The wing was just soft-mounted for pics - as in just sitting on the hatch, if you recall earlier in my build thread, I have 404 sides and TRD rear spats to install as well.
... and the "fart-can" is leaving me when I get the new exhaust system installed for the 3SGE.
Was thinking a HKS Carbon TI if they still make 'em... but I doubt they do.
Posted by: WALKER Oct 19, 2012 - 1:50 PM
I'm definitely liking the looks with the TRD on there!
Posted by: BonzaiCelica Oct 19, 2012 - 1:59 PM
These I have. The wing was just soft-mounted for pics - as in just sitting on the hatch, if you recall earlier in my build thread, I have 404 sides and TRD rear spats to install as well.
... and the "fart-can" is leaving me when I get the new exhaust system installed for the 3SGE.
Was thinking a HKS Carbon TI if they still make 'em... but I doubt they do.
ok go with apexi n1 60mm muffler. You cant go wrong nice sound and doesn't look super huge like hks
Posted by: richee3 Oct 19, 2012 - 10:12 PM
Looking good! Once you get your 3S in there, it'll be a whole new car.
Posted by: _mikeE Oct 22, 2012 - 9:49 AM
Been a long time since I've posted on this site now that I'm just selling off all my 6gc parts...
Very nice Jeremy! Can't wait to see the car at its finished result with the plans you've told me.
Posted by: KAOS Oct 22, 2012 - 10:08 AM
Very nice Jeremy! Can't wait to see the car at its finished result with the plans you've told me.
Thanks Micheal. I have a new-found inspiration thanks to you.
Thank you for the TRD Wing!
Posted by: KAOS Aug 13, 2013 - 4:29 PM
Overdue update!
The rebuild has begun. Slow and steady...
Head torn apart, mating surface of the head has been lapped and ready to go for a metal headgasket:
The block, all reassembled and lapped the surface as well. Waiting for the head...
Posted by: kurt95gt Aug 13, 2013 - 7:38 PM
Your still alive!! Yay
Posted by: Box Aug 13, 2013 - 8:32 PM
I had forgotten about you.
Posted by: WALKER Aug 13, 2013 - 8:40 PM
Looks like you need to update your signature! It has the Ogooogo 2012 sign up still! Only a couple meets old!
Posted by: JoshuaM Aug 13, 2013 - 9:26 PM
Haha, just a little break between drinks
I want to see this thing all painted with the skirts, spats and spoiler on!
Posted by: KAOS Aug 30, 2013 - 9:40 AM
Alive and kicking, Kurt. Saw your track video on the book of Face's and I likey!
Yes, I don't lurk here near as often as I should. Probably because when we were getting thread spammed I turned off all my notifications, and now I can't seem to get ANY.
I want to see this thing all painted with the skirts, spats and spoiler on!
That's probably going to be a while off yet... but YOU AND ME BOTH
Posted by: KAOS Aug 30, 2013 - 9:50 AM
Update:
Engine is almost back together. Just getting some parts cleaned up/powdercoated before I can proceed.
Valve adjustments are done and very compliant (yay!)
Cometic Metal Headgasket is installed and torqued to 60ft lbs, as per the specs on the ARP head bolts.
Timing assembly is all back together, and its looking like an engine again!
PICS:
- Nice clean head with new cometic valve stem seals installed, then shims and buckets reinstalled.
- ARP Headbolts installed and headgasket placed. 
- Torquing the bolts
- Timing assembly.... assembled!
- a 3SGE powered MKII? ... yeah I don't think so... 
- VID of the christening! It's official now... no turning back.
http://i208.photobucket.com/albums/bb199/KAOS2K8/CARS/1994%20Celica%20GT-S/3SGE%20Swap/PinPull_zpsd6cb38c3.mp4
Posted by: Syaoran Aug 30, 2013 - 10:23 AM
IT'S GONNA EXPLODE! RUN!
Posted by: Rusty Aug 30, 2013 - 5:22 PM
well done engine looks awesome.
Posted by: enderswift Aug 30, 2013 - 6:09 PM
Have you started to second guess your work yet? it drove me nuts when I was building my 3s. I would always wonder things like 'hmmm did I really align the piston rings properly?'.....after I had the pistons installed  documenting everything, taking pics/vids and placing white paint dots on bolts that were properly torqued was the only way I could keep myself from redoing work haha
Posted by: KAOS Aug 30, 2013 - 11:36 PM
it drove me nuts when I was building my 3s. I would always wonder things like 'hmmm did I really align the piston rings properly?'.....after I had the pistons installed documenting everything, taking pics/vids and placing white paint dots on bolts that were properly torqued was the only way I could keep myself from redoing work hahaYes, I second-guess myself all the time.
Especially because this project is taking such a long time from beginning to where I'm at now, half the time I can't remember what bolts came from where.
Luckily I have the 3SGE blue book from Toyota, and an engineering friend that has fully rebuilt a plethora of engines in his life time. Including that fully built MKII Celica-Supra you can see in the background of one of those shots. He is a wealth of knowledge and is very precise about everything he does.
He made me lap the head and block with an enormous lapping stone for a total of about 10 hours, just to get the mating surfaces PERFECT for the metal head gasket. With his guidance, shop, and help I can do no wrong.
Posted by: kurt95gt Aug 30, 2013 - 11:59 PM
Glad one of us like my track vid
Im more than alil unhappy with my performance
1mz did great.....I was a epic failure of a driver lol
Posted by: KAOS Sep 11, 2013 - 2:13 PM
Crap - youre probably right...
Pics and part numbers? (if you have them)
Challenge accepted good sir.
... actually I have something decent in the mix.
Good luck with the rest of the progress.
Got some bits back from the powder coater today...


Posted by: Tigawoods Sep 11, 2013 - 3:40 PM
better than the paint on my car hahahahaha
looks great man
Posted by: KAOS Sep 25, 2013 - 11:11 AM
For those of you NOT in the Facebook group, here's where I'm at:

Posted by: KAOS Nov 18, 2013 - 10:27 PM
3SGE beside a newer 2ZZ 
Progress!


Posted by: enderswift Nov 19, 2013 - 8:07 AM
That looks awesome KAOS. Great job as always
Posted by: bsamps4 Nov 19, 2013 - 10:02 AM
looks great man! bet you can't wait to drive it!
Posted by: cheela Nov 19, 2013 - 11:27 AM
nice! let's get it in there.
Posted by: kurt95gt Nov 19, 2013 - 11:47 AM
Looking good man
It'll look even better in the car
Posted by: Rusty Nov 19, 2013 - 2:21 PM
awesome
that's the colour scheme I want to do, I wasn't sure about the ACIS cover, but looks great, nice contrast. Are you going to paint the first intake plenum a silver? And did you while it was off put heat reflective tape underneath it?
Posted by: Red123 Nov 19, 2013 - 2:33 PM
nice progress mate. Keep it up.
Posted by: KAOS Nov 20, 2013 - 11:12 AM
Nope - can't wait at all!!
awesomethat's the colour scheme I want to do, I wasn't sure about the ACIS cover, but looks great, nice contrast. Are you going to paint the first intake plenum a silver? And did you while it was off put heat reflective tape underneath it?
I was actually going to ceramic coat the intake, but I just went with your suggestion instead. Much cheaper! LOL.
As for painting the first intake plenum, I'm done with the painting for now, I just want to get this thing back into the car and drive it again.
Posted by: SwissFerdi Nov 20, 2013 - 5:51 PM
I'm picturing that red in the engine bay contrasting with the body's yellow, and it's tasty.
Posted by: KAOS Nov 20, 2013 - 8:22 PM
Hahaha. I agree.
Posted by: H8TRAIN Nov 20, 2013 - 10:44 PM
Way to do the job right, Kaos.
I'm eagerly anticipating your posts about making the appropriate changes to get the swap running. I hope you can detail the process. I'm hoping to put one in myself, but I don't know what changes need to be made to the wiring.
Posted by: KAOS Nov 21, 2013 - 3:18 PM
I'm eagerly anticipating your posts about making the appropriate changes to get the swap running. I hope you can detail the process. I'm hoping to put one in myself, but I don't know what changes need to be made to the wiring.
So far so good... the only thing I need to do that's big with the harness is find a way to get it through the firewall.
As far as I've been told - the pins are all plug 'n play in the cabin.
Posted by: H8TRAIN Nov 21, 2013 - 8:58 PM
That sounds excellent. Check this out. I've been searching hi and low to find somebody with a writeup or something. And I found a post by an active member on here about swapping a 3rd gen. He actually used the stock 5sfe harness!
99gt3sge said this:
What the hell? You can do that? I guess you can. I've think the ecu plugs on the 5s harness match up to the 3rd gen ecu so why not?
I also have a bookmark around here somewhere about a guy who ran a 3sge on the 5s harness, sensors and ecu! Very detailed write up. Ah I gotta find it now that I mentioned it. Here: http://www.toymods.org.au/forums/tech-conversions/43868-tutorial-how-build-cheap-5s-ge-motor-5s-fe.html
Posted by: Lil-Joe101 Dec 22, 2013 - 1:39 AM
MORE PICS MORE PICS MORE PICS!!!! Lol
Posted by: KAOS Mar 28, 2014 - 12:02 AM
No photo updates as of yet, just a confession.
I'm tired of not being able to drive this car, so as of today; I'm officially back on the rebuild.
(been taking an extended break due to rebuild challenges, finances, and ****ty weather).
First things first, I need to build a fuel line.
Stay tuned...
Posted by: Lil-Joe101 Mar 28, 2014 - 10:13 AM
I'm tired of not being able to drive this car, so as of today; I'm officially back on the rebuild.
(been taking an extended break due to rebuild challenges, finances, and ****ty weather).
First things first, I need to build a fuel line.
Stay tuned...
STAYING TUNED
Posted by: mi645 Mar 31, 2014 - 2:35 AM
way better than my build, i am glad there is anoter 3d gen user like my self and rusty, lovong this progress thread!!!!! get it running
Posted by: KAOS May 30, 2014 - 3:02 PM
My buddy with the shop that houses my engine, bits and chassis is on holidays for a couple weeks. But as soon as he's back - the car gets finished.
T-minus 3 weeks and counting.
Posted by: kurt95gt Jul 2, 2014 - 12:22 AM
Yes!! Progress will be made!!
Posted by: KAOS Jul 14, 2014 - 10:30 AM
Wiring harness has been unloomed, lengthened appropriately and buttoned back up. Next weekend, if I can get the rest of the parts, oil, etc gathered, the car will hopefully fire up! W00t!
Posted by: KAOS Jul 19, 2014 - 1:30 PM
Big weekend for me and my car;
After 6 long years, it will hopefully be back up and running by the end of the weekend!!!!
Engine off the stand and fidanza flywheel soft mounted:
ARP flywheel bolts laced with Loctite and hand threaded:
Posted by: KAOS Jul 19, 2014 - 1:33 PM
Torqued to 95 ft-lbs, as per spec:
Ran into my first speed bump. The brand new Southbend Stage 2 clutch I ordered doesn't mate to the flywheel (its for a 3SGE), the clutch was for a 5SFE - so it'll be going up for sale very soon. Someone PM me if you need it - give you a sweet dealio.
Luckily a member of the local Celica Car Group has a brand new clutch that he decided not to use for his 3SGTE swap... so yay for me! Have to go pick it up this afternoon, and then will get back to work shortly after.
Posted by: KAOS Jul 19, 2014 - 4:12 PM
Just building a new fuel line while I wait to pick up the 3SGTE clutch. 
And here it is, much nicer than the one I was originally putting on it.
Housing back on - breaking for lunch and then it goes back into the car!
Posted by: njccmd2002 Jul 19, 2014 - 5:05 PM
are you seriously updating as you go? nice...
Posted by: KAOS Jul 19, 2014 - 8:47 PM
Done for the night.

Posted by: KAOS Jul 19, 2014 - 8:56 PM
Yeah sorry for the spamming... just wanted to keep a log of it and I had some down time earlier while I was waiting for the 3SGTE clutch set up.
Posted by: WALKER Jul 19, 2014 - 9:34 PM
Awesome to hear it's all coming back together. I can't believe it has been 6 years, really?
Are you planning to bring it to Ogopogo if all goes well?
Posted by: KAOS Jul 20, 2014 - 11:47 PM
Hey bud!
Yes, Ryan and I should have it running this week for sure. Had a few hiccups this weekend that held things up a bit.
I would need to break it all in, entirely new everything pretty much... and then assess the financial situation afterwards.
Posted by: KAOS Jul 21, 2014 - 11:18 AM

aaaaaaaaaaaaand its in.
Mounts were a PITA to line up.
Posted by: KAOS Jul 21, 2014 - 11:23 AM
Working frantically to get everything buttoned up and the extended harness through the firewall... most everything was smooth.
AC Compressor was being a major b1tc# tho... :@
Posted by: njccmd2002 Jul 21, 2014 - 2:02 PM
thats funny, maybe ill see it in person..
Posted by: KAOS Jul 21, 2014 - 2:45 PM
Engine has to come back out, the reason the transmission went on so easily is most likely the 21 spline count friction disc (from the 3SGTE kit) on the 20 spline shaft. I should have used the smaller 5S friction disc but we were concerned with the mating surfaces. I see now from one of Manny's old 5SFTE days that using the smaller 5S friction disc is fine. (I'm not putting down near as much HP as he is either).
F!@K
Posted by: KAOS Jul 30, 2014 - 2:40 PM
Car's running.
Drove it home from the shop last night - car won't rev over 3-45k, sometimes higher, we narrowed down the issue to either the distributor housing (as the cap and rotor were replaced in the rebuild) or the wire harness. But as the portion of the wiring harness that goes to the distributor wasn't touched and remains intact, I'm pretty sure its the distributor housing. The pickups are struggling under load to keep up. So, I need a spare unit from a 3rd Gen 3SGE/3SGTE to test with, and then sink another few hundred into it to get it running properly.
Car was fun to drive though. New shifter assembly/clutch/lightweight flywheel really went well together. Engages quickly and the shifts are very solid despite missing the plastic shifter grommet thingy. Engine sounds mean at idle, and I can tell it really wants to GO. Really too bad about the dizzy.
Posted by: KAOS Jul 30, 2014 - 2:50 PM
LIST OF THINGS TO DO NOW:
[ ] - test out dizzy with known working one
[ ] - replace dizzy (if, that IS the issue)
[ ] - replace fuel VSV and reconnect lines; currently they're bridged and not running through the broken VSV
[ ] - fix ignition wire; old command start unit spliced into the unit between the key ignition and interior fuse box panel somewhere (need to tear the panels off under steering wheel to fix)
[ ] - fix/replace turn signal blinking relay
[ ] - troubleshoot the driverside window switch, doesn't roll down/up; contacts might just need cleaning
[ ] - find spacer bushing for Cusco front pillowball mounts; too much of a gap causes loud thunk on smallest of bumps.
[ ] - connect/wire up projectors/ballasts
[ ] - connect/wire up JDM repeaters
[ ] - clean up rotors/calipers (paint touch up); gotten a little rusty from sitting all these years
[ ] - reshape rotor guards as they rub on rotors while driving
[ ] - clean up/polish muffler
[ ] - Plasti-Dip car, body panels, and apply all body panels.
[ ] - find rims/summer tires (currently only have facelift GTFour stockies w/ winter tires )
[ ] - monitor engine for leaks; minor oil leak during start up/testing, seems to have gone away
Posted by: WALKER Jul 30, 2014 - 4:50 PM
Glad to hear you have it running! Good luck with the next few steps of getting a reliable fun driver!
Posted by: cheela Jul 30, 2014 - 5:19 PM
awesome that you got it running and get to drive it
Posted by: enderswift Jul 30, 2014 - 10:25 PM
Now it's time to enjoy the shyt out of it
Posted by: KAOS Jul 31, 2014 - 10:16 AM
Now it's time to enjoy the shyt out of itGoing to try... need to troubleshoot the dizzy first so that it can actually rev. But yes - the drive home was fun!
Posted by: KAOS Sep 11, 2014 - 10:26 AM
Ok - long overdue update for anyone that cares.
Swapped out the dizzy with a working one from a ST205, and the same issue was prevalent.
Was about to tear apart the exhaust, thinking it was a flow issue, when I had a thought, "What if its the new O2 sensor?"
... so I unplugged it from the harness, and viola, the engine runs properly now. (sans O2 sensor )
Bizarre, the O2 sensor is brand new, and I have yet to take it out of the piping to look at the ceramics, but has anyone else had an issue like this?
Also, I think the lightweight flywheel, combined with the polyurethane motor mounts are causing too much vibration in my engine bay... I've lost a handful of nuts, bolts, etc and noticed last night that the nut came off of my front engine mount and the bolt was almost gone. I went through and re torqued what I could get at easily without a lift, etc.
^^^ Anyone else had that happen on a fresh built engine?
The last thing that concerns me greatly is the amount of leakage from the transmission side of the engine, there doesn't appear to be oil on the flywheel, but the oil has to be coming from somewhere... any chance the bell housing could be leaking trans fluid into it somewhere?
I hooked up the HIDs and buttoned everything back up last night. Needed to drive my car to work today...
The drive was pretty smooth. I have no radio so I had to listen to the exhaust drone the whole way into Calgary, meh.
I made it to work ok, the car dropped down to 600rpm when it wasn't in gear a couple of times and scared me a little bit, I thought it was going to stall out...
I'm leery about driving it still, as I just don't think I trust it just yet, does that make sense?
Anyways, here she sits at my work, waiting for another run...
Posted by: 4-eyed-freek Sep 11, 2014 - 10:38 AM
look at that snow.... 
Posted by: KAOS Sep 11, 2014 - 10:49 AM
That's Calgary for ya. Don't like the weather? ... just wait 5 minutes.
Posted by: mi645 Sep 11, 2014 - 1:06 PM
how does it run? i still need to pull mine back out and do a few things here and there. clutch flywheel etc.
Posted by: KAOS Sep 11, 2014 - 3:29 PM
i still need to pull mine back out and do a few things here and there. clutch flywheel etc.Seems to run ok, despite not having an active O2 sensor, I guess...
Pretty solid actually. Responsive, but then again I haven't driven it in 6 years, and a lot has changed since then (suspension, etc).[X] - test out dizzy with known working one
[X ] - replace dizzy (if, that IS the issue) - ended up NOT being the case, need to troubleshoot the O2 sensor now
[ ] - replace fuel VSV and reconnect lines; currently they're bridged and not running through the broken VSV
[X] - fix ignition wire; old command start unit spliced into the unit between the key ignition and interior fuse box panel somewhere (need to tear the panels off under steering wheel to fix)
[ ] - fix/replace turn signal blinking relay
[ ] - troubleshoot the driverside window switch, doesn't roll down/up; contacts might just need cleaning
[X] - find spacer bushing for Cusco front pillowball mounts; too much of a gap causes loud thunk on smallest of bumps.
<- just reinstalled stock upper strut mounts[X] - connect/wire up projectors/ballasts
[ ] - connect/wire up JDM repeaters
[X] - clean up rotors/calipers (paint touch up); gotten a little rusty from sitting all these years
[X] - reshape rotor guards as they rub on rotors while driving
[ ] - clean up/polish muffler
[ ] - Plasti-Dip car, body panels, and apply all body panels.
[ ] - find rims/summer tires (currently only have facelift GTFour stockies w/ winter tires
)[ ] - monitor engine for leaks; minor oil leak during start up/testing, seems to have gone away
[ ] - troubleshoot faulty O2 sensor
Posted by: richee3 Sep 11, 2014 - 4:14 PM
Have you tried pulling codes yet? You probably have and I missed it. Unplugging the O2 sensor will cause the ECU to dump fuel, which may be hiding the real issue if something else is causing it to run lean.
Posted by: KAOS Sep 11, 2014 - 4:34 PM
When it was sputtering etc (with the o2 sensor plugged in) there were no codes stored.
I haven't tried since then to pull codes though - there's no CEL however with the O2 sensor unplugged, not sure what to make of that...
Posted by: richee3 Sep 11, 2014 - 9:03 PM
My BEAMS will only light the CEL up for the really important things, not for stuff like the O2 sensor. The 3rd gen 3S-GE could be the same way. You know for sure that you have to at least have a code 5 or 21 for the O2 sensor.
1 Normal Condition.
2 Air Flow Meter signal.
3 Ignition signal.
4 Engine Coolant Temperature Sensor signal.
5 Oxygen Sensor.
6 RPM signal (Crank Angle Pulse).
7 Throttle Position Sensor signal.
8 Intake Air Temperature Sensor signal.
9 Vehicle Speed Sensor signal.
10 Starter signal.
11 Switch signal.
11 ECU/ECM.
12 Knock Control Sensor signal.
12 RPM signal.
13 Knock Control CPU (ECM).
13 RPM signal.
14 Turbocharger Pressure.
14 Ignition signal.
15 Ignition signal
21 Oxygen Sensor.
22 Engine Coolant Temperature Sensor signal.
23 Intake Air Temperature Sensor signal.
24 Intake Air Temperature Sensor signal.
25 Air-Fuel Ratio Lean.
26 Air-Fuel Ratio Rich.
27 Sub Oxygen Sensor signal.
28 No. 2 Oxygen Sensor signal.
31 Air Flow Meter signal (Vacuum Sensor signal).
32 Air Flow Meter signal.
34 Turbocharger Pressure signal.
35 Turbocharger Pressure Sensor signal.
35 HAC Sensor signal.
39 VVT-i
41 Throttle Position Sensor signal.
42 Vehicle Speed Sensor signal.
43 Starter signal.
51 Switch signal.
52 Knock Sensor signal.
53 Knock Sensor signal.
54 Inter-cooler ECM signal.
71 EGR System.
72 Fuel Cut Solenoid signal.
78 Fuel Pump Control signal.
81 TCM Communication.
83 TCM Communication.
84 TCM Communication.
85 TCM Communication.
Posted by: KAOS Oct 6, 2014 - 1:53 PM
LIST OF THINGS TO DO NOW:
[X] - test out dizzy with known working one
[ ] - replace fuel VSV and reconnect lines; currently they're bridged and not running through the broken VSV
[X] - fix ignition wire; old command start unit spliced into the unit between the key ignition and interior fuse box panel somewhere (need to tear the panels off under steering wheel to fix)
[ ] - fix/replace turn signal blinking relay - parts ordered, on the way!
[ ] - troubleshoot the driverside window switch, doesn't roll down/up; contacts might just need cleaning
[X] - find spacer bushing for Cusco front pillowball mounts; too much of a gap causes loud thunk on smallest of bumps. kindasad.gif <- just reinstalled stock upper strut mounts
[X] - connect/wire up projectors/ballasts
[ ] - connect/wire up JDM repeaters
[X] - clean up rotors/calipers (paint touch up); gotten a little rusty from sitting all these years
[X] - reshape rotor guards as they rub on rotors while driving kindasad.gif
[ ] - clean up/polish muffler biggrin.gif
[ ] - Plasti-Dip car, body panels, and apply all body panels. biggrin.gif biggrin.gif
[ ] - find rims/summer tires (currently only have facelift GTFour stockies w/ winter tires frown.gif )
[X] - monitor engine for leaks; minor oil leak during start up/testing, seems to have gone away - replaced REAR MAIN SEAL, now clutch slave is leaking...
[X] - troubleshoot faulty O2 sensor - was a bad ground on the harness... O2 sensor works fine now
Posted by: kurt95gt Oct 7, 2014 - 12:04 AM
Progress!!
Posted by: sircalebwhite Jun 28, 2015 - 3:19 PM
Hey you wouldn't remember anything about the dual muffler setup at all do you? I'm kind of open to trying something like it and want to know what mufflers were used for it if you remember or know.
This thread, just like the car; is a work in progress.
My Car was purchased back in 2006 and was meant to be a project car right away, but unfortunately I was busy with my career at the time and she was quickly neglected.
1994 Celica GT-S w/ ~224K kms on it (approx 139187 miles)
Interior was in great condition, nothing special done to it...
Exterior was in decent shape, except for the driverside fender, which was mashed in, punched back out, and rattle canned. The most unique feature of this car, was the dual exhaust.
http://youtu.be/3nisz-mXi9w
Powered by Invision Power Board (http://www.invisionboard.com)
© Invision Power Services (http://www.invisionpower.com)