  |
 Aug 11, 2006 - 9:09 PM Aug 11, 2006 - 9:09 PM
|
|
|
Enthusiast  Joined Feb 26, '06 From CA Currently Offline Reputation: 1 (100%) |
Tools:
 Flathead Screwdriver 10mm Socket & Ratchet 1.) Pop Trunk Open  2.) Pop open the covers (they are marked with a picture of a light bulb) Use the screwdriver to remove  3.) There are only 3 that you need to remove  4.)Use the 10mm Socket to unscrew the bolts holding the tails on  5.) TIP: Once it comes loose, use the socket without the ratchet to manually turn and remove the nuts   6.) Carefully wedge loose the tails using the screwdriver  7.) Remove Tails  8.) Bulb Layout for OEM tails (the JDM tails are on the bottom)  9.) Remove bulbs  10.) JDM Tails with bulbs placed (The bulbs really only go in at certain spots so you really can't "mix" the bulbs  11.) There is one bulb that is not used on the JDM Tails, I just removed the bulb  12.) Place the tails back... Insert nuts into socket. Re-screw tails in.  13.) Place the covers back, and your done 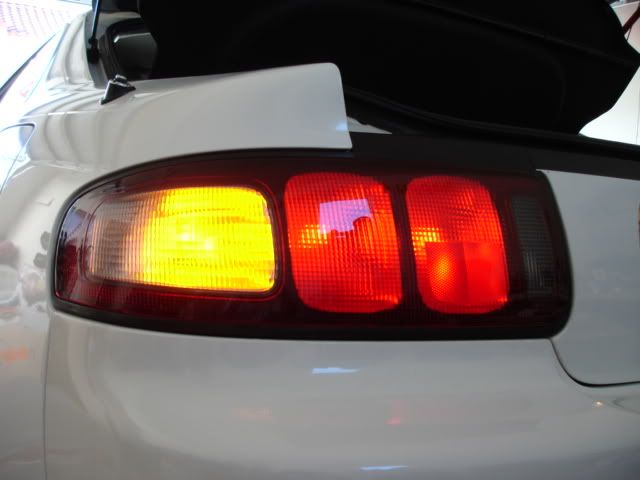 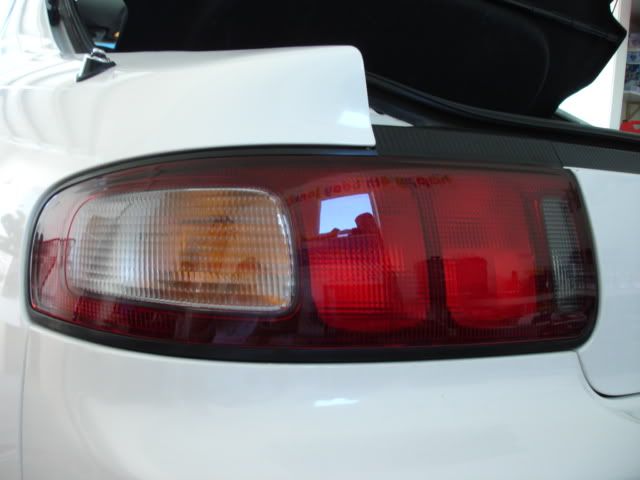 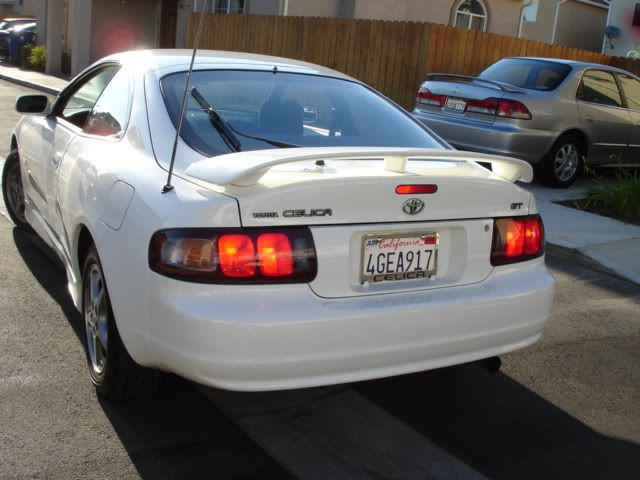 -------------------- '99 GT & '06 GTI
 |
 Aug 11, 2006 - 9:20 PM Aug 11, 2006 - 9:20 PM
|
|
 Enthusiast   Joined Mar 15, '06 From Long Beach Currently Offline Reputation: 0 (0%) |
nice write up!
-------------------- " i don't work for toyota, i work for my toyota. "
|
 Aug 11, 2006 - 9:38 PM Aug 11, 2006 - 9:38 PM
|
|
|
Enthusiast     Joined Dec 9, '05 From Long Beach Currently Offline Reputation: 1 (100%) |
sticky this! lol
do one for the coupes/verts now -------------------- Is this good enuff 4 ya? :D
 |
 Aug 12, 2006 - 6:41 AM Aug 12, 2006 - 6:41 AM
|
|
|
Moderator      Joined Oct 1, '02 From fall river, ma Currently Offline Reputation: 13 (100%) |
nice write up!
moved to exterior forum, and added to the sticky! -------------------- Former Team 5SFTE pro member ;)
 13.6@108MPH, 5SFTE Powered |
 Aug 12, 2006 - 8:09 AM Aug 12, 2006 - 8:09 AM
|
|
 Enthusiast      Joined May 25, '06 From Hong Kong Currently Offline Reputation: 256 (100%) |
Good Job!!
Nice and neat!! -------------------- |
 Aug 12, 2006 - 9:41 AM Aug 12, 2006 - 9:41 AM
|
|
|
Enthusiast    Joined Feb 25, '03 From Springfield, MO Currently Offline Reputation: 1 (100%) |
step 6 is a no-no
-------------------- Coming in 2010 full paintjob - new wheels - modified body - new interior - engine build- marriage |
 Aug 12, 2006 - 10:07 AM Aug 12, 2006 - 10:07 AM
|
|
 Enthusiast      Joined May 15, '05 From Toronto Currently Offline Reputation: 4 (100%) |
nice write up. seems simple enough. LOL. my gf has that same Keroppi thing on the back of her celica but she has the pink one.
|
 Aug 12, 2006 - 2:17 PM Aug 12, 2006 - 2:17 PM
|
|
|
Enthusiast  Joined Feb 26, '06 From CA Currently Offline Reputation: 1 (100%) |
QUOTE(b1gr3d @ Aug 12, 2006 - 9:41 AM) [snapback]468158[/snapback] step 6 is a no-no I had a hard time trying to remove the OEM tails with out trying to "pry" it loose, if you want to be more careful, you can use a plastic knife. -------------------- '99 GT & '06 GTI
 |
 Aug 12, 2006 - 2:22 PM Aug 12, 2006 - 2:22 PM
|
|
|
Enthusiast     Joined Nov 29, '04 Currently Offline Reputation: 5 (100%) |
Awesome write-up man!
|
 Aug 12, 2006 - 2:29 PM Aug 12, 2006 - 2:29 PM
|
|
 Enthusiast     Joined Aug 27, '05 From Texas Currently Offline Reputation: 0 (0%) |
I dont get it...what is this write up doing? Is it just installing JDM tails?
--------------------  I am now a part of the ihavemorethen16gc club! |
 Aug 13, 2006 - 4:57 PM Aug 13, 2006 - 4:57 PM
|
|
|
Enthusiast      Joined Aug 2, '05 From Guam Currently Offline Reputation: 15 (100%) |
I think so. More stickies, the merrier.
This post has been edited by trdproven: Aug 13, 2006 - 4:57 PM -------------------- 94 Celica GT
|Toyota OEM Japan|Toyota Racing Development|Tom's|Competition Clutch|5Zigen|Apexi| |Laille/Beatrush|Magnecor|Denso|Royal Purple|Optima|PIAA|PW JDM|Megan Racing|Nitto| |Work|Greddy|Samco|Project Mu|H&R|Gates|Moog|Rota|Yokohama|Epman|1320|Upgr8 04 Celica GT |Toyota OEM Japan|Toyota Racing Development|Tein|BC Racing|Greddy| |
 Aug 13, 2006 - 5:47 PM Aug 13, 2006 - 5:47 PM
|
|
|
Enthusiast    Joined Jan 29, '06 From Kitchener, ON, CA Currently Offline Reputation: 0 (0%) |
sweet
|
 Aug 13, 2006 - 8:28 PM Aug 13, 2006 - 8:28 PM
|
|
|
Enthusiast   Joined Apr 16, '06 From Jackson, MS Currently Offline Reputation: 0 (0%) |
Awesome writeup, I just need some jdm tails now
~FlamingCelica -------------------- 94 Red Celica ST
|
 Aug 13, 2006 - 8:54 PM Aug 13, 2006 - 8:54 PM
|
|
|
Enthusiast     Joined Jul 11, '06 From Sefner, FL Currently Offline Reputation: 24 (100%) |
i did the same thing with my extra bulb i was like what the heck htey all dont plug in and its in the way, snip its gone lil electric tape and we were good to go, now i know htat s not the best or safest thing to do but it was strating to rain, and i wanted to get done, man these tails look so sweet!
--------------------  |
 Aug 13, 2006 - 11:43 PM Aug 13, 2006 - 11:43 PM
|
|
 Enthusiast      Joined Apr 18, '05 From Calgary Currently Offline Reputation: 20 (100%) |
QUOTE(JFrost9 @ Aug 12, 2006 - 2:29 PM) [snapback]468233[/snapback] I dont get it...what is this write up doing? Is it just installing JDM tails? it seems like he decided to do the write up after having the tails already installed. nice write up btw. i took off the rear plastic panel (and loosened the rear corner panels) and for step 6, i pushed the metal threading to help push the old tails out. also, i pulled out the usdm ones and kept the jdm ones. -------------------- -------------------------------------------------------------------------------- -------------------------------------------------------------------------------- |
 Aug 14, 2006 - 12:30 AM Aug 14, 2006 - 12:30 AM
|
|
|
Enthusiast    Joined Dec 28, '05 From USA Currently Offline Reputation: 0 (0%) |
why are there no altezzas for these celicas? :S i've never seen altezzas on a 6gc before :S
|
 Aug 15, 2006 - 12:16 PM Aug 15, 2006 - 12:16 PM
|
|
 Enthusiast     Joined Aug 27, '05 From Texas Currently Offline Reputation: 0 (0%) |
QUOTE(pure_dx @ Aug 14, 2006 - 12:30 AM) [snapback]468735[/snapback] why are there no altezzas for these celicas? :S i've never seen altezzas on a 6gc before :S I would like to keep it that way =/. I think him having the JDM tails already on kinda threw me off... --------------------  I am now a part of the ihavemorethen16gc club! |
 Sep 20, 2006 - 2:21 AM Sep 20, 2006 - 2:21 AM
|
|
|
Enthusiast Joined Aug 3, '06 From Sydney, Australia Currently Offline Reputation: 1 (100%) |
Thanks so much, this DIY helped me understand what i had to do before doing it, n then gettin stuck etc. !!
|
 Jul 5, 2009 - 1:14 PM Jul 5, 2009 - 1:14 PM
|
|
 Enthusiast      Joined Feb 15, '08 From Royal Oak, MI Currently Offline Reputation: 7 (100%) |
i did the same thing with my extra bulb i was like what the heck htey all dont plug in and its in the way, snip its gone lil electric tape and we were good to go, now i know htat s not the best or safest thing to do but it was strating to rain, and i wanted to get done, man these tails look so sweet! What was the bulb that you took out? what was it for? reverse ? thanks -------------------- God made man....
Everything else... Made in China  |
 May 4, 2011 - 11:43 PM May 4, 2011 - 11:43 PM
|
|
|
Enthusiast     Joined Mar 7, '10 From Ft. Lauderdale Currently Offline Reputation: 9 (100%) |
step 6 is a no-no I had a hard time trying to remove the OEM tails with out trying to "pry" it loose, if you want to be more careful, you can use a plastic knife. or you could just push on the metal studs the nuts were on in the back of the taillight housing like i did when ever i change my lights. that way you eliminate all risk of scratching your paint, or chipping the plastic on the taillight housing. -------------------- |
  |
1 User(s) are reading this topic (1 Guests and 0 Anonymous Users)
0 Members:
| Lo-Fi Version | Time is now: April 23rd, 2025 - 5:58 PM |


