  |
 Sep 20, 2009 - 3:39 PM Sep 20, 2009 - 3:39 PM
|
|
|
Enthusiast Joined Mar 14, '09 From Omaha, NE Currently Offline Reputation: 0 (0%) |
anybody know if there's a way to put the 7g leather seats into my 97? i bought them on a whim and obviously they are not going to fit, anyone kno if theres someone out there who has done this successfully? thanks.
|
 Sep 20, 2009 - 4:27 PM Sep 20, 2009 - 4:27 PM
|
|
 Enthusiast      Joined Feb 5, '05 From pineapple under the sea Currently Offline Reputation: 9 (100%) |
Try using the wonderful search function we have on this site.
http://www.celica-club.co.uk/wiki/index.ph..._seats_in_Gen_6 http://www.6gc.net/forums/index.php?showto...l=7th+gen+seats http://www.6gc.net/forums/index.php?showto...l=7th+gen+seats Just some links I found after a quick 30 second search. -------------------- 1991 MR2 - T-tops - Crimson Red - Gen3 3SGTE - Lots of money
 I'm not really an asshole, but I play one on the internet. **** Photobucket |
 Sep 20, 2009 - 6:53 PM Sep 20, 2009 - 6:53 PM
|
|
|
Enthusiast    Joined Nov 20, '04 From Carlisle, PA Currently Offline Reputation: 27 (100%) |
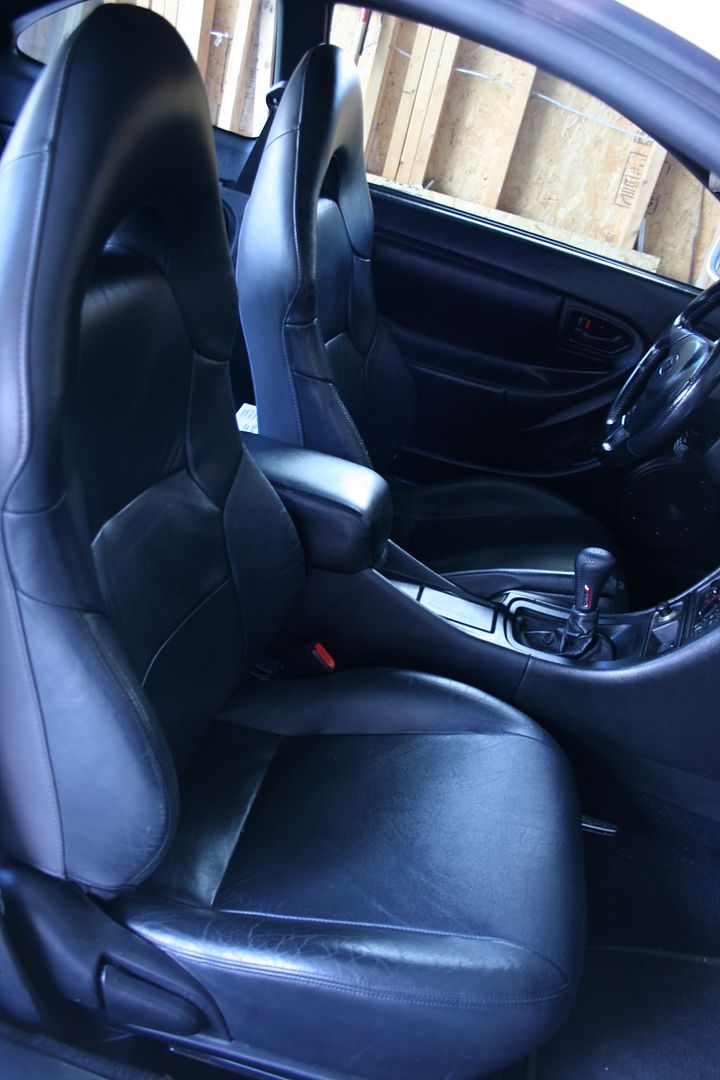 You can, but you don't need to do any welding. Swap the metal bracket under the 6th gen seat onto the 7th gen seat and then use the 6th gen rails. Easier said than done but it's not hard at all... |
 Sep 23, 2009 - 2:25 PM Sep 23, 2009 - 2:25 PM
|
|
|
Enthusiast Joined Mar 14, '09 From Omaha, NE Currently Offline Reputation: 0 (0%) |
i'll give it a shot thnx guys
|
 Sep 23, 2009 - 4:39 PM Sep 23, 2009 - 4:39 PM
|
|
|
Enthusiast      Joined Apr 24, '08 From Orange County, CA Currently Offline Reputation: 33 (100%) |
those seats weigh the same as our stock ones right??
-------------------- Group buy to replicate Narrow E series transaxle parts
http://www.6gc.net/forums/index.php?showto...p;#entry1107514 |
 Sep 23, 2009 - 9:34 PM Sep 23, 2009 - 9:34 PM
|
|
|
Enthusiast    Joined Nov 20, '04 From Carlisle, PA Currently Offline Reputation: 27 (100%) |
I didn't notice much difference. Probably within a few lbs of each other.
|
 Sep 27, 2009 - 2:18 AM Sep 27, 2009 - 2:18 AM
|
|
|
Enthusiast    Joined Mar 10, '08 From Socal, OC Currently Offline Reputation: 7 (100%) |
dang..7g seats look sweet
|
 Sep 29, 2009 - 12:15 AM Sep 29, 2009 - 12:15 AM
|
|
|
Enthusiast      Joined May 12, '06 From Wilmington, NC Currently Offline Reputation: 45 (100%) |
the seats in my 7g have airbags in the sides, which I'm sure would make them heavier than stock 6gc seats, the non-airbag ones are probably about the same weight
--------------------  94 GT - Sold -------- 69 Pontiac Lemans - Sold 88 Alltrac - Sold ---- 04 WRX - Sold 00 GT-S - Sold ------ 91 Miata - project/drift car 95 GT - Sold -------- 96 GT - New Daily Drive |
 Oct 1, 2009 - 2:49 PM Oct 1, 2009 - 2:49 PM
|
|
 Enthusiast      Joined Feb 15, '08 From Royal Oak, MI Currently Offline Reputation: 7 (100%) |
 You can, but you don't need to do any welding. Swap the metal bracket under the 6th gen seat onto the 7th gen seat and then use the 6th gen rails. Easier said than done but it's not hard at all... Cant find swap info without welding. A write up from you would be great but you've done it already and missed taking pix. -------------------- God made man....
Everything else... Made in China  |
 Oct 2, 2009 - 4:10 PM Oct 2, 2009 - 4:10 PM
|
|
|
Enthusiast    Joined Nov 20, '04 From Carlisle, PA Currently Offline Reputation: 27 (100%) |
I was originally going to take pictures but it's really not hard so I didn't bother making a write up. Here's the general idea of what you have to do-
Remove the 6g seats from the car. Get a flat head screw driver and start by removing the plastics coverings on each side of the seat. Here is where all the mounting tabs are- 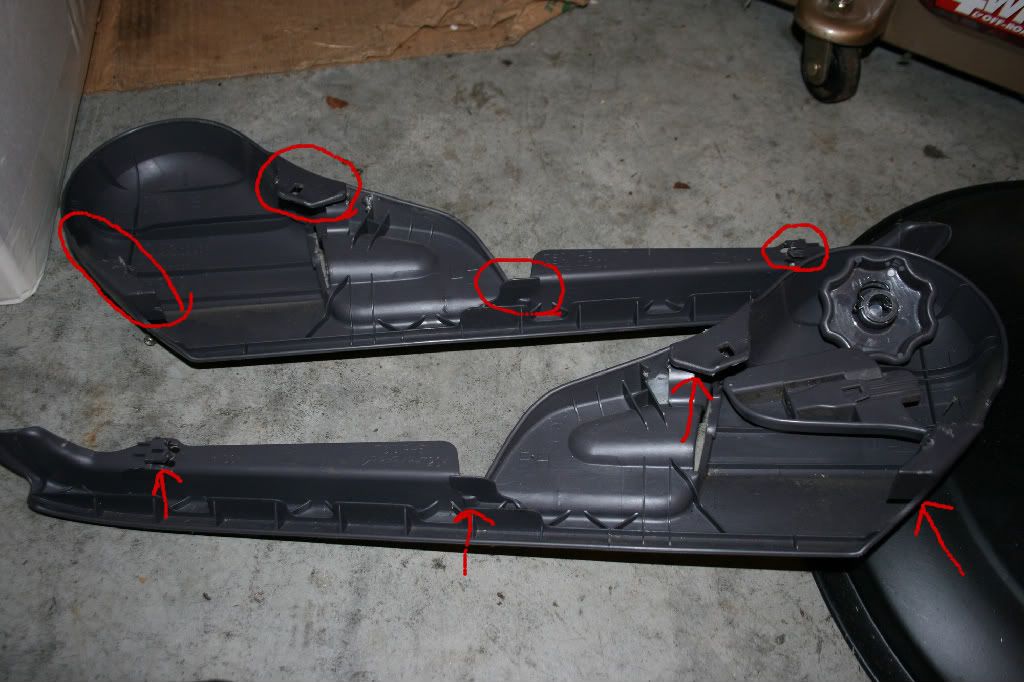 To get the height-adjustment knob off, take a rag and pull it across the c-clip to remove it. (You can see it in the picture) Or a flathead screw driver works too. Then remove the brackets from the seat- 4 bolts on the bottom, and there are maybe 2 on each side of the back cushion. Once the bolts are out the seat should more or less come apart from the bracket. There is a bar that runs through the bottom of the back-cushion for the 'reclining' function. This is the hardest part (you'll see) of the whole swap when you're putting it back together. Once you have the cushions and brackets removed, start by removing the metal support from the bottom of the seat. There are hog-ties and a plastic 'rail' they you need to remove. 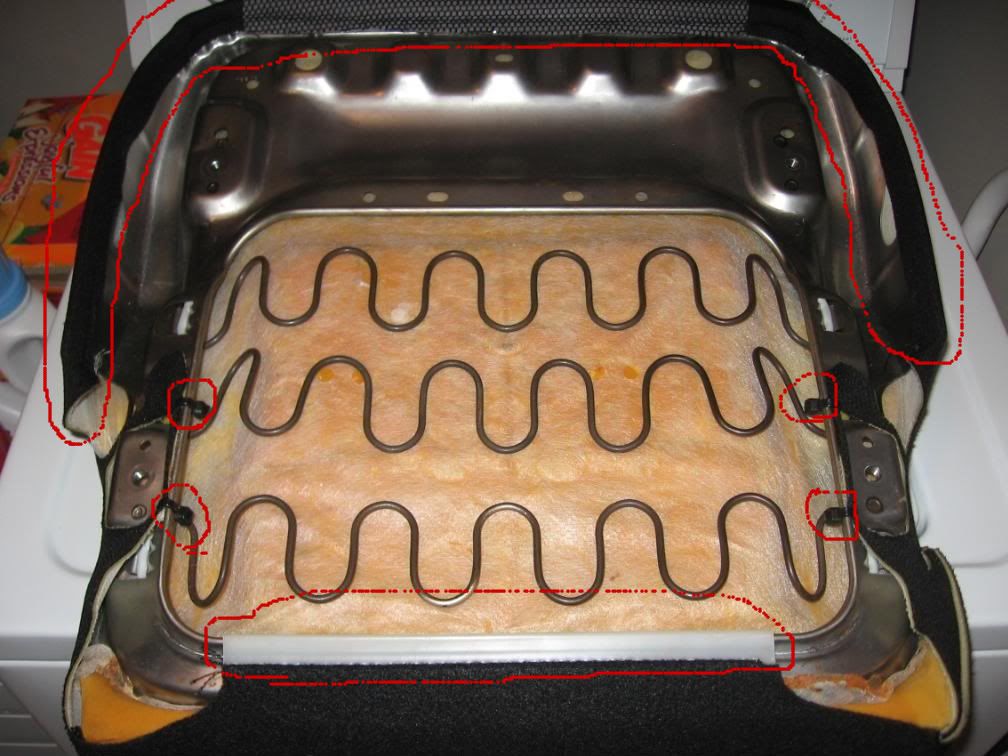 Once they're removed, the metal support piece will come away from the cushion. You need to swap this piece from the 6g cushion to the 7g cushion. The bottom cushion of the two seats is identical, but the "metal support piece" has the two front holes in a different place, that is why you need to swap it from the old 6g seat to the 7g seat (so you can bolt the seat to the 6g brackets). Once you have that swapped, you can start putting the seat back together. The bar that runs through the bottom of the back-cushion can be tricky to put in without the seat falling apart. It helps if you thread the bolts in just slightly to keep the cushion in place while you're aligning that bar. (you'll see what I'm talking about when you go to do it) Once the bar is back in, tighten the 8 seat bracket bolts and test the reclining function to make sure you got the bar in there correctly. If it works, you're ready to start on the other front seat. Hope these instructions help. Post back if you need any help. |
 Oct 3, 2009 - 6:37 AM Oct 3, 2009 - 6:37 AM
|
|
|
Enthusiast    Joined Aug 6, '09 From Bergen County,NJ Currently Offline Reputation: 10 (100%) |
Good post man seems way easier then welding.
all you needa to now, is come to jersey and drop those seat at my house -------------------- 1996 Toyota Celica ST 25th Anni. Edition #461
 |
 Oct 5, 2009 - 3:03 PM Oct 5, 2009 - 3:03 PM
|
|
 Enthusiast      Joined Feb 15, '08 From Royal Oak, MI Currently Offline Reputation: 7 (100%) |
cool! nice info! will try 'em soon! still looking for a 7gc cloth seats
-------------------- God made man....
Everything else... Made in China  |
 Nov 25, 2010 - 9:28 PM Nov 25, 2010 - 9:28 PM
|
|
 Enthusiast      Joined Apr 20, '06 From Florida Currently Offline Reputation: 44 (100%) |
So I am in the middle of this project myself, with the seats apart in front of me. Can anyone confirm that the picture he has up of the bottom of the 6g seat is in fact the newer style 6g seat that wasn't the same as the 94 ones? I am running into a much different looking seat bottom and it is keeping me from getting these swapped over. I'm about to try welding this up instead..
This post has been edited by jcbass7: Nov 25, 2010 - 11:04 PM |
 Nov 25, 2010 - 9:33 PM Nov 25, 2010 - 9:33 PM
|
|
|
Enthusiast      Joined Jul 27, '06 From Soda Currently Offline Reputation: 9 (91%) |
if it works, this should be stickied. a lot of people want to do this. im looking into doing this with the 7g cloth seats.
--------------------  |
 Nov 26, 2010 - 12:11 AM Nov 26, 2010 - 12:11 AM
|
|
 Enthusiast      Joined Apr 20, '06 From Florida Currently Offline Reputation: 44 (100%) |
7th gen seat pan (2000)
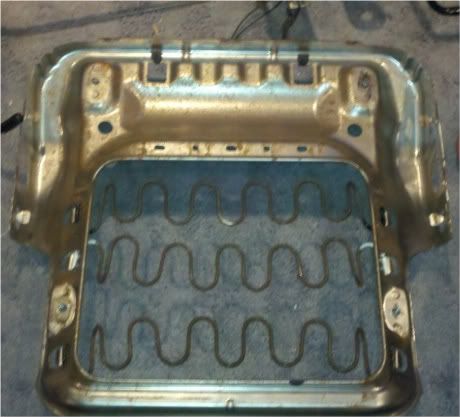 6th gen seat pan (1994) 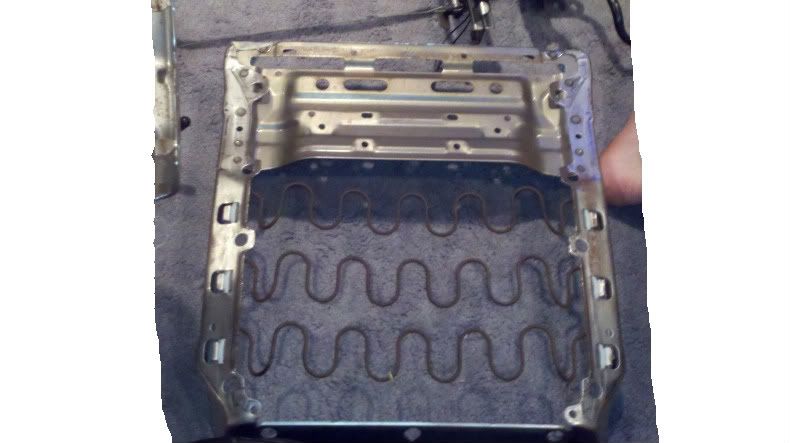
This post has been edited by jcbass7: Nov 26, 2010 - 12:14 AM |
 Nov 26, 2010 - 2:42 PM Nov 26, 2010 - 2:42 PM
|
|
|
Enthusiast      Joined Mar 15, '07 From Tennessee Currently Offline Reputation: 52 (100%) |
6th gen pan 1995

-------------------- Learned a lot in 10 years... I hardly log in anymore, last login Today Sept 6 2019, and I was forced just to clarify a post. LOL
If you PM me and I dont respond, dont fret or cry. Im alive, better post your questions in the thread below, maybe I log back in 2grfe Swapped... Why I chose the 2GR, before you ask read here... A great civilization is not conquered from without until it has destroyed itself from within. @llamaraxing in Instagram is the best way to find me. I hardly log here anymore. |
 Dec 9, 2010 - 8:11 PM Dec 9, 2010 - 8:11 PM
|
|
|
Enthusiast  Joined May 30, '10 From PA Currently Offline Reputation: 0 (0%) |
When you get to the part putting the seat back together, the back of the seat doesn't have any place to screw it in since we are using the 6g brackets. so what do you do there?
I was originally going to take pictures but it's really not hard so I didn't bother making a write up. Here's the general idea of what you have to do- Remove the 6g seats from the car. Get a flat head screw driver and start by removing the plastics coverings on each side of the seat. Here is where all the mounting tabs are-  To get the height-adjustment knob off, take a rag and pull it across the c-clip to remove it. (You can see it in the picture) Or a flathead screw driver works too. Then remove the brackets from the seat- 4 bolts on the bottom, and there are maybe 2 on each side of the back cushion. Once the bolts are out the seat should more or less come apart from the bracket. There is a bar that runs through the bottom of the back-cushion for the 'reclining' function. This is the hardest part (you'll see) of the whole swap when you're putting it back together. Once you have the cushions and brackets removed, start by removing the metal support from the bottom of the seat. There are hog-ties and a plastic 'rail' they you need to remove.  Once they're removed, the metal support piece will come away from the cushion. You need to swap this piece from the 6g cushion to the 7g cushion. The bottom cushion of the two seats is identical, but the "metal support piece" has the two front holes in a different place, that is why you need to swap it from the old 6g seat to the 7g seat (so you can bolt the seat to the 6g brackets). Once you have that swapped, you can start putting the seat back together. The bar that runs through the bottom of the back-cushion can be tricky to put in without the seat falling apart. It helps if you thread the bolts in just slightly to keep the cushion in place while you're aligning that bar. (you'll see what I'm talking about when you go to do it) Once the bar is back in, tighten the 8 seat bracket bolts and test the reclining function to make sure you got the bar in there correctly. If it works, you're ready to start on the other front seat. Hope these instructions help. Post back if you need any help. -------------------- ...5sFREAK...
|
 Dec 9, 2010 - 8:24 PM Dec 9, 2010 - 8:24 PM
|
|
 Enthusiast      Joined Apr 20, '06 From Florida Currently Offline Reputation: 44 (100%) |
I used the 6th gen plastics as well and it all worked perfect. in the car now..
|
 Dec 9, 2010 - 8:53 PM Dec 9, 2010 - 8:53 PM
|
|
|
Enthusiast  Joined May 30, '10 From PA Currently Offline Reputation: 0 (0%) |
how did you put your seat back together?
-------------------- ...5sFREAK...
|
 Dec 9, 2010 - 8:58 PM Dec 9, 2010 - 8:58 PM
|
|
 Enthusiast      Joined Apr 20, '06 From Florida Currently Offline Reputation: 44 (100%) |
how did you put your seat back together? sorry i read your post wrong, I used the 6th gen rails and seat bottom complete assembly and swapped the foam and leather seat cover from the 7th gen. The seat backs for the 7th gen and 6th gen bolt in exactly the same with two bolts and a solid steel bar that runs across. the steel bar fits into a small notch on each side. I can try to get pictures later. so theoretically if you wanted 7th gen seats you could just swap the back of the seat over and keep your 6th gen bottoms (which have a bit more support on the sides..) This post has been edited by jcbass7: Dec 9, 2010 - 8:59 PM |
  |
1 User(s) are reading this topic (1 Guests and 0 Anonymous Users)
0 Members:
| Lo-Fi Version | Time is now: November 27th, 2024 - 1:21 PM |


