  |

 May 26, 2006 - 2:36 PM May 26, 2006 - 2:36 PM
|
 
|
 Enthusiast  Joined Apr 18, '05 From Calgary Currently Offline Reputation: 20 (100%) |
How to install GT-FOUR raiser blocks ------------------------------------------ Tools used: 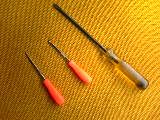 - A set of pics or a flat screwdriver - A set of pics or a flat screwdriver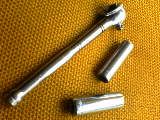 - A ratchet with 10mm and 12mm sockets - A ratchet with 10mm and 12mm sockets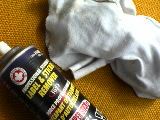 - Adhesive Remover (or GooGone) Spray and a cleaning rag - Adhesive Remover (or GooGone) Spray and a cleaning rag - A Hand Saw - A Hand Saw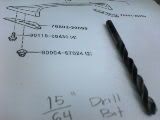 - A Power Drill with 15/64" Drill Bit - A Power Drill with 15/64" Drill Bit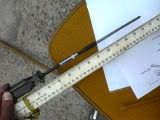 - A 'super' long Phillips Screwdriver (kinda overexaggerated) 10" is fine - A 'super' long Phillips Screwdriver (kinda overexaggerated) 10" is fine  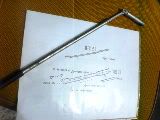 Optional: A long magnet to pick up screws dropped inside the block Optional: A long magnet to pick up screws dropped inside the blockParts needed: - The GT-Four Raiser Blocks themselves - 4 x 90159-60414 Screw ($.52 USD each) or any 4 short, stubby screws/bolts that have deep threading. 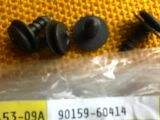 Optional: - 1 x 76882-20090 Spoiler Gasket RH - 1 x 76881-20090 Spoiler Gasket LH 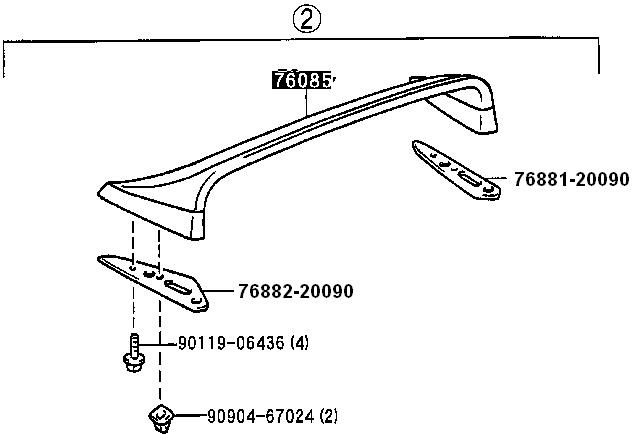 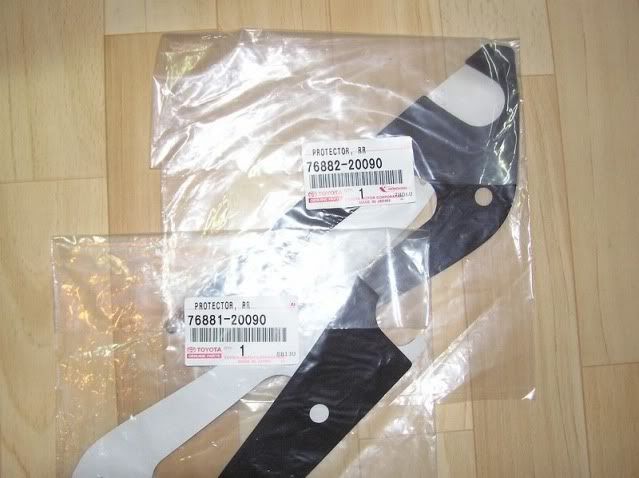 Image taken from Complete information for SS-III replica makers  by malpaso. by malpaso.Note: You can PM vincent_doggy for GT-FOUR raiser blocks, keep a look out on eBay for a pair, or buy new from the dealer (ie. 1sttoyotaparts.com) using Part Numbers: 76087-20916 and 76088-20914 ($262.48 for both) Intro ------ I bought my GT-FOUR blocks a little over a year now and have been waiting for this summer to install them. They are replicas of the authentic version and they fit satisfyingly well. The pic below is how it looked right out of the box.  Here's how they look during its prepping stage. 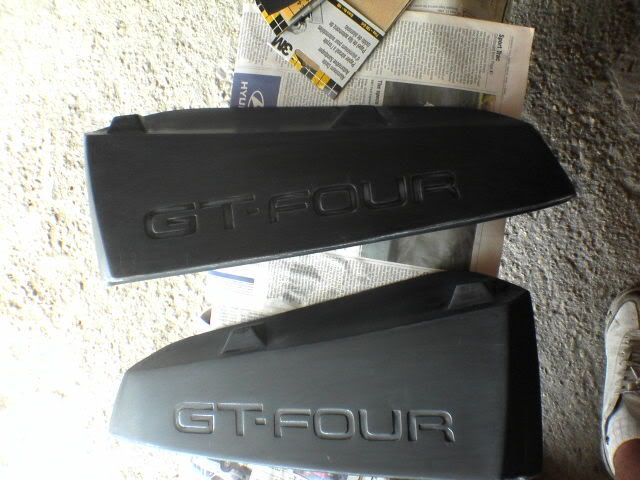 After being painted. 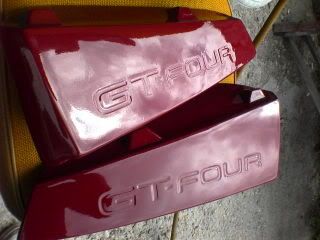 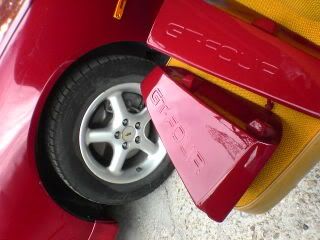 Procedures ------------ 1. Remove the lower hatch trim cover. For this you can just use your hands or you can use the picks.  2. Remove the lower hatch trim. For this I used my hands but you can also use the picks or flathead screwdriver. There are a total of 14 clips. There are two clips directly in front of the cover opening. Then work your way around. I would recommend using your hands and push down from the inside center. By using the screwdriver and pulling from the edges, you may risk damaging the trim plastic or even the clips. 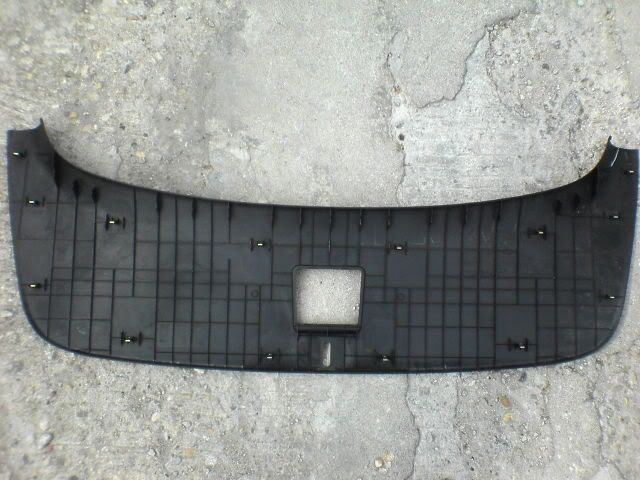   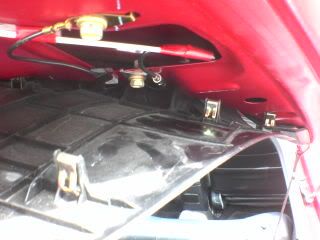 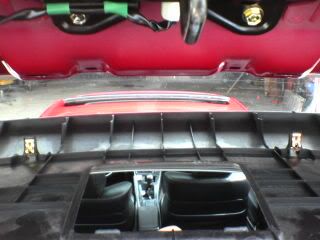 3. Remove these rubber plugs on both sides. Behind them there's a 10mm bolt holding the spoiler.  4. Using the ratchet with the 10mm socket, remove the two 10mm bolts holding the spoiler on each side.  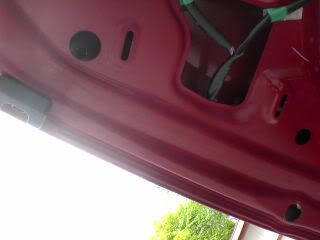 5. Remove the spoiler. It should easily come right off.  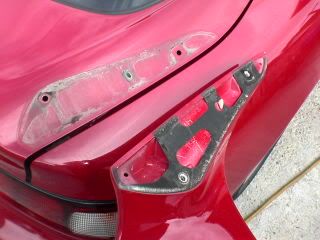 I kinda like that spoilerless look.. hmmm..... 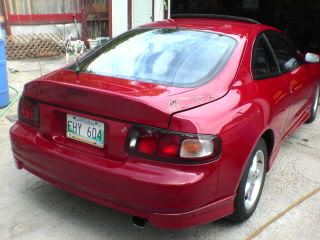 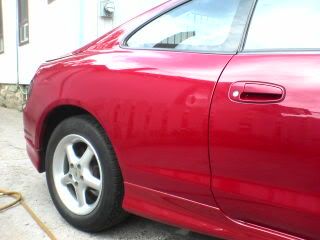  6. Notice a white peg attached on the bottom of the spoiler. These will need to be sawed off both sides with the handsaw because the replica spoiler blocks doesn't have a hole to support these. But you can skip this step if you have a pair of authentic OEM blocks. 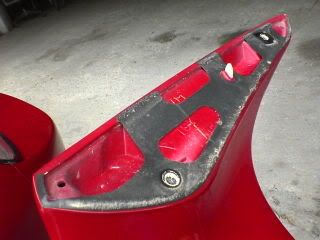   7. Drill holes through the bottom of the spoiler. There are two little markings or indents to show 5here you should drill. For this part, use the 15/64" drill bit. 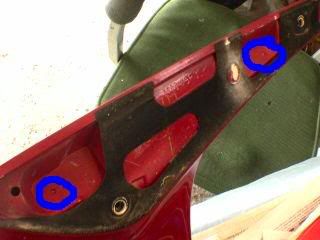 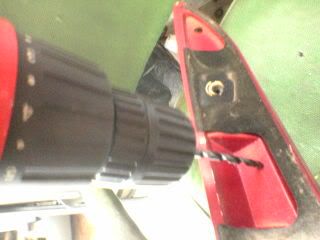 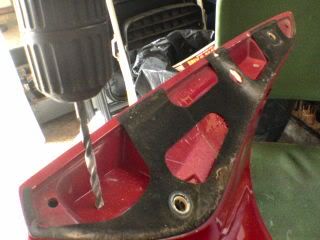  8. Use that long screwdriver and place the screw to the tip vertically upward. Then insert it into one of the holes of the block (I chose to do the deeper side first). Then flip it over and screw it in to the spoiler. 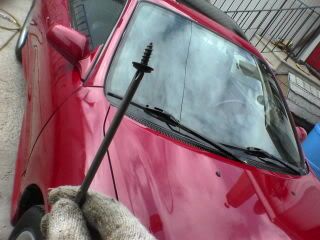 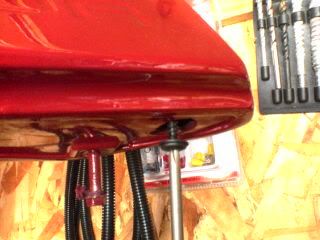 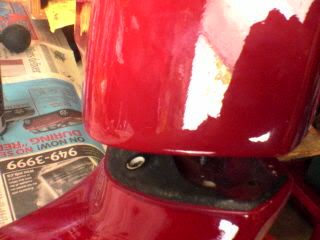 If you're wondering about the original spoiler gasket, you can just leave it on.. i tried removing mine only to find out that it's stuck on there. after i pulled on it, it started to tear, so i just left it on. 9. Now you'll need to screw in the other hole. You can either flip the entire spoiler over and repeat step 10. But what i did was i used double-sided tape and stuck the screw in place. Getting the screw into the hole through the block and spoiler is probably the hardest step. If you happen to lose the screw, just use the magnet to pull it out.. or you can flip it, shake it until it comes out of the hole. 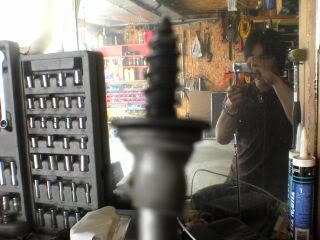 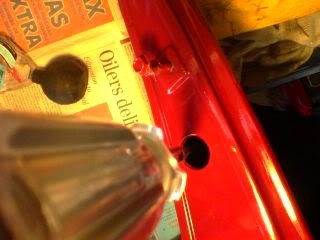 Here's how they look inside with the screws in place.  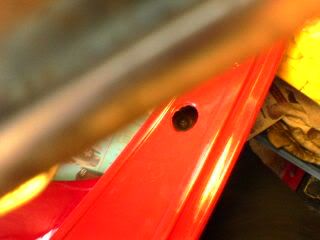 and here's how the whole spoiler looks after.   10. Prior to putting the spoiler on the hatch. Be sure to remove the dirt left under. You can use a moist cleaning rag and simply wipe it off. But for the adhesive leftover, use the adhesive remover spray, or you can use a warm damp rag and wipe it off.   This is where you apply the spoiler gaskets (if you bought them) and stick them onto the bottom of the raiser blocks. 11. Now place the spoiler onto the hatch ensuring that the holes line up with the bottom side. 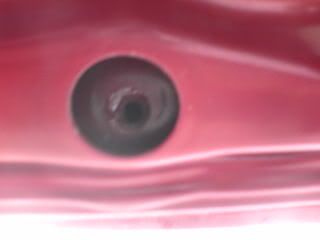   12. Install the bolts back on. Once on, try opening and closing the hatch. If you hear some rattling when you close the hatch shut. It means the bolts aren't tightened hard enough. Slowly tighten them as you'll hear some of the fiberglass from the blocks starting to crisp. It just comes to show the tension being applied as the screw pulls on to the block. When you no longer hear the buzzing or rattling, then you know they are tight enough.  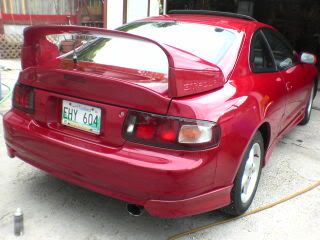  13. Now don't get too excited, you still have to put the hatch trim back on. It's pretty straight forward, just line up the clips and push on them.  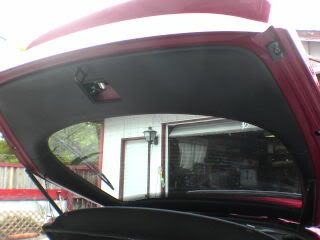 14. Reattach the trim cover. 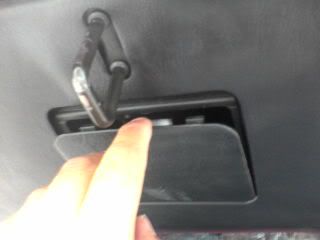 15. And plug in the rubber plugs.  16. Congrats! You are now finished! Total Time: 3 hours including breaks (haha, yeah i took some believe it or not), all the picture taking and finding which drill bit works best with the screws. but if i were to do it again, it would probably take only 1 hour or less The End Result ------------------- Before and After  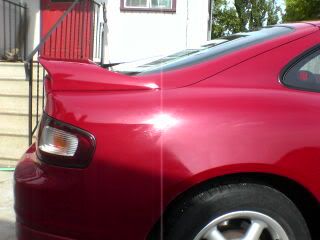   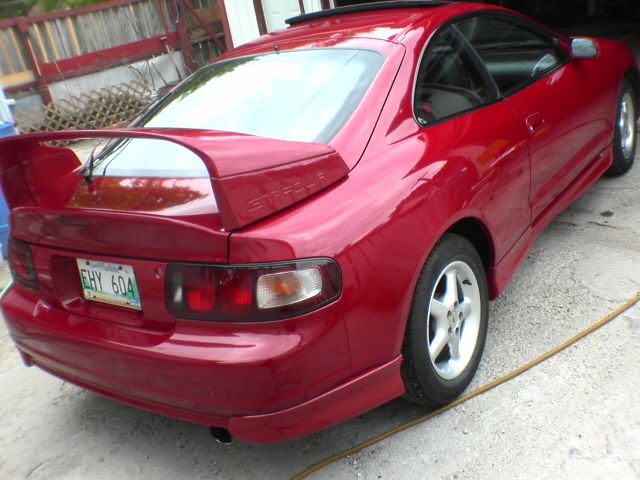  This concludes the installation of the GT-FOUR spoiler blocks Other Spoiler How-To Threads: -------------------------------------- - Converting from a 3-Post Spoiler (96-99) to a 2-Post Spoiler (94-95) by 97lestyousay - Converting from a 2 or 3-Post Spoiler to No Spoiler (Spoilerless) by hurley97 any questions? just post. This post has been edited by azian_advanced: Jan 13, 2010 - 9:02 AM -------------------- -------------------------------------------------------------------------------- -------------------------------------------------------------------------------- |

|
May 26, 2006 - 2:45 PM
|
|
|
Enthusiast Joined Aug 31, '02 From Philadelphia, PA Currently Offline Reputation: 8 (100%) |
awesome write up!
-------------------- 15PSI - 30MPG - Megasquirt Tuned
|
|
May 26, 2006 - 2:59 PM
|
|
|
Enthusiast Joined Apr 18, '05 From Calgary Currently Offline Reputation: 20 (100%) |
oops.. i mentioned 15/64" drill bit on the tools used list while i posted 14/64" drill bit in step 9.
just to clarify, use 14/64" first. it should still work just you'll have a tighter grip with the screw (which is what you want) ^fixed in original post This post has been edited by azian_advanced: Jan 13, 2010 - 8:40 AM -------------------- -------------------------------------------------------------------------------- -------------------------------------------------------------------------------- |
|
May 26, 2006 - 3:08 PM
|
|
|
Enthusiast Joined Dec 28, '05 From Norway Currently Offline Reputation: 0 (0%) |
He did it again!

--------------------  |
|
May 26, 2006 - 3:12 PM
|
|
|
Enthusiast Joined Oct 12, '05 From Texas Currently Offline Reputation: 59 (100%) |
Another awesome write up azian
~snap -------------------- Past: V6 Swapped 6G Celica, E46 BMW M3, Jeep Wrangler TJ
Current: 850rwhp C6 Corvette Grandsport, Gen1 6.2L Ford Raptor |
|
May 26, 2006 - 3:26 PM
|
|
 Enthusiast Joined Feb 3, '06 From Czech Republic (Europe) Currently Offline Reputation: 56 (100%) |
you are invincible...

-------------------- No more replicas... This is evolution... This is SS-four :)
 ________[Featured Celica of 6gc.net @ 2010]_________ |
|
May 26, 2006 - 3:35 PM
|
|
 Moderator Joined Apr 17, '03 From Rockland NY Currently Offline Reputation: 15 (100%) |
Awesome write up. I hope more members follow in your footsteps.
This will be added to the stickies. --------------------  I will return one day. |
|
May 27, 2006 - 9:10 AM
|
|
 Enthusiast Joined Aug 31, '02 From Virginia Currently Offline Reputation: 4 (100%) |
MAN, Thanks so much! This is IMPECCABLE timing since my blocks are on the way from Chrisc!!! I may PM you to talk about the painting process.
This post has been edited by Celicav: May 27, 2006 - 9:11 AM |
|
May 27, 2006 - 10:07 AM
|
|
|
Enthusiast Joined Oct 13, '02 From Blairstown, New Jersey Currently Offline Reputation: 6 (100%) |
x2!
You rocked the how-to once again, GREAT write up. -------------------- 3rd gen ST205 3SGTE - Alive and boosting. |
|
May 27, 2006 - 11:02 AM
|
|
|
Moderator Joined Oct 1, '02 From fall river, ma Currently Offline Reputation: 13 (100%) |
great job man!
looks great! -------------------- Former Team 5SFTE pro member ;)
 13.6@108MPH, 5SFTE Powered |
|
May 28, 2006 - 1:58 AM
|
|
|
Enthusiast Joined Sep 26, '05 From New Zealand Currently Offline Reputation: 0 (0%) |
That's an awesome write-up
 Are the part numbers in that diagram for the spoiler gaskets? Are the part numbers in that diagram for the spoiler gaskets?
-------------------- |
|
May 28, 2006 - 6:45 AM
|
|
|
Enthusiast Joined Apr 18, '05 From Calgary Currently Offline Reputation: 20 (100%) |
those are the spoiler gaskets for the blocks, not for the original 2 post spoiler.
-------------------- -------------------------------------------------------------------------------- -------------------------------------------------------------------------------- |
|
May 28, 2006 - 8:24 AM
|
|
|
Enthusiast Joined Aug 2, '05 From Guam Currently Offline Reputation: 15 (100%) |
very detailed writeup... good job!
-------------------- 94 Celica GT
|Toyota OEM Japan|Toyota Racing Development|Tom's|Competition Clutch|5Zigen|Apexi| |Laille/Beatrush|Magnecor|Denso|Royal Purple|Optima|PIAA|PW JDM|Megan Racing|Nitto| |Work|Greddy|Samco|Project Mu|H&R|Gates|Moog|Rota|Yokohama|Epman|1320|Upgr8 04 Celica GT |Toyota OEM Japan|Toyota Racing Development|Tein|BC Racing|Greddy| |
|
May 28, 2006 - 10:57 PM
|
|
|
Enthusiast Joined Jan 29, '06 From Kitchener, ON, CA Currently Offline Reputation: 0 (0%) |
wow man! good job!
|
|
Jun 1, 2006 - 2:50 AM
|
|
 Enthusiast Joined Feb 5, '05 From pineapple under the sea Currently Offline Reputation: 9 (100%) |
very nice and detailed. Off topic though, how much did it cost to get the blocks painted? If I had any other color other than black I would leave them, but that would look ghey.
-------------------- 1991 MR2 - T-tops - Crimson Red - Gen3 3SGTE - Lots of money
 I'm not really an asshole, but I play one on the internet. **** Photobucket |
|
Jun 4, 2006 - 11:24 PM
|
|
|
Enthusiast Joined Aug 31, '02 From Virginia Currently Offline Reputation: 4 (100%) |
WELL, I just finished installing my Blocks tonight and this write-up was my guide for sure. Thanks again Gerald!! I just have a few things to add to clarify/make things a little easier:
1. There should only be TWO 10 mm bolts on each side of the spoiler that you have to take off when removing the spoiler. The pic of the ratchet undoing the 12 mm bolt with the big rubber thing around it...no need to remove that...all those bolts do is hold the big rubber cushion in place that cushions the impact when you close the gate. Also, make sure you secure the spoiler when getting the last couple of bolts off (duh). 2. When working with the spoiler, the best thing to do is lay it across two cushioned chairs (for the drilling of holes, securing the blocks to the spoiler). When securing the blocks, the easiest thing to do is put some strong tape on the screw driver and on top of the screw, and have the blocks upside down laying on top of the spoiler. Also, a FLASHLIGHT is a big help in guiding the screw down into the hole. 3. Personally, I did not have the gaskets to place between the gate lid and the blocks. To have some cushion and get a weather proof seal, I placed some 3M double sided tape all around the screw holes on the gate lid first. You need to worry most about the screw hole that is located under the big inside trim piece that we had to take off. Hope this helps! I'll add a pic soon. |
|
Jul 6, 2006 - 9:56 PM
|
|
 Enthusiast Joined Feb 18, '06 From NB, Canada Currently Offline Reputation: 12 (100%) |
If I might add someting, instead of cutting the two nipple of the spoiler, I drilled two holes in the block to make it fit, I guess it good either way but I liked having those as a guide to hold the spoiler in place instead of only the screws.
--------------------  -Rémy 02 SiR, 08 250R |
|
Jul 7, 2006 - 12:48 AM
|
|
 Enthusiast Joined Jun 16, '06 From Plantation, FL Currently Offline Reputation: 0 (0%) |
very nice, I want some blocks.
--------------------  |
|
Feb 17, 2007 - 1:12 PM
|
|
|
Enthusiast Joined Jul 7, '03 Currently Offline Reputation: 55 (100%) |
QUOTE(azian_advanced @ May 26, 2006 - 11:59 AM) [snapback]438280[/snapback] oops.. i mentioned 15/64" drill bit on the tools used list while i posted 14/64" drill bit in step 9. just to clarify, use 14/64" first. it should still work just you'll have a tighter grip with the screw (which is what you want) Excellent right up!!! You won't find a 14/64 drill bit so just use a 7/32.
This post has been edited by 97lestyousay: Feb 17, 2007 - 8:36 PM -------------------- JDM guy made me do it.
|
|
Feb 17, 2007 - 7:02 PM
|
|
 Enthusiast Joined Nov 12, '02 From Webster Ma. Currently Offline Reputation: 1 (100%) |
very detailed. looks awesome too.
great writeup. -------------------- |
|
Apr 22, 2008 - 10:10 AM
|
|
|
Enthusiast Joined Feb 26, '07 From Boston, MA Currently Offline Reputation: 1 (100%) |
Bringin this thread back.....
quick question for anybody, are these four little screws the only thing securing the spoiler to the blocks? --------------------  |
|
Apr 22, 2008 - 1:38 PM
|
|
|
Enthusiast Joined Apr 18, '05 From Calgary Currently Offline Reputation: 20 (100%) |
yes, pretty much. but if you can find better screws (ones with deeper threading and wider diameter), you're better off that way.
-------------------- -------------------------------------------------------------------------------- -------------------------------------------------------------------------------- |
|
Apr 22, 2008 - 1:51 PM
|
|
|
Enthusiast Joined Feb 26, '07 From Boston, MA Currently Offline Reputation: 1 (100%) |
okay thanks, just wanted to make sure
-------------------- |
|
May 22, 2008 - 1:12 AM
|
|
|
Enthusiast Joined May 20, '08 From SF Currently Offline Reputation: 2 (100%) |
cool write up , someone made it sticky pls.
|
|
May 22, 2008 - 12:08 PM
|
|
 Enthusiast Joined Oct 30, '04 From So Cal Currently Offline Reputation: 13 (100%) |
Wow,, how could I miss this awesome write up!??!
-------------------- |

|
May 22, 2008 - 12:26 PM
|
|
 Enthusiast Joined Mar 8, '04 From Newport, RI Currently Offline Reputation: 63 (99%) |
QUOTE (thangxixon @ May 22, 2008 - 2:12 AM)  cool write up , someone made it sticky pls. it already is stickied -------------------- |

|
Jun 4, 2008 - 6:39 PM
|
|
|
Enthusiast Joined Mar 15, '08 From Arizona Currently Offline Reputation: 0 (0%) |
WERE CAN I BUY THE GT FOUR SPOILER
|
|
Jun 4, 2008 - 7:52 PM
|
|
|
Enthusiast Joined Apr 18, '05 From Calgary Currently Offline Reputation: 20 (100%) |
-------------------- -------------------------------------------------------------------------------- -------------------------------------------------------------------------------- |
|
Aug 18, 2008 - 3:03 PM
|
|
|
Enthusiast Joined Apr 28, '08 From Redondo Beach, CA Currently Offline Reputation: 0 (0%) |
What about for the 3 post hatchs? how do you cover holes and work with the holes for the current blocks??
Thanks. |
|
Aug 18, 2008 - 5:20 PM
|
|
|
Enthusiast Joined Aug 2, '05 From Guam Currently Offline Reputation: 15 (100%) |
who hath summoned this thread from the grave? It is indeed a good write-up.
-------------------- 94 Celica GT
|Toyota OEM Japan|Toyota Racing Development|Tom's|Competition Clutch|5Zigen|Apexi| |Laille/Beatrush|Magnecor|Denso|Royal Purple|Optima|PIAA|PW JDM|Megan Racing|Nitto| |Work|Greddy|Samco|Project Mu|H&R|Gates|Moog|Rota|Yokohama|Epman|1320|Upgr8 04 Celica GT |Toyota OEM Japan|Toyota Racing Development|Tein|BC Racing|Greddy| |
|
Aug 22, 2008 - 8:31 AM
|
|
|
Moderator Joined Oct 1, '02 From fall river, ma Currently Offline Reputation: 13 (100%) |
QUOTE (Betta-J @ Aug 18, 2008 - 4:03 PM) What about for the 3 post hatchs? how do you cover holes and work with the holes for the current blocks?? Thanks. this thread by hurley97 (Steff) will show you how its done
-------------------- Former Team 5SFTE pro member ;)
13.6@108MPH, 5SFTE Powered |
|
Jan 7, 2009 - 11:25 AM
|
|
|
Enthusiast Joined Nov 6, '08 From locust grove, va Currently Offline Reputation: 0 (0%) |
thanks helped me alot installing mine!!
|
|
Jan 7, 2009 - 11:58 AM
|
|
 Enthusiast Joined Aug 25, '08 From England Currently Offline Reputation: 1 (100%) |
QUOTE (jcaron9gt4 @ Apr 22, 2008 - 10:10 AM) Bringin this thread back..... quick question for anybody, are these four little screws the only thing securing the spoiler to the blocks? No...to fit it correctly there is a fitting kit from Toyota that includes proper bolts like the ones that hold the spoiler to the boot/trunk lid, it also includes some captive nuts in a bracket that clip into the underside of the spoiler keeping it very secure.....IMO you should be using this kit as little self tapping screws arnt strong enough...there is potentially alot of force going through the spolier, both from wind resistance, and if you use the spoiler to open the boot/trunk. -------------------- |
|
Jan 26, 2009 - 8:28 AM
|
|
|
Enthusiast Joined Jan 26, '09 From Ireland Currently Offline Reputation: 0 (0%) |
Hey Guys
My friend asked me to find out for him wheter or not the GT-Four raiser blocks would fit on a gen 6 Celica GT its a Jap Import. The guy in Toyota here in Ireland told him they wouldnt. Any help much appreciated Cheers |
|
Jan 26, 2009 - 9:34 AM
|
|
|
Enthusiast Joined Feb 3, '06 From Czech Republic (Europe) Currently Offline Reputation: 56 (100%) |
QUOTE (SteJay @ Jan 26, 2009 - 2:28 PM) Hey Guys My friend asked me to find out for him wheter or not the GT-Four raiser blocks would fit on a gen 6 Celica GT its a Jap Import. The guy in Toyota here in Ireland told him they wouldnt. Any help much appreciated Cheers since it's Jap import it's hatchback... and since it's hatchback they must fit... for 100% -------------------- No more replicas... This is evolution... This is SS-four :)
________[Featured Celica of 6gc.net @ 2010]_________ |
|
Jan 26, 2009 - 12:15 PM
|
|
|
Enthusiast Joined Jan 26, '09 From Ireland Currently Offline Reputation: 0 (0%) |
Okay cheers buddy
|
|
Jan 27, 2009 - 12:41 PM
|
|
 Enthusiast Joined Mar 27, '04 Currently Offline Reputation: 14 (100%) |
QUOTE (Nial @ Jan 7, 2009 - 4:58 PM) QUOTE (jcaron9gt4 @ Apr 22, 2008 - 10:10 AM) Bringin this thread back..... quick question for anybody, are these four little screws the only thing securing the spoiler to the blocks? No...to fit it correctly there is a fitting kit from Toyota that includes proper bolts like the ones that hold the spoiler to the boot/trunk lid, it also includes some captive nuts in a bracket that clip into the underside of the spoiler keeping it very secure.....IMO you should be using this kit as little self tapping screws arnt strong enough...there is potentially alot of force going through the spolier, both from wind resistance, and if you use the spoiler to open the boot/trunk. how much is that kit? -------------------- ~Daniel~ No Longer Celica Owner.. moved on to a 03 WRX-EJ207
 |
|
Jun 8, 2009 - 4:55 PM
|
|
|
Enthusiast Joined Jan 26, '09 From Los Angeles Currently Offline Reputation: 1 (100%) |
I know this thread is old and I'm not much of a big poster on here but I'm really wondering what the answer is to the above question..
How much is it? and what is the exact name for it? (if any) Thanks -------------------- |

|
Sep 3, 2009 - 10:27 PM
|
|
|
Enthusiast Joined Jan 20, '09 From Winnipeg Currently Offline Reputation: 5 (100%) |
I just mounted my blocks, and realized that useing the two screws like this write up says really isn't the best way. where you drill the holes on the spoiler is really soft material, seems to be a harder version of styrafoam. So i mounted them once, then took them off to paint, and the holes i drilled were basically stripped. Definately would not recomend just using the two screws, doesn't seem too safe to me.
-------------------- -Protection mode, For when your amp tries to blow its load. 1995 Toyota Celica GTS - Daily Driver 1999 Chevy Cavalier - Winter Beater 1994 Honda Civic CX Hatchback - Dead My Celica! |
|
Sep 4, 2009 - 9:23 AM
|
|
|
Enthusiast Joined Aug 25, '08 From England Currently Offline Reputation: 1 (100%) |
-------------------- |
|
Sep 4, 2009 - 5:29 PM
|
|
|
Enthusiast Joined Jan 20, '09 From Winnipeg Currently Offline Reputation: 5 (100%) |
I realize thats how its supposed to go on, and that you can buy a kit to install it, I just thought I would share my opinion so others don't run into the same problem
-------------------- -Protection mode, For when your amp tries to blow its load. 1995 Toyota Celica GTS - Daily Driver 1999 Chevy Cavalier - Winter Beater 1994 Honda Civic CX Hatchback - Dead My Celica! |
|
Nov 19, 2009 - 12:37 PM
|
|
 Enthusiast Joined Oct 7, '09 From Northern kentucky Currently Offline Reputation: 8 (90%) |
just so everyone knows the part numbers for the gaskets are no longer the same ones for toyota
-------------------- 1996 Toyota Celica Project Mean Green
3RD Gen 3SGTE WRC Edition W/LSD E153 - Love BOOST <3 2001 Solar yellow Lexus IS300 2001 Dodge ram 1500 Off-road edition |
|
Nov 13, 2012 - 10:54 PM
|
|
 Enthusiast Joined Nov 7, '12 From Puerto Rico Currently Offline Reputation: 0 (0%) |
I'm about ready to install my blocks to the Celica. Seeing as how this thread is a little old, has anyone figured out a more secure way to mount that doesn't use the kit mentioned before? I don't want to go on the highway and see my blocks fly away or anything like that.
|
|
Nov 15, 2012 - 2:20 PM
|
|
|
Enthusiast Joined May 29, '09 From Gainesville, FL Currently Offline Reputation: 17 (100%) |
QUOTE (Fuzzyfo @ Nov 13, 2012 - 10:54 PM) I'm about ready to install my blocks to the Celica. Seeing as how this thread is a little old, has anyone figured out a more secure way to mount that doesn't use the kit mentioned before? I don't want to go on the highway and see my blocks fly away or anything like that. Just get some serious threaded short screws and it works fine. I've mounted them twice and never has flown off. |
|
Nov 15, 2012 - 2:46 PM
|
|
|
Enthusiast Joined Apr 18, '05 From Calgary Currently Offline Reputation: 20 (100%) |
If I ever attempt another install, I'd use a combination of washers with toggle anchors to hold the spoiler on the block.
-------------------- -------------------------------------------------------------------------------- -------------------------------------------------------------------------------- |
|
Nov 17, 2012 - 11:13 PM
|
|
|
Enthusiast Joined Nov 7, '12 From Puerto Rico Currently Offline Reputation: 0 (0%) |
Thanks for the tips guys!
|
|
Jan 28, 2015 - 5:11 PM
|
|
|
Enthusiast Joined Jan 26, '15 From Tecate Mexico Currently Offline Reputation: 0 (0%) |
What R the measures of the riser blocks? (Long,tall, height)
|
|
1 User(s) are reading this topic (1 Guests and 0 Anonymous Users)
0 Members:
| Lo-Fi Version | Time is now: April 23rd, 2025 - 6:48 PM |