
 Mar 24, 2009 - 11:30 PM Mar 24, 2009 - 11:30 PM
|
 
|
|
Enthusiast  Joined Jun 25, '05 From Fort Wayne, IN Currently Offline Reputation: 14 (100%) |
Since I thought the write up here on the site was lacking some pics, I thought I'd do my own.
First, gotta get the glass out. You need a big pot or something. I didn't have a pot big enough, but this Wok did the trick!  But, do NOT try to force the glass out. I wasn't thinking and pushed too hard....whoops. Fortunately this is hidden and not visible as installed:  It only takes about 5 minutes in boiling water to soften the sealant up enough to pry everything apart. This is what you end up with:  When you're prying the glass off, make sure you don't get any on the chrome inner housing. It screws it up. See pic:  Ok, so you've got the glass out. Time to remove the chrome housing. You can see in this pic that there's two screws holding it on.  Remove those two screws and lift up from the bottom to allow the retaining tab to slip free from the top mount shown below:  Now you're left with the outer housing and the projector assembly mounted inside:  The projector assembly is a bit more tricky to remove. There are two adjusting screws on the back but they won't free the projector assembly from the housing. The projector assembly is held in by an alignment assembly at the lower inside corner. This is screwed in to the assembly from the backside. To reach those screws, you have to back the lower outer adjusting screw out of the assembly pushing it outwards as shown below:  Then you can access the screws on the alignment assembly backside though the back of the housing:  Once those screws are backed out, you can back out both of the alignment screws from the projector assembly, freeing it from the housing. BE ADVISED that one of the screws is reverse threaded, so watch what you're doing. Once it's freed, you are left with the pic below:  In this pic you can see the alignment assembly that's left in the main housing:  Now, to take apart the projector assembly, from the backside you will see two screws.  Remove those, then remove the rear housing from the lens housing:  Don't worry about putting it back on the right way. There are alignment pins that will only let it go together one way:  Now it's time to disassemble the projector lens housing. From the front side, there are two screws located at top and bottom of the lens.  Remove those screws, then separate the lens retaining ring and the lens from the housing.  Time for the REAL work, creating and affixing the cutoff modification. We're all familiar with why it's needed and what the part is so here's what I did. First, I created a cardboard template with the shape and size needed to do the job:  Then, I got myself some aluminum sheeting:  Cutting out a square big enough for the template, scribe the template pattern on to the piece you just cut out. HINT: Use a straight edge of the sheet for the top edge of the cutoff:  Using some aluminum shears or the like, cut your cutoff piece out:  Once the piece is cut, confirm it's the right size. trim if necessary to the right size:  Now you need to contour the piece to the shape of the housing so everything sits flush as shown below:   Now for the not so normal part. Most people have been using self tapping screws or something to affix the cutoff modification panel to the housing. I decided to go the pop rivet route because I don't want ANY chance of any kind of failure. I used a 1/8" pop rivet. I drilled the panel and housing at the same time on my drill press, so I didn't have a chance to take pics. But, as you can see below, two holes drilled allow two rivets to be put in place to retain the panel:    Pop the rivets, and I added a third to keep vibrations from causing a lighting flutter:    Now you can reassemble the projector housing in the reverse order that you took it apart. Set it aside and get ready for some tedious, time consuming, hand tiring work. Scraping the glass and housing free from all the old sealant. The glass will come free with a razor, but the housing is a different story as the majority of sealant is left in there. Fortunately, I found a trick that made it MUCH easier. A flathead screwdriver, and a small propane torch.  Doing a small section at a time, heat up the sealant, then come through with the screwdriver and scrape what you can out. With a few passes, you'll end up with the pics below, and you're ready to finish reassembling everything.   Put the projector housing back into the main housing and reattach everything starting with the alignment assembly, then move to the adjustment bolts. Once the projector is back in the housing, put the chrome inner housing back in. Now you're ready to tackle the glass. I used ultra black RTV sealant in a caulk gun tube. This made it EXTREMELY easy to fill the recess for the glass in the housing. Just run a thick bead all the way around, press the glass back into the housing, and let it cure for 24 hours! Then put your rubber seal back on and the clips and you're done! Questions or comments? Addition!!!!! Side Marker Bulb housing modification for fitment to side marker harness connector. There are three alignment tabs for the accessory bulb housing that must be trimmed off, then it will fit in the side marker light connector. Below you can see a modded and unmodded bulb housing. This is pretty simple to do, jsut take a shop knife and trim little by little until it's gone and smoothed down.   
This post has been edited by Fastbird: Mar 31, 2009 - 10:11 PM --------------------  |

 |
Replies
(1 - 65)
|
Mar 25, 2009 - 1:21 AM
|
|
|
Enthusiast Joined Mar 19, '04 From Scottsdale, Az Currently Offline Reputation: 2 (100%) |
I just finished with a set of some real cool projectors for my solstice. While you have yours open, add some halos and some audi r8 type leds.
|
|
Mar 25, 2009 - 7:13 AM
|
|
 Enthusiast Joined Mar 8, '04 From Newport, RI Currently Offline Reputation: 63 (99%) |
nice write up ! and cat
 -------------------- |

|
Mar 25, 2009 - 7:43 AM
|
|
|
Enthusiast Joined Jun 25, '05 From Fort Wayne, IN Currently Offline Reputation: 14 (100%) |
QUOTE (madmods @ Mar 25, 2009 - 1:21 AM)  I just finished with a set of some real cool projectors for my solstice. While you have yours open, add some halos and some audi r8 type leds. Not to the lows. Once I get the car back I'll pull the highs and put halo's in there. The lows are sexy enough without anything being added. The modifications are kittah approved. 
-------------------- |
|
Mar 25, 2009 - 8:48 AM
|
|
|
Moderator Joined Oct 1, '02 From fall river, ma Currently Offline Reputation: 13 (100%) |
great write up man. sticky material for sure!
-------------------- Former Team 5SFTE pro member ;)
 13.6@108MPH, 5SFTE Powered |
|
Mar 25, 2009 - 9:06 AM
|
|
|
Enthusiast Joined Jun 25, '05 From Fort Wayne, IN Currently Offline Reputation: 14 (100%) |
QUOTE (presure2 @ Mar 25, 2009 - 8:48 AM) great write up man. sticky material for sure! Coming from you, that makes my day man! I'm going to admit one thing. I was scared sh***ess when I started the project. Then after I took them apart, I went "Why in the HECK are these $900 a set????" because they're so simple on the inside. -------------------- |
|
Mar 25, 2009 - 10:17 AM
|
|
|
Enthusiast Joined Feb 14, '09 From Mid West Currently Offline Reputation: 7 (100%) |
Step x step with pics !! Easy for someone who doesn't know how it's done (like myself--lol). STICKY!?!
|
|
Mar 25, 2009 - 10:20 AM
|
|
|
Moderator Joined Oct 1, '02 From fall river, ma Currently Offline Reputation: 13 (100%) |
QUOTE (Bigblock @ Mar 25, 2009 - 10:17 AM) Step x step with pics !! Easy for someone who doesn't know how it's done (like myself--lol). STICKY!?! already done. 
-------------------- Former Team 5SFTE pro member ;)
13.6@108MPH, 5SFTE Powered |
|
Mar 25, 2009 - 10:58 AM
|
|
|
Enthusiast Joined Oct 23, '08 Currently Offline Reputation: 24 (100%) |
Nice write up. With the sheet metal being that thin you could use a good pair of HD scissors to cut it if you don't have tin shears. I actually prefer the scissors over the tin shears as it doesn't bend the metal as much and leaves a cleaner cut. Not that it matters on the bottom for this mod though.
|
|
Mar 25, 2009 - 4:48 PM
|
|
 Enthusiast Joined Apr 18, '05 From Calgary Currently Offline Reputation: 20 (100%) |
if only i had the guts to do this....
-------------------- -------------------------------------------------------------------------------- -------------------------------------------------------------------------------- |
|
Mar 25, 2009 - 11:16 PM
|
|
|
Enthusiast Joined Jun 25, '05 From Fort Wayne, IN Currently Offline Reputation: 14 (100%) |
QUOTE (azian_advanced @ Mar 25, 2009 - 4:48 PM) if only i had the guts to do this.... Send them to me. I'll do them up exactly like this for you for cheap. I have plenty of metal and rivets left over.
-------------------- |
|
Mar 26, 2009 - 6:53 AM
|
|
|
Enthusiast Joined Aug 2, '05 From Guam Currently Offline Reputation: 15 (100%) |
To me, this is not necessary for many people, the cutoff is something really that messes with your head, correct cutoff or not with HIDs they will blind others period. Never been flashed at all. Is this an issue for many of you? I guess really my question is is it really that bad to make you do this mod? I understand the cutoff but never really understood why the importance of it all. is it blinding others? its not that bad with people with reg. USDM headlights with HIDs, they will blind you no matter what. Just curious... you guys must have been getting flashed at or been pulled over.
-------------------- 94 Celica GT
|Toyota OEM Japan|Toyota Racing Development|Tom's|Competition Clutch|5Zigen|Apexi| |Laille/Beatrush|Magnecor|Denso|Royal Purple|Optima|PIAA|PW JDM|Megan Racing|Nitto| |Work|Greddy|Samco|Project Mu|H&R|Gates|Moog|Rota|Yokohama|Epman|1320|Upgr8 04 Celica GT |Toyota OEM Japan|Toyota Racing Development|Tein|BC Racing|Greddy| |
|
Mar 26, 2009 - 8:34 AM
|
|
|
Enthusiast Joined Jun 25, '05 From Fort Wayne, IN Currently Offline Reputation: 14 (100%) |
QUOTE (trdproven @ Mar 26, 2009 - 6:53 AM) To me, this is not necessary for many people, the cutoff is something really that messes with your head, correct cutoff or not with HIDs they will blind others period. Never been flashed at all. Is this an issue for many of you? I guess really my question is is it really that bad to make you do this mod? I understand the cutoff but never really understood why the importance of it all. is it blinding others? its not that bad with people with reg. USDM headlights with HIDs, they will blind you no matter what. Just curious... you guys must have been getting flashed at or been pulled over. It doesn't matter if you've been flashed or not, the potential for them to be a hazard exists. It's a safety thing more than anything. Personally I was ok with just having the silverstar bulbs in there without the modded cutoff, but it was obvious that these were RHD headlights. With HID's, that's going to become more pronounced. Personally, I'd rather not become a distraction or safety hazard to other drivers. Not to mention, if you happen to get pulled over at night and the police office knows what he's doing and looking at, you could be facing some stiff penalties for having non DOT approved equipment on the road. -------------------- |
|
Mar 26, 2009 - 8:51 AM
|
|
|
Enthusiast Joined Apr 18, '05 From Calgary Currently Offline Reputation: 20 (100%) |
i've been flashed once only. but otherwise i have never had a problem with mine or ever have been pulled over. although i know for a fact that i AM shining my HIDs towards oncoming traffic and i know how it's like because i've seen mony other imports with HIDs do the same. same goes for people who raise their SUVs without adjusting the beam of their lights which also blinds traffic. but for most oncoming traffic, i am out of their site in a couple of secs so most people don't bother 'flashing' me. however there is still a risk involved especially when driving through smaller roads like in a poorly lit 2-way traffic road (like most of the roads in my town) at night which may momentarily blind the oncoming driver. still.. i'm too freaked out about doing this mod. from what i see, it's either: a) keep it the way it is and blind traffic (on certain occasions). or b) fix cutoff but risk damaging $800 headlamps, risk of future water intrusion due to silicone wear, remove bumper & headlamps, perform work. for now, i'll stick with a) until i find a better reason for doing this like if i get pulled over by cops telling me to fix my lights.
This post has been edited by azian_advanced: Mar 26, 2009 - 8:53 AM -------------------- -------------------------------------------------------------------------------- -------------------------------------------------------------------------------- |
|
Mar 26, 2009 - 10:02 PM
|
|
|
Enthusiast Joined Aug 2, '05 From Guam Currently Offline Reputation: 15 (100%) |
Momentary blindness will not affect the driver, rain is worse. But yes, I do understand the safety as well.
-------------------- 94 Celica GT
|Toyota OEM Japan|Toyota Racing Development|Tom's|Competition Clutch|5Zigen|Apexi| |Laille/Beatrush|Magnecor|Denso|Royal Purple|Optima|PIAA|PW JDM|Megan Racing|Nitto| |Work|Greddy|Samco|Project Mu|H&R|Gates|Moog|Rota|Yokohama|Epman|1320|Upgr8 04 Celica GT |Toyota OEM Japan|Toyota Racing Development|Tein|BC Racing|Greddy| |
|
Mar 26, 2009 - 10:25 PM
|
|
|
Enthusiast Joined Apr 24, '08 From Orange County, CA Currently Offline Reputation: 33 (100%) |
this is a good sticky. much more detailed than the other one. how much would you charge for this project?
-------------------- Group buy to replicate Narrow E series transaxle parts
http://www.6gc.net/forums/index.php?showto...p;#entry1107514 |
|
Mar 26, 2009 - 10:42 PM
|
|
|
Enthusiast Joined Jun 25, '05 From Fort Wayne, IN Currently Offline Reputation: 14 (100%) |
QUOTE (BonzaiCelica @ Mar 26, 2009 - 10:25 PM) this is a good sticky. much more detailed than the other one. how much would you charge for this project? I'd do it for $30 plus return shipping for anyone on here that wants it done. Mainly because it's time consuming. Just ship them to me, I'll do them, and then I'll get payment set up when they're done and ready to be returned. -------------------- |
|
Mar 27, 2009 - 11:01 AM
|
|
|
Enthusiast Joined Apr 24, '08 From Orange County, CA Currently Offline Reputation: 33 (100%) |
doesn't sound too bad. any before and after pics. and like some members are concerned about water getting in. how long have you had the projecters converted for?
-------------------- Group buy to replicate Narrow E series transaxle parts
http://www.6gc.net/forums/index.php?showto...p;#entry1107514 |
|
Mar 27, 2009 - 11:17 AM
|
|
|
Enthusiast Joined Jun 25, '05 From Fort Wayne, IN Currently Offline Reputation: 14 (100%) |
QUOTE (BonzaiCelica @ Mar 27, 2009 - 11:01 AM) doesn't sound too bad. any before and after pics. and like some members are concerned about water getting in. how long have you had the projecters converted for? Did'nt take any low light pics, but did test them. Take the cutoff as they come from the factory, and just make the left side flat. It's what you end up with. Don't have them back on the car yet, it's still in the shop for another 2-3 weeks for paint, ect. Leaking shouldn't be an issue because I ran a full bead of sealant around the glass recess in the housing and verified that it had complete coverage. -------------------- |
|
Mar 31, 2009 - 10:08 PM
|
|
|
Enthusiast Joined Jun 25, '05 From Fort Wayne, IN Currently Offline Reputation: 14 (100%) |
Made an update to the original post to include the proper modding necessary to allow the side marker harness fit on the accessory light bulb housing if you want to use those as the markers instead (I am because we shaved the side markers).
-------------------- |
|
Apr 28, 2009 - 3:47 PM
|
|
|
Enthusiast Joined Apr 24, '09 From switzerland Currently Offline Reputation: 0 (0%) |
Hi all
Great HowTo! I did it myself, it's quite eazy if you know how to do it. Just one addition: the opening (and re-sealing) is MUCH simplier that way: - put the whole headlight in a backing oven, and heat it at 120 degrees Celsius (250 degrees Fahrenheit) for about 5 minutes (or as long as it needs to get the right temperature. - wearing gloves, take it out (carefully, it's hot!), and remove the glass gently as mentioned in this how-to. It should come off nicely. ...convert your headlight following the how-to, then, when you're finished: - do NOT mess around by trying to remove the sealant. - put the glass and the body back in the oven, heat them again to 120 C (250 F). - Wearing protection gloves again, remove them after 5 minutes and simply put them carefully back together. The sealant should be nicely soft, so it will be quite eazy. - Firmly press the glass and the body together, and let the whole headlight cool down... you're done! The JDM's really look amazing, by the way... I strongly recommend this mod to anyone who can afford it (or loves its celica! )Cheers marbot |
|
Dec 31, 2009 - 2:00 PM
|
|
|
Enthusiast Joined Jan 20, '09 From Winnipeg Currently Offline Reputation: 5 (100%) |
I don't really understand the point of this mod. Cans omeone explain it to me? What exactly does this "cutoff" do? Howcome the headlights have to be converted from RHD to LHD? Any explanation on this is helpful, cause I'm planning on gettin projectors eventually for my car. Thanks.
-------------------- -Protection mode, For when your amp tries to blow its load. 1995 Toyota Celica GTS - Daily Driver 1999 Chevy Cavalier - Winter Beater 1994 Honda Civic CX Hatchback - Dead My Celica! |
|
Dec 31, 2009 - 2:01 PM
|
|
|
Enthusiast Joined Jan 20, '09 From Winnipeg Currently Offline Reputation: 5 (100%) |
I don't really understand the point of this mod. Cans omeone explain it to me? What exactly does this "cutoff" do? Howcome the headlights have to be converted from RHD to LHD? Any explanation on this is helpful, cause I'm planning on gettin projectors eventually for my car. Thanks.
-------------------- -Protection mode, For when your amp tries to blow its load. 1995 Toyota Celica GTS - Daily Driver 1999 Chevy Cavalier - Winter Beater 1994 Honda Civic CX Hatchback - Dead My Celica! |
|
Dec 31, 2009 - 2:03 PM
|
|
|
Enthusiast Joined Jun 18, '09 From Orlando Currently Offline Reputation: 8 (100%) |
QUOTE (jordisonjr @ Dec 31, 2009 - 2:01 PM) Howcome the headlights have to be converted from RHD to LHD? Since Japan drives on the left side of the road, the lights are aimed away from oncoming traffic, so to the left. Since the US drives on the right, this would mean that the lights actually point into oncoming traffic, so they have to be converted to point to the right. -------------------- '97 ST \ Eibach \ KYB \ Kenwood \ Alpine \ Cusco \ OEM+ [sold 10/18]
'93 MX-5 LE |
|
Dec 31, 2009 - 2:12 PM
|
|
|
Enthusiast Joined Jan 20, '09 From Winnipeg Currently Offline Reputation: 5 (100%) |
QUOTE (SwissFerdi @ Dec 31, 2009 - 2:03 PM) QUOTE (jordisonjr @ Dec 31, 2009 - 2:01 PM) Howcome the headlights have to be converted from RHD to LHD? Since Japan drives on the left side of the road, the lights are aimed away from oncoming traffic, so to the left. Since the US drives on the right, this would mean that the lights actually point into oncoming traffic, so they have to be converted to point to the right. So could you not just re-aim them, the same way you would aim a normal set of headlights? -------------------- -Protection mode, For when your amp tries to blow its load. 1995 Toyota Celica GTS - Daily Driver 1999 Chevy Cavalier - Winter Beater 1994 Honda Civic CX Hatchback - Dead My Celica! |
|
Dec 31, 2009 - 5:05 PM
|
|
|
Enthusiast Joined Mar 15, '07 From Tennessee Currently Offline Reputation: 52 (100%) |
no, is a different angle
-------------------- Learned a lot in 10 years... I hardly log in anymore, last login Today Sept 6 2019, and I was forced just to clarify a post. LOL
If you PM me and I dont respond, dont fret or cry. Im alive, better post your questions in the thread below, maybe I log back in 2grfe Swapped... Why I chose the 2GR, before you ask read here... A great civilization is not conquered from without until it has destroyed itself from within. @llamaraxing in Instagram is the best way to find me. I hardly log here anymore. |
|
Nov 15, 2010 - 11:26 AM
|
|
|
Enthusiast Joined Dec 16, '08 From Norway Currently Offline Reputation: 0 (0%) |
QUOTE (Fastbird @ Mar 25, 2009 - 12:30 AM) Addition!!!!! Side Marker Bulb housing modification for fitment to side marker harness connector. There are three alignment tabs for the accessory bulb housing that must be trimmed off, then it will fit in the side marker light connector. Below you can see a modded and unmodded bulb housing. This is pretty simple to do, jsut take a shop knife and trim little by little until it's gone and smoothed down. Hi. About the side marker bulbs. I cut off the three alignment tabs, but still it won't fit. I looked on your picture, and it looks like you had to trim of inside also addition to the tabs? 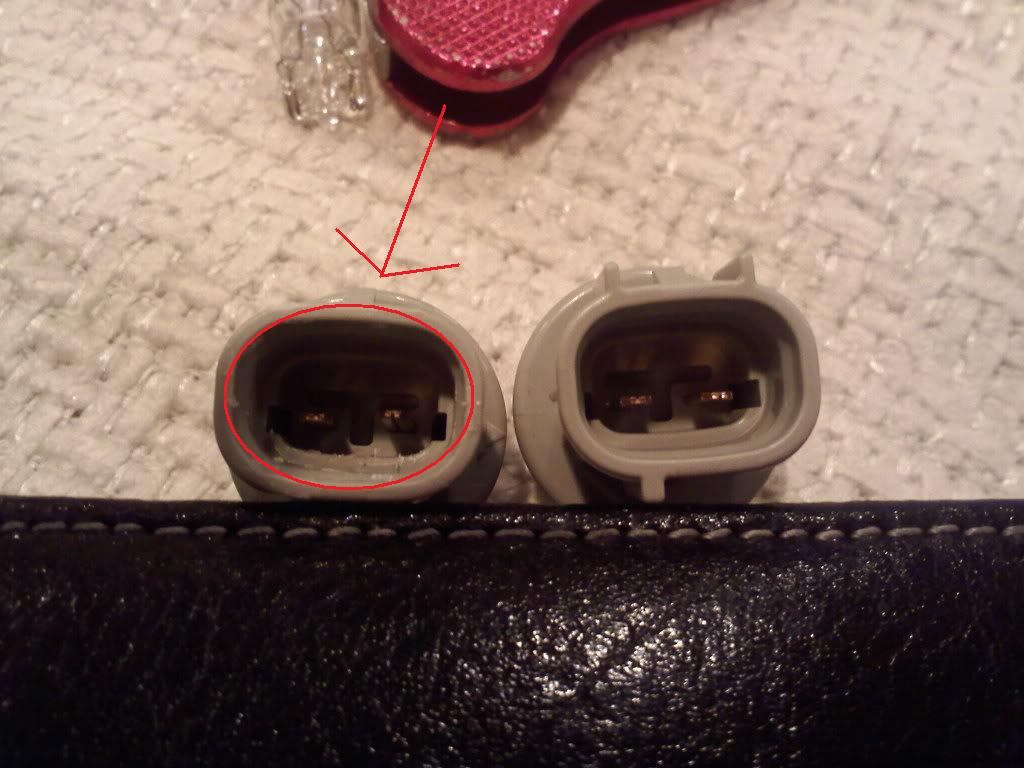
This post has been edited by richee3: Oct 7, 2017 - 10:41 PM -------------------- - Celica ST202 w/ JDM 3S-GE 180HP (Special LE Subaru Blue steel paint!)
- A video of my car, before & after: Click here |
|
Dec 13, 2010 - 4:40 PM
|
|
|
Enthusiast Joined Jun 25, '05 From Fort Wayne, IN Currently Offline Reputation: 14 (100%) |
I don't remember having to trim anything off the inside of the connector. It's been a long time but had I trimmed anything I'd have mentioned it because I posted this right when I did it.
-------------------- |
|
Dec 13, 2010 - 5:03 PM
|
|
|
Enthusiast Joined Mar 15, '07 From Tennessee Currently Offline Reputation: 52 (100%) |
Addingmore options.
 stainless steel fron the cheapo piping braces also cleaned the old rubber and used this to seal  perfect seal 
This post has been edited by njccmd2002: Oct 15, 2011 - 8:49 AM -------------------- Learned a lot in 10 years... I hardly log in anymore, last login Today Sept 6 2019, and I was forced just to clarify a post. LOL
If you PM me and I dont respond, dont fret or cry. Im alive, better post your questions in the thread below, maybe I log back in 2grfe Swapped... Why I chose the 2GR, before you ask read here... A great civilization is not conquered from without until it has destroyed itself from within. @llamaraxing in Instagram is the best way to find me. I hardly log here anymore. |
|
Dec 13, 2010 - 5:13 PM
|
|
|
Enthusiast Joined Jun 18, '09 From Orlando Currently Offline Reputation: 8 (100%) |
^ You are a god of custom, small modifications. Awesome.
-------------------- '97 ST \ Eibach \ KYB \ Kenwood \ Alpine \ Cusco \ OEM+ [sold 10/18]
'93 MX-5 LE |
|
Dec 14, 2010 - 9:42 AM
|
|
|
Enthusiast Joined Dec 11, '07 From Davie, Florida Currently Offline Reputation: 4 (100%) |
QUOTE (njccmd2002 @ Dec 13, 2010 - 6:03 PM) Addingmore options. also cleaned the old rubber and used this to seal  Who says Nissan parts doesn't work on Toyota's? Lol |
|
Dec 16, 2010 - 4:08 PM
|
|
|
Enthusiast Joined Mar 15, '07 From Tennessee Currently Offline Reputation: 52 (100%) |
unfortunately, they are the only smart ones that sell them, if you google oem butyl rubber, the acura guys, nissan, mazda all recommend this stuff.
OH i forgot, for the first few weeks they recommend silica gel packets for dessicant. -------------------- Learned a lot in 10 years... I hardly log in anymore, last login Today Sept 6 2019, and I was forced just to clarify a post. LOL
If you PM me and I dont respond, dont fret or cry. Im alive, better post your questions in the thread below, maybe I log back in 2grfe Swapped... Why I chose the 2GR, before you ask read here... A great civilization is not conquered from without until it has destroyed itself from within. @llamaraxing in Instagram is the best way to find me. I hardly log here anymore. |
|
Dec 27, 2010 - 10:48 AM
|
|
|
Enthusiast Joined Oct 21, '05 From Okinawa, Japan Currently Offline Reputation: 0 (0%) |
QUOTE (njccmd2002 @ Dec 16, 2010 - 2:08 PM) OH i forgot, for the first few weeks they recommend silica gel packets for dessicant. where do you put the packets at? inside? also, has anyone take the right side apart to see what it looks like? Is it possible to get the angle on that side to shine up so you can see more of the side of the road/shoulder? (maybe swap inner housings?) -------------------- -Dan
1998 SSII Beams, work in progress... |
|
Dec 29, 2010 - 2:06 PM
|
|
|
Enthusiast Joined Mar 15, '07 From Tennessee Currently Offline Reputation: 52 (100%) |
packets go inside, and i tought about opening the other side, but too much hassle.. lol..
i only use it during day, only on rare ocassions. -------------------- Learned a lot in 10 years... I hardly log in anymore, last login Today Sept 6 2019, and I was forced just to clarify a post. LOL
If you PM me and I dont respond, dont fret or cry. Im alive, better post your questions in the thread below, maybe I log back in 2grfe Swapped... Why I chose the 2GR, before you ask read here... A great civilization is not conquered from without until it has destroyed itself from within. @llamaraxing in Instagram is the best way to find me. I hardly log here anymore. |
|
Nov 5, 2011 - 6:42 PM
|
|
|
Enthusiast Joined May 30, '05 From MN Currently Offline Reputation: 8 (100%) |
I have to admit that I didn't understand the point of this mod until I installed the projectors. After 3 weeks of use and numerous adjustments, I was still getting flashed daily by school buses and truckers. I live in a small town with two lane highway traffic. So today I decided to tackle this mod today. I'm glad to say that its not hard to do at all. First one took me 2.5 hours and the second one took less than an hour! I actually reversed the angle to the right instead of keeping the cut off straight. The reason is that I noticed its hard to see street signs to the right at night with the jdm cut off. So I basically reversed the cut off. I highly recommend it.
-------------------- 3sgteing.
..burns twice as bright, lasts half as long. "The weight of the world is love. Under the burden of solitude, under the burden of dissatisfaction." -Allen Ginsberg- |
|
Nov 5, 2011 - 7:09 PM
|
|
|
Moderator Joined Jun 29, '08 From Denver Currently Offline Reputation: 59 (100%) |
I haven't done this and I'm running 35w 4,500k DDM HID's. I've only been flashed once, and I was on top of a hill where my lights would have been pointed at them anyway. Part of me still wants to do it, then most of me is too lazy now that they're installed.
Eli, how did you reverse the cutoff? Did you completely remove the factory cutoff rather than add your own as this writeup says to do? -------------------- "Employ your time in improving yourself by other men's writings, so that you shall gain easily what others labored hard for." -Socrates. Even Socrates told us to use the search button!
 2006 Aston Martin V8 Vantage. 1998 Celica GT- BEAMS Swapped. 2022 4Runner TRD Off Road Prenium. 2021 GMC Sierra AT4. |
|
Nov 5, 2011 - 9:33 PM
|
|
|
Enthusiast Joined May 30, '05 From MN Currently Offline Reputation: 8 (100%) |
Hi Dan, I added the cut off the same way as this write up except instead of keeping the cut off straight across, l made an angle opposite where the JDM one was. I used a dremel and a metal filer to make the angle. My new angle is slighlty less than the JDM one. I figured the purpose of this angle is to illuminate road signs. Thus, in our case the angle need to be on the opposite side of the road for us. I bought that nissan sealant but didn't need/use it. I used the oven method to remove and replace the glass. Time will tell. Next l need to sort out a good HID kit to install.
-------------------- 3sgteing.
..burns twice as bright, lasts half as long. "The weight of the world is love. Under the burden of solitude, under the burden of dissatisfaction." -Allen Ginsberg- |
|
Nov 10, 2011 - 6:43 PM
|
|
|
Moderator Joined Jun 29, '08 From Denver Currently Offline Reputation: 59 (100%) |
QUOTE (malecrod @ Nov 5, 2011 - 8:33 PM) Hi Dan, I added the cut off the same way as this write up except instead of keeping the cut off straight across, l made an angle opposite where the JDM one was. I used a dremel and a metal filer to make the angle. My new angle is slighlty less than the JDM one. I figured the purpose of this angle is to illuminate road signs. Thus, in our case the angle need to be on the opposite side of the road for us. I bought that nissan sealant but didn't need/use it. I used the oven method to remove and replace the glass. Time will tell. Next l need to sort out a good HID kit to install. I thought that would make the cutoff too high and therefore, aim the lights too low. I suppose this can be rectified by aiming the bulbs higher? I'm curious to see nighttime shots of your cutoff line. Even though we've been running ours for a while now without doing this mod, it's always in the back of my mind that we still need to do it and I might be interested in copying your idea. Might as well go the whole 9 yards by the time I take these apart. As for HID kits, I have a 35w 4,500k DDM Tuning kit. It's bright and as usual, has a fantastic warranty. The price is right too, $35 for the bulbs, ballast, and a lifetime warranty. But they're too blue for my liking. My 4,500k bulbs are more like 5-5,500k. I've had both 9006 and H1's and both are too blue for me. I had a 4,300k kit from Griffgirl that I was much more satisfied with but you can't go wrong with DDM Tuning HID's. This post has been edited by richee3: Nov 10, 2011 - 6:47 PM -------------------- "Employ your time in improving yourself by other men's writings, so that you shall gain easily what others labored hard for." -Socrates. Even Socrates told us to use the search button!
2006 Aston Martin V8 Vantage. 1998 Celica GT- BEAMS Swapped. 2022 4Runner TRD Off Road Prenium. 2021 GMC Sierra AT4. |
|
Dec 4, 2012 - 8:43 PM
|
|
|
Enthusiast Joined Nov 30, '12 From Ohio Currently Offline Reputation: 0 (0%) |
Thread revival
 So I understand the whole concept here, but I don't have the HID on my Celica, I have the JDM "el cheapo"version:  My High beams are perfect, but the low beams have somewhat dull reflectors. Has anyone modified this type of headlight? I'm a bit afraid to take them apart, but maybe I can polish the reflectoror and maybe made the same alignment mod for the headlights? |
|
Dec 4, 2012 - 11:32 PM
|
|
 Enthusiast Joined Nov 29, '10 From Lake Havasu City, AZ Currently Offline Reputation: 31 (100%) |
The only way to modify JDM Halogen housings to work for the US roads is to swap out the glass lenses, as the JDM versions point to the left since they drive on the left side of the road.
If you didn't swap, some light would be refracted into oncoming traffic making it annoying and possibly hazardous. You would really only need to swap the LOW beams since you generally don't use high beams when there is oncoming traffic. Or do a full projector retrofit, like I've done It's really simple, just heat the lenses either by boiling the whole headlight, using an oven, or grab heat gun and some patience. I chose to use heat gun and it works fine. Then once the JDM glasses are off then apply heat again to the sealant and USDM glass and press firmly, letting the heat continue to make sure its fully sealed. For extra security you can use a clear silicone to further seal. --------------------  6gcHeroes:808hectortimmybatmandiegotigamak |
|
Dec 5, 2012 - 3:52 AM
|
|
|
Enthusiast Joined Dec 16, '11 From The Netherlands Currently Offline Reputation: 5 (100%) |
 here you can see the straight cut-off |
|
Jan 9, 2013 - 8:19 PM
|
|
|
Enthusiast Joined Dec 26, '12 From Illinois Currently Offline Reputation: 0 (0%) |
I have the money to buy the JDM projectors and I am willing to convert them to LHD. My only question that I want to make clear is: Are the modified projectors absolutely safe to use on US roads? I am sorry if this question has been answered before, but I want to make sure considering that they aren't cheap and I wouldn't want to buy them just so they can sit in my closet.
|
|
Jan 9, 2013 - 9:05 PM
|
|
|
Moderator Joined Jun 29, '08 From Denver Currently Offline Reputation: 59 (100%) |
After they are modified, they are essentially exactly the same as any projectors sold here in the States. The only difference is the lack of a DOT stamp on your newly modified projectors.
-------------------- "Employ your time in improving yourself by other men's writings, so that you shall gain easily what others labored hard for." -Socrates. Even Socrates told us to use the search button!
2006 Aston Martin V8 Vantage. 1998 Celica GT- BEAMS Swapped. 2022 4Runner TRD Off Road Prenium. 2021 GMC Sierra AT4. |
|
Jan 10, 2013 - 3:23 AM
|
|
|
Enthusiast Joined Apr 24, '08 From Orange County, CA Currently Offline Reputation: 33 (100%) |
QUOTE (richee3 @ Jan 9, 2013 - 9:05 PM) After they are modified, they are essentially exactly the same as any projectors sold here in the States. The only difference is the lack of a DOT stamp on your newly modified projectors. haha legal. that word does not exist when it comes to my celica -------------------- Group buy to replicate Narrow E series transaxle parts
http://www.6gc.net/forums/index.php?showto...p;#entry1107514 |
|
Mar 16, 2013 - 3:19 PM
|
|
|
Enthusiast Joined Aug 31, '02 From Philadelphia, PA Currently Offline Reputation: 8 (100%) |
I just wanted to chime in on something I learned while doing this mod.
There are two types of cutoffs. One is for halogen lights, and the other is for HID lights. The factory headlights are not only setup for right hard drive, but they are also setup for halogen lights, not HIDs. Here is a typical cutoff for halogen lights. including the light output:  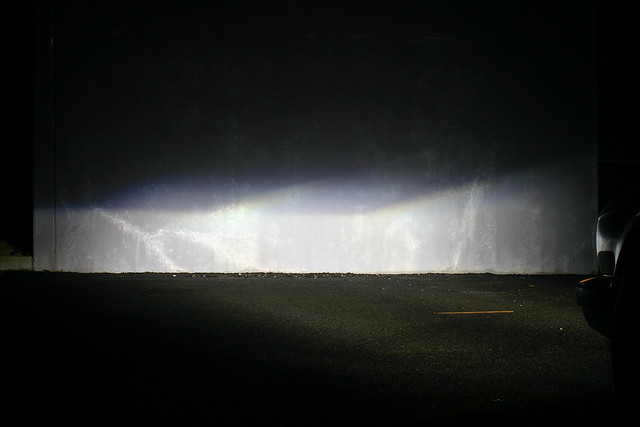 Now here is a cutoff for an HID bulbs:  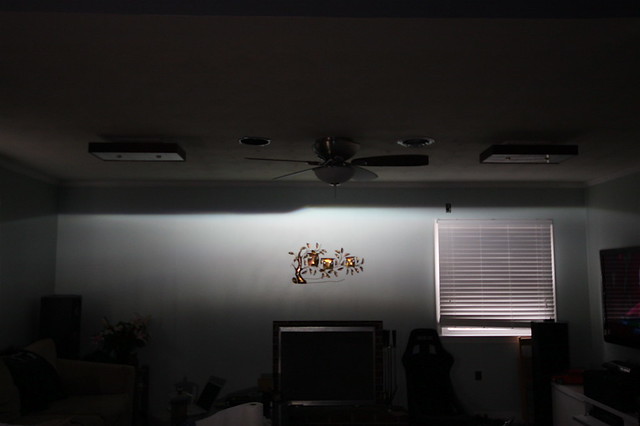 So do not attempt to replicate the same 45 degree cutoff that is in the factory projector. You'll just end up shooting your beam up into the sky and blinding people walking on the sidewalk. The cutoff should be straight like in Fastbirds first post, or a very minimal step, but nothing as drastic as what is done with the factory toyota cutoff. And on a side note, you can use a heat gun to separate the glass housing. No need to stink up your oven or a pot of water you'll later use to cook your dinner. This post has been edited by lagos: Mar 16, 2013 - 3:25 PM -------------------- 15PSI - 30MPG - Megasquirt Tuned
|
|
Mar 16, 2013 - 4:25 PM
|
|
|
Enthusiast Joined Mar 15, '07 From Tennessee Currently Offline Reputation: 52 (100%) |
cool you are able to park the car in the living room. brah!
-------------------- Learned a lot in 10 years... I hardly log in anymore, last login Today Sept 6 2019, and I was forced just to clarify a post. LOL
If you PM me and I dont respond, dont fret or cry. Im alive, better post your questions in the thread below, maybe I log back in 2grfe Swapped... Why I chose the 2GR, before you ask read here... A great civilization is not conquered from without until it has destroyed itself from within. @llamaraxing in Instagram is the best way to find me. I hardly log here anymore. |
|
Mar 16, 2013 - 4:37 PM
|
|
|
Moderator Joined Jun 29, '08 From Denver Currently Offline Reputation: 59 (100%) |
QUOTE (njccmd2002 @ Mar 16, 2013 - 4:25 PM) cool you are able to park the car in the living room. brah! I was thinking the same thing!
-------------------- "Employ your time in improving yourself by other men's writings, so that you shall gain easily what others labored hard for." -Socrates. Even Socrates told us to use the search button!
2006 Aston Martin V8 Vantage. 1998 Celica GT- BEAMS Swapped. 2022 4Runner TRD Off Road Prenium. 2021 GMC Sierra AT4. |
|
Mar 16, 2013 - 6:00 PM
|
|
|
Enthusiast Joined Aug 31, '02 From Philadelphia, PA Currently Offline Reputation: 8 (100%) |
QUOTE (njccmd2002 @ Mar 16, 2013 - 5:25 PM) cool you are able to park the car in the living room. brah! Not my pic, but I wouldn't mind having my car in the living room with me at all times. -------------------- 15PSI - 30MPG - Megasquirt Tuned
|
|
May 1, 2013 - 6:21 PM
|
|
|
Moderator Joined Jun 29, '08 From Denver Currently Offline Reputation: 59 (100%) |
Finally got around to doing this myself today. I will echo Sean's sentiment:
QUOTE (Fastbird @ Mar 25, 2009 - 9:06 AM) I'm going to admit one thing. I was scared sh***ess when I started the project. Then after I took them apart, I went "Why in the HECK are these $900 a set????" because they're so simple on the inside. During the entire disassembly of the first light, I was stressing out. By the time I had affixed my new cutoff, I realized there was really no reason to worry. I was going to emulate the stepped USDM HID cutoff as posted above by Lagos, but decided against it and went with a straight cutoff. I picked up some of the butyl rubber from Nissan that njccmd used, that stuff was very easy to work with and didn't make a mess like black RTV would. It cost me $29, money well spent. After being so nervous about getting this job started, I will say that there's no reason not to do this, as it's a much easier mod than it sounds. -------------------- "Employ your time in improving yourself by other men's writings, so that you shall gain easily what others labored hard for." -Socrates. Even Socrates told us to use the search button!
2006 Aston Martin V8 Vantage. 1998 Celica GT- BEAMS Swapped. 2022 4Runner TRD Off Road Prenium. 2021 GMC Sierra AT4. |
|
Oct 9, 2013 - 2:48 PM
|
|
|
Enthusiast Joined Oct 7, '13 From Spruce Grove, Alberta, Canada Currently Offline Reputation: 0 (0%) |
This is one of the better write-ups I have seen on a car forum, great step-by-step guide with pictures. I have a set of JDM projectors waiting to go into my 96 ST205 and was looking into doing this mod and this thread has the best information on the subject I could find.
Since it has been awhile, I wonder if anybody that has done this mod has noticed any problems with the seals (moisture inside the lenses)? |
|
Oct 9, 2013 - 3:09 PM
|
|
 Enthusiast Joined Mar 6, '04 From Charlotte, NC Currently Offline Reputation: 9 (100%) |
QUOTE (Hugo4 @ Oct 9, 2013 - 3:48 PM) This is one of the better write-ups I have seen on a car forum, great step-by-step guide with pictures. I have a set of JDM projectors waiting to go into my 96 ST205 and was looking into doing this mod and this thread has the best information on the subject I could find. Since it has been awhile, I wonder if anybody that has done this mod has noticed any problems with the seals (moisture inside the lenses)? I did the mod about a month or two ago, and using the Nissan sealant that Richee3 and nccmjd2002 suggested, I've had no problems with moisture build-up at all - and it's rained quite a bit here in North Carolina recently. I think you will be alright if you take your time and use the right materials. 
This post has been edited by Keiri: Oct 9, 2013 - 3:09 PM -------------------- Has no more Celicas
|
|
Nov 1, 2013 - 7:05 PM
|
|
|
Enthusiast Joined Jun 25, '05 From Fort Wayne, IN Currently Offline Reputation: 14 (100%) |
QUOTE (Hugo4 @ Oct 9, 2013 - 3:48 PM) This is one of the better write-ups I have seen on a car forum, great step-by-step guide with pictures. I have a set of JDM projectors waiting to go into my 96 ST205 and was looking into doing this mod and this thread has the best information on the subject I could find. Since it has been awhile, I wonder if anybody that has done this mod has noticed any problems with the seals (moisture inside the lenses)? I have had no problems with mine. They're still on the car, still sealed, car sat outside (cry!) from Jan of 2011 through Jan of 2013 due to no garage. Get a good bead of RTV into the groove and you'll be fine. -------------------- |
|
Dec 22, 2013 - 5:22 PM
|
|
|
Enthusiast Joined Dec 5, '13 From Bend, OR Currently Offline Reputation: 0 (0%) |
QUOTE (Fastbird @ Mar 26, 2009 - 10:42 PM) QUOTE (BonzaiCelica @ Mar 26, 2009 - 10:25 PM) this is a good sticky. much more detailed than the other one. how much would you charge for this project? I'd do it for $30 plus return shipping for anyone on here that wants it done. Mainly because it's time consuming. Just ship them to me, I'll do them, and then I'll get payment set up when they're done and ready to be returned. Was that $30 a light? |
|
Oct 16, 2016 - 2:56 AM
|
|
|
Enthusiast Joined Feb 18, '06 From Canada Currently Offline Reputation: 0 (0%) |
I just did mine, first light took little longer, second one 45 mins! it is not that hard! I used oven to baked the light instead of boiling water, 225F per heat then turn oven off, set light in oven for 7mins, if not open I will try another 5 mins!
Thank you for all detail step by step! |
|
Oct 6, 2017 - 6:19 PM
|
|
|
Enthusiast Joined May 10, '10 From MA Currently Offline Reputation: 37 (100%) |
noooooooo, everything is gone in this thread....

This post has been edited by mkernz22: Oct 6, 2017 - 6:19 PM |
|
Oct 6, 2017 - 7:27 PM
|
|
|
Moderator Joined Jun 29, '08 From Denver Currently Offline Reputation: 59 (100%) |
Give me a couple of days, Ill try to get everything back up.
-------------------- "Employ your time in improving yourself by other men's writings, so that you shall gain easily what others labored hard for." -Socrates. Even Socrates told us to use the search button!
2006 Aston Martin V8 Vantage. 1998 Celica GT- BEAMS Swapped. 2022 4Runner TRD Off Road Prenium. 2021 GMC Sierra AT4. |
|
Oct 7, 2017 - 7:33 PM
|
|
|
Enthusiast Joined Mar 11, '06 From Way South Chicago Currently Offline Reputation: 0 (0%) |
Don't do a flat cutoff :lol: You want more light to shine down the side of road you're driving on and the shoulder. Flat cut-offs are for fog lights down low so they don't glare up into oncoming traffic. Do the stepped 'HID' cutoff, but bear in mind that the headlight bowl and lens are built for a halogen light source so light distribution from a HID capsule won't be exactly the same. Some halogen units do fairly well with HID and some do not. On a whole many Toyota (Koito) halogen projectors do fairly well but tend to lack a good hot spot for far distance lighting and tend to wash out the foreground a bit more than is optimal. I haven't seen inside the JDM projector light, but there's a good chance that the projector unit can be removed and a true HID projector unit installed in the headlight and have that real HID bling! The SC430 and LS430 projectors are amazing Koito units, but expensive and harder to come by. You can swap a bi-xenon unit as well and get HID high and low beams. If there's room there's also some readily available low beam LED units from Koito with near HID performance and low/high LED units with HID like performance. There's also aftermarket LED and HID units around some of which are pretty good parts, the Chinese G5-R projector is really impressive for the price but a bit bulky.
-------------------- |
|
Oct 7, 2017 - 10:43 PM
|
|
|
Moderator Joined Jun 29, '08 From Denver Currently Offline Reputation: 59 (100%) |
Well, I was able to save one whole picture... Better than none, I guess. Let me dig through my own Photobucket account to see what pictures I still have.
Edit: A few pictures I was able to find still on Google. None of the following pictures are in any particular order. 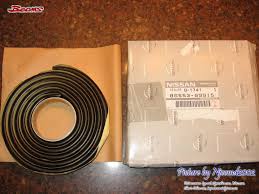 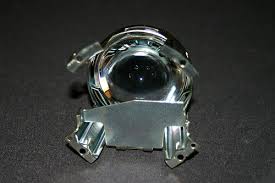 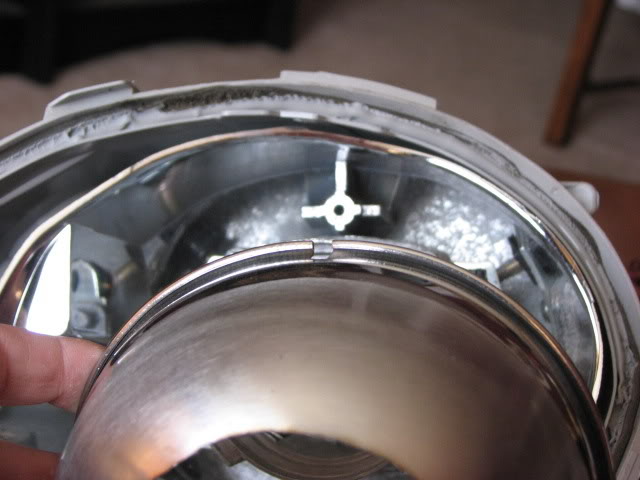 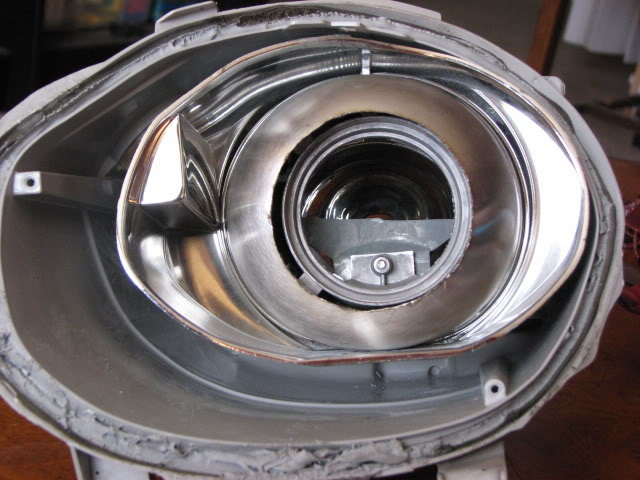   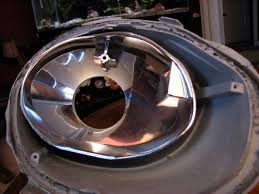 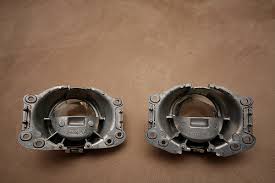 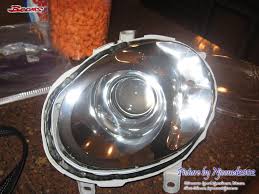 Here's what I dug up out of my own Photobucket account.  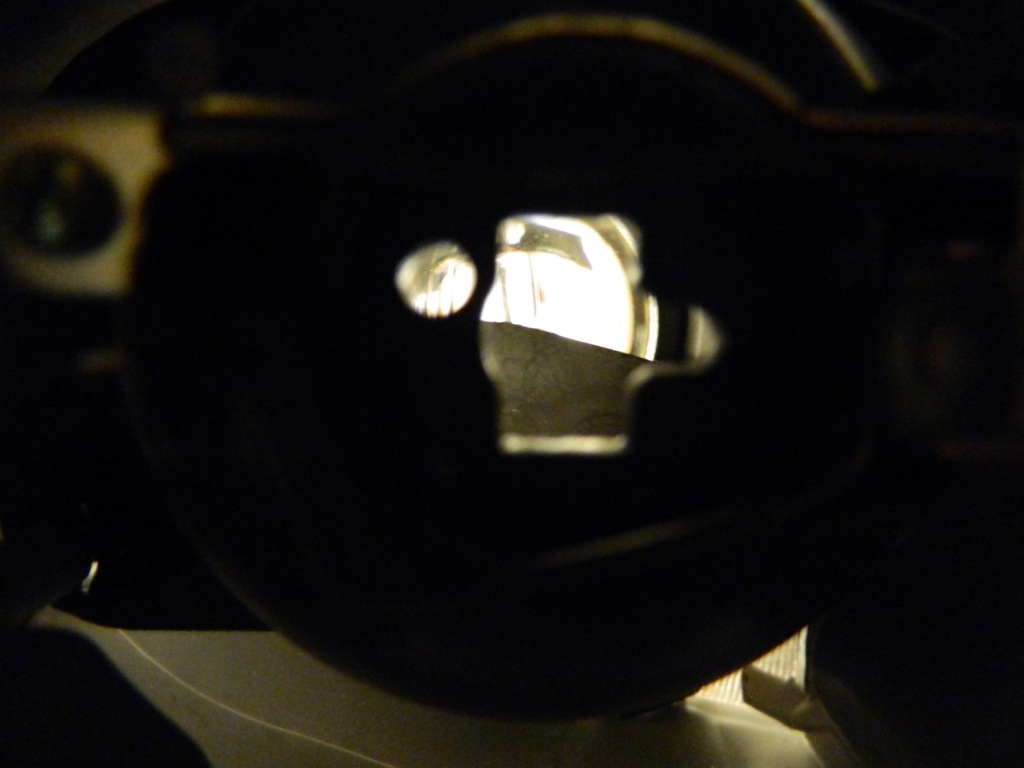 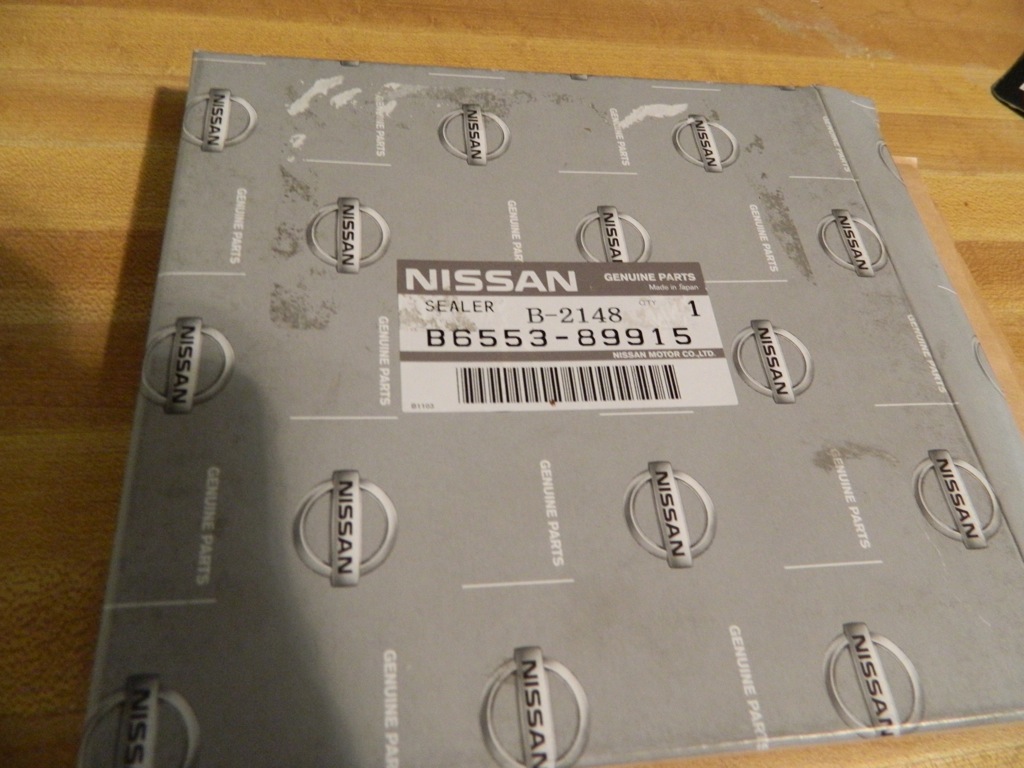 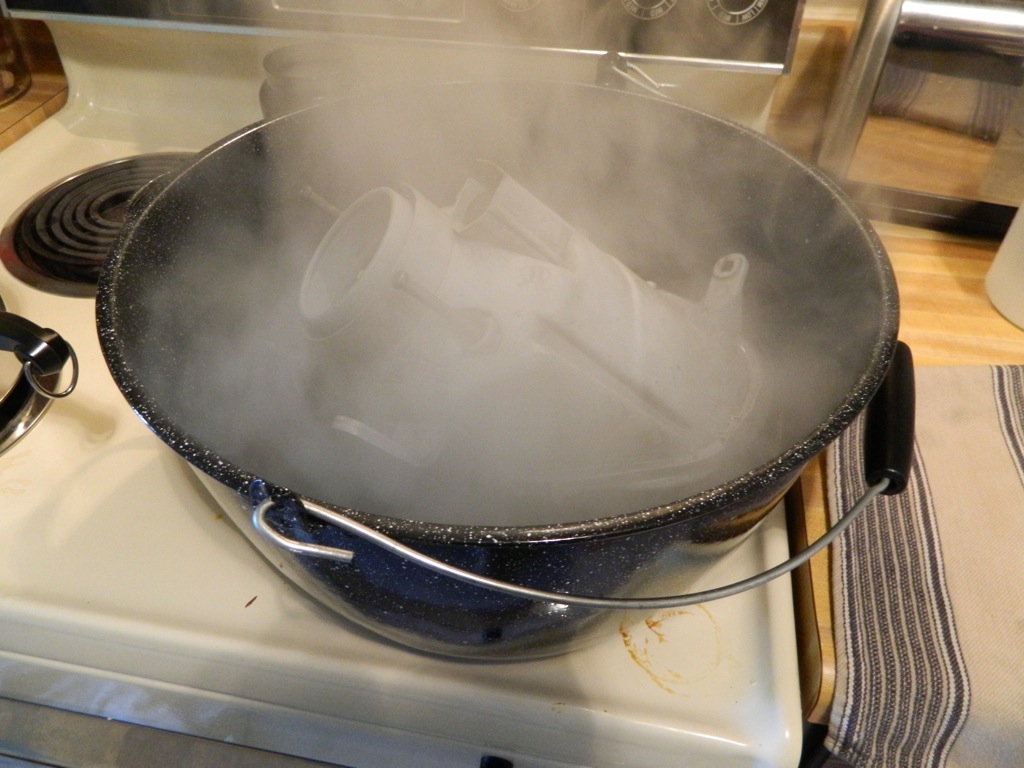 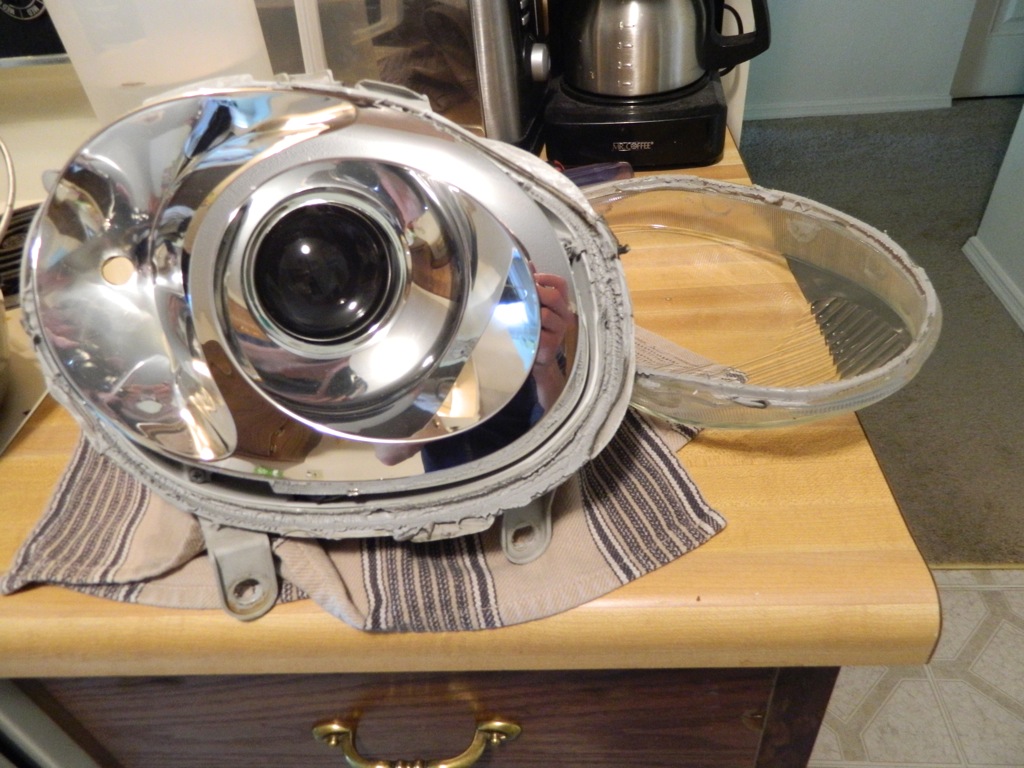 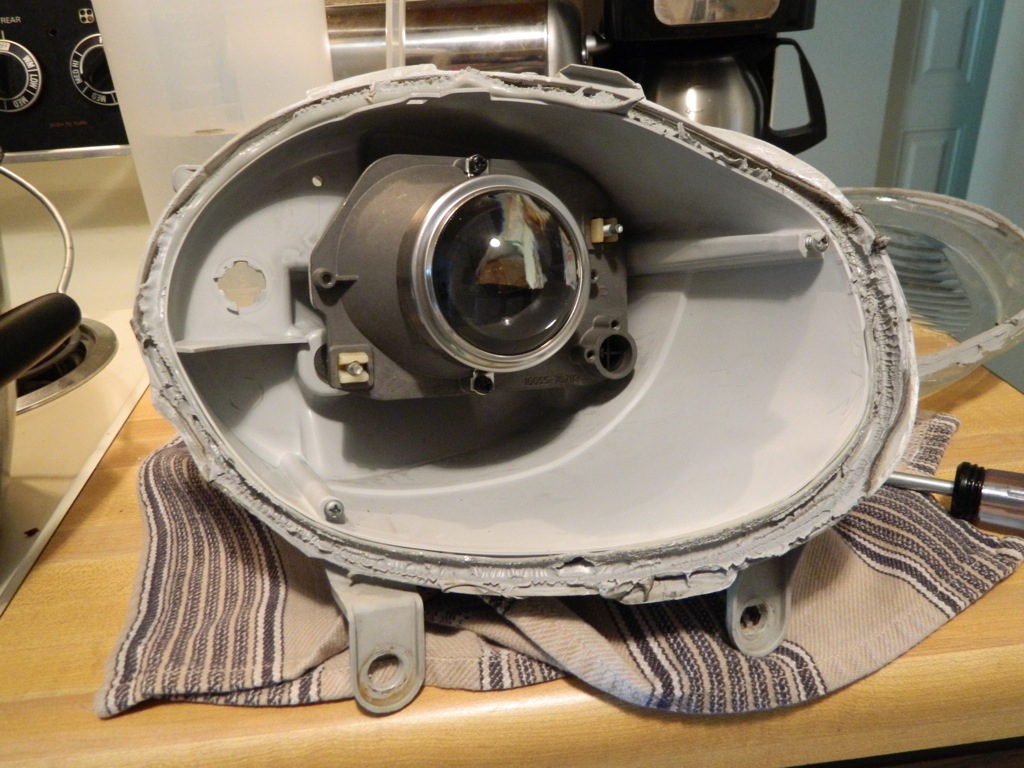 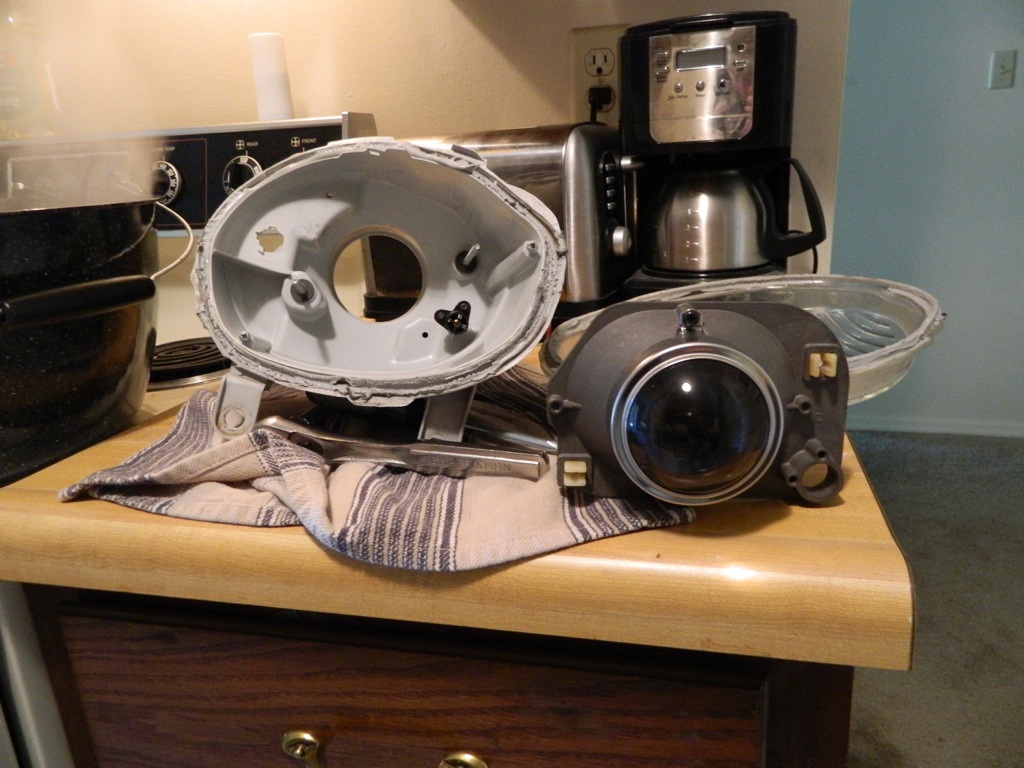 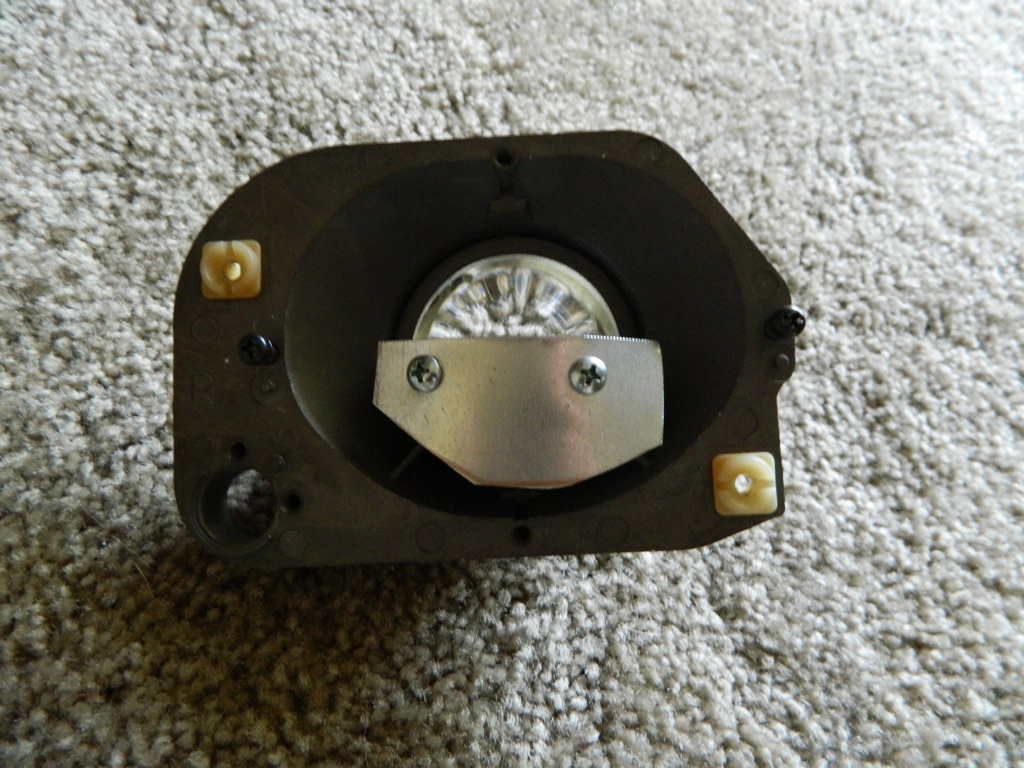
-------------------- "Employ your time in improving yourself by other men's writings, so that you shall gain easily what others labored hard for." -Socrates. Even Socrates told us to use the search button!
2006 Aston Martin V8 Vantage. 1998 Celica GT- BEAMS Swapped. 2022 4Runner TRD Off Road Prenium. 2021 GMC Sierra AT4. |
|
Oct 8, 2017 - 7:38 AM
|
|
|
Enthusiast Joined Mar 15, '07 From Tennessee Currently Offline Reputation: 52 (100%) |
funny is that 56k is going to feel it? lol, oh those times. i may have my pics somewhere available.
-------------------- Learned a lot in 10 years... I hardly log in anymore, last login Today Sept 6 2019, and I was forced just to clarify a post. LOL
If you PM me and I dont respond, dont fret or cry. Im alive, better post your questions in the thread below, maybe I log back in 2grfe Swapped... Why I chose the 2GR, before you ask read here... A great civilization is not conquered from without until it has destroyed itself from within. @llamaraxing in Instagram is the best way to find me. I hardly log here anymore. |
|
Oct 8, 2017 - 9:36 AM
|
|
|
Enthusiast Joined Mar 11, '06 From Way South Chicago Currently Offline Reputation: 0 (0%) |
Yes, that headlight is a GREAT example of one that has room to fit a real HID projector into it! That is for sure a Koito halogen low beam unit, it's not far off from what's in the 7th gen Celica actually. A simple adapter plate to snap into the factory adjusters and you could bolt in whatever HID projector would fit that ample available space. I can't remember the guys name but there's a member on HIDP that makes custom steel plates just for this kind of thing and they work perfect, they let you reuse the factory adjustment. The only possible concern would be the room behind the rear of the headlamp.
https://www.hidplanet.com/forums/ Is that a 2, 2.5, or 3 inch lens on the projector? That projector body looks super familiar. It looks like it's using a H1 halogen bulb? This post has been edited by Bitter: Oct 8, 2017 - 9:37 AM -------------------- |
|
Aug 27, 2018 - 11:53 PM
|
|
|
Enthusiast Joined Jan 19, '17 From Harrisburg, PA Currently Offline Reputation: 0 (0%) |
So Im currently looking into converting my 94 st headlights to a projector style but Im at a bit of a loss. So if I was theoretically able to get all 4 headlights off of a gt4 is it possible to just to replace the projector unit with an LED one that already has a cutoff shroud built in? What complications would come from this?
|
|
Feb 10, 2021 - 1:18 PM
|
|
|
Enthusiast Joined Apr 24, '08 From Orange County, CA Currently Offline Reputation: 33 (100%) |
soooo. im doing this because i cant stand the ugly cut off and i hate these headlight covers that i bought for $70. it also gives me an excuse to take off the bumper to maybe install fogs. but really
$52 for this nissan stuff!? whats the alternative 3m stuff??? https://www.amazon.com/Genuine-Nissan-B6553...t/dp/B00GKBDG4A -------------------- Group buy to replicate Narrow E series transaxle parts
http://www.6gc.net/forums/index.php?showto...p;#entry1107514 |
|
Feb 11, 2021 - 10:26 AM
|
|
|
Enthusiast Joined May 2, '15 From NY Currently Offline Reputation: 3 (100%) |
I used Morimoto RetroRubber a few months back when I had to open up the headlights and refurbish them a bit for my LeMons Celica. Worked fine, excellent reviews. Once I got the process down (bake, open reseal, re-bake), it was very simple.
https://www.theretrofitsource.com/morimoto-...UTYL?quantity=1 |
|
Feb 11, 2021 - 10:59 PM
|
|
|
Enthusiast Joined Mar 11, '06 From Way South Chicago Currently Offline Reputation: 0 (0%) |
Yes, and you can dispense it with a hot melt glue gun to do an even better job!
https://youtu.be/XUj-CGDHtHw You need a glue gun you don't care about and a 7/16ths threaded rod to advance the butyl rubber in the gun once it's cut into sections. -------------------- |
|
Feb 27, 2021 - 11:00 PM
|
|
|
Enthusiast Joined Apr 24, '08 From Orange County, CA Currently Offline Reputation: 33 (100%) |
ahh got it i see some butly tape on amazon for around $25. but wow that link for morimoto has it in grey like oem...
luckly the window guy at my dealership gave me a tube of his black sealant. if youve got a big enough oven. you can easily fit both lights. cook @ 250 degree Fah for 7 minutes and remove one headlight, separate glass and grab the last one. This post has been edited by BonzaiCelica: Feb 28, 2021 - 1:44 AM -------------------- Group buy to replicate Narrow E series transaxle parts
http://www.6gc.net/forums/index.php?showto...p;#entry1107514 |
|
Mar 2, 2021 - 3:03 AM
|
|
|
Enthusiast Joined Apr 24, '08 From Orange County, CA Currently Offline Reputation: 33 (100%) |
this is what lagos and bitter were talking about. differences between a halogen projector assy and a HID projector assmebly
https://www.theretrofitsource.com/morimoto-...LACK?quantity=1 -------------------- Group buy to replicate Narrow E series transaxle parts
http://www.6gc.net/forums/index.php?showto...p;#entry1107514 |
 |
1 User(s) are reading this topic (1 Guests and 0 Anonymous Users)
0 Members:
| Lo-Fi Version | Time is now: April 23rd, 2025 - 6:44 PM |