 Jul 24, 2013 - 11:17 AM Jul 24, 2013 - 11:17 AM
|
|
 Enthusiast      Joined Dec 22, '06 From Columbia, MD Currently Offline Reputation: 13 (100%) |
This is a GUIDE not a HOW TO and is a thread in progress. Its going to take me a bit to properly organize this load info into a visually pleasing manor.
If anyone has any input from their own experience post or PM me and I will add the info in! There is alot of info in here and I am sure it will get very convoluted **Be aware that the ST205 Brake upgrade will require at least a 16" wheels and possibly spacers to adjust the offset and avoid contact between the face of the caliper and the backside of the rim face. ** Torque Specs Caliper halve bolts (four bolts that hold the caliper halves together) 14-17 ft/lbs *Have an even torque value on each bolt (add a dab of red loctite to the bolts thread ends) Caliper Seal Part Numbers: Stephen at GT-FourPlay UK sells a rebuild kit. You can still get the kit lsited below from rock auto but Stephens kit is alot more straight forward and youd be supporting Local (UK) business! https://www.gt4-play.co.uk/shop/brake-calip...ce-kit?___SID=U Caliper Re-seal Kits (Centric Brand From Rock Auto) Front Seals X4 #14344031 (kits are used for the small crossover seals for all 4 calipers/the piston seals in this kit are too large so the rest is unused) Rear Seals X2 #14342021 (Each Single kit services 2 calipers. These piston seals are used for the front too) (I need to re-confirm that the rear piston seals fit the front pistons) This will cover the crossover seals/piston seals/piston boots/piston retaining rings Caliper Hardware Part Numbers (Need to add the Pad Pin retaining wire #'s & toyota diagram) Front pin clips: #04947-14010 Front pad pins: #90240-06019 Front shims: #04945-14110 (EBC pads come with stick on shims) Rear pin clips: #04948-14010 Rear pad pins: #90240-06017 Rear shims: #04946-14030 (EBC pads come with stick on shims) Front Hub/Caliper Preparation: (These part#'s correspond to the McMaster-Carr Catalog. I highly recommend ordering hardware from them: www.mcmaster.com as they have VERY fast shipping and exceptional products) Caliper Prep: For the rotor to sit center in the caliper, the mounting tabs on the caliper will need to be shaved a slight bit. Use a DREMEL and shave 7-8mm off of the mounting tabs. START OFF SMALL and shave say 5mm and check clearances, it is quite possible that with whatever spec rotor you use or just slight differences in hub thicknesses may not require a 7-8mm shave (keep in mind that if you plan on powdercoating the calipers, that will add 1mm or so on top of the mounting tabs, unless you leave them uncoated.) Use a Micrometer to make sure that the mounting tab is an even #mm across the entire area you shaved. 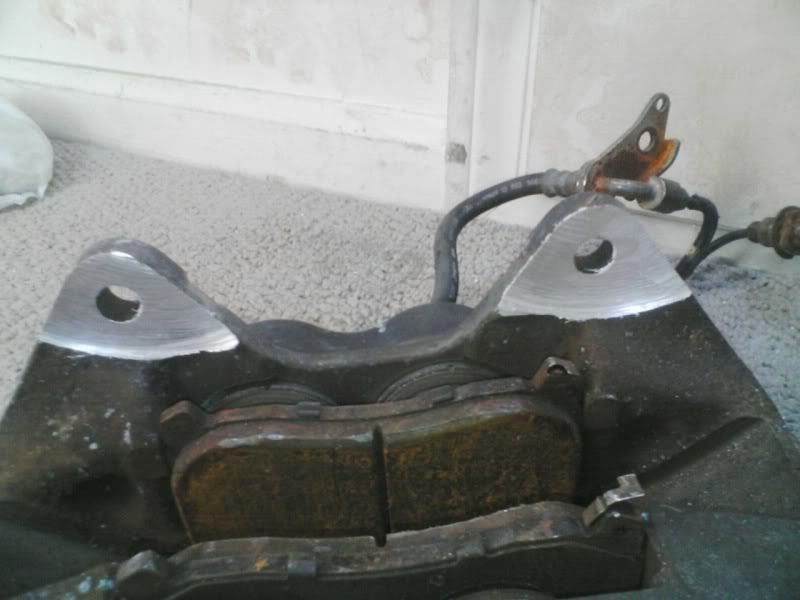  Hub Prep: _____________________________________________ The stock hubs are thread-less and will need to be threaded. Below are the specs I prepped my hubs to but also a small description of what Culpable did with his hub. The way I did it requires a bit more drilling, and it is possible to just re-tap the thread-less hub holes rather than drill them out and re-tap. If you drill the hubs you will possibly need to drill out the caliper holes to match. The tap information is listed below. CULPABLES THREAD (link at bottom of this post): take the knuckle off the car and thread tap them thread taps are available anywhere, buy matching bolts for the thread you are tapping ( grade 8 bolts please ) use a 1/2 x 20 tap or finer thread. ( the one used on the pictures is 9/16 x 20 but no need to go that big as that will require to drill the hole to make it a little bigger) ______________________________________________ Carbon Steel Hand Tap, 9/16"-18, 4 Flute (I will add the kind of tap wrench that is best for tapping the hubs) #26035A216  Drill for Tap 33/64 http://www.mcmaster.com/#catalog/119/2432/=oglxb8 8947A217 - 118 Degree Point High-Speed-Steel Short-Length Drill Bit, Black Oxide, 33/64", 3-7/8" Length Overall - $18.92 (CALIPER HOLES WILL ALSO NEED TO BE RE-DRILLED IF USING THIS SIZE, MAKE SURE TO DRILL TO MATCH THE DIAMETER OF THE BOLT YOU ARE USING TO MOUNT THE CALIPERS, THIS DRILL BIT WILL BE TOO SMALL) Grade 8 Alloy Steel Hex Head Cap Screw, Zinc Yellow Pltd,9/16"-18 Thrd, 1-1/4"l,fully Thrd #92620A779  (Large washers are used in between the Front Caliper bolts and Hub and one washer has to be trimmed per axle, I will add their sizes later) The Brake dust shield will fit and no modification is needed other than pushing it back a bit to avoid contact with the rotor (WITH 300mm Rotor). Rear Hub Preparation: I was fortunate enough to get the oem caliper bolts with the calipers in the kit from Culpable. I will get their specs since those are the bolts you will need to mount the caliper, the oem ST204 bolts are too short. The rear dust shield will need a good amount of trimming (use a small dremel) for the caliper to fit. Its hard to really explain where it will need to be cut exactly, but just hold up the ST205 caliper to its mounting mount and you will be able to judge where it will make contact with the dust shield. Both around the top and bottom mount holes on the hubs will need to be trimmed. (If you plan on powdercoating your calipers make sure to do this before, I scratched my newly powder coated calipers holding them up trying to judge how much more I needed to trim) When mounting the Rear Calipers, there needs to be a 6mm spacer washer between the caliper holes and mounting bracket. This will correct and center the caliper to match the lower rotor height of the ST205 disk (The ST205 disk is 6mm smaller than the GT disk). As a temporary solution I used 2 washers (2.5mm thick) per hole that when stacked added up to about 6mm. Washers usually have a thickness tolerance of +/- .3mm so I had to sort through a whole bunch to finally find a combination that added up to the right spec. Anywhere between 5-6mm will work fine but the closer to 6mm the better The better solution, as discussed with ricochet1490, would be to get a custom made 6mm thick washer. McMaster sells extra thick high strength steel washers, I am ordering a few to test them out, supposedly the thicknesses of the washers arent consistent but we will see  Rotors: OEM Celica Dimension Specs 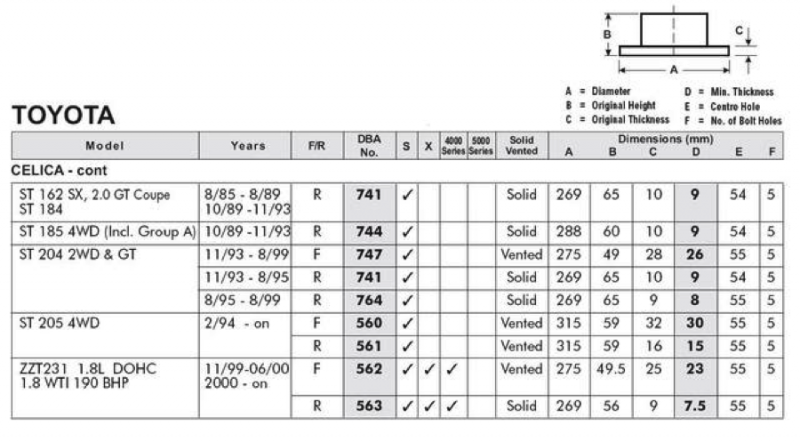 Front: Be aware of the hub diameters. The OE Celia hub diameter is 54.1. Most of our options for the front will be larger than that. I personally like to have hubcentric rotors but you can run them lug centric if you dont feel like making a shim, I would advise against that though. Subaru BRZ/Impreza Rotor Part Number: Centric 121.47021 PCB - 5x100 Hub Dia - 58 Dia - 292mm Centric Brand Part Number: 121.47021  (additional info on aftermarket solutions will be added soon thanks playr158 for the find!) 93-99 Toyota Supra NON-Turbo PCB - 5x114.3 (Must Be Re-Drilled) Hub Dia-60.1 Dia-296mm / 11.811" ****Most OEM and OEM replacement Supra Non-Turbo rotors have service holes on the face of the hat preventing them from being re-drilled to 5x100, Most aftermarket 2-Piece Rotors do not have these service holes allowing the hats to be re-drilled. Always check before purchasing. THIS MAY NO LONGER BE A VIABLE OPTION**** 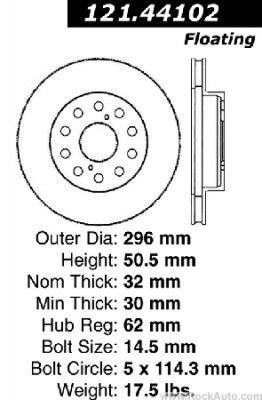 5x114.3 Conversion Front Rotors 93-99 Toyota Supra NON-Turbo Supra Hub Dia-60.1 Dia-296mm / 11.811" Rear: ST205 Rear Rotors Hub Dia-54.1 Dia-315mm I highly recommend EBC Brand through this site http://www.ebcbrakesdirect.com/ (Fast Int'l Shipping with Tracking code!) Here you have the option of OEM/SlottedDimpled/Slotted ENDLESS also makes a Slotted and Blank Rear Disk Blank Rotor (Single) $176 Slotted Rotor (Single) $225 ENDLESS Rotor PDF 5x114.3 Conversion Rear Rotor ***TBD**** Brake Pads: Supra MK4 Turbo Pads I recommend EBC brand pads as they come with black 3M rubberized stick on shims. Do Not use both the stick on rubber shim and the metal Toyota/Other brand shim. Part# Front DP31004C Rear DP31005C Some other brands that have both streetable performance and race performance pads that will fit are -HAWK Pads -Carbotech Pads -Endless Pads I have only ever used EBC pads so I have never needed Shims from Toyota. I am not sure if other brand pads come with some sort of shim. If they don't you will need to order a set of shims 3M Stick on Shims 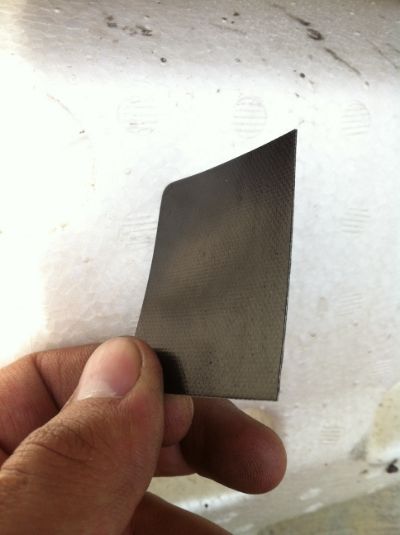 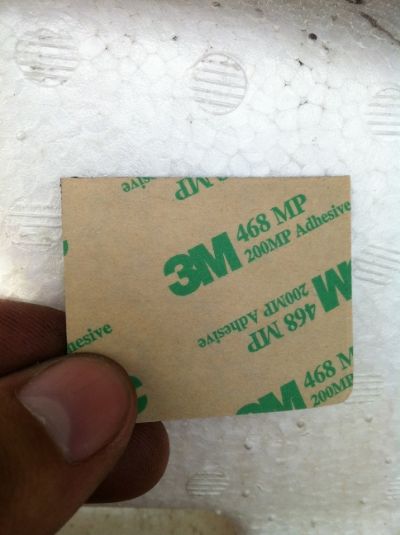 Brake Lines: ST205 Lines ST204 (GT) Lines Custom Lines (recommended) Bleeder Fittings Speed Bleeder #SB1010 Buy them. They work wonders 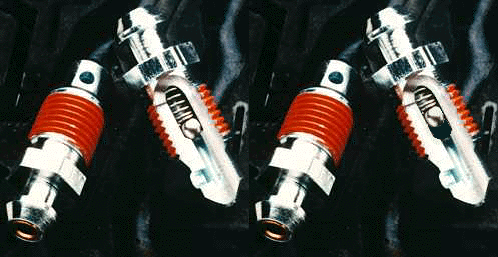 Caliper High Temp CELICA Stickers http://www.ebay.com/usr/uber9 Since the sale is re-listed weekly I cannot provide a direct link. Sreach for "celica" and the results will show up. Be sure to message the seller to specify it is for the ST205 Calipers 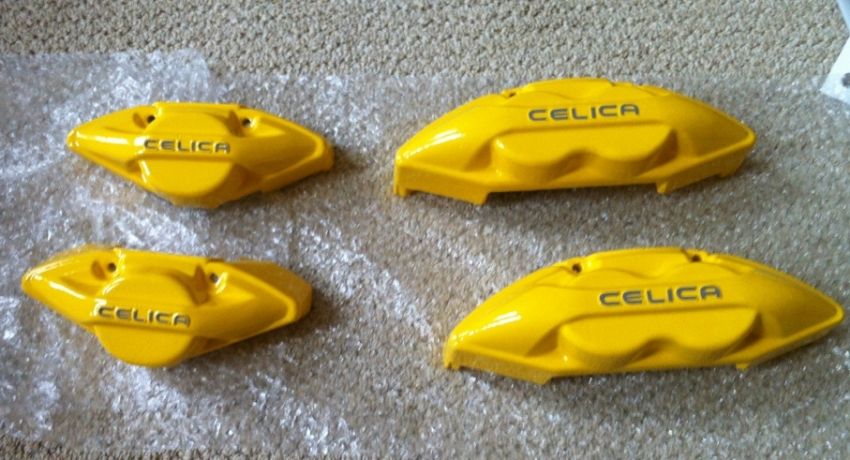 Brake Bias Controller One thing that will be immediately apparent with this swap is a different brake bias than what the GT/ST provided. The bias wont be the same for every car this swap is done for. There are alot of factors that will effect the ration ever so slightly. Worst case scenario your rear bias will be too much to the point of locking up way before the fronts get a chance too. For DD emergency situations, this may be undesirable. Combat this will installing a Brake BIAS Controller. I recommend Tilton as the brand to buy but there are other more budget friendly brands.  Brake Proportioning Info http://stoptech.com/technical-support/tech...rtioning-valves Additional Links/Reference Links: ST205 Brake Upgrade Completed (Culpable04) ST205 Brakes on a ST (Culpable04) ST205 Brake Upgrade Completed (Batman722) Toyota Supra Specifications End Goal? 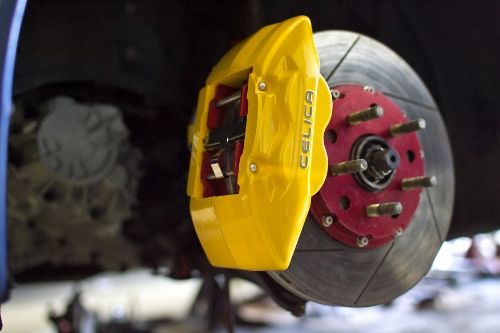
This post has been edited by Tigawoods: Dec 6, 2018 - 9:58 AM --------------------  1995 GT::::Diffusing the Situation エキサイティングカーレーシングチーム! march 2010 COTM : 6GC feature 2014 : january 2015-2016-2018 COTM |
 |
Replies
 Jan 17, 2014 - 11:31 AM Jan 17, 2014 - 11:31 AM
|
|
 Enthusiast      Joined Dec 22, '06 From Columbia, MD Currently Offline Reputation: 13 (100%) |
Info added! Thanks Dan!
I will be adding more info over the next few days as to our new found added options! This post has been edited by Tigawoods: Jan 17, 2014 - 11:31 AM --------------------  1995 GT::::Diffusing the Situation エキサイティングカーレーシングチーム! march 2010 COTM : 6GC feature 2014 : january 2015-2016-2018 COTM |
Posts in this topic
 Tigawoods The GT-Four Brake Upgrade Jul 24, 2013 - 11:17 AM
 yellowchinaman That is really useful.
Im doodling on the idea of ... Jul 24, 2013 - 1:36 PM
 playr158 Thanks TIGA. I was going to do the same with the i... Jul 24, 2013 - 2:12 PM
 njccmd2002 but then you have to redrill the gt4 rears... u ... Jul 24, 2013 - 3:37 PM
 playr158 I believe there might be some bolt on rotors but n... Jul 24, 2013 - 7:48 PM
 Fate *subscribed. Jul 24, 2013 - 9:28 PM
 Tigawoods QUOTE (playr158 @ Jul 24, 2013 - 3:1... Jul 25, 2013 - 8:09 AM
 playr158 Well if we use
FRONT: GEN 1 RAV4 front hubs + M... Jul 25, 2013 - 10:29 AM
 njccmd2002 well how big are the rear supra rotors? Jul 25, 2013 - 10:36 AM
 Tigawoods 300mm I believe Jul 25, 2013 - 10:46 AM
 njccmd2002 duh, how thick are the rear supra rotors. thats ... Jul 25, 2013 - 12:10 PM
 Tigawoods 15mm methinks. Either that or 17mm Jul 25, 2013 - 12:22 PM
 Tigawoods added a couple more things.
I will add the links... Jul 31, 2013 - 8:00 PM
 playr158 Wanted to Toss this in there
http://www.mcmaster.... Sep 11, 2013 - 9:09 AM
 Tigawoods thanks man! Sep 11, 2013 - 2:32 PM
 njccmd2002 Bringing this back from dead. Called adamsrotors,... Nov 25, 2013 - 3:45 PM
 Fate QUOTE (njccmd2002 @ Nov 25, 2013 - 3... Nov 25, 2013 - 5:38 PM
 Tigawoods I will have to update the OP! Nov 25, 2013 - 7:35 PM
 njccmd2002 we have to find a source of rotors that will meet ... Nov 25, 2013 - 8:24 PM
 njccmd2002 ok, classic example why i need to get my own tools... Nov 25, 2013 - 9:00 PM
 playr158 That's actually really smart......wheel spacer... Nov 25, 2013 - 9:53 PM

 Tigawoods QUOTE (playr158 @ Nov 25, 2013 - 9:5... Nov 26, 2013 - 11:01 AM
 njccmd2002 yeah man, im tired of trying to get someone to do ... Nov 25, 2013 - 10:07 PM
 njccmd2002 just found this
subaru impreza sti
326 x 30 mm
... Nov 26, 2013 - 4:32 AM

 99gt3sge QUOTE (njccmd2002 @ Nov 26, 2013 - 5... Nov 30, 2013 - 10:43 PM
 Fate QUOTE (njccmd2002 @ Nov 25, 2013 - 9... Nov 26, 2013 - 9:37 AM
 njccmd2002 Tiga, do you have a set of brake lines that alrea... Nov 26, 2013 - 8:26 PM
 playr158 326? isn't that too big for the GT4 setup?
I t... Nov 26, 2013 - 10:14 PM
 njccmd2002 yes i know, but it will be easier to get the rotor... Nov 26, 2013 - 10:28 PM
 Tigawoods 300mm MAX.
Let me throw that brake line info in, ... Nov 27, 2013 - 8:20 AM

 Trodai QUOTE (Tigawoods @ Nov 27, 2013 - 8... Nov 27, 2013 - 4:09 PM

 bnr32celica QUOTE (Trodai @ Nov 27, 2013 - 4:09 ... Nov 29, 2013 - 11:26 AM
 njccmd2002 Cool, I'll keep looking for those lines. Once... Nov 27, 2013 - 11:16 AM
 Malek QUOTE (Trodai @ Nov 27, 2013 - 5:09 ... Nov 29, 2013 - 11:52 AM
 Trodai my conversion (copied from my build trend in anoth... Nov 29, 2013 - 6:31 PM
 playr158 Just a thought....BRZ rotors are approximately 295... Dec 24, 2013 - 1:44 PM
 BonzaiCelica if you see newcelica.org there is a guy who bolted... Dec 24, 2013 - 6:16 PM
 jeffrosie Only 26mm thick. Dec 28, 2013 - 11:48 AM
 playr158 Honestly the 4mm or whatever is not going to make ... Dec 28, 2013 - 5:20 PM
 njccmd2002 ok, so the STI rotor sits awesome on the car, but ... Jan 12, 2014 - 9:05 PM
 playr158 More english prease?!
The rotor sits perfect ... Jan 12, 2014 - 9:37 PM

 njccmd2002 QUOTE (playr158 @ Jan 12, 2014 - 8:3... Jan 13, 2014 - 1:22 PM
 njccmd2002 found this on ebay, bought the last set, what are ... Jan 13, 2014 - 1:18 PM
 Tigawoods make sure they dont sit higher than the rotor face... Jan 13, 2014 - 1:21 PM
 njccmd2002 pics...
but.... to keep caliper centered..... Jan 13, 2014 - 2:31 PM
 playr158 Honestly, We could easily have an adaptor bracket ... Jan 14, 2014 - 8:58 AM
 njccmd2002 well actually no, because the caliper is not all t... Jan 14, 2014 - 9:21 AM
 playr158 Gotcha.
Well like all you other nuts, I picked up ... Jan 16, 2014 - 12:43 PM
 njccmd2002 yup sti rotor Jan 16, 2014 - 12:57 PM
 playr158 sooooooo.........BOLT ON
Rotor:
Part Nu... Jan 16, 2014 - 6:04 PM
 Tigawoods RE: The GT-Four Brake Upgrade Jan 16, 2014 - 7:32 PM
 njccmd2002 Subaru rotor? Thats good. Looks like regular imp... Jan 16, 2014 - 8:14 PM
 playr158 Yup BRZ, Legacy, Impreza wrx and a few others shar... Jan 16, 2014 - 8:44 PM
 Syaoran That's a nice find. Two questions:
You remov... Mar 25, 2014 - 8:02 PM
 playr158 I never had dust shields on this setup with the br... Mar 25, 2014 - 9:16 PM
 Syaoran So an update to this thread would be
Front: ST205... Mar 27, 2014 - 12:40 PM

 Tigawoods QUOTE (Syaoran @ Mar 27, 2014 - 1:40... Mar 27, 2014 - 12:45 PM

 Syaoran QUOTE (Tigawoods @ Mar 27, 2014 - 1... Mar 27, 2014 - 1:06 PM

 Tigawoods QUOTE (Syaoran @ Mar 27, 2014 - 2:06... Mar 27, 2014 - 1:18 PM

 Syaoran QUOTE (Tigawoods @ Mar 27, 2014 - 2... Mar 29, 2014 - 10:54 AM
 playr158 Can a mod sticky this thread alreaddy?! Mar 27, 2014 - 9:57 PM

 richee3 QUOTE (playr158 @ Mar 27, 2014 - 9:5... Mar 28, 2014 - 1:56 PM
 Tigawoods yeah! sticky!
still looking at rotor opti... Mar 28, 2014 - 1:33 PM
 njccmd2002 with a 5x14 hub change, just use oem supra rotors.... Mar 28, 2014 - 6:04 PM
 Tigawoods ship it to me on the east coast and then Ill ship ... Mar 29, 2014 - 11:35 AM
 playr158 5x114 swap only works if you don't have AWD
I... Mar 29, 2014 - 11:55 AM

 mkernz22 QUOTE (playr158 @ Mar 29, 2014 - 12... Mar 31, 2014 - 6:46 PM
 Syaoran QUOTE (Tigawoods @ Mar 29, 2014 - 12... Mar 29, 2014 - 8:41 PM
 playr158 Unless you have my car or a few others here who ha... Mar 30, 2014 - 9:23 AM

 Syaoran QUOTE (playr158 @ Mar 30, 2014 - 10... Mar 30, 2014 - 5:12 PM
 Fate QUOTE (Tigawoods @ Mar 28, 2014 - 2... Mar 31, 2014 - 5:01 PM
 Fate FACTORY SPECS:
FYI:
MODEL________YEAR_____BOL... Mar 31, 2014 - 5:25 PM
 Tigawoods thanks rico!
Ill add that stuff tomorrow.
Yo... Mar 31, 2014 - 8:12 PM
 playr158 QUOTE (mkernz22 @ Mar 31, 2014 - 7:4... Apr 1, 2014 - 11:11 AM

 Tigawoods QUOTE (playr158 @ Apr 1, 2014 - 12:1... Apr 2, 2014 - 11:18 AM
 njccmd2002 Mr2 rear hubs is another option... For awd Apr 13, 2014 - 2:06 PM
 playr158 ^some how I completely missed the concept of an MR... Apr 15, 2014 - 10:59 AM
 Tigawoods just thinking about this the other day and how tha... Aug 26, 2014 - 2:39 PM
 Fastbird I'll be ordering Rav4 Hubs, bearings, poopra r... Sep 6, 2014 - 6:33 PM
 olilaroche The Centric C-TEK Drilled & Slotted Brake Roto... Oct 24, 2014 - 1:51 AM
 felipeandrest205 Im looking on Evo 6 brake discs.
Celica brake disc... Dec 14, 2014 - 7:08 PM
 Tigawoods Thanks to Fate for pointing it out to me, but I ma... Jan 22, 2015 - 3:11 PM
 Batman722 about 2mm IIRC.
I would love to find out the exact... Jan 22, 2015 - 5:21 PM

 Tigawoods QUOTE (Batman722 @ Jan 22, 2015 - 5... Jan 23, 2015 - 6:56 AM
 felipeandrest205 For the rear brake rotors, I was looking at the WR... Mar 16, 2015 - 11:06 PM
 njccmd2002 Ok. To add more fuel to drama. I have found roto... Mar 19, 2015 - 2:27 PM
 njccmd2002 Found the disc....
http://counterspacegarage.com/... Mar 19, 2015 - 4:59 PM
 Fate http://counterspacegarage.com/products/bra...gt86-... Mar 19, 2015 - 6:26 PM
 Tigawoods ORLY?? Mar 19, 2015 - 7:25 PM
 njccmd2002 I l know its pricy investment initially however. ... Mar 19, 2015 - 8:54 PM
 MGCustoms325 That's not a bad price. I spent a lot more on ... Mar 20, 2015 - 6:22 PM
 mi645 so? front gt4 calipers with those counterspace gar... Mar 21, 2015 - 7:42 PM
 njccmd2002 No,no, no. We dont know the offset specs of thos... Mar 21, 2015 - 8:50 PM
 Culpable04 I printed the image and while I could not get it t... Mar 23, 2015 - 1:43 PM
 njccmd2002 i have been looking at wilwood hats, and they dont... Mar 24, 2015 - 9:09 PM
 olilaroche Does anyone have the part number for the rear st20... Apr 20, 2015 - 6:18 PM

 Tigawoods QUOTE (olilaroche @ Apr 20, 2015 - 7... Apr 22, 2015 - 7:34 AM
 olilaroche Would the supra turbo bolts would be the same? Sin... Apr 22, 2015 - 8:07 AM
 presure2 lots of cool info in here guys good work on all pa... Apr 26, 2015 - 11:21 AM
  |
12 User(s) are reading this topic (12 Guests and 0 Anonymous Users)
0 Members:
| Lo-Fi Version | Time is now: November 23rd, 2024 - 9:24 AM |


