
 Jul 12, 2009 - 7:10 PM Jul 12, 2009 - 7:10 PM
|
 
|
 Enthusiast  Joined Mar 26, '09 From Longmont, CO. Currently Offline Reputation: 0 (0%) |
well i finally got it done, what is needed for this project are these parts. cruise contol actuator(under hood, and behind gas pedal) wiring harness, brake pedal switch, cruise control computer (CCM), cruise control steering wheel switch and switch cover, SRS clock ring (located behind steering wheel), combination meter with cruise light bulb ( or make your own like i did) well thats all the parts, its not a very expensive job, i maybe spent 75 dollars total on this swap. but it is VERY time consuming. lots of fun stuff to wire in, well here goes nothing... first off install all the little bits and pieces of the system, dnt worry about the wiring just yet. get all the hard part mounted up. once thats all done the fun begins, start by removing the lower drivers dash, glove box, center consoule, water fall trim, and the instrument cluster. (remove the steering wheel if you havnt already installed your new clock ring and cruise switch. the removal and instalation is pretty straight forweard for those parts. all u will need is a short and standard length philips screw driver, and a 10 & 12 mm socket and ratchet. first part of the wiring is the actuator in the engine bay, the wires run under the rad. support to the drivers side inner fender, then into the grommet on the firewall inside the drivers fender, the next step is to drill the mounting holes for the gas pedal actuator, using a 9/32 drill bit, dril the 2 mounting holes in the center of the tar paper punch outs. MAKE SURE TO DRILL SHALLOW!!! one of the mounting holes goes right behind your brake proportioning valve. then using the origional bolts, mount the actuator. then your off to that crazy looking wiring harness. all of the wiring notes, and locations are listed in the pictures below, as well as the toyota diagram for the cruise system. enjoy, and happy cruisin!
sry for the stupidly small print, download the image and blow it up to see writen txt 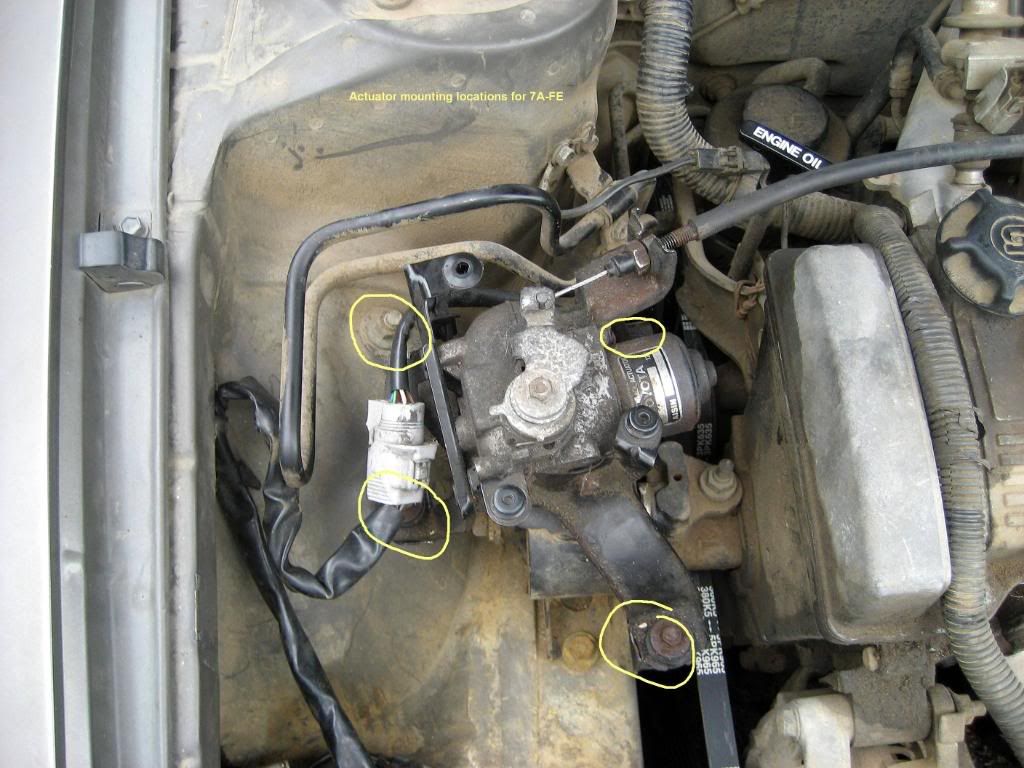 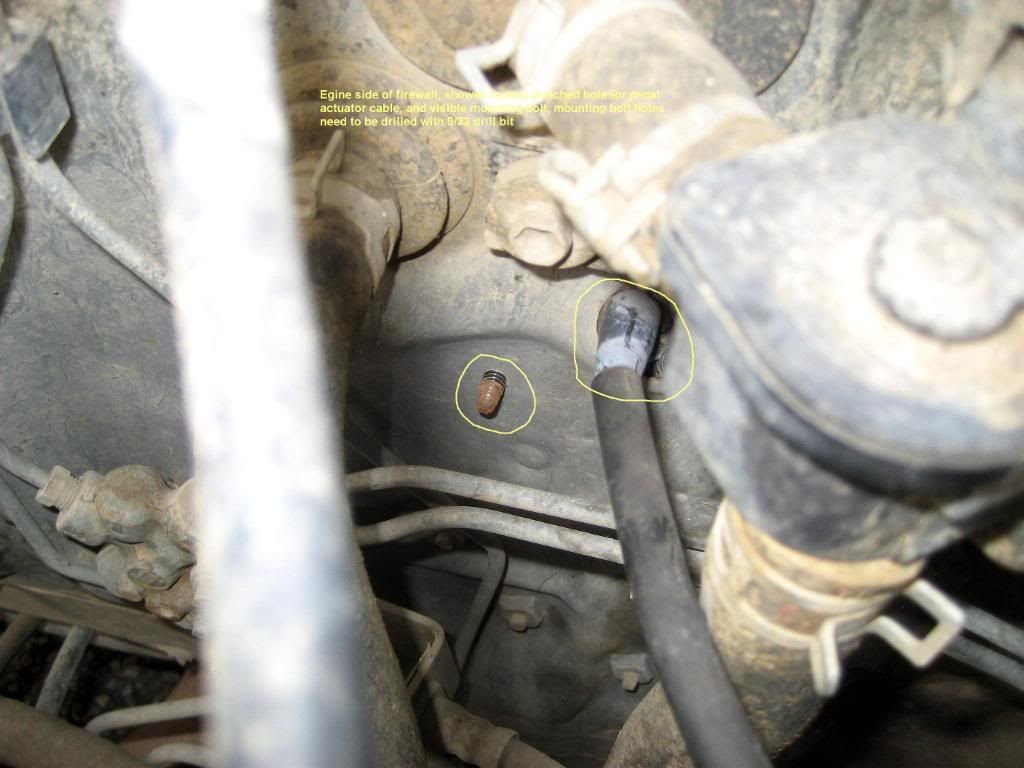    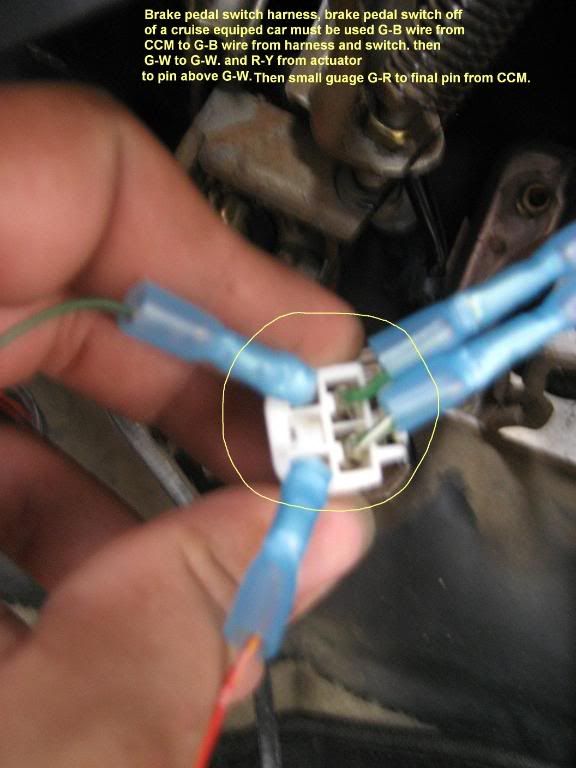 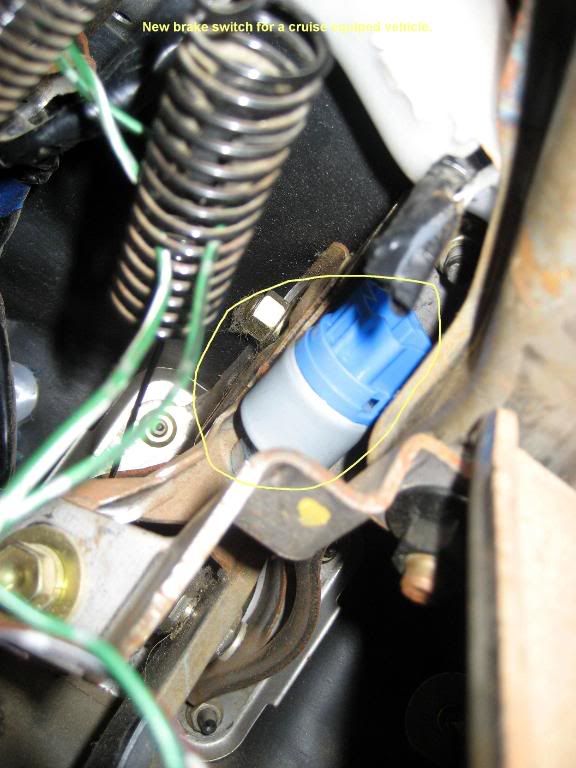 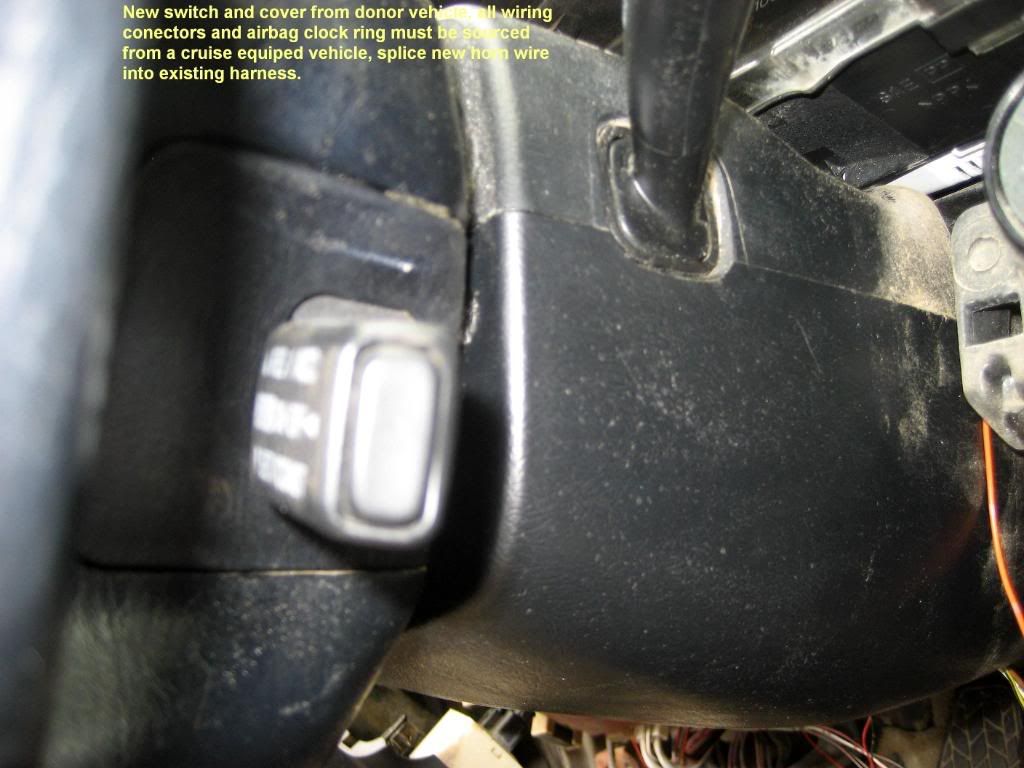  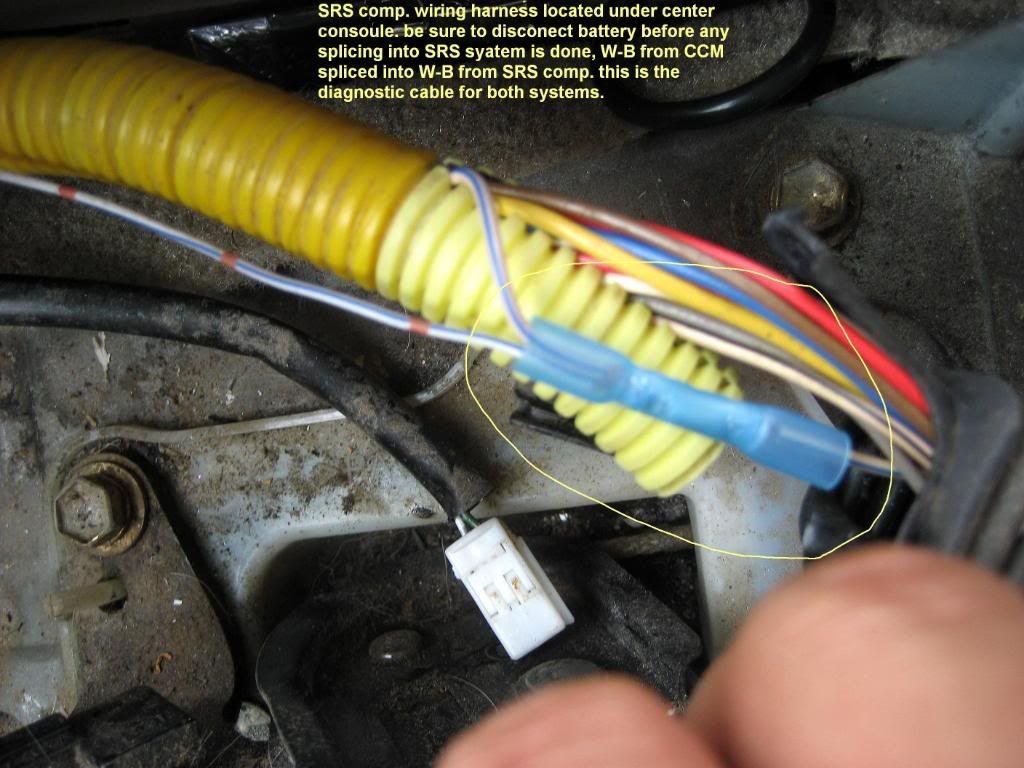   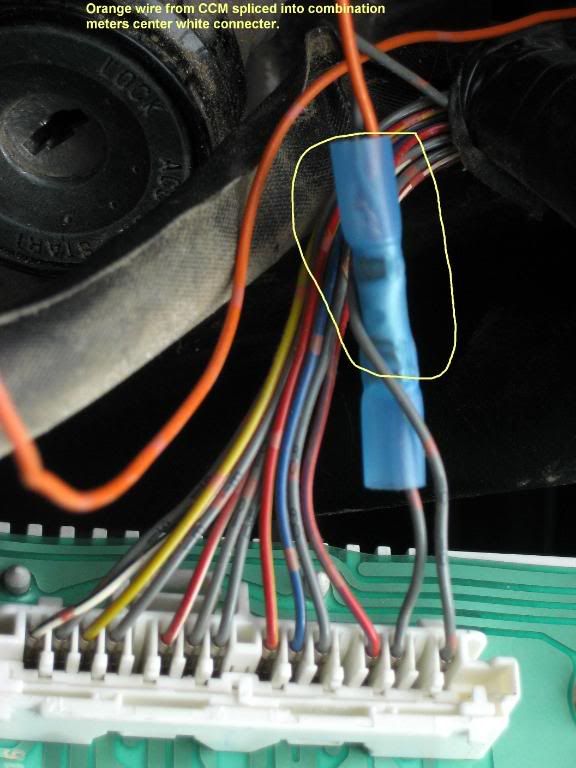 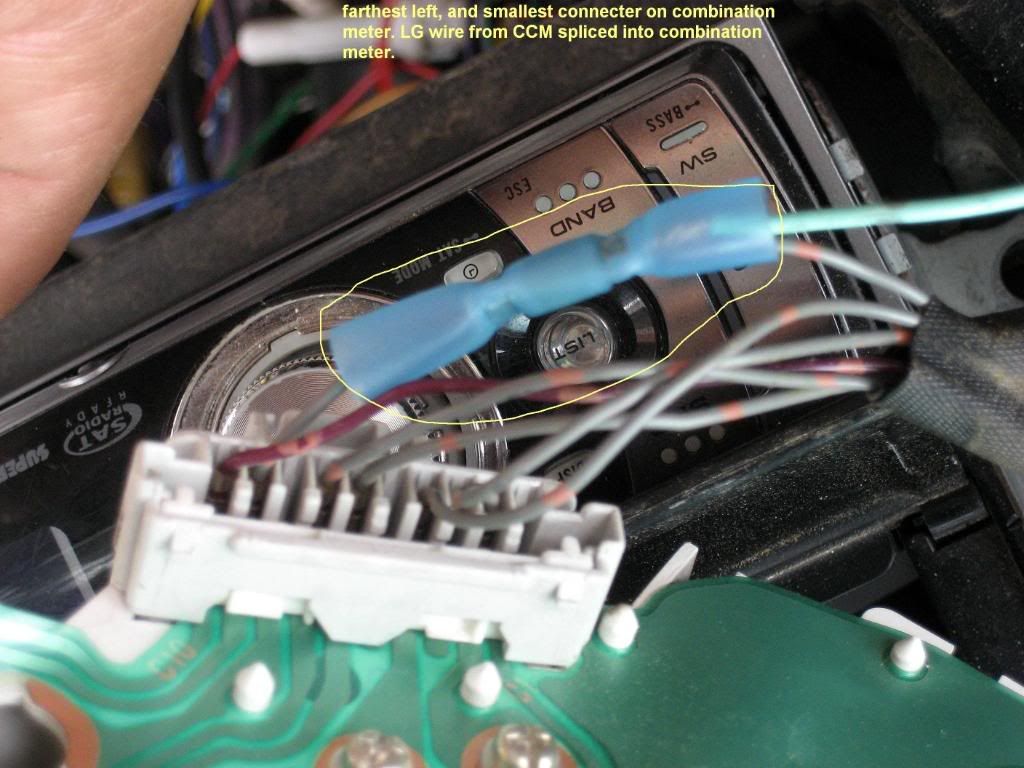  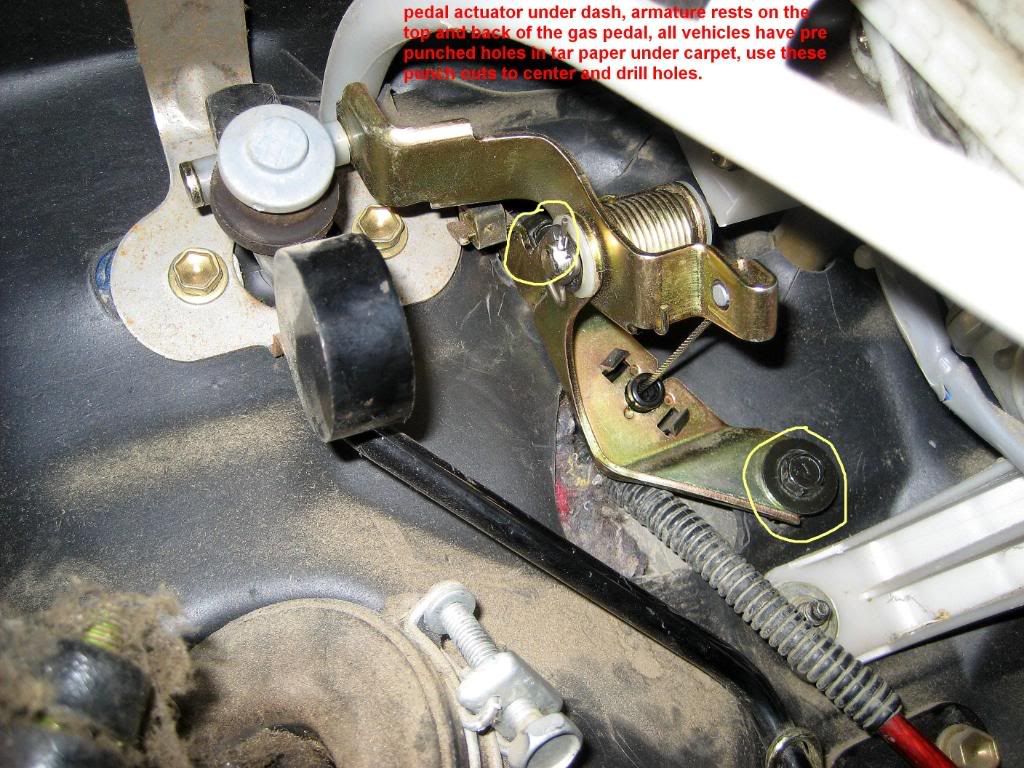 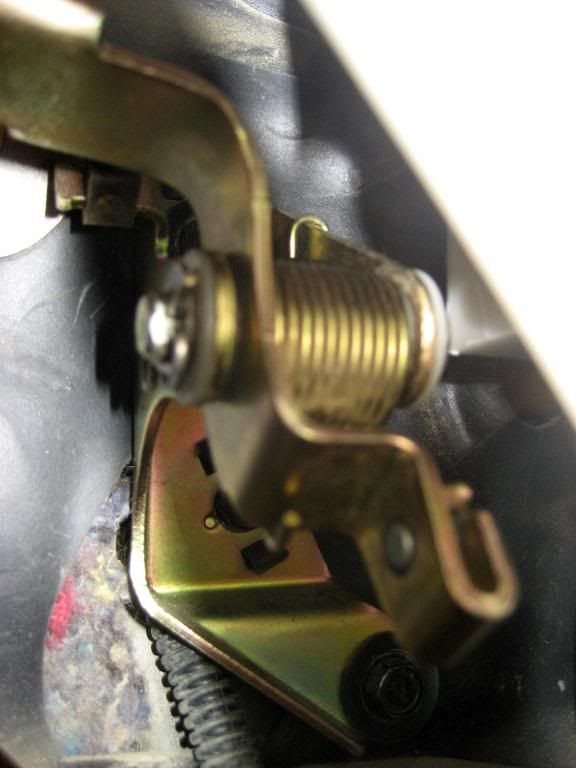   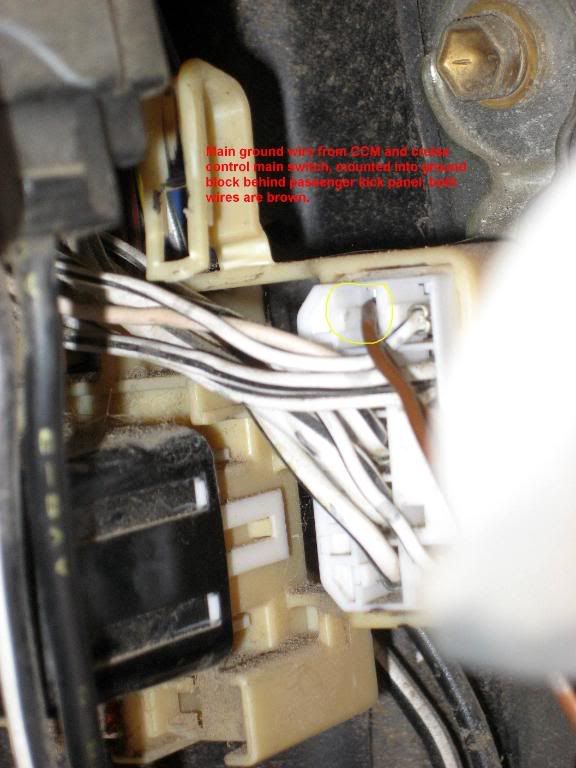 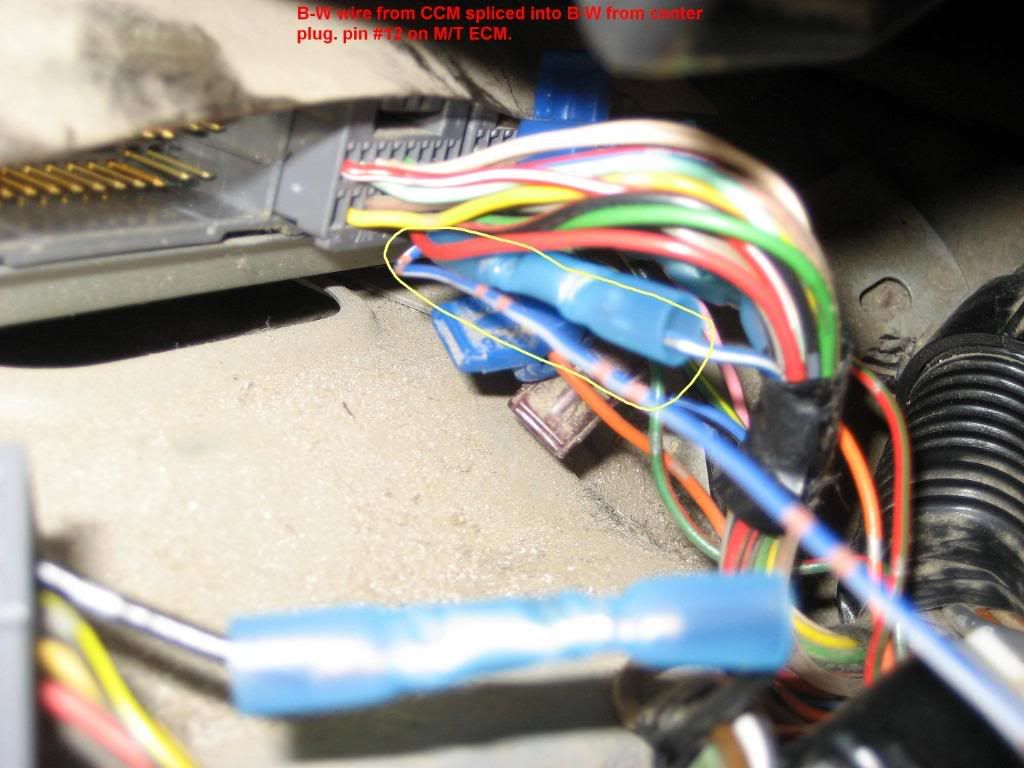 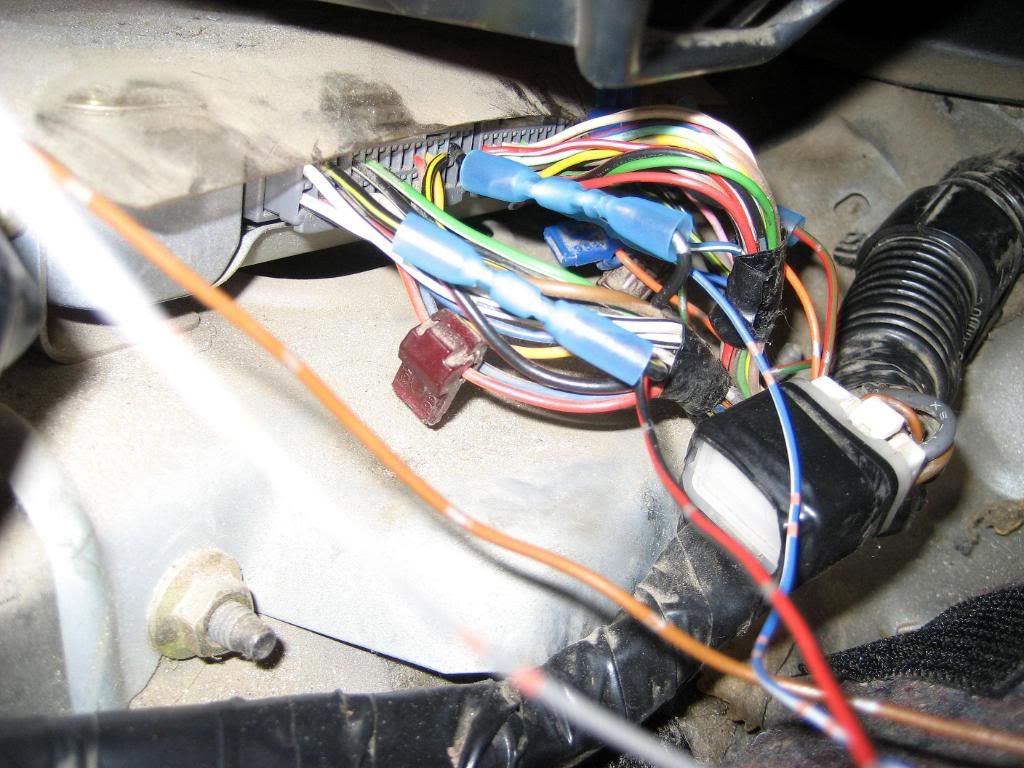 PDF file from toyota service manual: please e-mail me with a request for this file, and i will reply back with the requested information. This post has been edited by Ryouxrs: Jul 12, 2009 - 7:15 PM -------------------- Lift Addict!! ^_^
----------------------  |

 |
Replies
|
Aug 2, 2015 - 1:19 PM
|
|
|
Enthusiast Joined Apr 16, '10 From Poland Currently Offline Reputation: 0 (0%) |
Lol, its been almost 2 years now and I just finaly got clutch sensor from toyota previa, so im back in the game
 Also i bought 6gc steering wheel switch and now i have both, 6gc and 7gc. Meanwhile I abandonet cruise control project due to damage of speed sensor in gearbox. Plug got rust and stopped working so it took me like only 5 months to fix this Also i bought 6gc steering wheel switch and now i have both, 6gc and 7gc. Meanwhile I abandonet cruise control project due to damage of speed sensor in gearbox. Plug got rust and stopped working so it took me like only 5 months to fix this  Today I installed clucth sensor and I extended wires from actuator. Today I installed clucth sensor and I extended wires from actuator.Ryouxrs i hope You'r still there. I have a question about clutch connection. One cable from clutch sensor goes to pin 2 in CCM 9BLK/RED), and second cable goes to Gauge Fuse 10A? Where is this fuse? I dont see anything about this fuse connection in Your first post. Is this because You got power from cig lighter? I have heated seats connected to cig lighter so im woried this can be too much for one fuse? Also i see that clutch plug has 1 and 2 wires description. Does it matter which one goes to CCM ? This post has been edited by Makabra: Aug 2, 2015 - 2:06 PM |
Posts in this topic
 Ryouxrs DIY: install factory cruise control in a non cruise equiped car Jul 12, 2009 - 7:10 PM
 njccmd2002 wow, dude if this works, props to you. it really ... Jul 12, 2009 - 10:07 PM
 Ryouxrs QUOTE (njccmd2002 @ Jul 12, 2009 - 9... Jul 12, 2009 - 11:53 PM njccmd2002 just out of curiosity. what was the total cost. 7... Jul 13, 2009 - 6:24 AM Ryouxrs QUOTE (njccmd2002 @ Jul 13, 2009 - 5... Jul 13, 2009 - 10:47 AM Ruroniarc I really want to do this to my car. Could you give... Jul 13, 2009 - 2:24 PM Ryouxrs ok, send me an e-mail to my hotmail, and ill send ... Jul 13, 2009 - 2:30 PM Ruroniarc Hey, do you know if it matters whether or not the ... Aug 11, 2009 - 5:02 PM Ryouxrs yes, the cruse sytems are the same for manual or a... Aug 11, 2009 - 9:48 PM eduardorq wooooooOWWWW..!!! very nice mod inform... Sep 7, 2009 - 1:16 PM DEATH Fcuk - guess I need to get around to doing this wi... Sep 11, 2009 - 9:52 AM Ryouxrs thanks death, and ya, its pretty much the same for... Oct 18, 2009 - 1:49 PM Makabra I want to know if i buy cc from RHD car, will it f... Sep 21, 2010 - 2:27 AM Makabra Anyone? Oct 3, 2010 - 9:46 AM Ryouxrs you would have to extend the wiring for the lhd/rh... Oct 3, 2010 - 12:50 PM Makabra Thanks for the tip !:) Maybe You have any ph... Oct 3, 2010 - 1:28 PM Ryouxrs unfort i dnt dnt have one to dig into and find al... Oct 6, 2010 - 7:00 PM Ryouxrs Ok everyone ive got an update, ive made it work wi... May 18, 2013 - 12:55 PM Makabra QUOTE (Ryouxrs @ May 18, 2013 - 12:5... Oct 21, 2013 - 3:54 AM Ryouxrs Yes, I am useing the 7a setup on my 3s as the syst... Oct 21, 2013 - 6:49 AM bsamps4 Great work! This should be stickied! Oct 21, 2013 - 8:19 AM Makabra Question:
Which type of clutch sensor do I need? C... Oct 27, 2013 - 11:51 AM Ryouxrs Yes. You are correct. The upper stopper in your la... Oct 27, 2013 - 12:30 PM Ryouxrs ok here is the diagrams, and a few operation descr... Oct 27, 2013 - 1:21 PM Makabra Thanks very much Ryouxrs I will post my progress ... Oct 27, 2013 - 1:56 PM Makabra If a donnor car wit CC has ABS with broken sensor,... Oct 31, 2013 - 2:52 AM Ryouxrs No the abs doesn't affect the cruise control i... Oct 31, 2013 - 10:06 PM Makabra Could i replace clutch switch with old 2pin brake ... Nov 2, 2013 - 7:38 PM Ryouxrs I'm not sure how it acts compared to the brake... Nov 3, 2013 - 11:43 PM Makabra QUOTE I'm not running one at the moment becaus... Nov 4, 2013 - 2:10 AM Ryouxrs It will but I don't recommend it because if yo... Nov 4, 2013 - 6:14 PM Makabra Yes i just want to bypass clutch sensor only once ... Nov 5, 2013 - 2:31 AM msk59 I am gathering parts to do this mod on my 1996 ST.... Aug 29, 2014 - 8:17 AM Ryouxrs This is not a plug and play mod unless you take th... Aug 29, 2014 - 9:08 AM msk59 Thank You Ryouxrs. I have the actuator from the ST... Aug 29, 2014 - 10:35 PM Ryouxrs If you have any questions I'll be glad to answ... Aug 29, 2014 - 10:50 PM msk59 Much Appreciated Ryouxrs. The connector next to th... Aug 30, 2014 - 12:50 PM Ryouxrs That connector goes from the cruise actuator to th... Aug 31, 2014 - 12:19 AM msk59 Got it thanks. I will double check this location. ... Aug 31, 2014 - 3:51 PM Ryouxrs Unfortunately when it comes too the fog light wiri... Aug 31, 2014 - 7:33 PM msk59 Hey thanks, I will try to do that but I am facing ... Aug 31, 2014 - 8:36 PM Ryouxrs Ok. I have a 94 so it didn't have any of the f... Aug 31, 2014 - 10:22 PM njccmd2002 please see under the glove box, if you have the pl... Sep 1, 2014 - 2:00 AM msk59 Thanks Ryouxrs as always I will keep you posted.
... Sep 1, 2014 - 7:59 AM Ryouxrs The pigtail njccmd2002 is talking about should be ... Sep 1, 2014 - 10:10 AM msk59 OK I just looked through behind the glove box and ... Sep 1, 2014 - 6:34 PM njccmd2002 best pic to have from my archive.
circled is th... Sep 1, 2014 - 9:31 PM msk59 OK this picture will help. I don't think I hav... Sep 1, 2014 - 9:53 PM njccmd2002 its part of the main dash wires. Sep 1, 2014 - 11:10 PM Ryouxrs Looks like all the pictures you've taken are o... Sep 2, 2014 - 6:47 AM msk59 Yes, After seeing the picture njccmd2002 psoted, I... Sep 2, 2014 - 8:45 AM msk59 OK checked everything on the right hand side. It i... Sep 2, 2014 - 5:41 PM njccmd2002 quick question, if the clutch sensor is only used ... Oct 6, 2014 - 11:46 PM enderswift there are two switches for the clutch pedal. One s... Oct 6, 2014 - 11:59 PM njccmd2002 Hmmm.. Ill go back and see tomorrow.... Oct 7, 2014 - 12:05 AM msk59 OK waiting on the parts and wiring pigtail from a ... Oct 8, 2014 - 9:46 PM njccmd2002 Anyone have an idea what this means....
Cant fi... Oct 12, 2014 - 10:14 PM msk59 check the electrical manual and on page 9 it shows... Oct 13, 2014 - 3:36 PM njccmd2002 i figured it out, its only for automatic, and it d... Oct 20, 2014 - 3:05 PM Ryouxrs Sorry I havnt been replying guys! I'll be ... Oct 20, 2014 - 8:06 PM njccmd2002 he should have the DIY Kit!!!! Oct 20, 2014 - 11:01 PM Ryouxrs DIY kit?? Oct 20, 2014 - 11:26 PM njccmd2002 he has all my cruise components.. I removed it en... Oct 23, 2014 - 7:36 AM Ryouxrs Nice!! I was actually thinking about build... Oct 23, 2014 - 1:05 PM Ryouxrs I am still trolling the forums. Lol. I'll try... Aug 2, 2015 - 5:36 PM
Ryouxrs QUOTE (njccmd2002 @ Jul 12, 2009 - 9... Jul 12, 2009 - 11:53 PM njccmd2002 just out of curiosity. what was the total cost. 7... Jul 13, 2009 - 6:24 AM Ryouxrs QUOTE (njccmd2002 @ Jul 13, 2009 - 5... Jul 13, 2009 - 10:47 AM Ruroniarc I really want to do this to my car. Could you give... Jul 13, 2009 - 2:24 PM Ryouxrs ok, send me an e-mail to my hotmail, and ill send ... Jul 13, 2009 - 2:30 PM Ruroniarc Hey, do you know if it matters whether or not the ... Aug 11, 2009 - 5:02 PM Ryouxrs yes, the cruse sytems are the same for manual or a... Aug 11, 2009 - 9:48 PM eduardorq wooooooOWWWW..!!! very nice mod inform... Sep 7, 2009 - 1:16 PM DEATH Fcuk - guess I need to get around to doing this wi... Sep 11, 2009 - 9:52 AM Ryouxrs thanks death, and ya, its pretty much the same for... Oct 18, 2009 - 1:49 PM Makabra I want to know if i buy cc from RHD car, will it f... Sep 21, 2010 - 2:27 AM Makabra Anyone? Oct 3, 2010 - 9:46 AM Ryouxrs you would have to extend the wiring for the lhd/rh... Oct 3, 2010 - 12:50 PM Makabra Thanks for the tip !:) Maybe You have any ph... Oct 3, 2010 - 1:28 PM Ryouxrs unfort i dnt dnt have one to dig into and find al... Oct 6, 2010 - 7:00 PM Ryouxrs Ok everyone ive got an update, ive made it work wi... May 18, 2013 - 12:55 PM Makabra QUOTE (Ryouxrs @ May 18, 2013 - 12:5... Oct 21, 2013 - 3:54 AM Ryouxrs Yes, I am useing the 7a setup on my 3s as the syst... Oct 21, 2013 - 6:49 AM bsamps4 Great work! This should be stickied! Oct 21, 2013 - 8:19 AM Makabra Question:
Which type of clutch sensor do I need? C... Oct 27, 2013 - 11:51 AM Ryouxrs Yes. You are correct. The upper stopper in your la... Oct 27, 2013 - 12:30 PM Ryouxrs ok here is the diagrams, and a few operation descr... Oct 27, 2013 - 1:21 PM Makabra Thanks very much Ryouxrs I will post my progress ... Oct 27, 2013 - 1:56 PM Makabra If a donnor car wit CC has ABS with broken sensor,... Oct 31, 2013 - 2:52 AM Ryouxrs No the abs doesn't affect the cruise control i... Oct 31, 2013 - 10:06 PM Makabra Could i replace clutch switch with old 2pin brake ... Nov 2, 2013 - 7:38 PM Ryouxrs I'm not sure how it acts compared to the brake... Nov 3, 2013 - 11:43 PM Makabra QUOTE I'm not running one at the moment becaus... Nov 4, 2013 - 2:10 AM Ryouxrs It will but I don't recommend it because if yo... Nov 4, 2013 - 6:14 PM Makabra Yes i just want to bypass clutch sensor only once ... Nov 5, 2013 - 2:31 AM msk59 I am gathering parts to do this mod on my 1996 ST.... Aug 29, 2014 - 8:17 AM Ryouxrs This is not a plug and play mod unless you take th... Aug 29, 2014 - 9:08 AM msk59 Thank You Ryouxrs. I have the actuator from the ST... Aug 29, 2014 - 10:35 PM Ryouxrs If you have any questions I'll be glad to answ... Aug 29, 2014 - 10:50 PM msk59 Much Appreciated Ryouxrs. The connector next to th... Aug 30, 2014 - 12:50 PM Ryouxrs That connector goes from the cruise actuator to th... Aug 31, 2014 - 12:19 AM msk59 Got it thanks. I will double check this location. ... Aug 31, 2014 - 3:51 PM Ryouxrs Unfortunately when it comes too the fog light wiri... Aug 31, 2014 - 7:33 PM msk59 Hey thanks, I will try to do that but I am facing ... Aug 31, 2014 - 8:36 PM Ryouxrs Ok. I have a 94 so it didn't have any of the f... Aug 31, 2014 - 10:22 PM njccmd2002 please see under the glove box, if you have the pl... Sep 1, 2014 - 2:00 AM msk59 Thanks Ryouxrs as always I will keep you posted.
... Sep 1, 2014 - 7:59 AM Ryouxrs The pigtail njccmd2002 is talking about should be ... Sep 1, 2014 - 10:10 AM msk59 OK I just looked through behind the glove box and ... Sep 1, 2014 - 6:34 PM njccmd2002 best pic to have from my archive.
circled is th... Sep 1, 2014 - 9:31 PM msk59 OK this picture will help. I don't think I hav... Sep 1, 2014 - 9:53 PM njccmd2002 its part of the main dash wires. Sep 1, 2014 - 11:10 PM Ryouxrs Looks like all the pictures you've taken are o... Sep 2, 2014 - 6:47 AM msk59 Yes, After seeing the picture njccmd2002 psoted, I... Sep 2, 2014 - 8:45 AM msk59 OK checked everything on the right hand side. It i... Sep 2, 2014 - 5:41 PM njccmd2002 quick question, if the clutch sensor is only used ... Oct 6, 2014 - 11:46 PM enderswift there are two switches for the clutch pedal. One s... Oct 6, 2014 - 11:59 PM njccmd2002 Hmmm.. Ill go back and see tomorrow.... Oct 7, 2014 - 12:05 AM msk59 OK waiting on the parts and wiring pigtail from a ... Oct 8, 2014 - 9:46 PM njccmd2002 Anyone have an idea what this means....
Cant fi... Oct 12, 2014 - 10:14 PM msk59 check the electrical manual and on page 9 it shows... Oct 13, 2014 - 3:36 PM njccmd2002 i figured it out, its only for automatic, and it d... Oct 20, 2014 - 3:05 PM Ryouxrs Sorry I havnt been replying guys! I'll be ... Oct 20, 2014 - 8:06 PM njccmd2002 he should have the DIY Kit!!!! Oct 20, 2014 - 11:01 PM Ryouxrs DIY kit?? Oct 20, 2014 - 11:26 PM njccmd2002 he has all my cruise components.. I removed it en... Oct 23, 2014 - 7:36 AM Ryouxrs Nice!! I was actually thinking about build... Oct 23, 2014 - 1:05 PM Ryouxrs I am still trolling the forums. Lol. I'll try... Aug 2, 2015 - 5:36 PM |
5 User(s) are reading this topic (5 Guests and 0 Anonymous Users)
0 Members:
| Lo-Fi Version | Time is now: February 26th, 2025 - 12:33 PM |