 Aug 18, 2015 - 3:35 AM Aug 18, 2015 - 3:35 AM
|
|
|
Enthusiast Joined Aug 14, '15 From Austin, TX Currently Offline Reputation: 0 (0%) |
Hey all, a new Celica owner reporting in here at 6gc looking for tips and advice on taking care of my first ever car, the '97 25th Anniversary GT. I was lucky to come across it on Craigslist and fell in love with it immediately. But however, it has sustained some wear and tear over the years - pretty much all only cosmetic, and I'm looking to tending to them in the near future.
I want to start with getting a new cloth top for the El Nino winter that we're expected to have here in Texas. Before I pull the trigger on buying a cloth top from eBay (all I can afford really), I was wondering if anyone can share their instructions PDF or whatever help came with your replacement top. I had read on here that some people got them with buying a new top, but am unsure if the one I'm looking at would, and also to see how much work I'll have to do to install one. I did hear it was a two-person job, but I have no idea where I would start without these instructions, apart from knowing that it's a two-piece design that can be done with glue and a stapler gun. Any advice is welcome too, and thanks in advance. |
 |
Replies
 Oct 5, 2015 - 5:02 PM Oct 5, 2015 - 5:02 PM
|
|
|
Enthusiast  Joined Jan 2, '07 From Little Rock, AR Currently Offline Reputation: 0 (0%) |
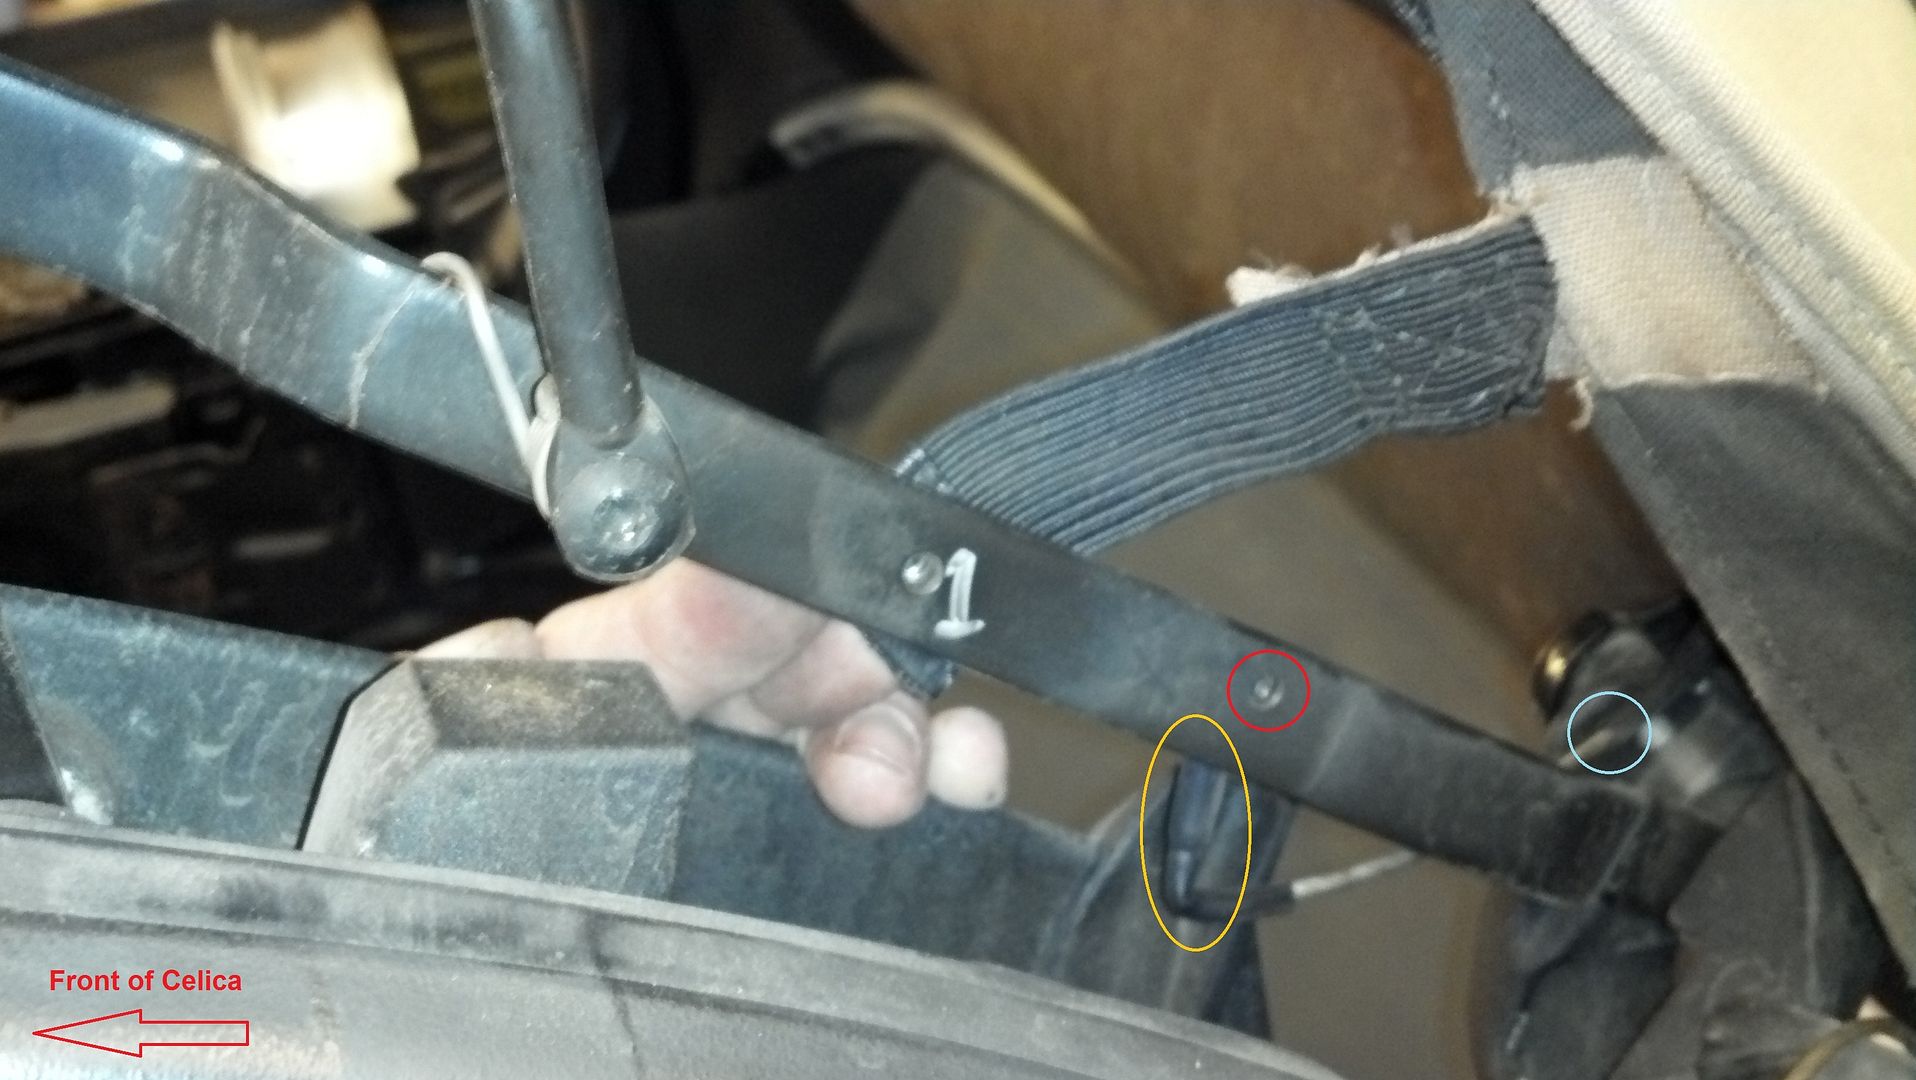
There is another cable on each side under the top, but above the headliner. It was close to where the top frame folds, near the top of where the front & back side windows meet. On my car these cables were both broken on both sides. The cables are short, only a few inches or maybe a foot long, & were held in with screws on both ends. I'm not sure of their function, maybe to prevent the headliner from getting pinched or to prevent the top from folding up too far.
 In the picture above the screw that holds the broken cable in place is circled in red, the cable where is was bent nearly in half below that is yellow, & the end were the cable is snapped is circled in light blue. I just would like someone to take a few pictures of this area so I can see where these cables need to go. I took the screws out & removed the broken cables a long time ago. It took me a long time to finish putting the new top on, & now I don't remember which screw holes they went to. I took a broken piece of one of the cables to home depot & got a length of replacement cable. I was going to crimp some electrical type connections to it, since that's pretty much what was already on there. |
Posts in this topic
 JPArdee Convertible Top Replacement Instructions Aug 18, 2015 - 3:35 AM
 pandito Funny enough, I was also thinking about replacing ... Aug 18, 2015 - 5:48 PM
 njccmd2002 8 hours 1 person job. i got one from a yard. not... Aug 18, 2015 - 11:13 PM
 JPArdee Thanks for the hindsight. I think I want to put my... Aug 19, 2015 - 3:41 AM
 njccmd2002 Unless youve done it before and you know what your... Aug 19, 2015 - 4:32 PM
 IllIllIll I replaced my top too, & it was a giant pain i... Oct 4, 2015 - 9:16 PM
 njccmd2002 dont understand the question. i think you already... Oct 4, 2015 - 10:40 PM
 njccmd2002 ill see what i can do tomorrow. Oct 5, 2015 - 8:11 PM
 CosaChow I'm curious to what these short cables are for... Oct 12, 2015 - 10:34 PM
 njccmd2002 i was out of the country for a few days, and its d... Oct 12, 2015 - 10:46 PM
 IllIllIll Thanks for the pictures. I'm sure it was diffi... Oct 15, 2015 - 10:35 PM
  |
1 User(s) are reading this topic (1 Guests and 0 Anonymous Users)
0 Members:
| Lo-Fi Version | Time is now: September 18th, 2025 - 8:08 AM |


