 Apr 1, 2005 - 7:44 AM Apr 1, 2005 - 7:44 AM
|
|
|
Enthusiast    Joined Jan 9, '05 From Under the car Currently Offline Reputation: 0 (0%) |
GT4 & 3sgte quick fixes and pointers, usefull to all Celica owners.
Having been on this Forum for a while now, and seeing many questions repeated over and over again I thought I’d take a bit of time to produce this to help out and return the favour for all the help I have received from this site. Focusing on GT4s (ST205`s) and 3sgte engines (standard) but I’m sure the info can be adapted to most of the 3sgte family. Will start with finding Error codes (this will only work if you have the standard ECU running things). Error codes will crop up for a number of reasons and will cover most of the cars systems, the most common error code is the code 54, coming from the Coolant level sensor on the Top mounted water to Air charge cooler (sometimes called the intercooler but this is strictly not correct terminology) also comes from problems with the water pump that circulates water around the charge cooler to the radiator (rad) on the front of the car. The sensor is prone to problems as it is sensitive and can misread a low level too easily. To check your Error codes – a) Do not disconnect the battery or pull the ECU fuse before doing this or you will loose all stored error codes. b) Locate the Diagnostics port, on right hand drive cars this is on the top right corner of the engine bay as you look at it. It is connected to a bunch of wires but is movable by undoing the clip on the inside for ease of access, but not necessary to move it. 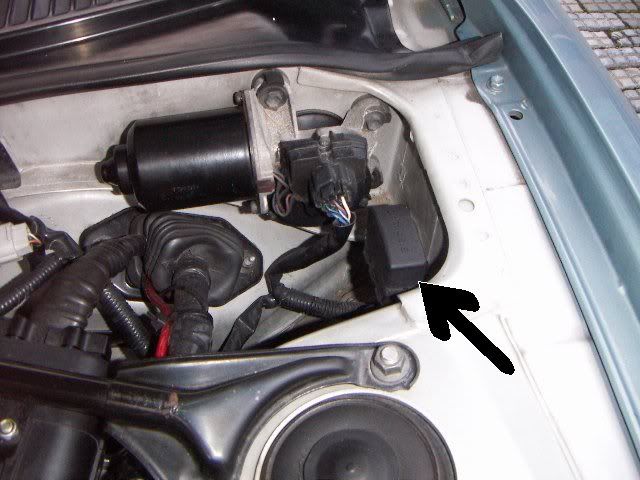 Once you have located this diagnostics port you will need to bridge two of the connectors together marked “E1” and “TE1”, you can use a small piece of wire or a paperclip, whatever is closest to hand. (As a side note:- when adjusting the timing on a 3sgte engine, you should connect E1 & TE1 together to get a steady reading, haven’t got a clue why, just something I have been told) 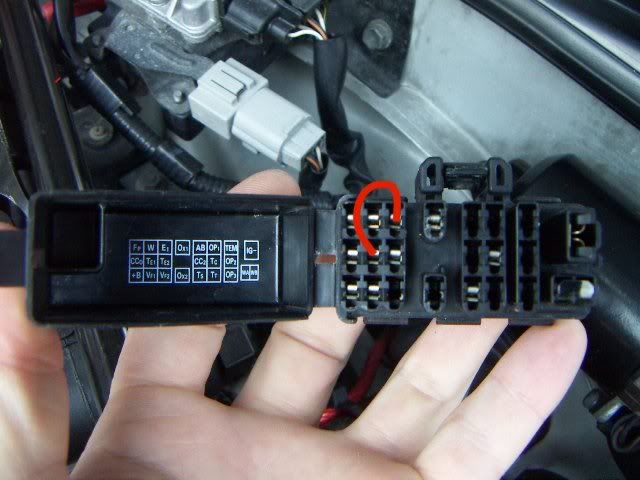 Having bridged these together you are ready to read error codes. Return to the drivers seat and turn the key to the “On” position, this will light up the engine check light and it will start flashing. Constant uninterrupted flashing means that there are no problems. To find out which error code you have if any, count the flashes and pauses. Flash, flash, flash, flash, flash, pause, flash, flash, flash, flash would indicate an error code 54 Flash, flash, pause, flash, flash, flash, flash would indicate an error code 24. 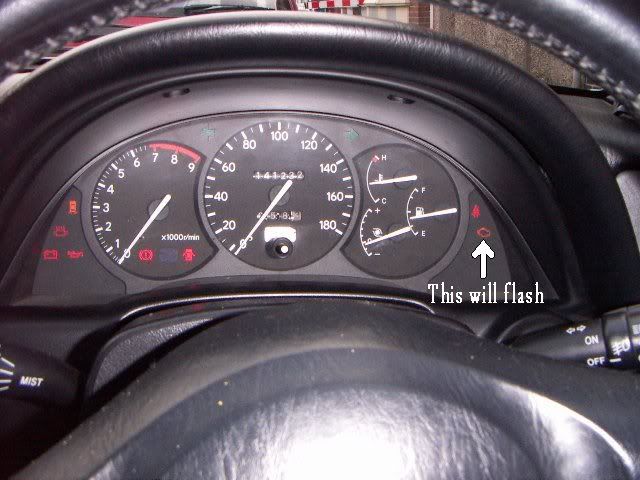 Once you error codes have been established, disconnect E1 and TE1 and return the diagnostics port to its home. Most Error codes will effect the engine management system in such a way that it will retard the timing, and sometimes reduce boost. Retarded timings worst effect other than making the car slower is to make your fuel consumption bad. The best way to get rid of the error 54 (it must be the level sensor and not the pump, if the pump is a fault replace it) is to bridge the sensor, you “can” replace the sensor and its not that expensive as things go, but its a lot of money for a simple sensor. 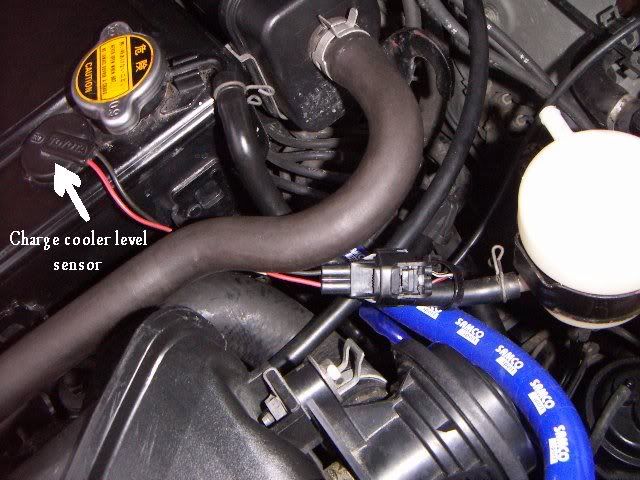 Bridging the sensor 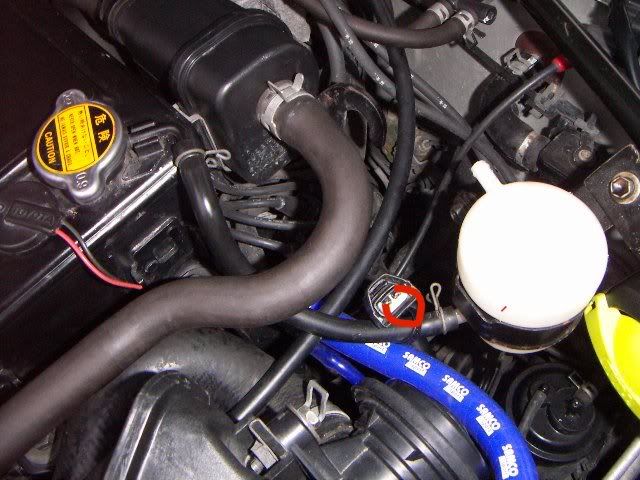 It may not look fantastic, but I have had my charge cooler bridged for over six months now with no problems, just remember to make those regular fluid level checks. No fluid in your charge cooler is not good at all. The next common mistake on the gt4 mostly but also on the 3sgte engine is where you tap into the vacuum line to put in a Boost gauge. Boost gauges are a good after market mod and should be your first purchase, when you have a boost gauge, be it mechanical or electric, you will realise how slow and crap the standard boost gauge is. Incorrect boost levels are a good indication of problems with the engine and can help diagnose a lot of problems. Most people tap into the vacuum from the inlet manifold from this vacuum line. 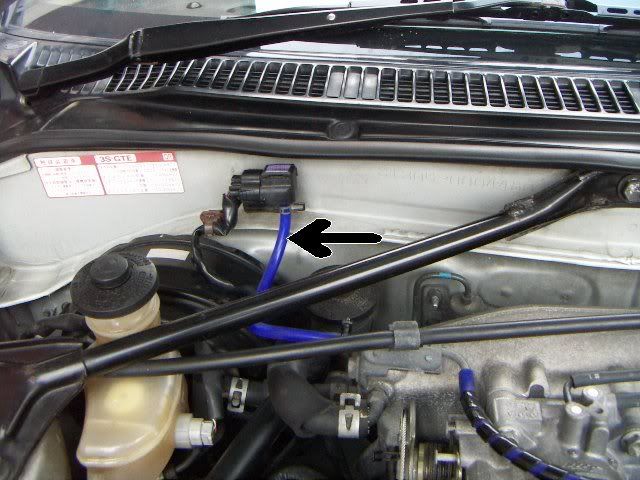 DON’T DO IT, this feeds info to a small transmitter which not only gives a reading for your standard boost gauge, it also supplies information to the ECU, should this line split, your gauge have a leak etc then incorrect information will be sent to your ECU and will/can cause lots of damage to your engine. Instead a safe line to tap into would be your dump valve line or this line here for the best results 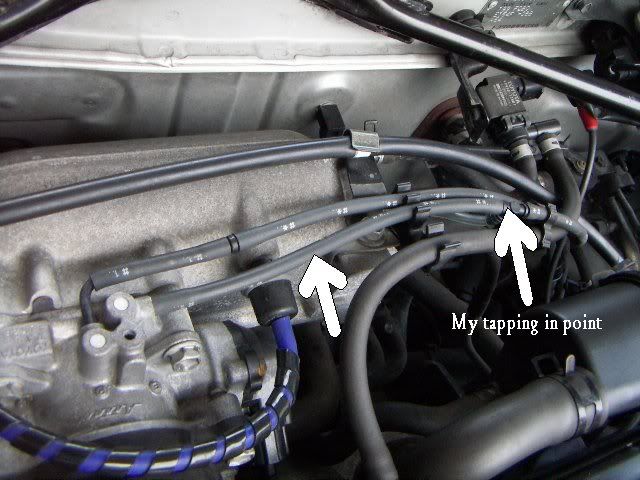 Dump valve vacuum line, good place to tap into for your boost gauge (caution needed, “can” effect the dump valve function) 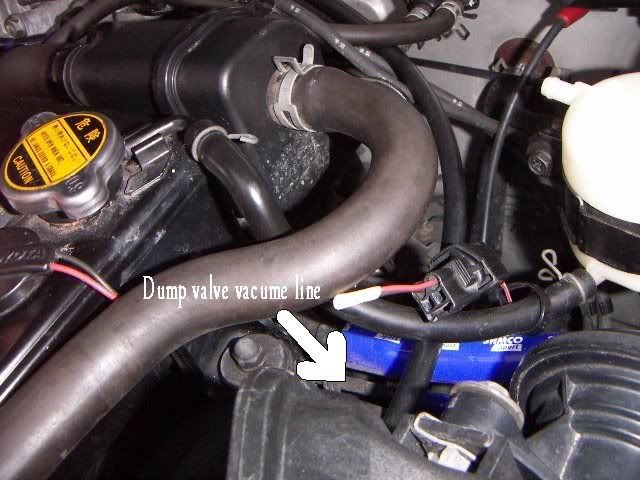 Next on my list of cheap mods is to do with the Induction system, A lot of people go down the route of fitting an aftermarket kit, with a GT4 you also have to upgrade the dump valve, (standard one is fixed to the airbox) This can cost a lot of money. I got this little lot all brand new from the internet for £120 ($200) with only a little bit a searching around. 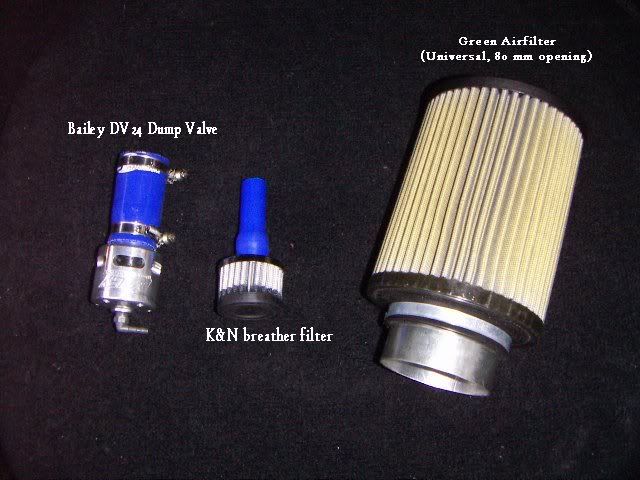 To be honest, I would advise against a Bailey dump valve, a) they aren’t fast enough in there action and b) the suck in unfiltered air when not closed (only closed under boost) After trying this set up for less than a week I discovered a few disappointing things, firstly the fuel economy worse than it had ever been and there was a loss of power. So I returned to the original set up with a few mods, the first been a K&N panel filter which is great, (you still get the induction noise with it. The second mod being the removal of the resonator box, the purpose of this is to reduce induction noise and to even out the airflow into the engine. Personally I think it’s a complete waist of space as it is just a box, with 4 very small holes to let air in, when I say small, I mean less than a mm across. 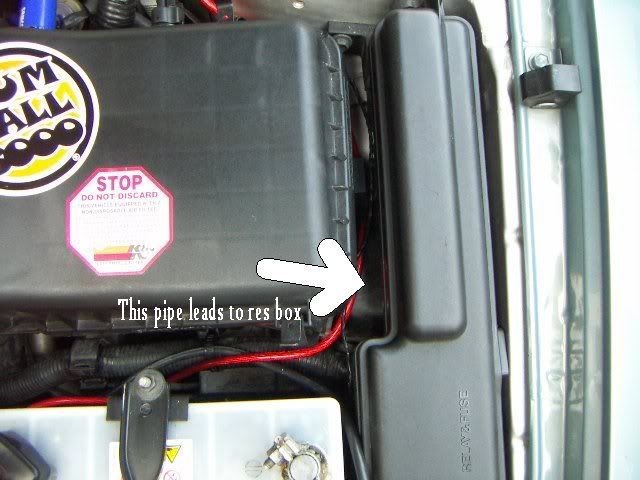 To remove the resonator box you have to remove the plastic wheel arch liner (12 screws or so) and the indicator (1 screw), there are 3 or 4 bolts holding the box in place, all pretty easy to get to (One via the hole where the indicator lives) 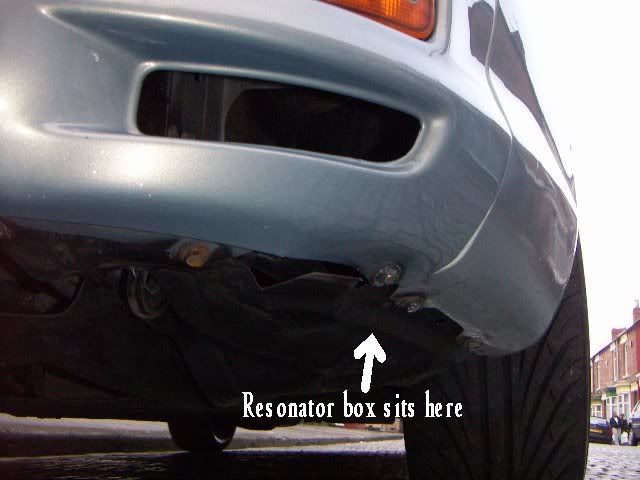 This is what you should pull out. 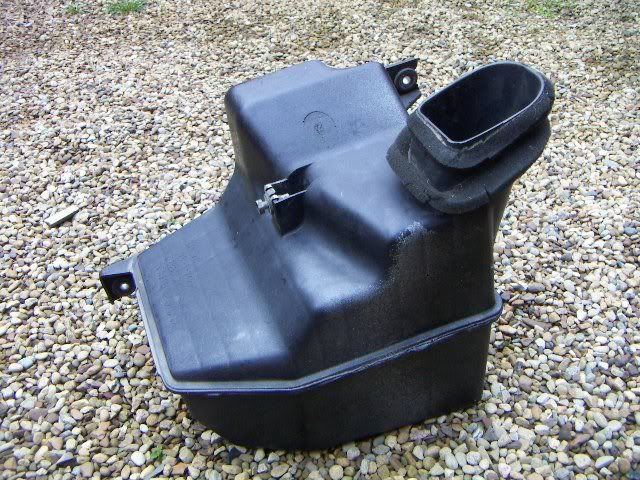 After doing this I noticed two things, more low down power, and more induction noise (YEY), worth doing this job. Next up should be your fuel filter replacement, unbelievable difference in my car after doing this and should be well up there on your list of things to do. It’s a bit of a bitch of a job and will take about an hour if your lucky, remove the airbox for ease of access, remove the pipes first, bolted to the filter, mine had been cross threaded by a previous owner and was a right pain in the arse to undo, next up is to remove the two bolts that hold the fuel filter to the engine bay wall. Fitting is reverse of removal. Jobs a good un! 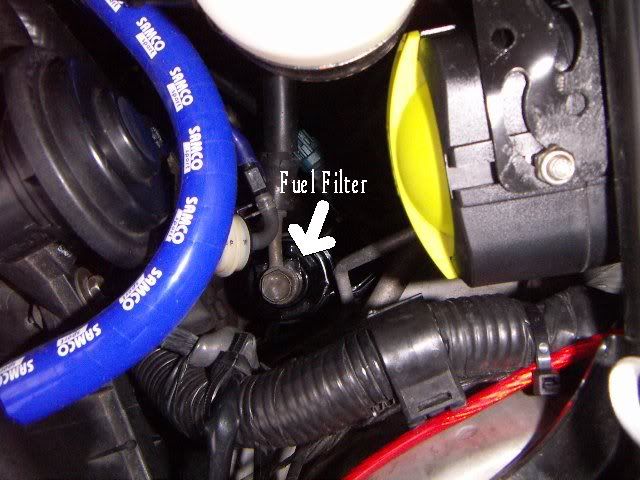 Couple of usefull tips Lagging the charge cooler can help prevent heat soak from heating the charge air. I used heat reflective tape and some insulating material, easy job, half hour max, removing the chargecooler can be a bit difficult. Twisting it away from both the turbo and inlet manifold is the easiest way. While your at it run some petrol through the charge cooler to get rid of any dirt and oil deposits that have built up inside. (CAUTION needed when using petrol, do it outside with a bucket of sand handy just in case) You can just see the silver tape on the bottom of the chargecooler 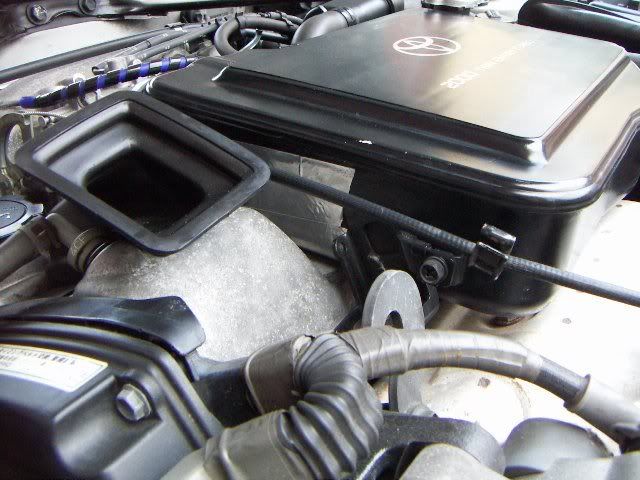 ECU fuse location. Use this to reset Error codes and to reset ECU after any repair work. 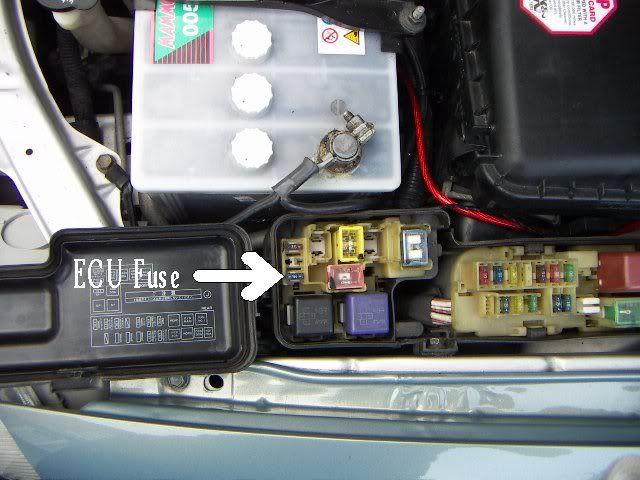 For any of you wanting to install some tweeters to your front doors, inside of the door card there is a small socket already wired up and running to attach Tweeters to (thanks Mr Toyota) just about where my stubby finger is pointing, removing the door card is easy, takes about 10 mins, don’t forget there is a screw behind the door latch finger plate, and under the door grab arm. 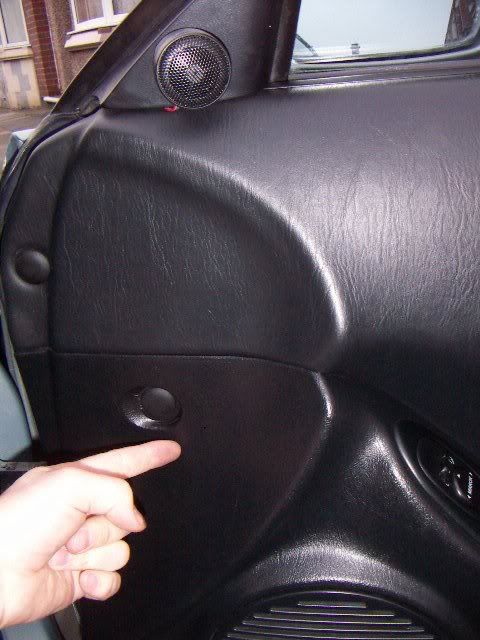 And last but not least, if anyone ever tells you not to put the GT4 raiser blocks on your car cause you wont see anything out the back……well, make your own mind up, heres what you`ll see. 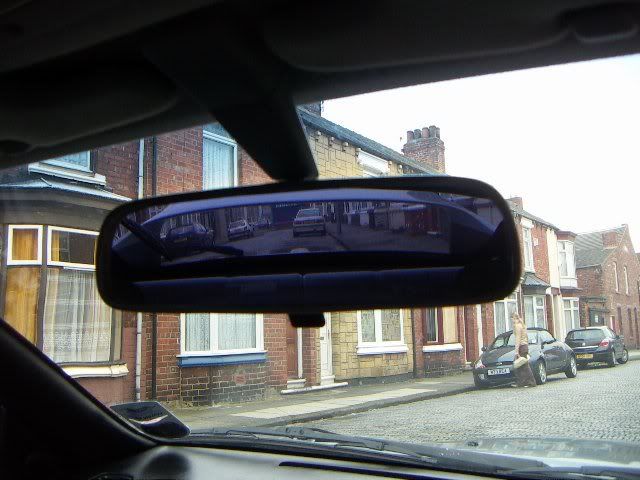 Suspension and the infamous Fig 8`s A Common problem with the super strut suspension is the Fig 8`s, these are little links that coonect the forward lower arm to the bottom of the shock absorber. They will go at around 60,000 miles I believe, and will need replacing at some point, Heres what and where they are. (please excuse the grease and mess, my CV boot went last week and I havnt had a chance to clean up after it yet) 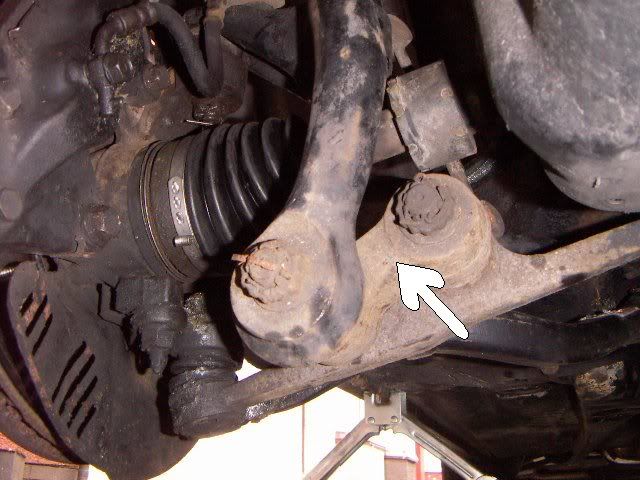 An indication that your fig 8`s have gone is a deep knocking sound when you go over bumps, or try to rotate the wheel of the car when its on the ground as normal, if they are really bad you will be able to rotate the wheel slightly, and it will move back and forth within the wheel arch. Not such a bad job to do yourself as long as you have the correct tools. Toyota unfortunately have twigged on to the fact that these “Go” and are quite expensive for what you get. Another question I have seen asked, not just here but on other forums is “where`s my track rod ends” In the picture below I have labelled all the important bits, once again replacing the track rod ends isn’t difficult. You will need a ball joint splitter, which looks like a big tuning fork, some spanners and a tape measure. 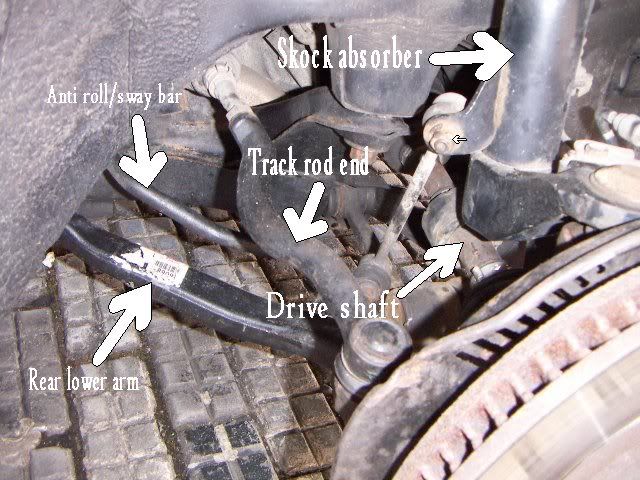 When replacing the TRE remember to measure the distance from the ball joint to a convenient immovable point on the track rod, if these distances are not the same before and after fitting a new track rod, the tracking will be out on your car and you will scrub away valuable rubber, not to mention have less car control. 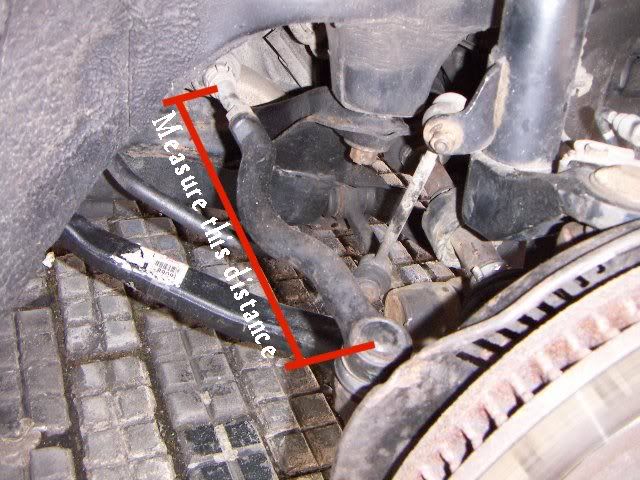 It apears that I cant post any more pics so thats all folks REMEMBER, WHEN WORKING ON CARS YOUR SAFTY IS PARRAMOUNT, NEVER WORK UNDER A CAR WITH JUST A HYDRAULIC JACK FOR SUPPORT, ALWAYS USE AN AXEL STAND. WHEN WORKING WITH FLAMABLE LIQUIDS HAVE A FIRE EXTINGUISHER HANDY, OR AT THE VERY LEAST A BUCKET OF SAND. LET SOMEONE KNOW YOU ARE WORKING ON YOUR CAR (IF ALONE) AND GET THEM TO CHECK UP ON YOU FROM TIME TO TIME. AND THE RIGHT TOOLS FOR THE JOB MAKES LIFE A LOT EASYER. HAPPY FIXING FOLKS. INSANITY. AKA NIAL. Hope that was helpful and didn’t bore you all to death. This post has been edited by Insanity-74: Apr 3, 2005 - 3:31 AM |
 |
Replies
 Apr 1, 2005 - 10:09 AM Apr 1, 2005 - 10:09 AM
|
|
|
Enthusiast    Joined Dec 11, '04 From USA Currently Offline Reputation: 12 (83%) |
it cools the timing belt .. it was used in racing ..
-------------------- Old guy with the toys
95 ST205 WRC (the real deal) 94 MR2 HARDTOP Supercharged 2GR/6SPD 22 owned  |
Posts in this topic
 Insanity-74 Some repair tips for GT4/3sgte owners Apr 1, 2005 - 7:44 AM
 presure2 great post man! Apr 1, 2005 - 8:54 AM
 25thcelica hey quick question what does the vent right next t... Apr 1, 2005 - 9:07 AM

 Mr_E :applause:
QUOTE(FORGMANN @ Apr 1, 2005 - 10... Apr 1, 2005 - 5:12 PM
 1bwilson This actually is helpfull for any celica owner. V... Apr 1, 2005 - 11:39 AM
 lagos someone lock this thread and sticky it!!... Apr 1, 2005 - 11:59 AM
 Drocay very informative bro, good job and thanx for takin... Apr 1, 2005 - 12:15 PM
 Insanity-74 Cheers everyone, I get alot of help and info from ... Apr 1, 2005 - 12:29 PM
 lagos timing belt cooler? i thought that was for getting... Apr 1, 2005 - 6:35 PM

 Mr_E QUOTE(lagos @ Apr 1, 2005 - 6:35 PM)timing be... Apr 1, 2005 - 7:42 PM

 GT4WRC QUOTE(lagos @ Apr 1, 2005 - 6:35 PM)timing be... Apr 1, 2005 - 8:38 PM
 GT4WRC ...and as for the resonator box. Easy to see why i... Apr 1, 2005 - 8:44 PM
 GT4WRC BTW Insanity - why was your car resprayed?
Gary Apr 1, 2005 - 8:45 PM

 Insanity-74 QUOTE(GT4WRC @ Apr 1, 2005 - 8:45 PM)BTW Insa... Apr 2, 2005 - 2:20 AM
 Jdog1385 definite sticky, good stuff...thanks a lot insanit... Apr 2, 2005 - 3:17 AM
 Insanity-74 I`ve added some more stuff about suspension. enjoy... Apr 2, 2005 - 4:59 AM
 richgt4 Deff make this post a sticky. Look @ the time ... Apr 11, 2005 - 5:34 PM

 Insanity-74 QUOTE(richgt4 @ Apr 11, 2005 - 5:34 PM)Deff m... Apr 12, 2005 - 2:10 AM
 Mr_E If you want a picture of suspension parts...... Apr 11, 2005 - 6:17 PM

 Insanity-74 QUOTE(Mr_E @ Apr 11, 2005 - 6:17 PM)If you wa... Apr 12, 2005 - 2:12 AM


 Mr_E QUOTE(Insanity-74 @ Apr 12, 2005 - 2:12 ... Apr 12, 2005 - 2:36 PM

 tomgt485 QUOTE (Mr_E @ Apr 11, 2005 - 6:17 PM... Jun 16, 2015 - 6:17 AM

 texasnick QUOTE (tomgt485 @ Jun 16, 2015 - 7:1... Dec 15, 2015 - 7:27 PM
 Batman722 great info. Keep it comming Apr 12, 2005 - 2:13 AM
 popstar Blin! spot on info mate as always
but now... Apr 12, 2005 - 11:52 PM

 Insanity-74 QUOTE(popstar @ Apr 12, 2005 - 11:52 PM)Blin... Apr 13, 2005 - 2:30 AM
 popstar Mate i hope to get it seen to this weekend !
... Apr 13, 2005 - 11:36 PM
 CheesyLobster nice info! sticky fo sho Apr 14, 2005 - 1:12 AM
 Insanity-74 Fitting a Down pipe / DeCat pipe
Well here we go ... Aug 27, 2005 - 1:31 AM
 _rz_ Thanks for all the info. Very useful. Great job an... Oct 6, 2005 - 7:34 AM
 popstar Hmmm
that looks like something i can do, with a b... Oct 6, 2005 - 7:59 AM
 zCelicaDude I just removed the intake resonator box. It seems ... Jan 4, 2007 - 9:52 PM
 Insanity-74 you dont need to take the wheel off, just jack the... Jan 5, 2007 - 5:13 PM
 easternpiro1 ACKHEM...STICKY?? Jan 5, 2007 - 5:46 PM

 presure2 QUOTE(easternpiro1 @ Jan 5, 2007 - 5... Jan 5, 2007 - 6:13 PM
 zCelicaDude QUOTE(Insanity-74 @ Jan 5, 2007 - 1... Jan 5, 2007 - 10:48 PM
 Insanity-74 Yep...I have 18`s aswell, and Eibach lowered s... Jan 6, 2007 - 4:27 AM
 zCelicaDude ah thats where i went wrong, the screwdriver i was... Jan 6, 2007 - 2:57 PM
 schmooot SO you still think the aftermarket dump valve and ... Apr 16, 2013 - 9:52 AM
 diegohiga Ok so i have my engine light on and i tried to fig... Apr 16, 2013 - 10:20 AM

 WannabeGT4 QUOTE (diegohiga @ Apr 16, 2013 - 10... Apr 16, 2013 - 12:28 PM

 presure2 QUOTE (WannabeGT4 @ Apr 16, 2013 - 1... May 5, 2013 - 12:39 PM
 empite I just did a 3sgte swap everything is OK but the E... Oct 14, 2015 - 3:58 AM
  |
7 User(s) are reading this topic (7 Guests and 0 Anonymous Users)
0 Members:
| Lo-Fi Version | Time is now: November 28th, 2024 - 11:14 PM |


