 Nov 18, 2007 - 9:01 PM Nov 18, 2007 - 9:01 PM
|
|
|
Enthusiast     Joined Aug 17, '04 From California Currently Offline Reputation: 20 (100%) |
Hey everyone, i need to change out my timing belt asap and wanted to know if this kit i found would be enough? http://cgi.ebay.com/ebaymotors/Timing-Belt...VQQcmdZViewItem
Also i wanted to know the magnitude of the project. Is there any advice you can give me? is there a specific problem i may run into? and also, should i bother changing the water pump? or is it reliable enough to keep? Im a bit low on funds so the less expenses the better. I found a write up on changing the t-belt in a mr2 but i wanted to get input from you guys here on 6gc. Again any help is appriciated. thanks! This post has been edited by eggman40: Nov 18, 2007 - 9:01 PM |
 |
Replies
 Nov 19, 2007 - 7:47 AM Nov 19, 2007 - 7:47 AM
|
|
|
Enthusiast    Joined Jan 9, '05 From Under the car Currently Offline Reputation: 0 (0%) |
One I wrote for the ST205 for the GT4OC, but very similar -
How to Change a Cam Belt A task that must fill each and every one of us with dread...well it isnt really that hard, I recon an experienced mechanic could do it in about 3 hours without doing anything else......Well here goes...deep breath...... Cam Belt Change Under normal circumstances, I would have not attempted this job due to my own personal time constraints, but as it is, I had to do it myself as a lot of other problems had occurred and I wanted to do some other jobs as well. Why should I change my cambelt? Well the most obvious reason to change your cam belt is because of a failure with either the cambelt itself or one of its components, but it is much better and less painful on the wallet to change the cambelt on a regular basis. Most cars will have some kind of notification in the handbook / service documents or even a sticker on the cambelt cover to indicate when the last cambelt change was done, or when the next one is due. Heed the warnings?.if you are unsure as to when the cambelt was changed last, change it now?don?t wait, as it is a very costly and time consuming repair when everything goes tits up. Jobs you can do whilst doing the cam belt change Here is a little list of jobs I have decided to do whilst undertaking the cambelt change, not essential to do but things that I might not otherwise bother with had I not be doing this. Polish Throttle body internals Clean Inside of Charge cooler Paint Rocker Cover Fit Oil Temp gauge Underseal front wheel arches Charge the battery Replace Hydraulic steering fluid All these jobs will be covered in this write up but I will state whether they need doing or not Tools needed for the job Specialist tools Pulley puller (£20+) 1/2 inch drive 19mm impact socket (?6+) 1/2 inch drive 14mm & 19mm deep sockets (?5 each) Breaker Bar 1/2 inch drive, 3 feet in length (?20) Regular Tools Socket set 1/4 inch drive and 1/2 inch drive, mainly 10, 12, 14 and 19mm but a full set is preferable. Ratchet?? inch drive and ? inch, the best you can afford as it will have to put up with some abuse on this job. Extension bars 1" (1/2 inch drive), 6" (1/2 inch drive and 1/4 inch drive) and 2x10? (1/2 inch drive) Assorted screw drivers but mostly a medium Phillips and a large flat headed. Jack?.hydraulic trolley jack is best Scissor jack Axel stand x2 Wire brush Torch Pliers Copper ease Lithium grease although normal grease will do Surgical rubber/latex gloves (helps keep hands clean and slightly warmer) Parts It is widely recommended to buy more than just the replacement cam belt, you should also buy an idler pulley, hydraulic tensioner pulley and the hydraulic tensioner and water pump. You can pick that up for a little over ?200 from Fensport, and although the water pump is not an essential fix if there is nothing wrong with the old one, for the sake of ?70 you may as well replace it whilst you are there and save another horrendous job later down the line. Engine coolant. these are the old parts, but obviously the new parts will be the same only newer looking  The Work Start by finding a nice warm garage or space for your car, remember this job can be done in a day, but may take a week or so depending on your available free time, so don?t choose a place that you or someone else is likely to want access to in that timeframe. Start by jacking up the drivers side of the car, remove the front wheel and support on an axel stand, using the sub-frame where it bolts onto the chassis near the footwell is a good place. Next remove the drivers side under tray, this is held in place by 6 or 7 10mm bolts/self tapping screws, 4 under the car and 3 under the wheel arch. Have a little container handy for the bolts. ( I use labelled jam jars and aerosol lids to store the nuts and bolts in so it is easier to remember where they came from) Then I found it easier to remove the chargecooler than to leave it on, as it increases the work space, and you can clean it out whilst your there, but it isn?t essential. To remove the charge cooler, undo the 3 x 12mm bolts that secure it to the top of the engine, one is on the front drivers side corner, the other 2 are on the front and rear passenger side corners, then you have to remove the two feed pipes that are located to the right and down of the chargecooler, they are held in place by 2 clips which you can remove by squeezing the tags together with a pair of pliers and wangling them past where the pipe flare is, they should then be easy to remove but can be helped along by pushing them off with a screw driver. (do not pull pipes off as when a pipe is pulled it ?thins? gripping whatever it is attached to even tighter, this can cause damage to both the pipe and whatever it is on). When the pipes are removed about 1 litre of coolant will pour out of the chargecooler, be sure to have a catch can / matt under the car as it is horrible greasy water, and is best removed asap.(although I always find that an elbow or bum cheek finds the bit of cooling water that I havnt cleaned up??yuck) Now you need to undo the jubilee clips that hold the charge cooler to the turbo and the throttle body, using either a 10mm socket or a flat head screwdriver, depends upon which type of jubilee clip you have. Break the seal that will have formed between the rubber and the pipe with a screwdriver (be careful not to mark the turbo/throttle body or to damage the pipe). Then disconnect the charge cooler water sensor. Now twist the charge cooler as best you can anticlockwise from above and at the same time lift the front of the charge cooler up. It should slowly detach itself from the pipe work and be easily removable. Clean out as mentioned in the ?Easy Mods? section stickied here, and store in a safe place. Now you have to remove the alternator belt, to do this slacken off the tension by turning the 10mm bolt under the alternator clockwise until the belt loosens enough to remove it from the pulleys. Place the belt somewhere safe or renew if the belt is cracked. Next you will have to remove the left hand engine mount, this is where things start to get a bit more complicated, First of all put a scissor jack under the engine with a bit of wood between the jack and the sump to help spread the load and prevent damage to the sump, this helps support the engine when you remove the engine mount, and will enable you to raise and lower the engine to gain better access to various parts. Next remove the cap from the Power steering Fluid expansion bottle, attached to the driver?s side suspension pillar. To do this you will have to use a tin bladed flat head screwdriver and push it between the expansion bottle and the little metal holder is sits in, this will release a metal spring clip and allow you to pull the expansion bottle up and out of its holder. You are now ready to undo the 2 pipes that feed in and out of the bottle, again as with the charge cooler, use a pair of pliers to nip the metal tags of the pipe clamp together and move down the pipe out of the way. Get a handy container (I found a butter/margarine carton was the perfect size, although not Flora Pro active as its just a little bit too small) Use a screw driver to push off the pipes, try to catch as much of the fluid as possible in the carton, you will get about 1/6 of a litre. Any spillage onto the inner wing should be mopped up immediately. Discard the fluid in the proper place, i.e. not down the drain. (I used this opportunity to thoroughly clean the expansion tank?brake cleaner removed the dirt very well although WD40 has a similar effect) store somewhere safe (the boot is a good place) Once the expansion bottle is removed you will clearly be able to see and get access to the engine mount, and the supporting frame for the bottle. Undo the nut that sits directly below the expansion bottle, then undo the bolts that hold the engine mount to the inner wing, the power steering fluid bottle framework should now come loose, remove from engine bay and store somewhere safe, at this point I jacked the engine up just a few mm to help take the strain off of the remaining engine mounts bolts to make them easier to undo. There are three bolts that hold the engine mount to the engine, two on the top and one that goes up from underneath, I undid the underside one first using a 10? extension bar on a ratchet, then the two top nuts, a little tap with a copper hammer will loosen the mount and enable you to remove it (again store it in the boot). The next job, to enable access to all of the top cam cover retaining bolts, was to undo the bolts that secure a cable duct behind the alternator, it?s a brown plastic thing that goes from behind the top of the alternator to below the front, it is held on by 2 bolts (10mm) one on the side of the engine, the other under the front of the alternator, there is no need to disconnect the wires as you only need to move the cable duct out of the way by a few `cm`. There are about 5x10mm bolts that hold the top cam belt cover in place, mostly around the outside edge but there is one in the middle which you will have to undo as well. The only problem I came across when undoing these bolts was the top rear corner bolt has very little space to access it, a normal spanner wont fit and there isn?t enough room for a regular ratchet, I used a 1/8 inch drive micro ratchet to remove this and even then there was only just enough space, a better solution would be to make a purpose built tool. Get a 1/2 inch drive 10mm socket and an Alan key, 7 or 8mm ?I think?, grind down the smaller arm of the Alan key by about half its length, the with a big hammer, then whack the Alan key into the drive side of the socket?.this will of course render the socket and the Alan key useless for anything else, so don?t do it if it is your only 10mm socket, this will then be perfect for removing said bolt. Once all of the bolts have been undone (store them together in a jar or aerosol lid) you can now remove the Top Cam belt cover and gain access to the Cam pulleys, be able to assess the damage to the belt, and visually inspect the hydraulic tensioner and tensioner pulley. 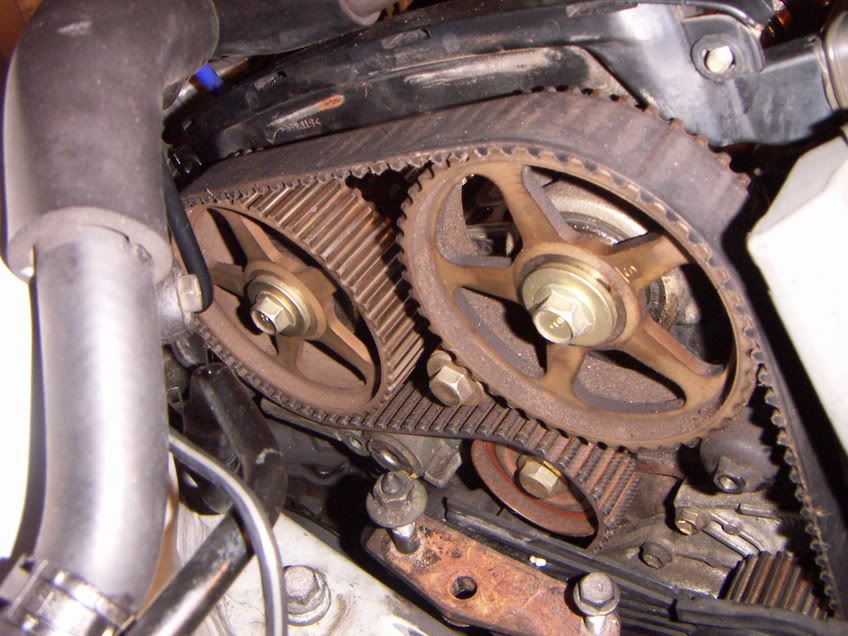 At this point I decided to undertake some other jobs as I needed to buy some more tools, and check on how to proceed from this point. It seemed like a good idea to remove the Rocker cover to paint it and to polish the inside of the throttle body as it was black from oil deposits. Throttle body removal is quite easy but I must stress, not a requirement for changing the cam belt, first of all, disconnect the accelerator cable but slackening it off, pulling it sideways out of its retaining clip and removing the cable end from the throttle body (similar to how a bicycle brake cable fits onto the brake lever), undo the 4 x 10mm bolts that hold the plastic duct to the front of the throttle body (the bit the charge cooler secures to) then undo the two long 10mm bolts that hold the securing bracket to the top of the rocker cover, then the two long bolts, again 10mm that hold the securing bracket to the throttle body. Next there are 2 x 10mm bolts on the top of the throttle body to undo, once undone this should make the throttle body come loose (be careful not to damage the metal gasket) Next undo the two electrical connectors each side of the throttle body, the 2 vacuum pipes on the top, and the 3 water pipes underneath (again by pinching the metal tags together with a pair of pliers). The throttle body should now be free and ready to work upon. I used brake cleaner, 1200grit wet n dry and some metal polish to clean the inside of the throttle body to a near mirror finish, not sure how much good it will do, but it looks nice anyway and I?m glad I did it, its quite relaxing. Don?t forget to block of the hole in the inlet manifold to prevent foreign body damage One important point to make though?you must not increase the size of the bore where the throttle plate sits, as it will no longer make a seal when it closes, most of my polishing effort was made on the turbo side of the throttle body as it was the most dirty, and had some casting marks on it still from production. Also be careful not to let the electrical parts get wet or fouled up with metal deposits. Store the finished throttle body somewhere safe and dry. Throttle body before polishing 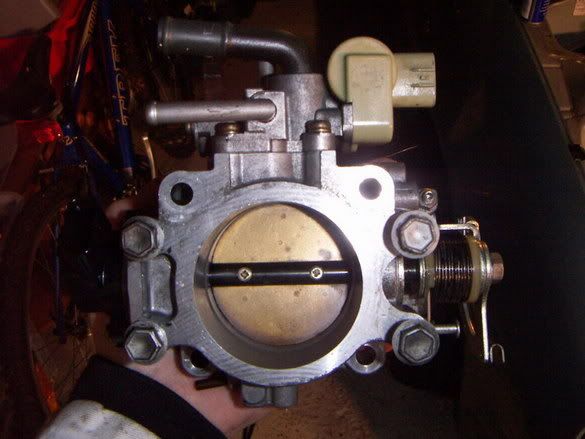 After Polishing...turbo side 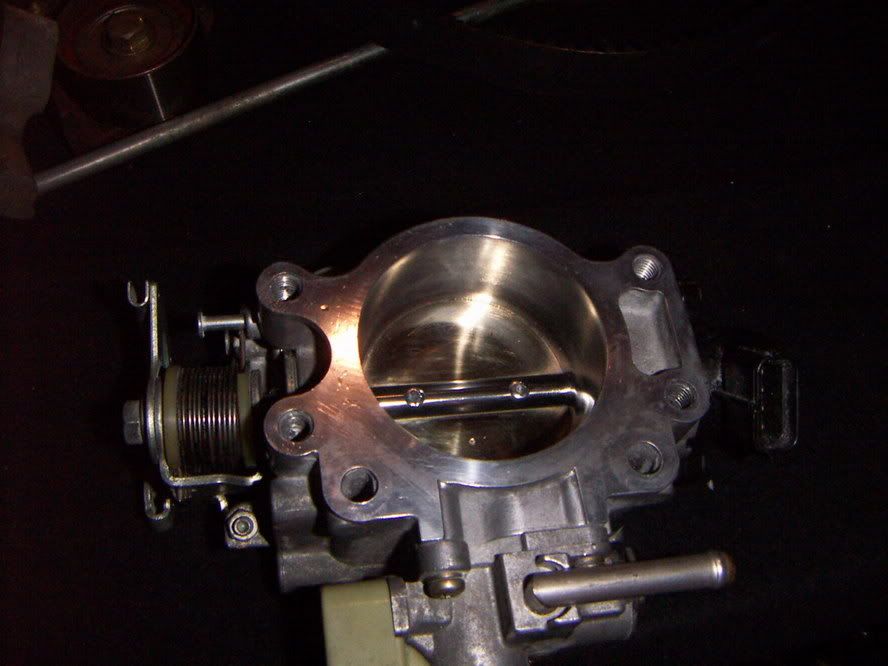 Inlet side 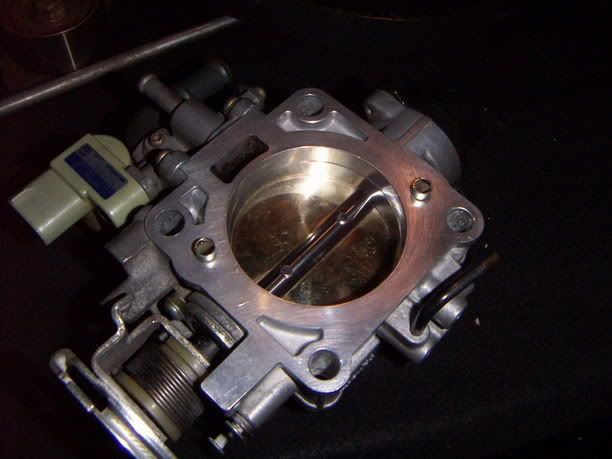 Now that the Throttle body is off next step is to remove the cam cover or Rocker cover, to do this you will first have to remove the breather pipe assembly…it is held in place by a simple clip, just undo this and the plastic breather assembly should come loose, disconnect the pipes and store in the boot. Next up undo the 6 x 10mm bolts that hold the spark plug wires in place and disconnect from the spark plugs. There is no need to disconnect this from the distributor as it can simply be moved to one side. Next remove the spark plugs and check for damage, wear and tear etc and store somewhere safe where they wont be knocked or replace with new (Denso cold grade plugs are very good). Now disconnect the pipe that feeds in to the cam cover just in front of the oil filler cap. Then undo the 10 x 10mm bolts that hold the Rocker cover in place and store somewhere safe. The Rocker cover should come off the engine fairly easily, but you might need to use a flat blade screw driver just to crack the seal. You should fit a new rocker cover seal, but it is not essential. With the rocker cover off you will be able to see the cams and inspect them for signs of damage, wear and tear etc. the tube sticking out of the spark plug number 2 is the compression tester I was using to check any damage to the pistons. 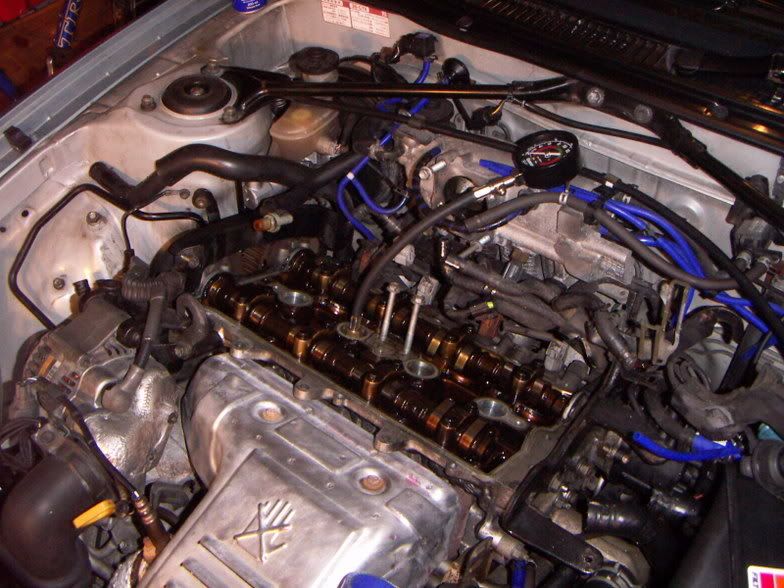 Block the spark plug holes up with a clean cloth to prevent any bits from falling into the piston chamber, also block the inlet manifold and turbo outlet…I used old latex gloves to do this. Next up remove all the service belts ie alternator belt and power steering pump belt. To loosen the power steering pump you’ll need a small 10mm ratchet, the bolt sits at the 5 o’clock position in relation to the power steering pump, slacken it off and pull the pump forward, this will loosen the bet and enable you to remove it. Next put the car into reverse, get a friend to apply the brakes…using a breaker bar, a 20” extension and a 19mm socket, undo the crank pulley…it will require some effort. Once the bolt is undone, you`ll need a gear puller to remove the crank pulley. Once removed store somewhere safe but close at hand as you will need it soon. Now remove the bottom cam cover held in place by 5 or 6 x 10mm bolts you`ll need to fight with the bottom cam cover a bit as it dosnt come off directly, you`ll soon figure out how to do it, store it close to hand as you will need it again soon. My finger pointing at the place where the bolt should have been that fell off and did all the damage (just to the right of my finger). My thumb is on the Tensioner pulley with the Hydraulic tensioner to the left of it. 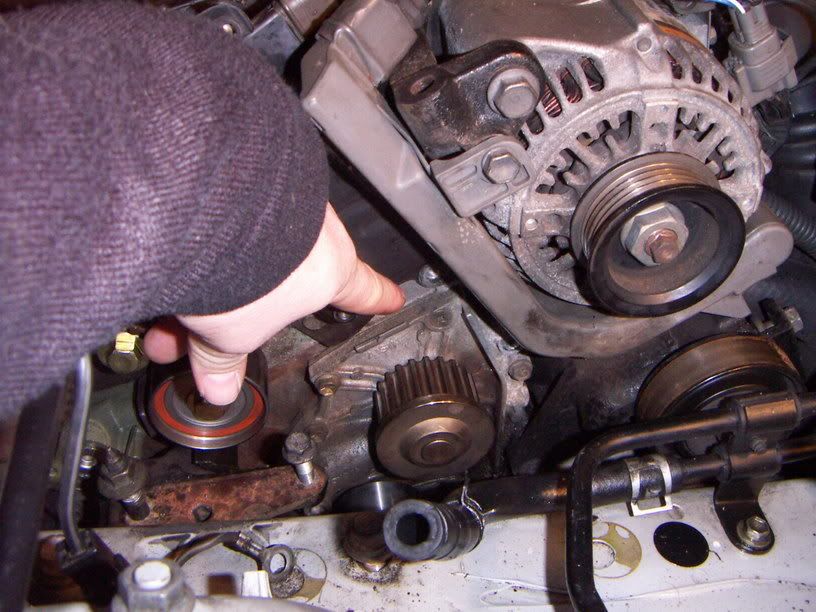 You’re at the stage now where you can start to pull the cam belt off. The hydraulic tensioner is very very strong…I couldn’t budge mine at all so what I did was undo the 12mm bold that holds the tensioner pulley to the engine block, it was a bit of a pain, cause at some point in its life the retaining bolt had been bent and was a little stuck…yours should be OK though. When its undone the whole tensioner pulley assembly will fall off along with a 2mm thick washer...retreive the bits and put them somewhere safe (for me this was the bin as I wasn’t re-using them, but due to the good condition I suspect that the idler pulley and the tensioner pulley could both have been re-used. Next job is to undo the 2 x 10mm bolts that hold the Hydraulic tensioner in place, it will then drop off and find the most annoying angle ever to jam itself and get stuck, once you have retrieved it you can remove the cam belt. Dead easy to do once the cam belt tensioner has been removed, just pull and it will come off. The only slightly difficult bit will be getting the cam belt out between the engine and the chassis, just twist it and it will fit no probs. The view down nthe drivers side of the engine with cam covers and belt removed. 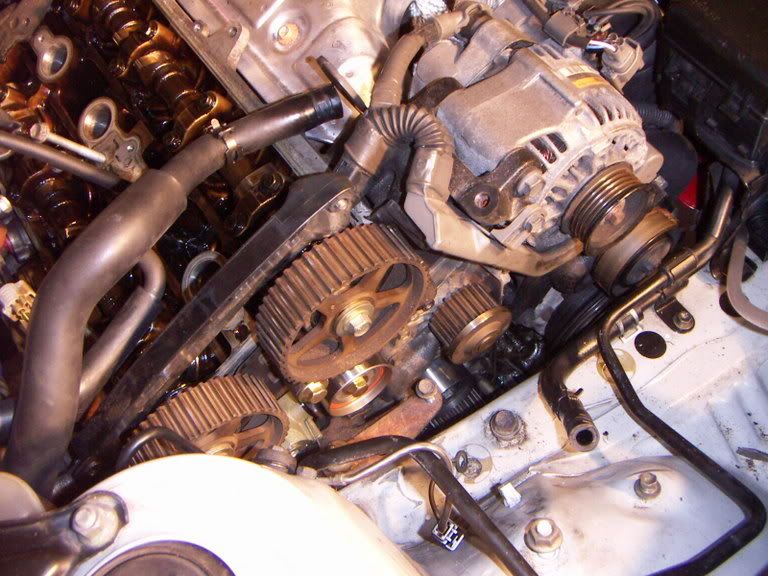 Now this is the point where I met problems…mainly because of the nature of the failure, but if you are just replacing a worn cam belt then it’s real easy. Putting the cam belt back on was a right pain in the backside until I figured out an easy way to get everything sorted out. First of all set the cams to TDC (Top dead centre or Top direct centre depending upon where your from) to do this you will need to look at the cams themselves which is why the cam cover was removed. On the drivers side of the cams on the very end there are two small notches cut into the cams….(one on each cam) likewise there is a notch cut into the head. Line these up and that’s the cams at TDC and IIRC there should be no valves being pushed open (Exhaust valve number one may just be starting to make contact) Here you can clearly see the marks on the Cams that indicate TDC on the very left of the cam just where it mates up to the head. 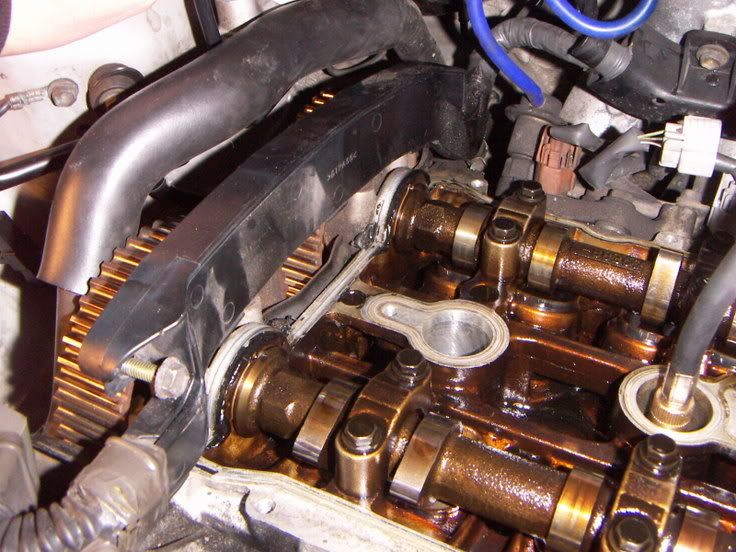 Now go to the crank. You will have to refit the bottom cam cover (with the timing marks on) secure it in place with one or two bolts, and refit the crank pulley and retaining bolt. Now turn the crank using the crank pulley retaining bolt and a 19mm socket until the mark on the pulley lines up with the 0 degrees mark on the cam cover. Everything is now set at TDC with number one cylinder at the top of its stroke. You can see the external cam pulley here without the belt in place or the bottom cam cover...I did this to turn the engine over during the compression test 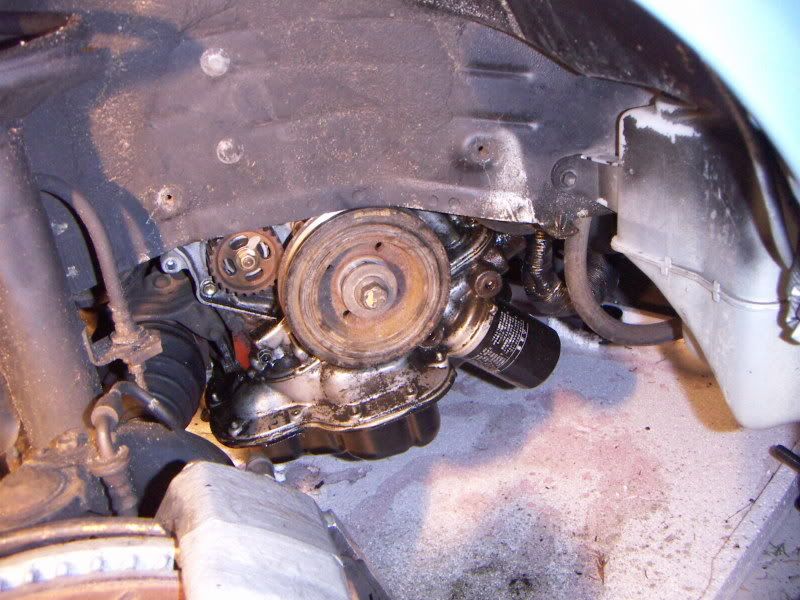 Next job is to refit the tensioner pulley (A new one is best) and the Hydraulic tensioner. When you receive the hydraulic tensioner it will be in its compressed position with a pin holding it in place…whatever you do, DON’T remove the pin until you are 110% sure that everything is set up correctly. I also replaced the idler pulley which sits just below the water pump but I doubt this would be necessary. Here you can see the tensioner Pulley and Hydraulic tensioner prior to fitting the cam belt. 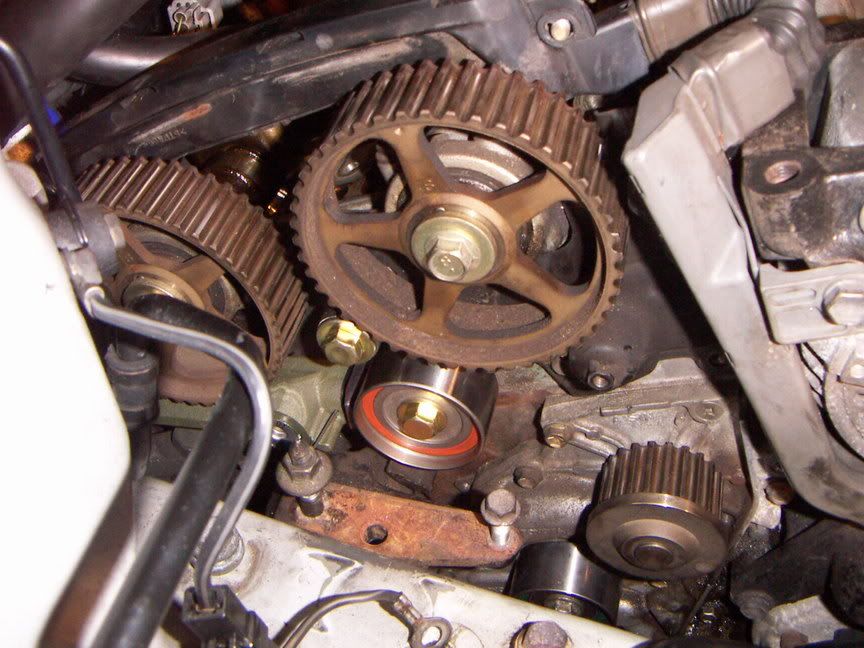 Remove the crank pulley and the lower cam belt cover and prepare to fit the belt…now this may sound a bit anal, but I would have a good clean up at this point as you don’t want to get any grease, oil or debris anywhere near the new cam belt. I`d also wash your hands or change your gloves if you have them. Start by turning the exhaust cam about 2 degrees anti clockwise, fit the cam belt to the inlet pulley first and feed it around the tensioner pulley, then fit it to the exhaust cam pulley over the water pump and the idler pulley and position the rest of the belt down near the crank but do not fit it to the crank pulley yet. Next, rotate the exhaust cam back to its TDC position, this should remove any slack from the belt. Remember to recheck the TDC markings on the cams though to make sure that both are correctly positioned….make any alterations to the position of the cam belt on the cam till this is achieved. Now pull the cam belt as much as you can down to the crank pulley and remove all the slack from the belt…make doubly sure that the belt is centrally positioned on all pulleys and has no kinks etc. Now slide the cam belt over the crank pulley making sure to line up the lobes on the belt with the teeth on the pulley, feed the belt the rest of the way around the engine. Now refit the bottom cam cover and external crank pulley and tighten into place being very careful not to turn the engine. Next using a spanner, and very carefully turn the inlet cam anti clockwise by about 20 degrees, then use the crank to turn it back clockwise by the same amount…..double check that all the timing marks still line up to there TDC points. If they do, you are now ready for the moment of truth, to remove the pin from the hydraulic tensioner. This will be very difficult as the force from the tensioner is considerable, use a pair of pliers and pull firmly but slowly (be prepared to lose some skin when it finally gives) Be sure to keep a firm grip of the pin as you don’t want to drop it and lose it down the open cam cover. Next using a 19mm socket a long extension 20” is about enough and a ratchet, turn the engine over 4 times and line the crank pulley up with the 0 degrees mark on the cam cover, again check that the cams also line up with their respective TDC marks. If they do then well done you have just done your first cam belt change on a GT4 and you are ready to start putting it all back together. Putting everything back together is pretty simple…first of all replace the top cam belt cover to stop any bits falling into the void. Tighten the external cam pulley up and tighten all the cam cover bolts. Replace the power steering belt, put a screw driver between the pump and the engine and lever it out to make the belt run tight, do the 10mm retaining bolt up tight. Next you`ll want to put the Rocker cover back on and tighten all the bolts down….be sure not to push the rubber seal/gasket out of place…if you suspect it may leak carefully apply some gasket sealant to the underside of the gasket. Be careful not to put too much on as it could break off inside the engine and contaminate the oil. Replace the throttle body and mounting bracket (remembering to reconnect the 2 electrical connections and the three rubber hoses underneath and the 2 breather/vacuum pipes on the top). Re insert the spark plugs and secure the spark plug lead tray in place, be careful as it is very brittle. Push the plastic cable tray back into place that runs from the alternator (brown plastic thing) and the one that runs over the rocker cover. Reconnect the 2 engine breather tubes and the oil catch can. Clean up the big engine mount an secure back into place along with all of the power steering pump reservoir and Bracketry, Top up the power steering fluid (be careful to get the correct type as there are several to choose from) Reconnect the alternator belt and tighten it up. Put the Charge cooler back into place, connect the inlet and outlet pipes and top up with fresh Coolant. Check the oil level and the coolant level, reconnect the battery…..now the moment of truth Start the car up and let it tick over for a minute or two, listen out for any untoward sounds…..there may be the odd unusual sound but don’t worry too much if it dosnt sound exactly the same as it did. Replace all the under trays, put the wheels back on and your ready to go..take it easy for the first couple of miles and soon everything will be as you remember….turn the boost up if you can and go and chase Mr Subaru |
Posts in this topic
 eggman40 3SGTE timing belt change (2nd gen) Nov 18, 2007 - 9:01 PM
 lagos That kit has the basic components that you need to... Nov 18, 2007 - 9:08 PM

 eggman40 QUOTE(lagos @ Nov 18, 2007 - 6:08 PM... Nov 19, 2007 - 1:46 AM
 eggman40 Dam! Now thats what i was after lol
Thank... Nov 19, 2007 - 1:28 PM
 phattyduck One more little trick:
Instead of pulling off the... Nov 19, 2007 - 2:16 PM

 eggman40 QUOTE(phattyduck @ Nov 19, 2007 - 11... Nov 19, 2007 - 9:27 PM
 adog QUOTE (eggman40 @ Nov 18, 2007 - 9:0... Jul 20, 2011 - 1:11 AM
 96stgreendemon You have to mark it, just turn it to TDC and mark ... Jul 20, 2011 - 9:52 AM
 DG_Performance I have a spare brand new timing belt too if you wa... Jul 20, 2011 - 1:48 PM
 GT4 in how many km i must change the timing belt?if i ... Sep 2, 2011 - 1:32 AM
 azian_advanced from this post: #491125
QUOTE (JDM_ST205_WRC ... Sep 2, 2011 - 7:02 AM
 GT4 what timing set i must put one ?? Sep 2, 2011 - 4:56 PM
  |
1 User(s) are reading this topic (1 Guests and 0 Anonymous Users)
0 Members:
| Lo-Fi Version | Time is now: November 23rd, 2024 - 10:47 PM |


