 Jan 12, 2008 - 8:58 PM Jan 12, 2008 - 8:58 PM
|
|
|
Enthusiast      Joined Oct 13, '02 From Blairstown, New Jersey Currently Offline Reputation: 6 (100%) |
Hey guys,
I haven't had much of a chance lately to be on 6GC as much as I used to, but since I'm home from work with a monster of a cold I figured I'd take the opportunity to fill you guys in on whats been going on with my swap. Its been done for some time now, just haven't updated things in a while. My goal was to create a very strong and durable swap that fulfills my requirements for power and all-out fun, while being very streetable and reliable for a daily driver. Now that all the kinks are worked out for the most part, I'm very satisfied with my setup and I think I've achieved the balance that I set out for. Here is my setup: Old picture from the day it first started: 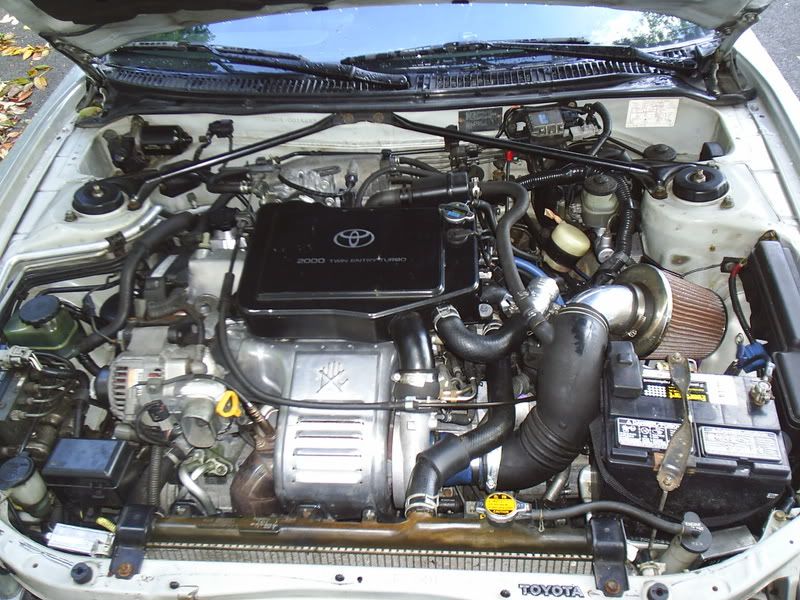 -3rd gen 3SGTE from a 1994 ST205 (Post WRC production) Low miles, around 118,000 km or 73,000 miles and extremely clean -Berk Tech V1 Downpipe w/KO Racing support -Forge Motorsport Hybrid BOV(atmosperic and recirc combo) -Custom 3" exhaust w/remote cutout dump pipe, mated to GReddy SP1 catback exhaust -NGK BKR7E Copper Plugs -ST205 fuel pump -ST205 mounts all around -Custom air intake setup -ST205 shifter cables -Exedy Stage 1 organic disc clutch and pressure plate -E153 transmission from a 2000 Camry V6 -88-91 Camry V6 and Lexus ES250 axle shafts - passenger axle using remachined ST204 carrier bracket assembly. -Remachined and cleaned cylinder head -New OEM Toyota 3rd gen MLS head gasket, all new engine gaskets -ARP head studs -New PCV valve from a 2001 Camry V6 (USDM availability) -ProSport Oil filter sandwich for Oil pressure and temp senders The story: I ordered my ST205 motor set last spring after shopping all winter, and it included everything I needed to do the swap on my car (ST205 mounts for my E153, complete wiring, ECU, etc.) I was thrilled with it when I recieved it, after dealing with alot of setbacks with the shipping due to snowstorms and not having a lift gate service available for weeks. It was extremely clean inside and out, with every part I needed, and then some. They even threw in the original engine bay model plate off the GT-Four which I mounted in the factory GT-Four location, the airbox resonator, a bag of spare bolts from removal, and so on. It was then time to get everything in order and ready to put in my Celica. I removed the transmission and front axles and sold them, then in turn purchased my transmission from a local junkyard from a 2000 Toyota Camry V6 5spd, which is the FWD E153 with longer final drive and dual synchros. I then ordered a set of ST205 shifter cables from a member on AllTrac.net to use with the trans to get the proper shifter throw and actuation. I ordered a handful of maintainence related and performance parts to get the motor up to snuff before I dropped it in. These included: - Timing belt and tensioner from Toyota World in Houston, TX. For maintainence purposes, pretty self explanitory. My experiences through them have been top notch, and they can get you whatever you need fast. - Idler and tensioner pulleys (same P/N) - Instead of ordering these from Toyota ($$$), I opted to try a local bearing supplier called Kaman Industries. They looked up the number indexed on the side of the bearing, and they overnight shipped them via FedEx to my house in less than 24 hours and cost me less than HALF of what Toyota wanted. I think it was something like $~150 from Toyota, as opposed to $68 through Kaman for the exact same thing! They are identical, they just lack the pretty Toyota box.  - Exhaust Cut-out - I purchased this item from a supplier near me in NJ because of its merits in versatility for my setup. By using the cutout I can have a quiet, mellow, and LEGAL exhaust installed that keeps the cops away....but then at the flick of a switch, all hell breaks loose from underneath the car. Its loud, whistles from the turbo spool and backfires when you lift hard, deafeningly loud through tunnels, and annoys people in general. Then close it back up and you could drive your grandma to the grocery store without a hitch. Perfect. - 3" Berk Tech Downpipe - Needed this for my exhaust setup. Love it, its held up really well so far and it frees up a lot of restriction and extra weight of the OEM downpipe. - Forge Motorsport Hybrid dump valve - This was another part that I bought so that I had the ability to be either needlessly loud or completely stealth. It features an adjustable diaphragm spring tension for different boost levels, as well as a dual outlet design so you can run either a full atmospheric valve, full recirculated, or 50/50 split. Sounds awesome, operates very quickly. - New distributor cap and rotor, Oil filter sandwich, ProSport Gauges - I bought these parts from KBox Engineering in Canada to replace the worn parts on the 3S and for monitoring the engine. KBox tends to be expensive and slower because of customs, but the owner Jody Collicut is a great guy to deal with and makes everything easy for the consumer. - E153/Exedy Stage 1 clutch/OEM ST205 resurfaced flywheel - I bought the E153/Exedy clutch combo for simple reasons. The E153 and its axles can take an absolute BEATING without worries, and its gear ratios are much better in my opinion than the S54 by a longshot. It shifts at least twice as smooth as any S54 I've driven, and paired with an organic street disk from Exedy it will handle just under 400 lb/ft of torque and STILL be very streetable. The same cannot be said for having to use a comparibly more agressive clutch on an S54 to handle the stock output of a 3SGTE. For my needs, it allows for a great feel and balance while being very drivable everyday. The stock 3rd gen flywheel has more teeth for the starter than the 2nd gen 3SGTE, it works just fine and allows me to prevent chatter associated with some lightweight flywheel/clutch combos. 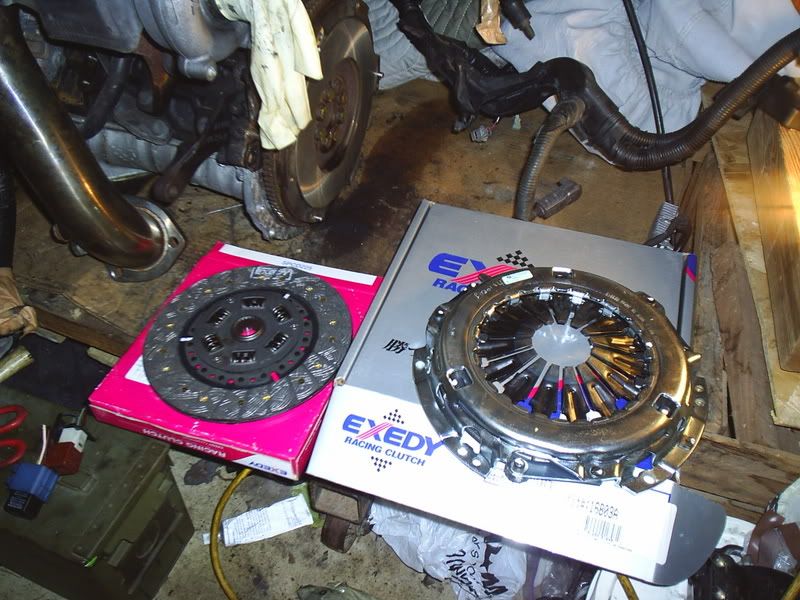 I ordered all the major components as time/money allowed, and as I needed them. There were lots of other small parts that I had to order as well, but that covers most of the important stuff. Everything was installed on the engine and then torqued to exacting specs to prevent failure down the road. Speaking of failure down the road...let me clear up any confusion on the axles. For my setup, I used a passenger side inner axle from a 1990 Toyota Camry V6, a drivers side inner stub from a 1991 Lexus ES250, and outer axles from a 88-91 Toyota Camry V6. The outers have the SAME PART NUMBER as the ST185 All-Trac outers, so you NEED to use spacers. They will be too short otherwise. I utilized a 1/2" spacer on the passenger side made from a bored and shortened CV bearing race, which seems to be just right...the drivers side needs at least a 1/4" spacer for the axle length to be where it needs to be. I know most people with the E153 use no spacer, but if your car is lowered a good deal like mine is, you will be at the absolute limit of axle travel without a spacer. Stock ride height or similar could probably make due without a spacer, but for how low my car is the axle runs out of length. Just one look at this picture shows how extended the axle is without a spacer, even on jackstands! - For my passenger side inner, I utilized the GT axle carrier hardware by boring out the cupped piece around the bearing to accept the larger carrier bearing of the E-series axle. Then you can bolt the bracket up to the 3SGTE block using spacers and not have to track down MR2 turbo hardware - 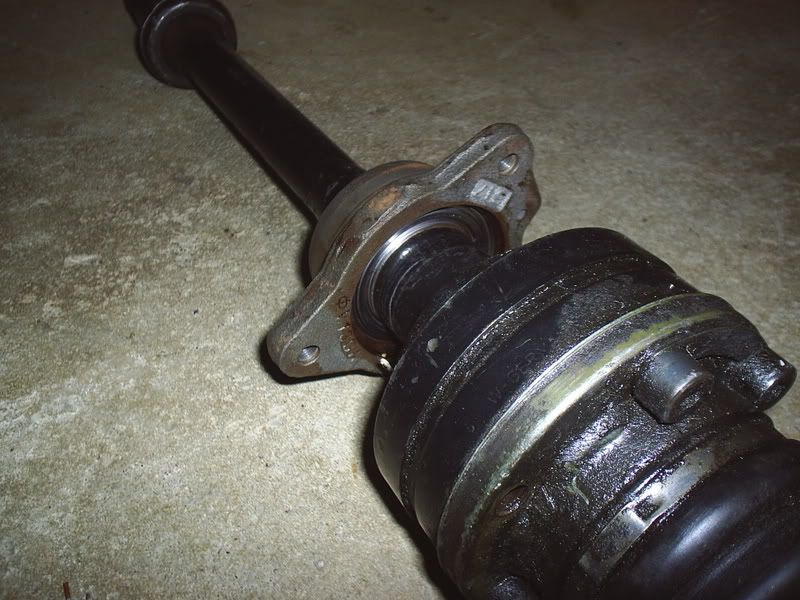 Ideally, the best and easiest way to do the inner axle setup is to just buy an MR2 Turbo inner WITH the carrier bearing and bracket. I decided to go this route simply because I had access to a machine shop and it was cheaper and more convenient. With the engine and drivetrain mostly set, it was time to tackle wiring. Since this engine came from a Japanese ST205, the wiring passes into the left side of the firewall as opposed to the right side like our USDM Celicas. To remedy this issue, I decided to extend the whole harness 28 inches (about 90% sure thats what it was, but whatever it was ended up perfect) so that it could be utilized as if it passed through the right side firewall. This took somewhere around 7-8 hours to do cleanly, and required roughly ~110 feet of 20 gauge wiring, a spool and a half of rosin core solder, 5 packs of heat shrink, about 80 feet of heat-resistant electical tape, about 30 inches each of 4-lead and 2-lead shielded wire from a 5SFE harness, and lots of wire loom. What you are left with is a clean harness that you can zip tie directly along the brake hardlines behind the engine and keep out of sight. The harness that came on my engine had everything on the body harness side of things completely cut off from below the fuse box. This wasn't a huge deal, since the only things missing from the GT body harness as opposed to the ST205 is wiring and pinouts in the fusebox for the intercooler relay, and the fuel pump relay. I created my own relay setup using a 4-pin relay for the intercooler and a 5-pin for the fuel pump, then using the ST205 and ST204 wiring diagrams I imitated the GT-Four configuration by splitting off before the fusebox and wiring up to the relays directly. Also, the connector for the Intercooler pump had to be wired into the relay wiring that I created so that it could switch power to the pump like the OEM layout. Otherwise, everything in the engine bay will plug directly into the GT's fusebox. The only other hitch with wiring lies on the interior body plugs, and rewiring the clutch starter switch circuit to work with the GT body connectors. If you look at the three body plugs from the ST205 harness, there is a black wire from the COR that splits three times to different pins on the three body connectors. The female connector for plug "IJ1" on the GT body has one black wire to complete the clutch start, where the GT-Four body has two leads to do this (they go to totally different pins than on the ST204). You will have to study the wiring diagrams and do what I did - cannabalize your old GT plug IJ1 and remove this pin from the male side, and snap in the pin into the corresponding location on the ST205 harness. You will then need to cut and join BOTH black wires from the pins on the ST205 harness to the new pin on connector IJ1. This will complete the clutch start circuit, and it will start right up. Heres a crappy shot of the re-pinned ST205 connector, IJ1 : 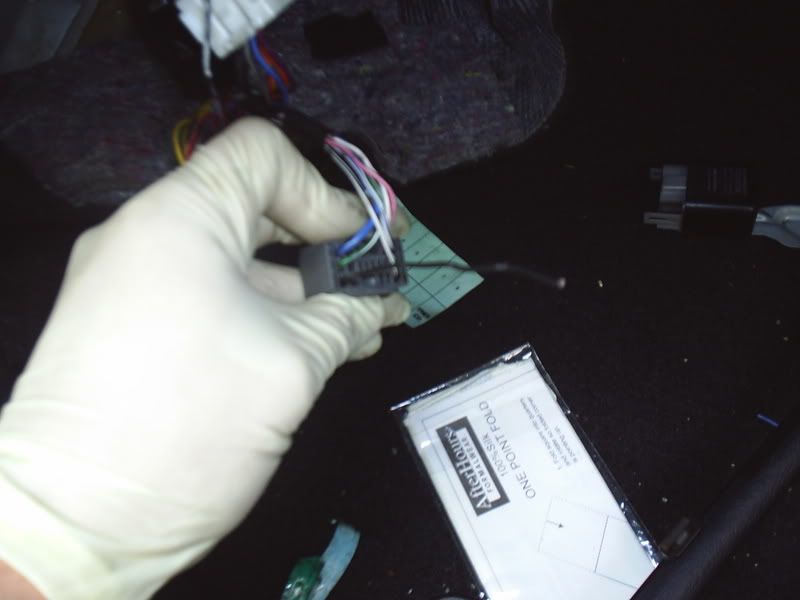 This is the pin that you need to connect the extra black wires from the ST205 harness to. Once I had the wiring addressed, it was out with the 5SFE and in with the 3SGTE. 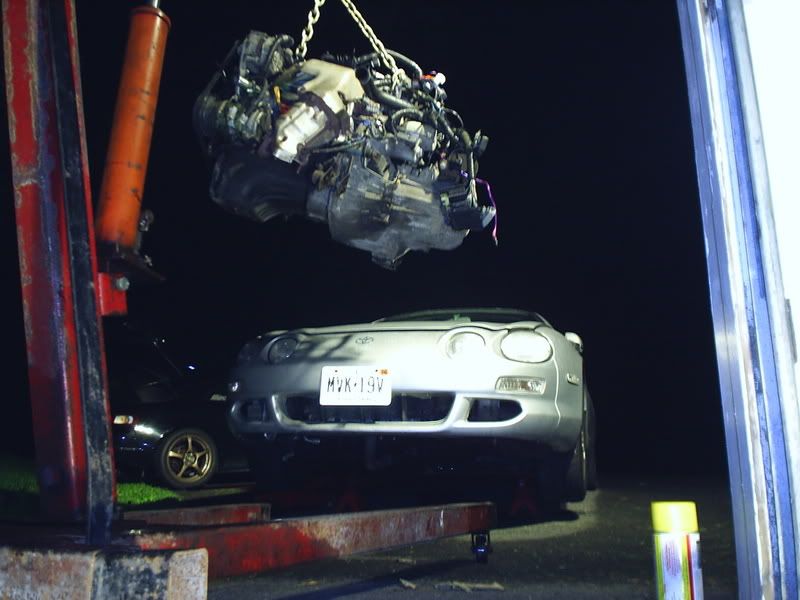 I cleaned up the engine bay with LOTS of Gunk engine degreaser and towels, and then I ditched the evap canister and installed a new fuel filter once everything was spotless. At this point, the ST205 shifter cables were also installed. The ST205 intercooler pump had to be mounted in its factory location under the battery tray - USDM Celicas have the holes already tapped for you to mount up the pump. But, make sure you use lots of PB Blaster and steel wool and slowly thread the bolts until the rust is cleared from them. With the pump in place and the engine bay ready, we lowered the 3SGTE into the engine bay using the engine hoist and a load balancer, which makes the job much easier and less dangerous. From here I bolted up all the mounts, installed my custom axle setup, installed the ST205 fuel pump and replaced the feed line since the high pressure fuel line fitting was seized to the old pump bracket, and connected all the wiring. After a little troubleshooting and priming the engine, the car started right up and ran beautifully. First Startup Video:  However.... Major problems lie ahead. Issue #1: Passenger axle bracket alignment was off, creating shaking. Needed spacers to properly align axle. Issue #2: Passenger outer axle was damaged from the junkyard. Once replaced, it seemed to fix axle issues... Issue #3: The biggest problem of all, and a nightmare scenario....the engine started to randomly overheat, and white smoke was coming from the exhaust. NOT good...compression test revealed that the middle two cylinders were about 40psi under target compression, indicating head gasket failure or a warped head or both....for whatever reason. Not taking chances, I tore down the entire motor and removed the head to be inspected, ordered a rebuild kit from Champion Toyota, new thermostat from KBox Engineering and ARP head studs from Summit Racing. Head was then milled about .14" at LRB Performance in Sparta, NJ and rebuilt, then I reassembled everything using all new gaskets and a new multi-layer steel headgasket. ARP head studs ensured that nothing would move out of place with the rebuilt top end. The thermostat and water pump both operated perfectly fine and weren't to blame, and coolant wasn't the culprit....so my guess is that my motor was defective when I got it. Issue #4-#8: Constant axle failures after realizing that 88-91 Camry V6 axle length is NOT sufficient, contrary to rumors from other E153 threads. Spacer(s) are needed....Front end ride height was also raised to lessen the stress on the CV joints. Issue #9: Passenger axle explodes while giving a friend a ride...turns out I was sold a factory defective axle from Advance Auto. Had to replace the axle, and destroyed the wheel bearing....went through three (yes, three) bad steering knuckles before I found another good one. Issue #10: Axle seal is found to be leaking, fixed. Issue #11: Exhaust is knocking against rear crossmember - re-welded on a tig welder, and problem solved. Issue #12: Drivers side outer axle CV begins to pop from being over extended...coupling on the CV boot actually broke and tore the CV boot from being so stretched. New axle and spacer needed to resolve issue. Issue #13: Upon initial filling of Intercooler heat exchanger, found there were numerous punctures in the fins causing coolant to leak out. Leaks fixed, and works fine now. The good new is, after all the problems that arose, I now have a swap that runs great. Nearly everything has been fixed to 100%, and although it was unusually time and money consuming, emotionally draining, and probably cost me a relationship at the time....its done, and it was worth it. Heres just a short video of everything put back together. Nothing too crazy fast and dramatic yet, just some small pulls to enjoy...it was Christmas Eve and the roads were packed -  Sorry for writing a novel. Enjoy. -Corey -------------------- 3rd gen ST205 3SGTE - Alive and boosting. |
 |
Replies
 Jan 23, 2008 - 1:31 PM Jan 23, 2008 - 1:31 PM
|
|
|
Enthusiast      Joined Oct 13, '02 From Blairstown, New Jersey Currently Offline Reputation: 6 (100%) |
I almost forgot, I have a few pictures from the rebuild process. I'll throw some up here this evening.
This post has been edited by Silver94CelicaOwner: Jan 23, 2008 - 1:38 PM -------------------- 3rd gen ST205 3SGTE - Alive and boosting. |
Posts in this topic
 Silver94CelicaOwner My 3rd gen 3SGTE swap. Jan 12, 2008 - 8:58 PM
 lagos I officially hate you now
A big CONGRATS on gett... Jan 12, 2008 - 10:03 PM
 presure2 great post corey, good to see you got all the litt... Jan 12, 2008 - 10:09 PM
 lagos QUOTE(presure2 @ Jan 12, 2008 - 10:0... Jan 12, 2008 - 10:14 PM

 presure2 QUOTE(lagos @ Jan 12, 2008 - 10:14 P... Jan 12, 2008 - 10:21 PM
 Celiracer18 Nice!
Where did you get your motor set from... Jan 12, 2008 - 10:54 PM
 hurley97 does that mean you are coming to the next meet up ... Jan 13, 2008 - 11:23 AM
 phattyduck Sounds like you had many of the same problems I ha... Jan 13, 2008 - 8:52 PM
 supershannon77 Nice work...glad 2 see it running good...good luck... Jan 13, 2008 - 10:30 PM
 Supersprynt Is it me or does the north east just kick alot of ... Jan 13, 2008 - 10:33 PM
 Rusty very nice, good to see it done properly (thinking ... Jan 14, 2008 - 12:28 AM
 reko Thats like the bible to me Jan 14, 2008 - 11:41 AM
 playr158 very nice little write up, will give me a bit of h... Jan 14, 2008 - 12:07 PM
 zipstrips glad to see you got it all back together! the ... Jan 14, 2008 - 7:48 PM
 snapshotgt Great job Corey, congrats. Jan 15, 2008 - 9:01 AM
 jcbass7 I remember seeing it on the floor in your garage, ... Jan 17, 2008 - 9:46 AM
 Daftboy ^x 2 now lets do some runs up in DWG =] Jan 17, 2008 - 12:42 PM
 Daftboy ^x 2 now lets do some runs up in DWG =] Jan 17, 2008 - 12:42 PM
 laff09 Amazing work. +1 for clean ass engine Jan 17, 2008 - 2:38 PM
 Silver94CelicaOwner Thanks for all the comments guys, I really appreci... Jan 17, 2008 - 3:52 PM
 Silver94CelicaOwner Ok heres a few shots I had laying around of the re... Jan 27, 2008 - 1:40 PM
 laff09 Whats that -08B axle code stand for?? Jan 27, 2008 - 1:44 PM
 Silver94CelicaOwner I have no clue what the letters and numbers mean, ... Jan 28, 2008 - 3:30 PM
 lagos so fresh and clean!
whats the deal with pisto... Jan 28, 2008 - 4:10 PM
 laff09 The reason i asked was maybe it referred to a stoc... Jan 28, 2008 - 4:15 PM
 jason very nice and clean! props on the work!... Jan 28, 2008 - 5:20 PM
 Silver94CelicaOwner Thanks Jason
QUOTE(lagos @ Jan 28, 2008 ... Jan 29, 2008 - 1:35 PM
 Rossy88 Hey Ive got a couple of questions.
1.How would yo... Feb 28, 2008 - 1:04 AM
 celicaGT96 QUOTE(Rossy88 @ Feb 28, 2008 - 2:04 ... Feb 28, 2008 - 1:16 AM
 99GT Corey any updates? Dyno numbers? Oct 14, 2008 - 1:10 PM
 Silver94CelicaOwner Hey guys. Everyone probably thought I fell off th... Nov 22, 2008 - 1:15 PM
 phr0st do you have to get different axle shafts for when ... Nov 27, 2008 - 9:48 AM
 _Jim_ Axles are Trans specific, not motor specific. If ... Nov 27, 2008 - 4:46 PM
 SlvrCelica09 RE: My 3rd gen 3SGTE swap. Sep 29, 2009 - 10:46 AM
  |
1 User(s) are reading this topic (1 Guests and 0 Anonymous Users)
0 Members:
| Lo-Fi Version | Time is now: November 29th, 2024 - 7:16 AM |


