
 Mar 31, 2008 - 11:13 AM Mar 31, 2008 - 11:13 AM
|
 
|
|
Enthusiast  Joined Dec 19, '07 From tx Currently Offline Reputation: 22 (100%) |
The the GF and I made up some speaker mounts for my Boston Acoustic SX60 6.5" component speakers. They came out really clean and the speakers sound incredible there. I figured I'd post a few pics so people who, like me don't care to wait/pay for adapters, can see how we did it. All pics are from driver's side door panel but the passenger is the same:
1. Start by removing the door panel [Not going to go into specifics on this as it's super easy and covered in your Chilton's or Hayne's manual]. Pics of the speaker housing with the door off: 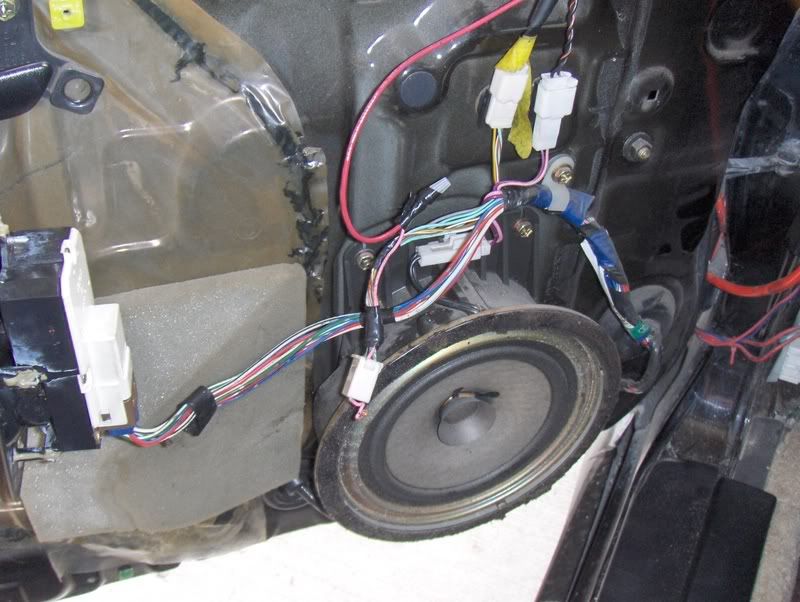 2. Disconnect the white wire connector located at the top of the speaker housing [Driver's side will have 1 pink and 1 purple-ish wire as shown above]. Remove the four 12mm screws [2 top, 2btm] holding the speaker housing in place. You will be left with this: 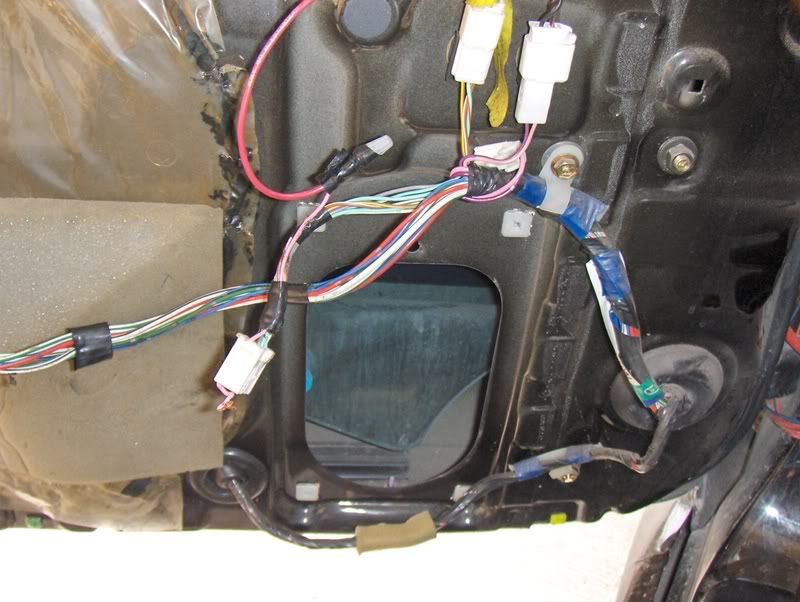 and this: 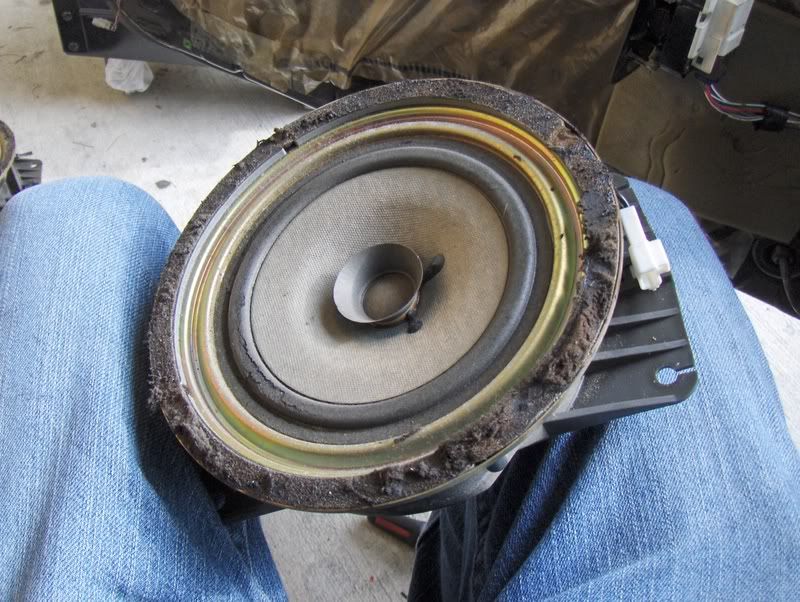 3. Next we continued by ripping out the original speaker cones [no pics of that - it's pretty self explanatory]. 4. We cut the magnets and posts mounting them to the original speaker rings out with a dremil tool. This part was easy and only took about 30mins each to get them off and the edges nice and smooth with a sanding wheel on the dremil. Make sure your new speaker cone will drop in without rubbing or ripping on the cut edges [a smooth finish is not necessary if you are careful when mounting the new speaker - I, however, like to do things right and take my time - to a fault probably] *Pic missing - I will get it up soon* 5. Next we drilled 3 holes using the speaker as a guide. This will vary with the speakers - some have 3 mounting holes, some have 4 mounting holes. Just be careful and only use your speaker to mark it with - Don't drill with the speaker attached so you don't risk drilling a hole through the cone  . .*Pic missing - I will get it up soon* 6. Attach your new speaker to your custom made speaker adapter using screws and nuts on the back and add the bezil if you wish [not necessary but again I decided why not?]:  Be sure the magnet does not extend farther out than the stock enclosure will allow [the window will be obstructed if your magnet extends any farther]: 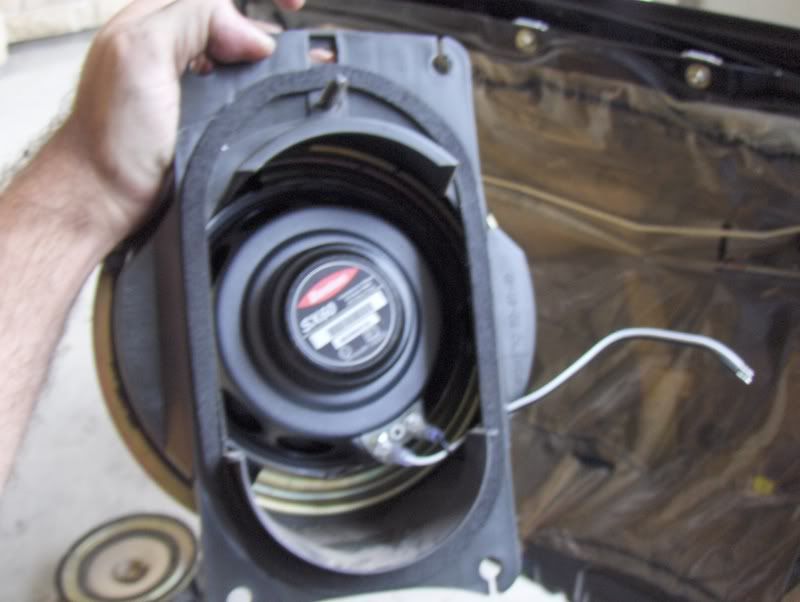 with the bezil [Mine somehow magically snapped into place inside the stock ring but I used the included mounting hardware as well - follow manufacturers instructions on this step]: 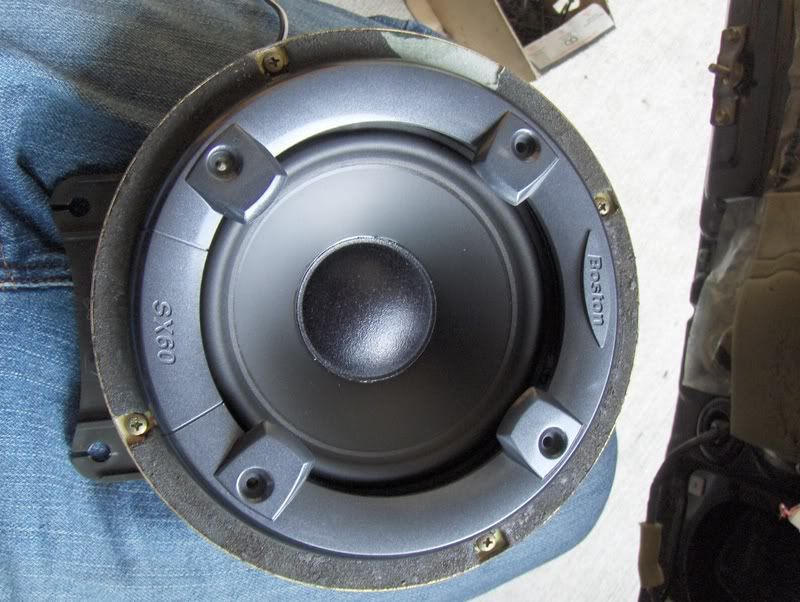 7. Next i drilled a hole in the housing to run the speaker thru and since they are not sealed enclosures I did not bother to seal them up [mainly cause I couldn't find my silicone ]. You can see the wires run thru two pics above.8. This step will be different for several different setups. I chose component speakers so I ran the stock wires to the input of the included crossovers [you will just splice them into your new speaker's wires if you choose to use full range speakers - pretty self explanatory]. I then ran the "woofer" output from the crossover to the new 6.5"s and ran a length of wire from the "tweeter" output to be used later and mounted the crossover to the enclosure [this is a perfect example of where not to mount the crossover on the driver's side. This is exactly where the window controls sit - I figured this out as I was installing the last peice of my door panel - the controls  . This is a great example of where to mount them for the passenger side (in other words you need a mirror image of this setup for the driver's side door]: . This is a great example of where to mount them for the passenger side (in other words you need a mirror image of this setup for the driver's side door]: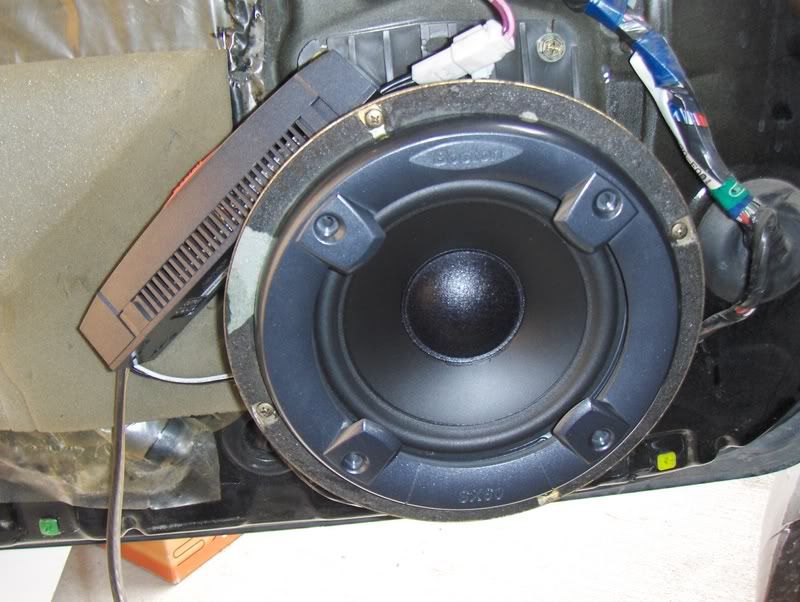 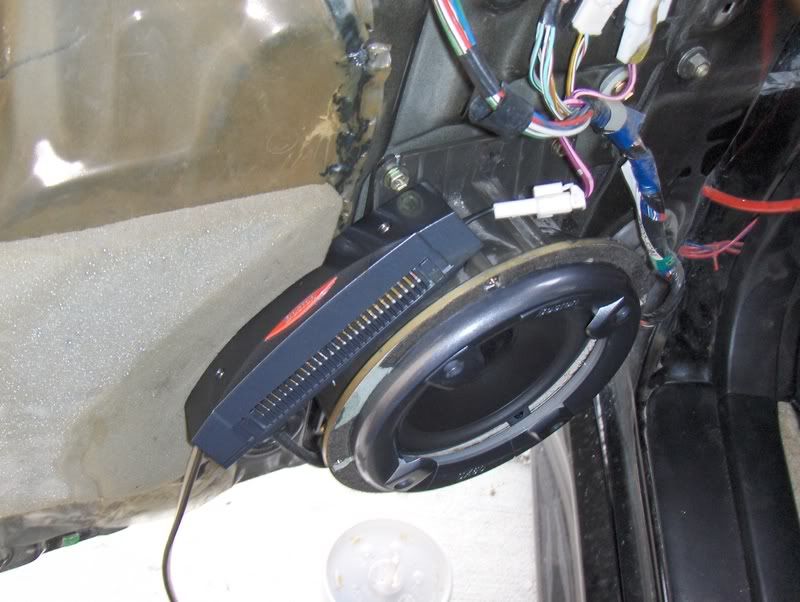 9. Decide where to mount your tweets if component - skip to step 10 if full range. I have not yet decided where to mount my tweets as I still wish to retain the stock tweets as well - the stock bracket is not setup to accept aftermarket tweets and I want to end up with 6 tweets total when I'm done so this is how I did mine. 10. Remount the door panel [route the tweet wire if necessary]. Everything looks stock now as shown:  even in close up: 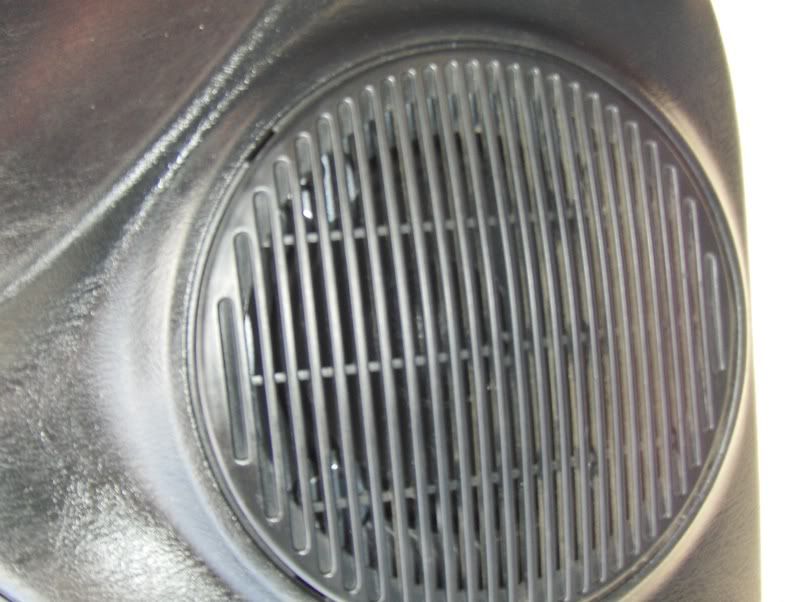 Notice in the first pic you can see where I left the tweet wire poking through bottom corner of the door for future use [Nevermind the boost gauge line and the gauge wires running to the right - it's a swapped car and I'm not done with my gauge setup so leave me alone damn it  ]. In the end I'm leaning towards installing them just to the rear of the speaker in that traingular dead space between the speaker and the door pocket. Most manufacturers of component speakers will give you an acceptable radius of where to mount the tweets relative to the 6.5"s to achieve the best sound - listen to them, they are the experts on sound imaging. You may also choose to cut out the stock grill so that you can see the aftermarket speaker grill - this would be very easy to do with the same dremil you used in step 4 [I live in Houston Tx and that's a good way to get your speakers stolen and a window busted so I opted for the "sleeper" look ]. ]. In the end I'm leaning towards installing them just to the rear of the speaker in that traingular dead space between the speaker and the door pocket. Most manufacturers of component speakers will give you an acceptable radius of where to mount the tweets relative to the 6.5"s to achieve the best sound - listen to them, they are the experts on sound imaging. You may also choose to cut out the stock grill so that you can see the aftermarket speaker grill - this would be very easy to do with the same dremil you used in step 4 [I live in Houston Tx and that's a good way to get your speakers stolen and a window busted so I opted for the "sleeper" look ].11. Crank it up and enjoy  Mods feel free to add to the stickys or how-to's - I would be honored .Stay tuned for more how-to's as my system is installed [BTW - I installed my Rockford-Fosgate 6.5" components in the rear for now - I may make a how-to on that as well]. Please don't reply with a copy of all this info - many how-to's get muddied this way. If you have a specific question on a step or pic feel free to reply with that tho. Thanks in advance. This post has been edited by DEATH: Apr 1, 2008 - 4:08 PM --------------------  ENGINE: '93 RC 3S-GTE/WRC CT-20b [18-20PSI] PERF: TRD/HKS/ARP/NGK/MSD/ACT/Blitz/STRI/APEX'i/TwosRus/GReddy/Magnaflo/KOYO SUSP: Tein/Bilstein/SusTech/ INT: SS-III SEATS/Toyota Hyper Sports EXT: WRC/TRD/404 QUOTE (lagos @ Aug 25, 2010 - 10:13 AM)  Its a safety feature so that people like you don't end up killing themselves or everyone around them. Slow down Paul Walker. 6GC Chat - Go there: [url="http://www.griffgirl.com/forum/chat/index.php[/url] |

 |
Replies
|
Mar 31, 2008 - 2:45 PM
|
|
|
Enthusiast Joined Sep 26, '07 From iowa Currently Offline Reputation: 1 (100%) |
you shouldn't run your powere wire in your doorn like that its not safe and each time you open and close your door you risk shorting out your wire just a heads up
-------------------- -Boss III
|
Posts in this topic
 DEATH Fabricated 6.5" Speaker mounts from the stock 8" front mount Mar 31, 2008 - 11:13 AM
 D-Man damn bro, sorry i missed sat... You never painted ... Mar 31, 2008 - 11:16 AM DEATH I have 6 of them total so that won't be a prob... Mar 31, 2008 - 11:17 AM
 D-Man Hahahah!!
Yeah, but i really wanted to pa... Mar 31, 2008 - 11:30 AM NgoFcukinWay I'm running those exact components and I love... Mar 31, 2008 - 11:49 AM DEATH Cool Alex - thanks for the head's up. I'm ... Mar 31, 2008 - 11:58 AM D-Man what are you going to do in the back speaker-wise?... Mar 31, 2008 - 12:36 PM njccmd2002 once i get what i ordered, i will give you a part ... Mar 31, 2008 - 12:51 PM DEATH QUOTE(D-Man @ Mar 31, 2008 - 12... Mar 31, 2008 - 1:06 PM D-Man QUOTE(DEATH @ Mar 31, 2008 - 2:06 PM... Mar 31, 2008 - 1:40 PM njccmd2002 QUOTE(DEATH @ Mar 31, 2008 - 2:06 PM... Apr 15, 2008 - 5:17 PM D-Man QUOTE(addictions @ Mar 31, 2008 - 3... Mar 31, 2008 - 3:28 PM DEATH QUOTE(addictions @ Mar 31, 2008 - 2... Mar 31, 2008 - 3:45 PM gt_driFFter QUOTE(DEATH @ Mar 31, 2008 - 5:45 PM... Apr 24, 2008 - 10:51 PM DEATH QUOTE(gt_driFFter @ Apr 24, 2008 - 10... Apr 25, 2008 - 6:20 AM D-Man QUOTE(gt_driFFter @ Apr 24, 2008 - 10... Apr 25, 2008 - 9:24 AM presure2 added to the stickys.
good job. Mar 31, 2008 - 3:49 PM DEATH QUOTE(presure2 @ Mar 31, 2008 - 3:49... Mar 31, 2008 - 3:54 PM DEATH Wow that's really cool - but what's it for... Apr 16, 2008 - 8:32 AM njccmd2002 QUOTE(DEATH @ Apr 16, 2008 - 9:32 AM... Apr 16, 2008 - 11:56 AM DEATH Ah - very cool. I'm always looking for ways to... Apr 16, 2008 - 12:14 PM eae1121 I just recently replaced my stereo and speakers in... Apr 29, 2008 - 1:09 PM DEATH Sweet.
Other people on here have done 8" Midb... Apr 29, 2008 - 1:17 PM purplegt4 i just did this same thing. awesome write up... Aug 17, 2008 - 12:39 AM Liam_c Thanks for this! Hope it works out for me Dec 18, 2012 - 1:02 AM
D-Man Hahahah!!
Yeah, but i really wanted to pa... Mar 31, 2008 - 11:30 AM NgoFcukinWay I'm running those exact components and I love... Mar 31, 2008 - 11:49 AM DEATH Cool Alex - thanks for the head's up. I'm ... Mar 31, 2008 - 11:58 AM D-Man what are you going to do in the back speaker-wise?... Mar 31, 2008 - 12:36 PM njccmd2002 once i get what i ordered, i will give you a part ... Mar 31, 2008 - 12:51 PM DEATH QUOTE(D-Man @ Mar 31, 2008 - 12... Mar 31, 2008 - 1:06 PM D-Man QUOTE(DEATH @ Mar 31, 2008 - 2:06 PM... Mar 31, 2008 - 1:40 PM njccmd2002 QUOTE(DEATH @ Mar 31, 2008 - 2:06 PM... Apr 15, 2008 - 5:17 PM D-Man QUOTE(addictions @ Mar 31, 2008 - 3... Mar 31, 2008 - 3:28 PM DEATH QUOTE(addictions @ Mar 31, 2008 - 2... Mar 31, 2008 - 3:45 PM gt_driFFter QUOTE(DEATH @ Mar 31, 2008 - 5:45 PM... Apr 24, 2008 - 10:51 PM DEATH QUOTE(gt_driFFter @ Apr 24, 2008 - 10... Apr 25, 2008 - 6:20 AM D-Man QUOTE(gt_driFFter @ Apr 24, 2008 - 10... Apr 25, 2008 - 9:24 AM presure2 added to the stickys.
good job. Mar 31, 2008 - 3:49 PM DEATH QUOTE(presure2 @ Mar 31, 2008 - 3:49... Mar 31, 2008 - 3:54 PM DEATH Wow that's really cool - but what's it for... Apr 16, 2008 - 8:32 AM njccmd2002 QUOTE(DEATH @ Apr 16, 2008 - 9:32 AM... Apr 16, 2008 - 11:56 AM DEATH Ah - very cool. I'm always looking for ways to... Apr 16, 2008 - 12:14 PM eae1121 I just recently replaced my stereo and speakers in... Apr 29, 2008 - 1:09 PM DEATH Sweet.
Other people on here have done 8" Midb... Apr 29, 2008 - 1:17 PM purplegt4 i just did this same thing. awesome write up... Aug 17, 2008 - 12:39 AM Liam_c Thanks for this! Hope it works out for me Dec 18, 2012 - 1:02 AM |
1 User(s) are reading this topic (1 Guests and 0 Anonymous Users)
0 Members:
| Lo-Fi Version | Time is now: April 23rd, 2025 - 7:17 AM |