
 Sep 7, 2008 - 5:03 PM Sep 7, 2008 - 5:03 PM
|
 
|
|
Enthusiast  Joined Aug 2, '05 From Guam Currently Offline Reputation: 15 (100%) |
I'm having an overdrive light blinking again after 1.5 years later after it disappeared. I'm seeing it again but at least this time, the speedometer is not going bonkers and my tranny is not getting out of gear when I drive (basically neutral). It is an auto tranny. However, it does make my car lack power when this light comes on and blinks. It does not come on when first turning on the car and the power is great but when it comes on, it gets sluggish until you are at a good speed, it feels normal. Anyway, I was wondering if anyone knew how to correct it. I've checked my ATF level and it has enough fluid, but I read the manual last night and there is also a differential fill hole that needs oil. Perhaps my oil is too low, does anyone know where it is and what type of fluid to use for our cars? Not sure if it is also electrical. Thanks in advance!
Update: I jumped the T1 and E1 together and the light flashes so fast. There are no obvious pauses. Just keeps repeatedly blinking. The CEL that is. The net and stuff means your car is normal but my car is not acting normal as described above. However, the difference is...while I'm reading my CEL light (TRYING), here comes the overdrive light flashing together. I am having a really hard time interpreting the flashes, but like I said, it blinks constantly so fast with no obvious pauses. Any tips on how to read the code? This post has been edited by trdproven: Sep 10, 2008 - 6:03 AM -------------------- 94 Celica GT
|Toyota OEM Japan|Toyota Racing Development|Tom's|Competition Clutch|5Zigen|Apexi| |Laille/Beatrush|Magnecor|Denso|Royal Purple|Optima|PIAA|PW JDM|Megan Racing|Nitto| |Work|Greddy|Samco|Project Mu|H&R|Gates|Moog|Rota|Yokohama|Epman|1320|Upgr8 04 Celica GT |Toyota OEM Japan|Toyota Racing Development|Tein|BC Racing|Greddy| |

 |
Replies
|
Sep 10, 2008 - 3:20 PM
|
|
|
Enthusiast Joined Jan 17, '08 From JB MDL, NJ Currently Offline Reputation: 30 (100%) |
NO. 1 & NO. 2 SHIFT SOLENOIDS R & I
Removal & Installation Solenoids are located on valve body. Remove bolt, solenoid and "O" ring from valve body. To install, reverse removal procedure using NEW "O" ring. CODE NO. 63 (NO. 2 SOLENOID) TEST 1) Access ECT ECU. See Figs. 4-6. Using ohmmeter, check resistance between terminal S2 and body ground with connector removed from ECT ECU. See Figs. 17-18. 2) Resistance should be 11-15 ohms. If resistance is okay, replace ECT ECU. If resistance is not within specification, remove oil pan. Disconnect electrical connector (Black wire) at No. 1 solenoid. 3) Check resistance between electrical terminal on No. 1 solenoid and body ground. Replace No. 1 solenoid if resistance is not 11-15 ohms. If resistance is 11-15 ohms, inspect and repair wiring between No. 1 solenoid and ECT ECU. ( I know it says S1, but this is the same for S1 and S2) 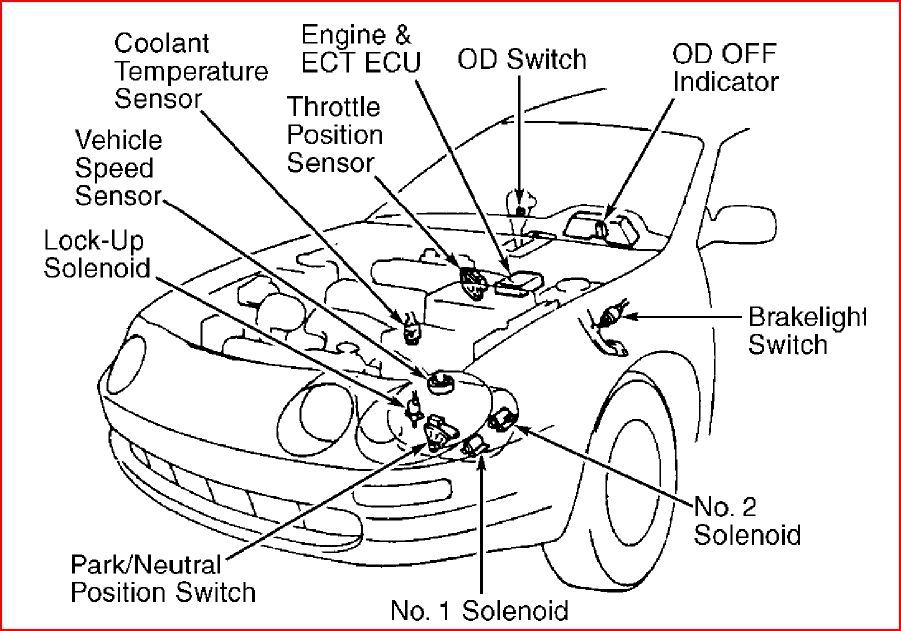
|
Posts in this topic
 trdproven How do you read the OBD diagnostic? Sep 7, 2008 - 5:03 PM
 Spider77 as far as fluid the bgb states that trans (2.6 qts... Sep 7, 2008 - 5:47 PM trdproven Spider, i'm thinking it could also be solenoid... Sep 7, 2008 - 7:36 PM Spider77 Yeah, Im reading about that right now.
SELF-DIAG... Sep 7, 2008 - 7:57 PM trdproven how would the throttle cable be adjusted?
thank... Sep 8, 2008 - 2:44 AM
Spider77 as far as fluid the bgb states that trans (2.6 qts... Sep 7, 2008 - 5:47 PM trdproven Spider, i'm thinking it could also be solenoid... Sep 7, 2008 - 7:36 PM Spider77 Yeah, Im reading about that right now.
SELF-DIAG... Sep 7, 2008 - 7:57 PM trdproven how would the throttle cable be adjusted?
thank... Sep 8, 2008 - 2:44 AM
 reko QUOTE (trdproven @ Sep 8, 2008 - 3:4... Sep 8, 2008 - 10:32 AM trdproven Thanks Reko, but also how would I check the TPS se... Sep 8, 2008 - 4:58 PM reko QUOTE (trdproven @ Sep 8, 2008 - 5:5... Sep 9, 2008 - 8:34 AM Spider77 QUOTE (trdproven @ Sep 8, 2008 - 4:5... Sep 9, 2008 - 2:19 PM trdproven Found the problem. As it appears, there is also a... Sep 10, 2008 - 6:07 AM trdproven Thanks spider that is hella useful information you... Sep 10, 2008 - 4:47 PM Spider77 I pretty much get all the info from the BGB. I ha... Sep 10, 2008 - 5:06 PM Spider77 Yeah, checked my other manuals and really couldnt ... Sep 10, 2008 - 5:19 PM trdproven Thats what I was thinking of doing...did more read... Sep 10, 2008 - 5:26 PM reko QUOTE (trdproven @ Sep 10, 2008 - 6... Sep 10, 2008 - 6:33 PM trdproven Would anyone know if dropping the tranny pan would... Sep 15, 2008 - 10:07 PM
 |
1 User(s) are reading this topic (1 Guests and 0 Anonymous Users)
0 Members:
| Lo-Fi Version | Time is now: February 21st, 2025 - 8:30 AM |