 Jan 15, 2010 - 1:29 AM Jan 15, 2010 - 1:29 AM
|
|
 Enthusiast      Joined Apr 18, '05 From Calgary Currently Offline Reputation: 20 (100%) |
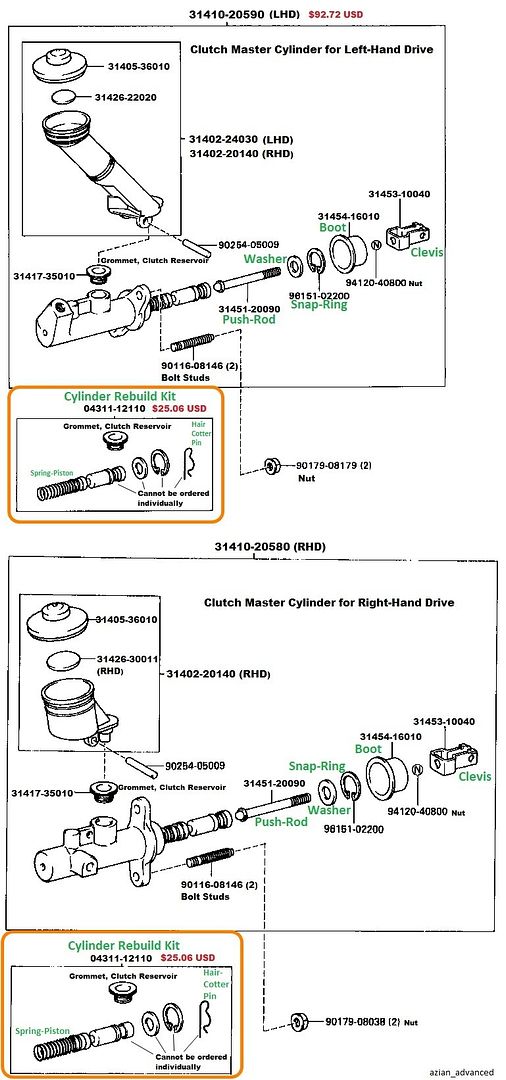
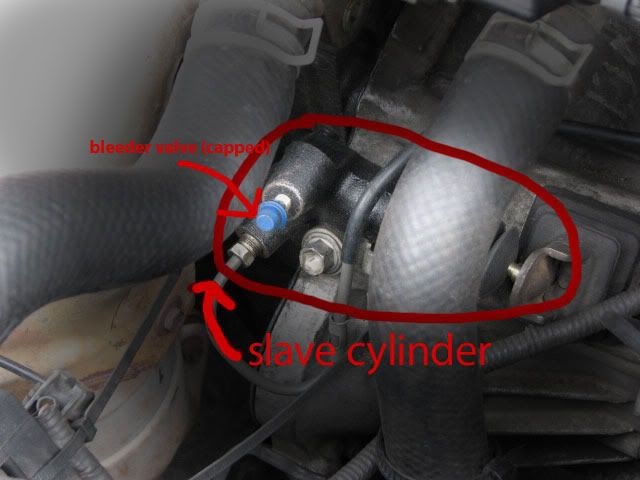
How To Rebuild Your Clutch Master Cylinder ------------------------------------------------------ Tools used: ---------------  - Ratchet with a 12mm socket and extension - Ratchet with a 12mm socket and extension - A pair of long nose pliers - A pair of long nose pliers - A 10mm open wrench - A 10mm open wrench - A pair of angled snap-ring pliers - A pair of angled snap-ring pliersParts Required: ------------------- -All you need is the Clutch Master Cylinder Rebuild Kit Part Number: 04311-12110  For Reference Only   Note: The kit includes a grommet for the reservoir. You'll need this if you are experiencing leaks between the reservoir and the cylinder assembly. I would not recommend putting the new grommet in if you're not experiencing any leaks as you may damage the slotted spring pin that holds the reservoir to the assembly. The pin is NOT part of the rebuild (see the diagram). Old vs. New    Intro: -------- 2 months ago, I noticed my clutch pedal beginning to stick. It only happened once every several stops so to me, it wasn't a big deal. I just used my left foot to pull it back. A few weeks later, it started happening more frequently, but by that time I was so broke and so focused in my studies I didn't have the time to take a look at it. Fast forward to a couple of weeks later, it got so bad that my clutch stopped working all together and I had to rev-match and use the ol' clutchless shifting method to drive home. The worst part was starting off from a stop.... I'm not even going to describe how I managed to get the car rolling without a clutch! Anyway, 1stToyotaParts had their shipments messed up and my order was delayed. I didn't get my parts until last night (1 month after placing the order). Desperate to drive the car again, after sitting for 3 weeks, and tired of using my dad's beat up truck, I managed to complete the job outside, past midnight, in the dark with a couple of lights, and in the cold. I did the rebuild part indoors, of course. There is also a rebuild kit for the slave cylinder (located in front of the tranny) but will not be covered in this thread. However, there's a really good how-to on alltrac.net with pictures. Instead use the part number: 04313-17010. It's probably the same as the one in the thread but just to be safe, use this one. Procedure ------------- 1. Do a 69 with clutch pedal to get a close look and undo the 2 12mm nuts beside the push rod that is connected with the clutch pedal. The pics suck, I know. There is very limited space and it's difficult to spot these 2 nuts without getting into an awkward position. It was hard to position my camera phone to take the pics.   2. Use the long-nose pliers and remove the 'hair-cotter' pin holding the clevis to the clutch pedal.    3. From the engine bay, pull out the clutch master cylinder assembly as far as you can until you're able to remove the clutch line from the assembly using the 10mm open wrench. At this point, you'll need to drain the fluid that is still inside the reservoir. Wrap the end of the assembly with a rag and pump the clutch pedal until all the liquid is out. Remove the entire assembly from the firewall.  4. Clean the inside of the reservoir and cylinder to get rid of any residue left behind.   5. Pull the boot from the assembly. Remove the snap-ring that was behind the boot using the snap-ring pliers. Then, pull out the piston-spring component from the assembly. Note: The reason my clutch went bad was because one of the little rubber piston rings was torn.     6. Loosen the nut that holds the clevis to the pushrod using the 10mm open wrench. Unscrew and separate the clevis from the pushrod. Remove the boot. Replace the old snap-ring and washer with the new one from the kit.    7. Insert the new piston-spring component in the cylinder and push it in using the pushrod. Lock the pushrod and washer in using the snap-ring and pliers. Put the boot and screw the clevis back on the push rod and tighten it with the nut. You've just rebuilt the master cylinder. Easy huh.     8. Screw the clutch line from Step 3 back into the cylinder assembly. Install the cylinder assembly back into the firewall. Put the two 12mm nuts back on from above the clutch pedal. Instal the clevis back on the clutch pedal and lock it using the new 'hair-cotter' pin that came with the kit.     9. Fill the clutch reservoir with brake fluid (DOT3 type). Loosen the bleeder valve located on the clutch slave cylinder. The clutch slave cylinder is mounted on the tranny beside the exhaust manifold. Remove the rubber cap from the valve. If the bleeder valve is seized, no worries, just bleed from the clutch line of the slave cylinder instead using the 10mm open wrench. When you remove the line from the slave cylinder, expect to see dirty fluid drip out. Pump the clutch pedal several times until clean fluid is dripping out (from the line or from the bleeder valve). Refill the clutch fluid reservoir back to 'max'. Re-install the clutch line back on the slave cylinder, or tighten the bleeder valve. Put the rubber cap back on the valve.  Image taken from the thread: Slave Cylinder Install, image posted by GriffGirl Finished Related Link: How To Rebuild Your Clutch Slave Cylinder But, Instead Use Part Number: 04313-17010 This post has been edited by azian_advanced: Jan 15, 2010 - 6:49 PM -------------------- -------------------------------------------------------------------------------- -------------------------------------------------------------------------------- |
Posts in this topic

 Keiri Classy post Azian!
Vote for Sticky. Jan 15, 2010 - 10:06 AM
 devilsden97 agree for sticky. i love the break downs on your D... Jan 15, 2010 - 10:20 AM
 BonzaiCelica when removing the the two bolts on the Master Clut... Apr 30, 2012 - 3:08 PM
  |
2 User(s) are reading this topic (2 Guests and 0 Anonymous Users)
0 Members:
| Lo-Fi Version | Time is now: January 10th, 2025 - 5:01 PM |


