
 Jan 6, 2007 - 4:04 PM Jan 6, 2007 - 4:04 PM
|
 
|
 Enthusiast  Joined Feb 3, '06 From Czech Republic (Europe) Currently Offline Reputation: 56 (100%) |
At last I had some time for another upgrade. Steering wheel swap... My stock one was 4-spoke with airbag/horn in the middle.
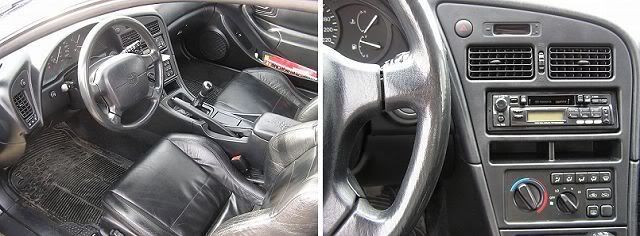 Just history now  . Since today I have this one . Since today I have this one  genuine 7th gen. Celica/91-04 MR2 st. wheel. genuine 7th gen. Celica/91-04 MR2 st. wheel.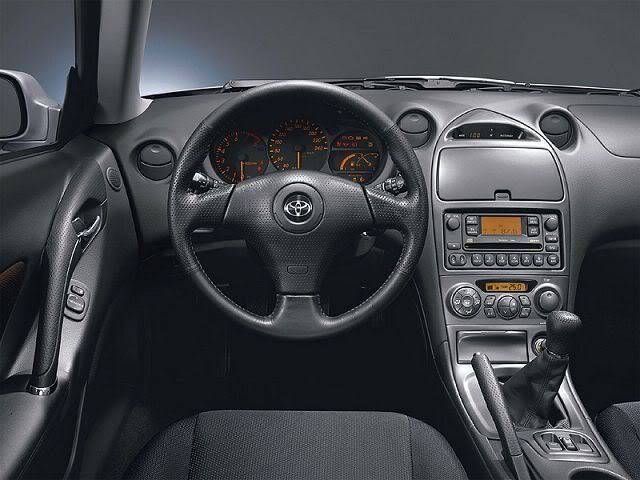 Although horn mechanism and airbag connector were different everything is working now. And I'll try describe here how generally do that... believe it will be handy for anyone step no one: remove old steering wheel Two screws on sides (behind small covers) holds airbag part 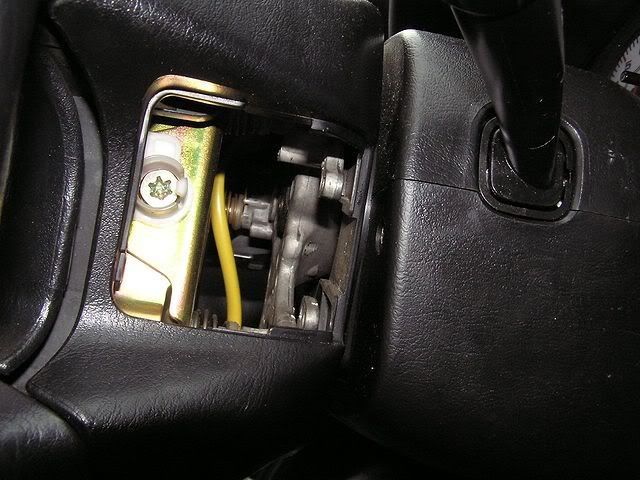 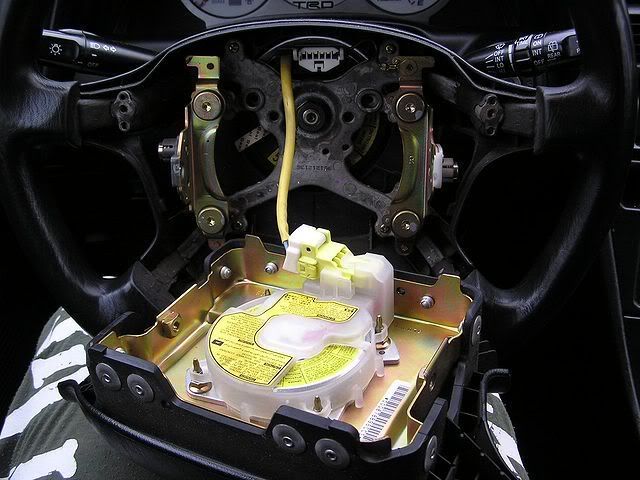 There are just two plugs inside. That yellow one is for airbag and white is horn (there is possibility also for cruise multi switch, where are many more wires. Horn wire is black, every time that last on right connected to wheel body) 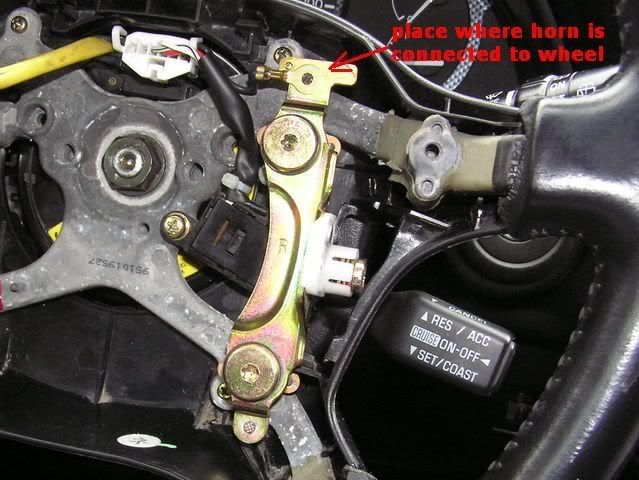 When you unplug everything + unscrew nut in the middle you should remove wheel with puller (w/o that it's not possible at all) 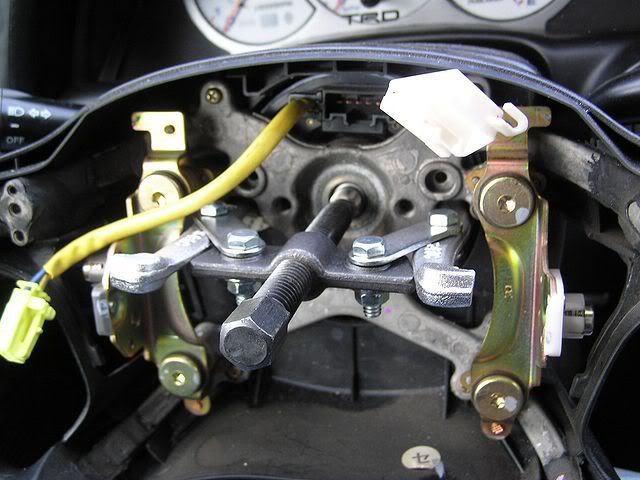 step two: solving airbag connection 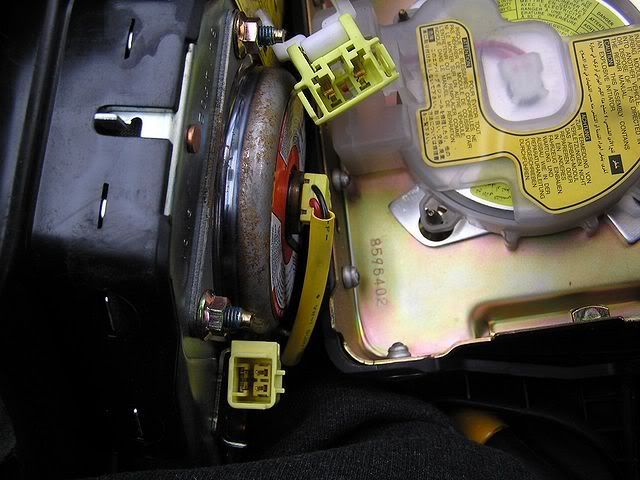 Different airbag connector means find right module (spiral) for it... 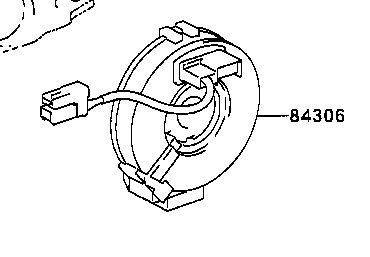 ...or use same airbag refill 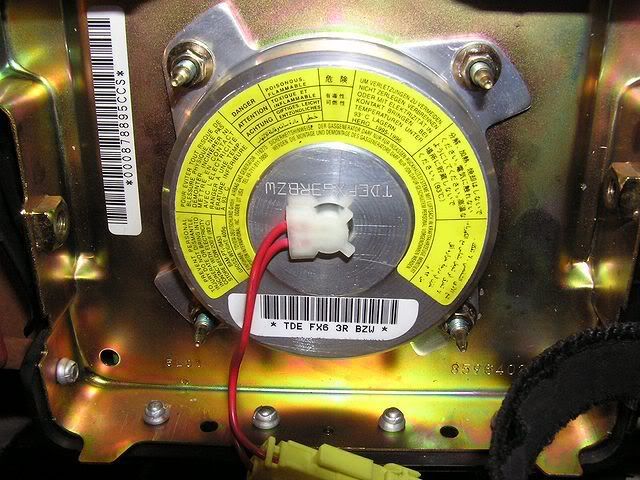 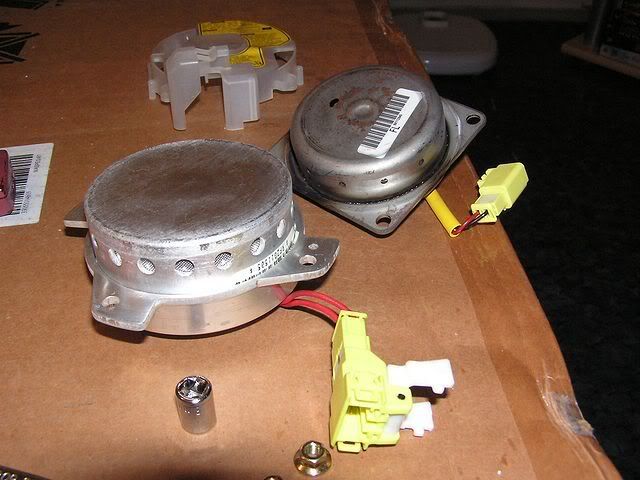 Of course... some customization should be done if airbag refill has different size (more are different, more custom work is needed). My one was just bit different... and airbag part was easy take into parts.  step three: solving horn connection This step depends on type of horn you have. However every time it's about find how horn mechanism works, cut black wire off old wheel and connect it somewhere... It really depends on that horn mechanism. However it's really easy, just one wire to screw... somewhere .step four: piece everything together Installation of new wheel body (with same center bore of course) is easy... 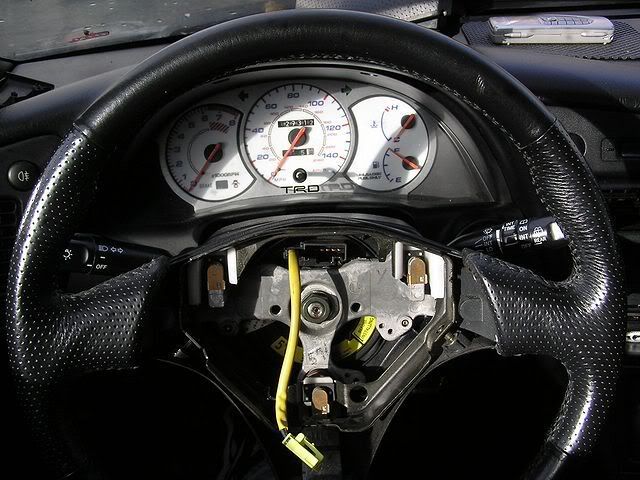 ...and in my case screw horn cable to airbag body (not wheel body like stock one)...and all finished .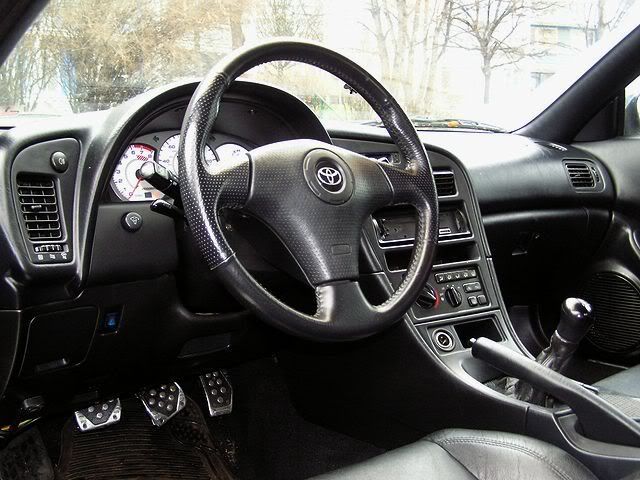
This post has been edited by malpaso: Jan 6, 2007 - 4:27 PM -------------------- No more replicas... This is evolution... This is SS-four :)
 ________[Featured Celica of 6gc.net @ 2010]_________ |

 |
Replies
|
Jan 20, 2010 - 5:25 PM
|
|
 Enthusiast Joined Feb 7, '07 From Portland, Oregon Currently Offline Reputation: 67 (96%) |
Since this thread is pretty much the most thorough how-to-swap-your-steering wheel, I'd love to see it completed with information on how to splice in the 7th gen cruise stalk for those of us not lucky enough to get a 98-99 or whatever it was that's plug-n-play.
As a side note, in the interest of consolidating info, here is how to clear the airbag code, as per the BGB for a '95 USDM Celica QUOTE CLEARING CODES
1) At DLC, connect a jumper wire to terminal Tc. See Figs. 11 and 12. Connect another jumper wire to terminal AB. Turn ignition switch to ACC or ON position. Wait about 6 seconds. 2) Starting with terminal Tc, apply body ground alternately to terminal Tc and terminal AB twice each, in cycles of 1/2 to 1 1/2 seconds (sequence is: Tc, AB, Tc, AB). Finally, keep applying body ground to terminal Tc until air bag warning light flashes quickly, indicating codes are cleared. NOTE: When alternately connecting jumper probes to terminals, simultaneously release one probe from one terminal while connecting other probe to other terminal. If time interval between probings exceeds 0.2 second, codes will not clear. --------------------  |
|
Feb 16, 2010 - 4:52 PM
|
|
|
Enthusiast Joined Feb 7, '07 From Portland, Oregon Currently Offline Reputation: 67 (96%) |
QUOTE (GriffGirl @ Jan 20, 2010 - 2:25 PM)  Since this thread is pretty much the most thorough how-to-swap-your-steering wheel, I'd love to see it completed with information on how to splice in the 7th gen cruise stalk for those of us not lucky enough to get a 98-99 or whatever it was that's plug-n-play. As a side note, in the interest of consolidating info, here is how to clear the airbag code, as per the BGB for a '95 USDM Celica QUOTE CLEARING CODES 1) At DLC, connect a jumper wire to terminal Tc. See Figs. 11 and 12. Connect another jumper wire to terminal AB. Turn ignition switch to ACC or ON position. Wait about 6 seconds. 2) Starting with terminal Tc, apply body ground alternately to terminal Tc and terminal AB twice each, in cycles of 1/2 to 1 1/2 seconds (sequence is: Tc, AB, Tc, AB). Finally, keep applying body ground to terminal Tc until air bag warning light flashes quickly, indicating codes are cleared. NOTE: When alternately connecting jumper probes to terminals, simultaneously release one probe from one terminal while connecting other probe to other terminal. If time interval between probings exceeds 0.2 second, codes will not clear. Edit: Samir, I'll email you the PDF out of the BGB - it's got diagrams and PICTURES! lol Edit again: Here's the PDFs for anyone else who wants them. "srs.pdf" has the wiring diagram, "airbag restraint system.pdf" contains trouble shooting, reset info and codes interpretation This post has been edited by GriffGirl: Feb 16, 2010 - 5:06 PM -------------------- |
Posts in this topic
 malpaso Steering wheel swap guide Jan 6, 2007 - 4:04 PM
 snapshotgt Very nice Jan 6, 2007 - 4:16 PM zCelicaDude very nice guide. this will be very helpful to the ... Jan 6, 2007 - 4:18 PM My2Celi nice i like it a lot. How much did you get the ste... Jan 6, 2007 - 7:46 PM Batman722 Nice Job Martin Jan 7, 2007 - 12:35 AM malpaso thanks for posts and PMs. Here is additional info:... Jan 7, 2007 - 2:39 AM tomazws Nice swap dude! That 7th gen steering wheel l... Jan 7, 2007 - 4:55 PM My2Celi aww. i guess i wont be doing it. US import cars ar... Jan 7, 2007 - 10:53 PM Rockford Excellent work, congrats!!!! Jan 7, 2007 - 11:19 PM CelicaSweden Which size is the puller?
100mm, 150mm or 200 mm ?... Feb 10, 2007 - 9:19 AM
snapshotgt Very nice Jan 6, 2007 - 4:16 PM zCelicaDude very nice guide. this will be very helpful to the ... Jan 6, 2007 - 4:18 PM My2Celi nice i like it a lot. How much did you get the ste... Jan 6, 2007 - 7:46 PM Batman722 Nice Job Martin Jan 7, 2007 - 12:35 AM malpaso thanks for posts and PMs. Here is additional info:... Jan 7, 2007 - 2:39 AM tomazws Nice swap dude! That 7th gen steering wheel l... Jan 7, 2007 - 4:55 PM My2Celi aww. i guess i wont be doing it. US import cars ar... Jan 7, 2007 - 10:53 PM Rockford Excellent work, congrats!!!! Jan 7, 2007 - 11:19 PM CelicaSweden Which size is the puller?
100mm, 150mm or 200 mm ?... Feb 10, 2007 - 9:19 AM
 malpaso QUOTE(CelicaSweden @ Feb 10, 2007 - 3... Feb 10, 2007 - 10:43 AM CelicaSweden QUOTE(malpaso @ Feb 10, 2007 - 10:43... Feb 11, 2007 - 3:16 AM malpaso QUOTE(CelicaSweden @ Feb 11, 2007 - 9... Feb 11, 2007 - 3:28 AM Excursion745 7th gen/MR2/MR-S st. wheel. Where and how much?: I... Feb 11, 2007 - 11:18 PM malpaso QUOTE(Excursion745 @ Feb 12, 2007 - 5... Feb 12, 2007 - 2:29 AM Batman722 I was lucky enough to get my hands on some 7th gen... Feb 27, 2007 - 10:56 PM malpaso QUOTE(Batman722 @ Feb 28, 2007 - 4:5... Feb 28, 2007 - 1:43 AM dutchboy QUOTE(Batman722 @ Feb 27, 2007 - 10... Jul 11, 2007 - 3:13 PM j0e_p3t nice. now i'm really thinking about doing this... Feb 27, 2007 - 11:13 PM Batman722 the 7th gen clockspring (spiral) does not fit in t... Feb 28, 2007 - 8:52 AM malpaso QUOTE(Batman722 @ Feb 28, 2007 - 2:5... Feb 28, 2007 - 9:30 AM Batman722 Martin NO !!! I cut here not the bag ... Feb 28, 2007 - 11:20 AM malpaso cunning Feb 28, 2007 - 12:09 PM Negative There is also a 6th gen steering wheel that looks ... Feb 28, 2007 - 2:27 PM tankd0g QUOTE(Negative @ Feb 28, 2007 - 2:27... Apr 1, 2008 - 8:42 PM Batman722 correct. The 98-99s had a 3 spoke also. IMO the 7t... Feb 28, 2007 - 2:41 PM Batman722 and some more pics
I still need to clean an... Feb 28, 2007 - 6:07 PM azian_advanced are all 7th gen steering wheels the same? do any ... Mar 1, 2007 - 2:25 AM malpaso QUOTE(azian_advanced @ Mar 1, 2007 - 8... Mar 1, 2007 - 2:43 AM Batman722 QUOTE(azian_advanced @ Mar 1, 2007 - 2... Mar 1, 2007 - 11:05 AM Negative So is my stock 3 post. Well pleather or whatever T... Mar 1, 2007 - 9:46 AM kerosene even though o wasn't replacing my steering whe... Jul 8, 2007 - 4:17 PM Kadett I really want one. To bad there aren't any ava... Jul 9, 2007 - 7:00 AM Kadett Found Myself a nice Leather 7th gen steering wheel... Jul 23, 2007 - 10:17 AM dutchboy Anyone know if the 6th gen cruise control switch w... Jul 25, 2007 - 4:48 AM malpaso QUOTE(dutchboy @ Jul 25, 2007 - 11:4... Jul 25, 2007 - 4:57 AM dutchboy Is the back side of the 7th gen wheel metal or pla... Jul 25, 2007 - 8:19 PM njccmd2002 Now all you have to do is test the airbag to see i... Jul 25, 2007 - 8:26 PM thespacepanda Nice write-up, man.
Just out of curiosity, if I w... Jan 22, 2008 - 10:23 PM reko Taking the thread back from the dead lol
.
Quick ... Apr 2, 2009 - 1:04 PM njccmd2002 take the momo steering of, and show us a picture. ... Apr 2, 2009 - 6:34 PM windowlicker quick question, is there any special process when ... Apr 7, 2009 - 6:25 PM njccmd2002 do the safest, disconnect the battery. Apr 7, 2009 - 6:43 PM windowlicker will do. i get spoiled with the mercedes airbags ... Apr 7, 2009 - 6:48 PM deliriouzgtfour any other precautions before starting...? like dis... Apr 14, 2009 - 12:41 AM malpaso QUOTE (deliriouzgtfour @ Apr 14, 2009 - ... Apr 14, 2009 - 2:13 AM deliriouzgtfour fixed my horn. On the other hand, wire was torn i... Apr 14, 2009 - 4:17 PM windowlicker took the airbag off this morning to speed up the p... Apr 22, 2009 - 1:18 PM azian_advanced as long as the 7th gen wheel you get comes with th... Apr 22, 2009 - 1:56 PM windowlicker oh, i'm not putting in a toyota wheel, i'm... Apr 22, 2009 - 2:12 PM reko Hey I'm having a hard time trying to put the s... Apr 22, 2009 - 9:56 PM windowlicker well its a little late for this now, but what i ha... Apr 22, 2009 - 11:17 PM azian_advanced yeah the wheel is supposed to be very tight.. use ... Apr 22, 2009 - 11:25 PM windowlicker QUOTE (azian_advanced @ Apr 23, 2009 - 1... Apr 22, 2009 - 11:50 PM reko That's the thing... i have a garage, impact gu... Apr 23, 2009 - 8:25 AM chacha what's the part number for the clock spring...... May 1, 2009 - 10:21 AM Superaison I did this today.
Was really easy, I didnt **** ... Jun 4, 2009 - 7:55 PM Dragondog i got a question if you swap wheels with one thats... Jun 5, 2009 - 1:57 AM windowlicker QUOTE (Dragondog @ Jun 5, 2009 - 2:5... Jun 7, 2009 - 9:12 PM windowlicker here's some pics of the nrg wheel, nrg quick r... Jun 7, 2009 - 9:09 PM windowlicker ok, i finished wiring the horn in last weekend, so... Jun 17, 2009 - 8:46 PM AnaXyd Will this swap from f.ex the Celica T23 to T20 act... Jun 20, 2009 - 10:27 AM AnaXyd QUOTE (AnaXyd @ Jun 20, 2009 - 10:27... Aug 7, 2009 - 9:51 AM tankd0g I just swapped a 99 rav4 wheel into my 5th gen (lo... Jul 23, 2009 - 12:25 AM shegarhuney GUYS!!.. i want to share a very very impor... Jul 28, 2009 - 4:29 PM zonz540 I swapped a GT4 wheel w/out an airbag into my 6gc ... Jul 29, 2009 - 1:06 AM GriffGirl this should be stickied! Jan 10, 2010 - 7:16 PM Wintersun Have a Gen 7 wheel in my Gen 6 SSIII and was easy ... Jan 10, 2010 - 8:58 PM abraxxa Thanks to malpaso who redirected me to this thread... Jan 16, 2010 - 3:52 AM malpaso QUOTE (abraxxa @ Jan 16, 2010 - 9:52... Jan 16, 2010 - 11:14 AM GriffGirl QUOTE (malpaso @ Jan 16, 2010 - 8:14... Jan 16, 2010 - 3:00 PM devilsden97 Does the RHD JDM st205 wheel have an air bag? and ... Jan 16, 2010 - 12:25 PM shegarhuney no more fuss.. the missing link ladies n gentlemen... Jan 18, 2010 - 5:34 PM GriffGirl QUOTE (shegarhuney @ Jan 18, 2010 - 2... Feb 16, 2010 - 3:50 PM malpaso OMG... I really didn't know what my now 3 year... Jan 21, 2010 - 8:32 AM GriffGirl Now, back to that cruise stalk swap! I'm c... Jan 22, 2010 - 12:03 AM Batman722 I just looked over my notes, it's not super cl... Jan 22, 2010 - 8:23 AM GriffGirl QUOTE (Batman722 @ Jan 22, 2010 - 5... Feb 16, 2010 - 4:01 PM samir0189 QUOTE (GriffGirl @ Feb 16, 2010 - 5... Feb 16, 2010 - 4:15 PM shegarhuney hehe.. Jan 29, 2010 - 4:38 PM abraxxa Good to see that the adapter fits!
I'm sti... Jan 29, 2010 - 5:16 PM yarik83 malpaso. I understand that you need a puller to re... Jan 29, 2010 - 5:42 PM abraxxa I removed mine about a year ago without a puller b... Jan 29, 2010 - 5:49 PM malpaso QUOTE (abraxxa @ Jan 29, 2010 - 11:4... Jan 30, 2010 - 1:56 AM GriffGirl I needed a puller to remove my 4 spoke wheel, defi... Jan 30, 2010 - 1:21 AM samir0189 ive got the BGB, thats why i was asking if thats h... Feb 16, 2010 - 4:55 PM GriffGirl I think you're right, I think it's somethi... Feb 16, 2010 - 5:09 PM Arsaces Hey guys,
I am thinking hard about doing this swa... Sep 15, 2011 - 10:02 AM abraxxa Just buy the adapter posted above. Sep 15, 2011 - 11:22 AM Arsaces QUOTE (abraxxa @ Sep 15, 2011 - 11:2... Sep 15, 2011 - 12:39 PM spy00005 buy the adapter and just leave the cruise control ... Sep 15, 2011 - 12:46 PM Arsaces QUOTE (spy00005 @ Sep 15, 2011 - 1:4... Sep 15, 2011 - 12:51 PM trdproven i disabled my cruise control, the red stitch steer... Sep 22, 2011 - 10:05 PM Arsaces Hey guys, got my steering wheel on, I would like t... Sep 23, 2011 - 8:30 PM spy00005 i used the old cc in my old steering wheel had but... Sep 23, 2011 - 8:51 PM Arsaces QUOTE (spy00005 @ Sep 23, 2011 - 9:5... Sep 23, 2011 - 9:41 PM spy00005 which steering wheel are you using because the old... Sep 24, 2011 - 12:58 AM Arsaces QUOTE (spy00005 @ Sep 24, 2011 - 1:5... Sep 24, 2011 - 4:06 PM
malpaso QUOTE(CelicaSweden @ Feb 10, 2007 - 3... Feb 10, 2007 - 10:43 AM CelicaSweden QUOTE(malpaso @ Feb 10, 2007 - 10:43... Feb 11, 2007 - 3:16 AM malpaso QUOTE(CelicaSweden @ Feb 11, 2007 - 9... Feb 11, 2007 - 3:28 AM Excursion745 7th gen/MR2/MR-S st. wheel. Where and how much?: I... Feb 11, 2007 - 11:18 PM malpaso QUOTE(Excursion745 @ Feb 12, 2007 - 5... Feb 12, 2007 - 2:29 AM Batman722 I was lucky enough to get my hands on some 7th gen... Feb 27, 2007 - 10:56 PM malpaso QUOTE(Batman722 @ Feb 28, 2007 - 4:5... Feb 28, 2007 - 1:43 AM dutchboy QUOTE(Batman722 @ Feb 27, 2007 - 10... Jul 11, 2007 - 3:13 PM j0e_p3t nice. now i'm really thinking about doing this... Feb 27, 2007 - 11:13 PM Batman722 the 7th gen clockspring (spiral) does not fit in t... Feb 28, 2007 - 8:52 AM malpaso QUOTE(Batman722 @ Feb 28, 2007 - 2:5... Feb 28, 2007 - 9:30 AM Batman722 Martin NO !!! I cut here not the bag ... Feb 28, 2007 - 11:20 AM malpaso cunning Feb 28, 2007 - 12:09 PM Negative There is also a 6th gen steering wheel that looks ... Feb 28, 2007 - 2:27 PM tankd0g QUOTE(Negative @ Feb 28, 2007 - 2:27... Apr 1, 2008 - 8:42 PM Batman722 correct. The 98-99s had a 3 spoke also. IMO the 7t... Feb 28, 2007 - 2:41 PM Batman722 and some more pics
I still need to clean an... Feb 28, 2007 - 6:07 PM azian_advanced are all 7th gen steering wheels the same? do any ... Mar 1, 2007 - 2:25 AM malpaso QUOTE(azian_advanced @ Mar 1, 2007 - 8... Mar 1, 2007 - 2:43 AM Batman722 QUOTE(azian_advanced @ Mar 1, 2007 - 2... Mar 1, 2007 - 11:05 AM Negative So is my stock 3 post. Well pleather or whatever T... Mar 1, 2007 - 9:46 AM kerosene even though o wasn't replacing my steering whe... Jul 8, 2007 - 4:17 PM Kadett I really want one. To bad there aren't any ava... Jul 9, 2007 - 7:00 AM Kadett Found Myself a nice Leather 7th gen steering wheel... Jul 23, 2007 - 10:17 AM dutchboy Anyone know if the 6th gen cruise control switch w... Jul 25, 2007 - 4:48 AM malpaso QUOTE(dutchboy @ Jul 25, 2007 - 11:4... Jul 25, 2007 - 4:57 AM dutchboy Is the back side of the 7th gen wheel metal or pla... Jul 25, 2007 - 8:19 PM njccmd2002 Now all you have to do is test the airbag to see i... Jul 25, 2007 - 8:26 PM thespacepanda Nice write-up, man.
Just out of curiosity, if I w... Jan 22, 2008 - 10:23 PM reko Taking the thread back from the dead lol
.
Quick ... Apr 2, 2009 - 1:04 PM njccmd2002 take the momo steering of, and show us a picture. ... Apr 2, 2009 - 6:34 PM windowlicker quick question, is there any special process when ... Apr 7, 2009 - 6:25 PM njccmd2002 do the safest, disconnect the battery. Apr 7, 2009 - 6:43 PM windowlicker will do. i get spoiled with the mercedes airbags ... Apr 7, 2009 - 6:48 PM deliriouzgtfour any other precautions before starting...? like dis... Apr 14, 2009 - 12:41 AM malpaso QUOTE (deliriouzgtfour @ Apr 14, 2009 - ... Apr 14, 2009 - 2:13 AM deliriouzgtfour fixed my horn. On the other hand, wire was torn i... Apr 14, 2009 - 4:17 PM windowlicker took the airbag off this morning to speed up the p... Apr 22, 2009 - 1:18 PM azian_advanced as long as the 7th gen wheel you get comes with th... Apr 22, 2009 - 1:56 PM windowlicker oh, i'm not putting in a toyota wheel, i'm... Apr 22, 2009 - 2:12 PM reko Hey I'm having a hard time trying to put the s... Apr 22, 2009 - 9:56 PM windowlicker well its a little late for this now, but what i ha... Apr 22, 2009 - 11:17 PM azian_advanced yeah the wheel is supposed to be very tight.. use ... Apr 22, 2009 - 11:25 PM windowlicker QUOTE (azian_advanced @ Apr 23, 2009 - 1... Apr 22, 2009 - 11:50 PM reko That's the thing... i have a garage, impact gu... Apr 23, 2009 - 8:25 AM chacha what's the part number for the clock spring...... May 1, 2009 - 10:21 AM Superaison I did this today.
Was really easy, I didnt **** ... Jun 4, 2009 - 7:55 PM Dragondog i got a question if you swap wheels with one thats... Jun 5, 2009 - 1:57 AM windowlicker QUOTE (Dragondog @ Jun 5, 2009 - 2:5... Jun 7, 2009 - 9:12 PM windowlicker here's some pics of the nrg wheel, nrg quick r... Jun 7, 2009 - 9:09 PM windowlicker ok, i finished wiring the horn in last weekend, so... Jun 17, 2009 - 8:46 PM AnaXyd Will this swap from f.ex the Celica T23 to T20 act... Jun 20, 2009 - 10:27 AM AnaXyd QUOTE (AnaXyd @ Jun 20, 2009 - 10:27... Aug 7, 2009 - 9:51 AM tankd0g I just swapped a 99 rav4 wheel into my 5th gen (lo... Jul 23, 2009 - 12:25 AM shegarhuney GUYS!!.. i want to share a very very impor... Jul 28, 2009 - 4:29 PM zonz540 I swapped a GT4 wheel w/out an airbag into my 6gc ... Jul 29, 2009 - 1:06 AM GriffGirl this should be stickied! Jan 10, 2010 - 7:16 PM Wintersun Have a Gen 7 wheel in my Gen 6 SSIII and was easy ... Jan 10, 2010 - 8:58 PM abraxxa Thanks to malpaso who redirected me to this thread... Jan 16, 2010 - 3:52 AM malpaso QUOTE (abraxxa @ Jan 16, 2010 - 9:52... Jan 16, 2010 - 11:14 AM GriffGirl QUOTE (malpaso @ Jan 16, 2010 - 8:14... Jan 16, 2010 - 3:00 PM devilsden97 Does the RHD JDM st205 wheel have an air bag? and ... Jan 16, 2010 - 12:25 PM shegarhuney no more fuss.. the missing link ladies n gentlemen... Jan 18, 2010 - 5:34 PM GriffGirl QUOTE (shegarhuney @ Jan 18, 2010 - 2... Feb 16, 2010 - 3:50 PM malpaso OMG... I really didn't know what my now 3 year... Jan 21, 2010 - 8:32 AM GriffGirl Now, back to that cruise stalk swap! I'm c... Jan 22, 2010 - 12:03 AM Batman722 I just looked over my notes, it's not super cl... Jan 22, 2010 - 8:23 AM GriffGirl QUOTE (Batman722 @ Jan 22, 2010 - 5... Feb 16, 2010 - 4:01 PM samir0189 QUOTE (GriffGirl @ Feb 16, 2010 - 5... Feb 16, 2010 - 4:15 PM shegarhuney hehe.. Jan 29, 2010 - 4:38 PM abraxxa Good to see that the adapter fits!
I'm sti... Jan 29, 2010 - 5:16 PM yarik83 malpaso. I understand that you need a puller to re... Jan 29, 2010 - 5:42 PM abraxxa I removed mine about a year ago without a puller b... Jan 29, 2010 - 5:49 PM malpaso QUOTE (abraxxa @ Jan 29, 2010 - 11:4... Jan 30, 2010 - 1:56 AM GriffGirl I needed a puller to remove my 4 spoke wheel, defi... Jan 30, 2010 - 1:21 AM samir0189 ive got the BGB, thats why i was asking if thats h... Feb 16, 2010 - 4:55 PM GriffGirl I think you're right, I think it's somethi... Feb 16, 2010 - 5:09 PM Arsaces Hey guys,
I am thinking hard about doing this swa... Sep 15, 2011 - 10:02 AM abraxxa Just buy the adapter posted above. Sep 15, 2011 - 11:22 AM Arsaces QUOTE (abraxxa @ Sep 15, 2011 - 11:2... Sep 15, 2011 - 12:39 PM spy00005 buy the adapter and just leave the cruise control ... Sep 15, 2011 - 12:46 PM Arsaces QUOTE (spy00005 @ Sep 15, 2011 - 1:4... Sep 15, 2011 - 12:51 PM trdproven i disabled my cruise control, the red stitch steer... Sep 22, 2011 - 10:05 PM Arsaces Hey guys, got my steering wheel on, I would like t... Sep 23, 2011 - 8:30 PM spy00005 i used the old cc in my old steering wheel had but... Sep 23, 2011 - 8:51 PM Arsaces QUOTE (spy00005 @ Sep 23, 2011 - 9:5... Sep 23, 2011 - 9:41 PM spy00005 which steering wheel are you using because the old... Sep 24, 2011 - 12:58 AM Arsaces QUOTE (spy00005 @ Sep 24, 2011 - 1:5... Sep 24, 2011 - 4:06 PM |
3 User(s) are reading this topic (3 Guests and 0 Anonymous Users)
0 Members:
| Lo-Fi Version | Time is now: February 17th, 2025 - 2:32 AM |