
 Mar 17, 2010 - 10:38 PM Mar 17, 2010 - 10:38 PM
|
 
|
|
Enthusiast  Joined Dec 29, '05 From So-Cal Currently Offline Reputation: 12 (100%) |
what are we really adjusting....which parts....the bottom rings or the top rings...does anyone have pics? of the lowest settings for front and back?
which to adjust? This bottom part only (the BLACK RING) or the part where my THUMB is touching? 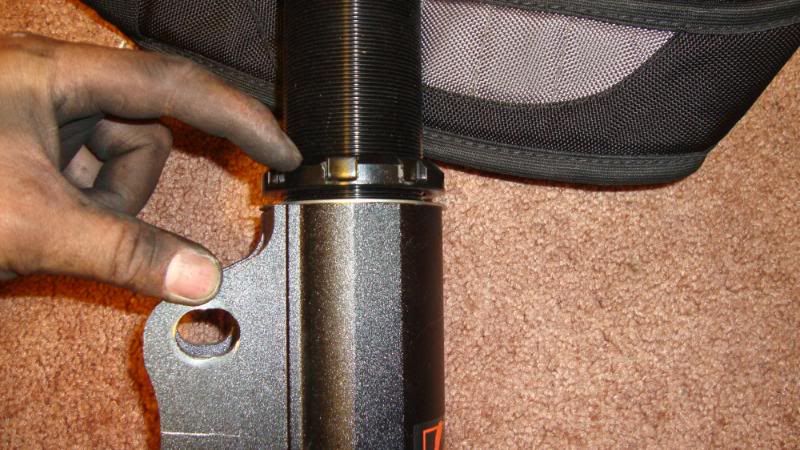 The orange rings.....? 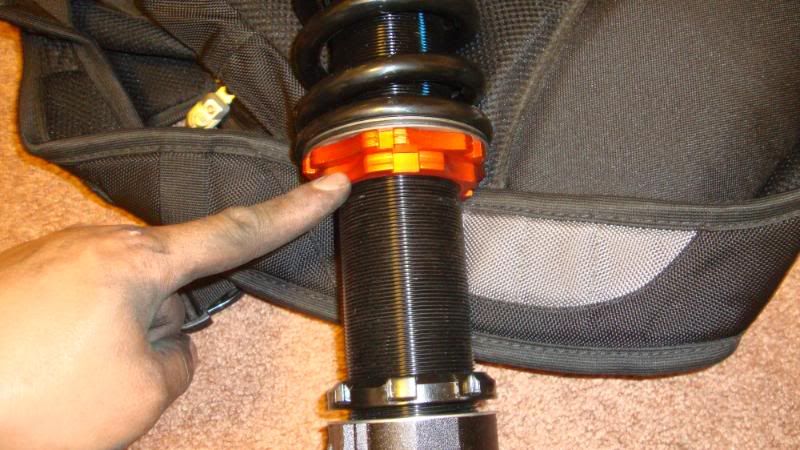 What about the space between my two fingers?  What are the right adjustable height of the bottom black piece and the space with thread from orange rings? the displacements? This post has been edited by chacha: Mar 21, 2010 - 10:22 AM |

 |
Replies
|
Mar 18, 2010 - 7:29 AM
|
|
|
Enthusiast Joined May 22, '03 From NOVA Currently Offline Reputation: 16 (100%) |
The orange rings you adjust so that the spring sits snug up against the top perch.
So push the spring up till it stops, and spin the upper orange ring till it touches the spring, now spin the bottom orange ring up till it meets the upper one. tighten the bottom ring to the top. This is setting pre-load on the spring. the bottom black ring, this is what is allowing your ride height to change. You spin the assembly (the threaded part that your fingers aren't touching) into the base piece (your thumb is touching). make sure you have the same amount of threads into the base, as its partner assembly (left and right must be equal). once you've gotten how low you want to go you snug the black ring down to the bottom piece to hold it in place. (finger to thumb) sounds a bit confusing i know. |
Posts in this topic
 chacha K-SPORT COILS Mar 17, 2010 - 10:38 PM
 chacha i understand what you mean...thanks....this took m... Mar 18, 2010 - 12:22 PM Tigawoods damn you and your newer version of the kontrols Mar 18, 2010 - 12:51 PM whatthe ^ I noticed that too, the build quailty looks real... Mar 18, 2010 - 1:23 PM playr158 QUOTE (chacha @ Mar 18, 2010 - 12:22... Mar 18, 2010 - 1:58 PM rjbibeau they are nice...mine are slammed till the sleeve a... Mar 18, 2010 - 7:57 PM chode from another post
QUOTE (chode @ Feb 2, 2010... Mar 18, 2010 - 10:35 PM chacha man...i swear i searched the forum...a GOOD 35 min... Mar 19, 2010 - 12:48 AM chacha great news is that i got these BRAND NEW for ... Mar 19, 2010 - 12:55 AM chacha all done...that's how it sits for now...waitin... Mar 19, 2010 - 7:49 PM chacha does anyone know if camber kits are necessary for ... Mar 22, 2010 - 8:53 PM SwissFerdi Only if your camber is out of spec. Judging from y... Mar 22, 2010 - 9:01 PM chacha those pics don't tell much...as you can tell, ... Mar 22, 2010 - 9:33 PM
chacha i understand what you mean...thanks....this took m... Mar 18, 2010 - 12:22 PM Tigawoods damn you and your newer version of the kontrols Mar 18, 2010 - 12:51 PM whatthe ^ I noticed that too, the build quailty looks real... Mar 18, 2010 - 1:23 PM playr158 QUOTE (chacha @ Mar 18, 2010 - 12:22... Mar 18, 2010 - 1:58 PM rjbibeau they are nice...mine are slammed till the sleeve a... Mar 18, 2010 - 7:57 PM chode from another post
QUOTE (chode @ Feb 2, 2010... Mar 18, 2010 - 10:35 PM chacha man...i swear i searched the forum...a GOOD 35 min... Mar 19, 2010 - 12:48 AM chacha great news is that i got these BRAND NEW for ... Mar 19, 2010 - 12:55 AM chacha all done...that's how it sits for now...waitin... Mar 19, 2010 - 7:49 PM chacha does anyone know if camber kits are necessary for ... Mar 22, 2010 - 8:53 PM SwissFerdi Only if your camber is out of spec. Judging from y... Mar 22, 2010 - 9:01 PM chacha those pics don't tell much...as you can tell, ... Mar 22, 2010 - 9:33 PM
 garin QUOTE (chacha @ Mar 22, 2010 - 10:33... Mar 22, 2010 - 9:46 PM chacha thanks...im planning to take it to a shop to get a... Mar 22, 2010 - 10:23 PM SwissFerdi No, you need to get a camber kit. Search for the o... Mar 22, 2010 - 10:28 PM chacha thanks swiss...ill check them out Mar 23, 2010 - 6:34 AM lagos I thought the whole idea of the ksports were that ... Mar 23, 2010 - 10:42 AM garin QUOTE (lagos @ Mar 23, 2010 - 11:42 ... Mar 23, 2010 - 11:05 AM rjbibeau only the front have the adjustable plates on them.... Mar 23, 2010 - 12:12 PM garin QUOTE (rjbibeau @ Mar 23, 2010 - 1:1... Mar 23, 2010 - 12:46 PM chacha yeah...i thought so too...the camber adjusty are o... Mar 23, 2010 - 7:49 PM garin You can adjust yourself any where from 0 to stight... Mar 23, 2010 - 8:17 PM rjbibeau most of the time u can eyeball it and take note of... Mar 24, 2010 - 11:13 AM whatthe QUOTE (rjbibeau @ Mar 25, 2010 - 3:1... Mar 24, 2010 - 5:20 PM 96stgreendemon not to thread jack but was wondering how u like th... Mar 24, 2010 - 11:25 AM garin well i like mine... i wish they were a differnt co... Mar 24, 2010 - 3:07 PM rjbibeau they are way nice...better then the stock strut an... Mar 24, 2010 - 5:20 PM garin QUOTE (rjbibeau @ Mar 24, 2010 - 6:2... Mar 24, 2010 - 8:19 PM rjbibeau damn mine doesn't have the adjustments in the ... Mar 24, 2010 - 9:15 PM garin QUOTE (rjbibeau @ Mar 24, 2010 - 10... Mar 24, 2010 - 9:49 PM Tigawoods i like how our versions are orange. they stand out... Mar 24, 2010 - 9:29 PM chacha with these install for those who do have it...what... Mar 25, 2010 - 2:33 AM Scar-- Is the inverted model for st205 bolt on just like ... Mar 26, 2010 - 1:50 PM
 |
7 User(s) are reading this topic (7 Guests and 0 Anonymous Users)
0 Members:
| Lo-Fi Version | Time is now: February 23rd, 2025 - 2:14 PM |