 Feb 7, 2009 - 1:45 AM Feb 7, 2009 - 1:45 AM
|
|
|
Enthusiast      Joined Aug 2, '05 From Guam Currently Offline Reputation: 15 (100%) |
Ok, first off, all of you are probably saying its about time TRDPROVEN contributed to this site. I just thought this pretty useful information.
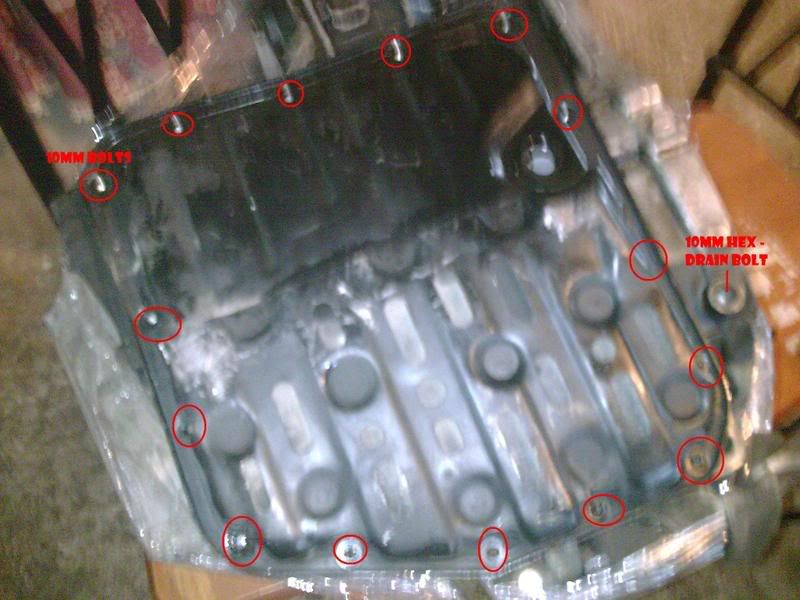
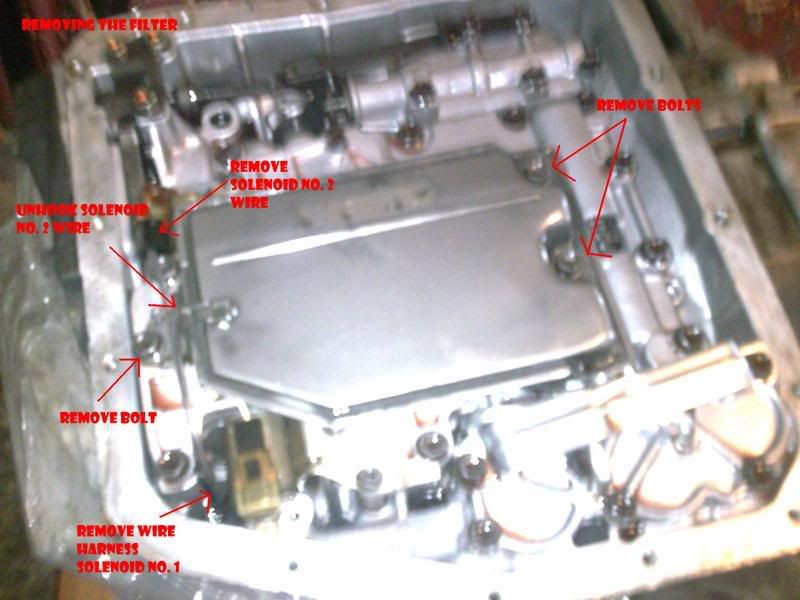
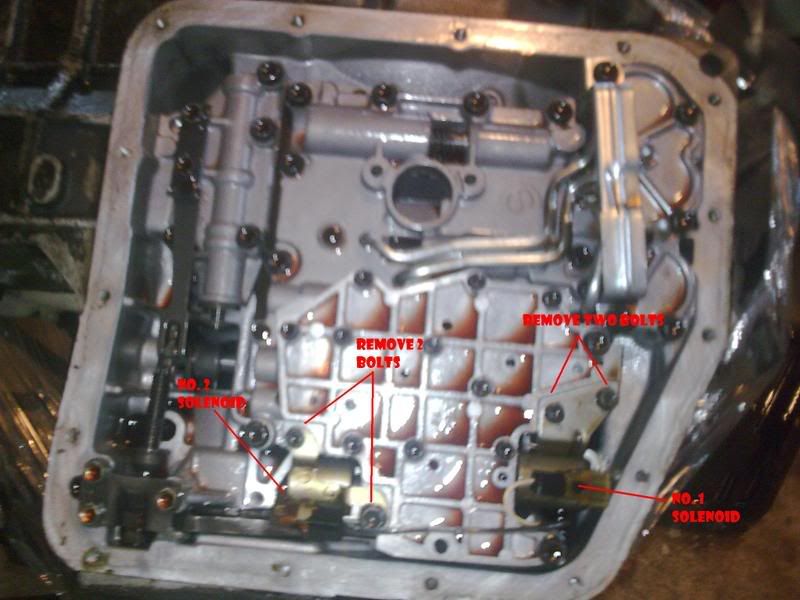
With my manual transmissions swap completed. I took the opportunity not just to do this how-to replace auto trans solenoid, filter, and change ATF, but also to take parts from my celica auto trans and put it on my 92 camry which had the same trans and motor 5sfe. To just get things straight, I am unclear if this is the same as a 7afe (which i think it is different since it is a different trans but same concept) but this is in regards to a 5sfe celica tranny. if you have OBD1 you can do a error check test jumping E1 and T1 On board diagnostics harness located under your hood next to your driver side firewall. If you begin to see your O/D lights begin to blink as you put it on ACC and you get either 62 (No. 1 solenoid short or open) or 63 (No. 2 solenoid short or open). Reason why you would have to perform this is because your O/D light blinks when driving and you notice a power loss, acceleration loss, or it won't downshift going up a hill or when stomping on your gas. It feels like you've lost second gear. I am not covering how to test the resistance on the wires from your solenoid wires to your tranny harness or to your ECU, or even testing the ECU. This writeup was strictly done because I believed that the tranny trouble codes that showed up when jumping the OBD, was considered true to me or accurate. ** Sorry the trans illustrated in the picture is not on the car but actually upside down becuase it was originally from my celica. I just used it for illustration purposes when I was scavenging it for my 92 camry. LET'S BEGIN 1. jack up the car  2. remove drain bolt (10mm hex) 3. drain ATF 4. Once drained, begin removing 10mm pan bolts. I'd advise using a socket wrench first to loosen and then use a socket screwdriver to remove bolts and same thing for putting them back on. Then again use your socket wrench to tighten. You'll see what I mean. 5. I recommend removing the ones facing towards the rear of the car first so that you can tilt the pan and let the ATF drain into your drain pain. Watch out as you get to your last bolts, the pan might fall on you or get ATF in your eyes. 6. remove pan and clean off left over gasket using a gasket scraper, do not sand or use a screw driver, you will damage the rim and you will create leaks.  7. remove the filter bolts as illustrated, three altogether. 8. do not forget to unhook the solenoid no. 2 wire on the filter.  9. change out your solenoids no. 1 and no. 2 are most common needing replacement as your car gets older and as you dont change ATF as often as metal particles can clog them. As illustrated. They just come out after you remove the bolts. You can get them from toyotaworld.com or 1sttoyotaparts.com. 10. secure all your bolts on the solenoids and the filter. Make sure you use brand new solenoids and new filter. 11. replace with new gasket. 12. Make sure they align as you hold them up. sealant sometimes is used to hold them in place but I just used electrical tape to hold the corners in place and aligned and then remove it as I got the bolts in. 13. as you start putting the tranny pan bolts back make sure you work your way beginning inwards and outwards to make sure you get even tightening and alignment. I did them working my way from the inner bolts and crossing tightening them like how you do lug nuts. DO NOT OVERTIGHTEN IT LIKE THEY ARE LUG NUTS, they are torque specs but I just used my feel and instincts. 14. tighten back your drain bolt. 15. begin putting ATF dexron 3 or newer is recommended where your trans dip stick hole is. 16. Manual states a refill is just 2.5 quarts. What I did was get close to that and warm up my car or drive it a bit until it gets hot enough and then begin filling little by little to get it in between the hot notches on your tran dip stick. 17. I am not covering a dry fill on this how-to just a refill. Dry fill takes somewhere around 5 quarts or something like that. 18. Once you've gotten it in between the notches, reset your error codes by removing the negative terminal on your battery for a few minutes. you can also remove i think the ECU or EFI fuses I forgot which ones. 19. Thats it, test drive your car. 20. Don't forget to clean up after yourself. ** I am not responsible for how you execute my instructions. This is just a guide and you should use your own knowledge, experience, or common sense to figure out the rest. I will also update or make changes to these or if i forgot something as I keep reading it or as input comes in on this thread. Just to let you know, the solenoid change was successful, my camry can shift now. [size="2"][/size] This post has been edited by trdproven: Feb 3, 2010 - 2:30 AM -------------------- 94 Celica GT
|Toyota OEM Japan|Toyota Racing Development|Tom's|Competition Clutch|5Zigen|Apexi| |Laille/Beatrush|Magnecor|Denso|Royal Purple|Optima|PIAA|PW JDM|Megan Racing|Nitto| |Work|Greddy|Samco|Project Mu|H&R|Gates|Moog|Rota|Yokohama|Epman|1320|Upgr8 04 Celica GT |Toyota OEM Japan|Toyota Racing Development|Tein|BC Racing|Greddy| |
 |
Replies
 Jan 9, 2011 - 8:48 PM Jan 9, 2011 - 8:48 PM
|
|
|
Enthusiast      Joined Jan 17, '08 From JB MDL, NJ Currently Offline Reputation: 30 (100%) |
I checked on Rockauto and both control solenoids have the same PN there....by same I mean that the transmission is an A104E
This post has been edited by Spider77: Jan 9, 2011 - 8:52 PM |
Posts in this topic
 trdproven How-To replace Shift Solenoids Feb 7, 2009 - 1:45 AM
 silver6gc Excellent instructions, I just want to make one co... Feb 7, 2009 - 11:33 AM
 trdproven True by the book Dexron III, problem is now is tha... Feb 7, 2009 - 11:41 AM
 Spider77 Was wondering when Id see this one here. Nice wri... Feb 7, 2009 - 11:43 AM

 trdproven QUOTE (Spider77 @ Feb 7, 2009 - 12:4... Feb 7, 2009 - 9:29 PM
 trdproven Wow, I'm surprised this is not a sticky, this ... Feb 8, 2009 - 5:31 PM

 Spider77 QUOTE (trdproven @ Feb 8, 2009 - 6:3... Feb 8, 2009 - 7:06 PM
 silver6gc QUOTE trdproven Posted Yesterday, 12:41 PM
True... Feb 8, 2009 - 6:45 PM
 trdproven Any obvious diff spider? Feb 9, 2009 - 4:58 AM
 Spider77 I have to say, when i first decided to use it I wa... Feb 9, 2009 - 9:47 PM
 trdproven Sometimes I think it is just psychological. Feb 9, 2009 - 9:49 PM
 njccmd2002 where the pics go? Jan 1, 2010 - 1:28 PM
 trdproven sorry will correct the pics, is there a celica pic... Feb 1, 2010 - 11:15 PM
 trdproven up and ready... Feb 3, 2010 - 2:31 AM
 Akirad1 Do you have part numbers Jan 9, 2011 - 8:19 PM
 Spider77 One more thing....A140E Transmission Manual Jan 9, 2011 - 8:54 PM
 Akirad1 Dang couldn't find the solenoid part numbers f... Jan 9, 2011 - 10:19 PM
 trdproven You can just call Jeff at toyotaworld, he can tell... Jan 9, 2011 - 10:49 PM
 DEATH Add to how-to's? Jan 9, 2011 - 10:51 PM
 Rusty yes it's in there see:
Transmissions, LSD ... Jan 10, 2011 - 1:32 AM
  |
1 User(s) are reading this topic (1 Guests and 0 Anonymous Users)
0 Members:
| Lo-Fi Version | Time is now: December 12th, 2024 - 1:52 AM |


