
 Aug 28, 2005 - 10:09 PM Aug 28, 2005 - 10:09 PM
|
 
|
 Enthusiast  Joined Mar 8, '04 From Newport, RI Currently Offline Reputation: 63 (99%) |
this is for removing the front bumper from a 94-99 Celica ST,GT,GT-Four
Manny and I did this with his car (beautiful st205 front conversion) and I assure you the process is the exact same with the at200 (ST) and st204 (GT) Tools needed : flathead screwdriver phillips head screwdriver 10mm socket, rachet, a few extensions, swivel Time : 30min-45min depending on skill level first, open your hood and prop open - and remove registration plate (if applicable) 1 - remove 4 bolts (10mm) on the top of the bumper (the retainer) and put retainer aside 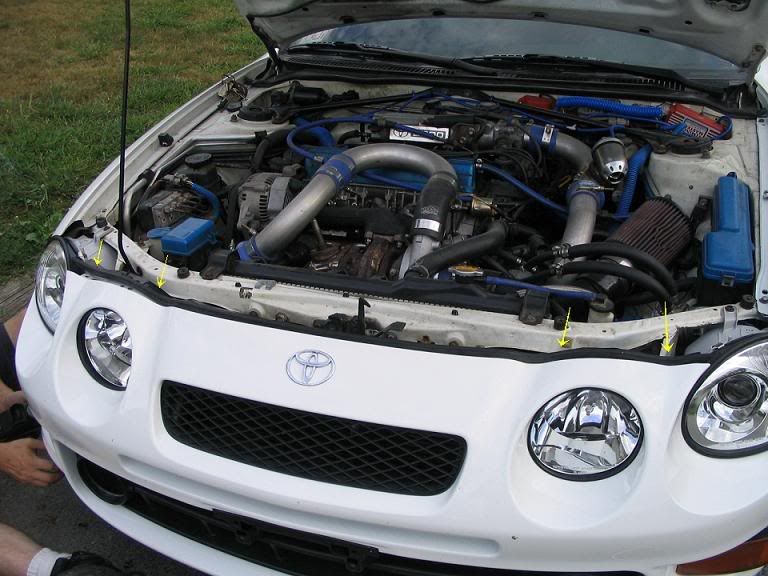 2 - remove 4 plastic drivers holding the bumper onto the re-bar (crash bar) with a flathead screwdriver 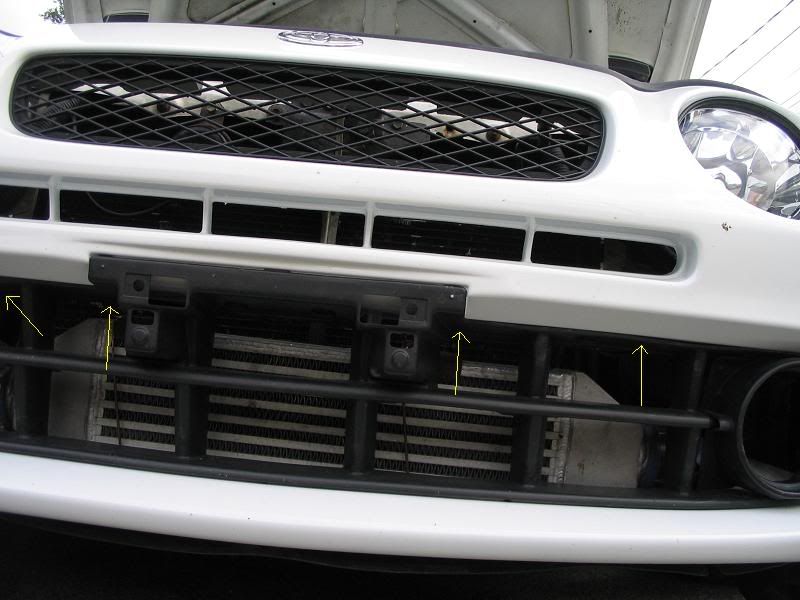 detailed view 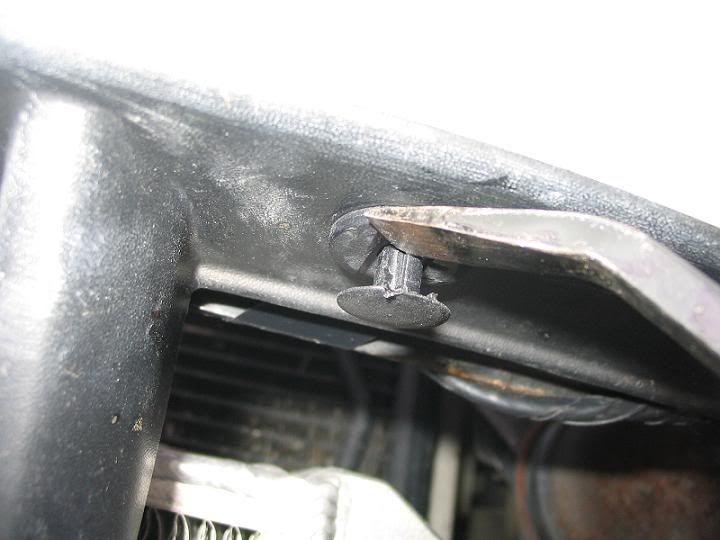 3 - remove 8 screws/bolts holding the bottom of the bumper to the under plastics 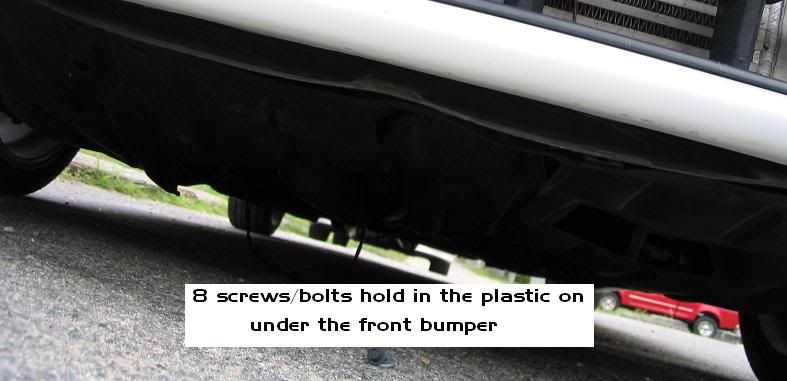 4 - unscrew turn signals (phillips head screw driver) and remove/disconnect housings (both sides) 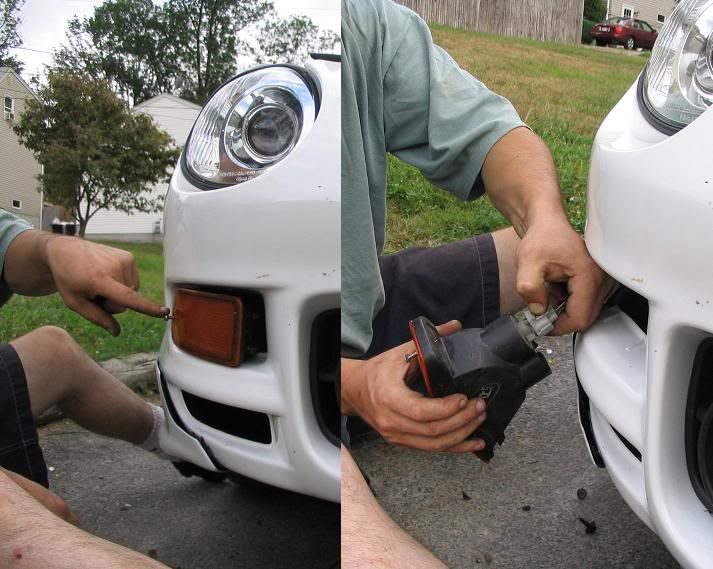 5 - next is the tricky part. There are 3 nuts (10mm) holding the bumper to the fender (on each side) - located here 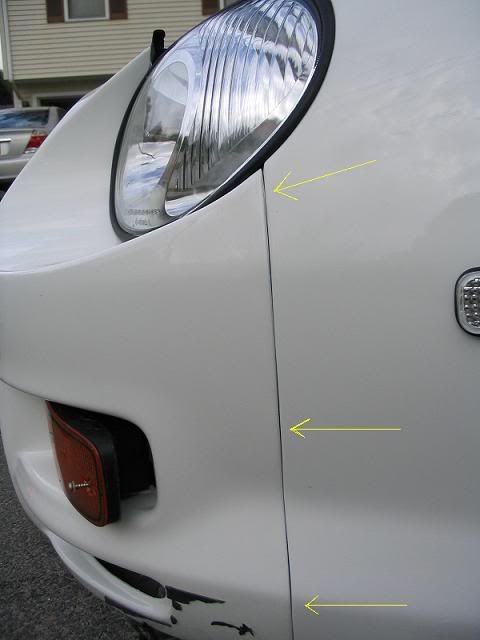 what I did was I pushed the wheel well plastic aside and stuck my hand/arm in to remove nuts 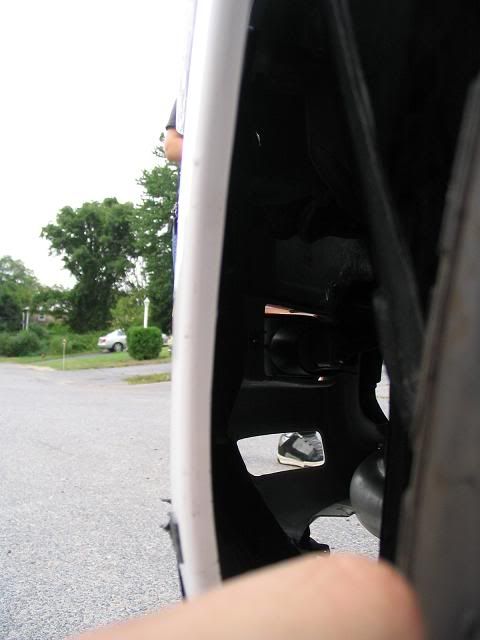 the bottom and the middle nuts are easy, the top nut is more difficult. To remove all 3 I used this 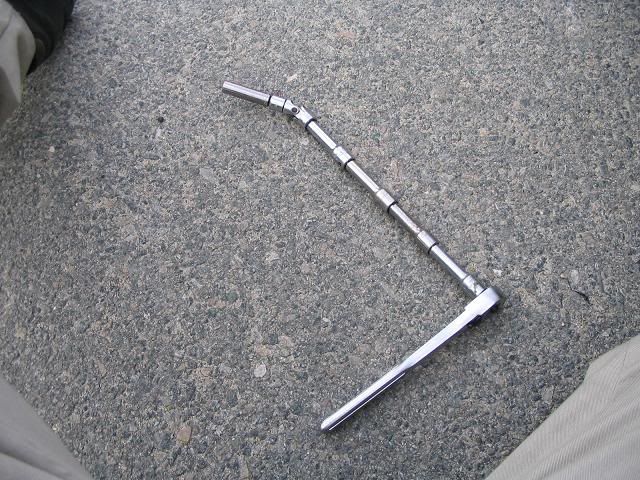 the top one is located right at the top of the inside of the fender close to the headlight, it is tight in there, I recommend you use a 10mm DEEP socket for more reach. 6 - once all 6 nuts (3 each side) are removed, pull the front bumper strait off toward the front of the car. You may need to wiggle it a little bit (it is easier to have someone help, one person on each side of the bumper) complete. To put the bumper back on, just reverse the directions  Notes/hints : make sure to keep all bolts/nuts ect clean and organized. You will need these again to put the bumper back on. I recommend putting them into baggies and labeling.  -------------------- |


 |
Replies
|
Apr 18, 2012 - 8:21 PM
|
|
|
Enthusiast Joined Dec 16, '08 From Norway Currently Offline Reputation: 0 (0%) |
Thanks for the tips guys, I will let the guys who takes the job start with the splitters and not messing the side skirts.
If it turns out it will be easier to break the splitters and do it over again then they just have to. I will just buy a new set (which isn't so expensive), and let them install it so I can remove them in the future.. The guy who did this molding is a great guy, he painted the car and it's good work, so I can't blame him, I guess he didn't know that is so hard to remove the headlights and that it was necessary.. I don't regret that the side skirts and rear bumper splitters is molded though, because they won't be needed to be removed unless there will be a car accident. This post has been edited by Iceman22: Apr 18, 2012 - 8:24 PM -------------------- - Celica ST202 w/ JDM 3S-GE 180HP (Special LE Subaru Blue steel paint!)
- A video of my car, before & after: Click here |
Posts in this topic
 Batman722 Removing front bumper Aug 28, 2005 - 10:09 PM
 presure2 good job, hommie.
added to the sticky Aug 29, 2005 - 7:21 AM ILuvMyCelica95 it's about time someone did this! Aug 29, 2005 - 9:24 AM jgreening nice how-to Batman. I heard you might be interest... Aug 29, 2005 - 10:07 AM Kadett Even i thought it wasnt worth making a how-to for,... Aug 29, 2005 - 10:14 AM forkee awesome write up! ive done it so many times th... Aug 29, 2005 - 10:33 AM WannabeGT4 Never had I heard anyone mention the 4 plastic cli... Aug 29, 2005 - 11:26 AM smerk thanks for the help batman Mar 24, 2006 - 3:13 AM Jdog1385 good stuff batman, great write-up Mar 24, 2006 - 1:15 PM magnum Very good and imformative ,i must use this when i... Mar 25, 2006 - 4:36 PM devilsden97 nicely done. Mar 25, 2006 - 4:41 PM dustin15brown great write up! It really helped.... and i do ... Apr 8, 2006 - 10:12 PM
presure2 good job, hommie.
added to the sticky Aug 29, 2005 - 7:21 AM ILuvMyCelica95 it's about time someone did this! Aug 29, 2005 - 9:24 AM jgreening nice how-to Batman. I heard you might be interest... Aug 29, 2005 - 10:07 AM Kadett Even i thought it wasnt worth making a how-to for,... Aug 29, 2005 - 10:14 AM forkee awesome write up! ive done it so many times th... Aug 29, 2005 - 10:33 AM WannabeGT4 Never had I heard anyone mention the 4 plastic cli... Aug 29, 2005 - 11:26 AM smerk thanks for the help batman Mar 24, 2006 - 3:13 AM Jdog1385 good stuff batman, great write-up Mar 24, 2006 - 1:15 PM magnum Very good and imformative ,i must use this when i... Mar 25, 2006 - 4:36 PM devilsden97 nicely done. Mar 25, 2006 - 4:41 PM dustin15brown great write up! It really helped.... and i do ... Apr 8, 2006 - 10:12 PM
 Batman722 QUOTE(dustin15brown @ Apr 8, 2006 - 11... Apr 8, 2006 - 10:30 PM dustin15brown QUOTE(Batman722 @ Apr 9, 2006 - 3:30... Apr 9, 2006 - 9:10 AM bigal004321 Good write up! that will help me alot in the c... Apr 8, 2006 - 11:13 PM lingham QUOTE(Batman722 @ Aug 28, 2005 - 10... Jun 10, 2006 - 4:14 PM Tech9ine good timing, I'm planning on doing this very s... Jun 11, 2006 - 7:40 PM mzztoyota This is going to be such a huge help when I replac... Aug 21, 2006 - 1:13 PM My2Celi man that was a pita. especially that one bolt unde... Sep 21, 2006 - 2:34 AM Rayme If I were to remove teh low beams, would that give... Sep 22, 2006 - 12:58 PM l19tly thanks for that batman i was wondering how to get ... Sep 22, 2006 - 4:23 PM 94_c3lica_gt This is very awesomely helpful, if you ever do a f... Jan 10, 2008 - 11:46 AM thespacepanda Nice write-up man. It helped us out. But I have a ... Jan 25, 2008 - 10:19 PM D-Man Good Job Batman! Now all you gotta do is send ... Mar 25, 2008 - 7:24 PM aspen QUOTE(thespacepanda @ Jan 25, 2008 - 10... Mar 25, 2008 - 7:18 PM njccmd2002 break them, then get replacement parts from autopa... Mar 25, 2008 - 7:32 PM GotToyota QUOTE (njccmd2002 @ Mar 25, 2008 - 7... May 19, 2008 - 11:07 PM ej8ferio702 very helpful just what i was looking for=] thanksf... May 27, 2008 - 3:18 AM mcsteamy Where did you get the clear headlamps been looking... May 5, 2009 - 4:29 PM ledge Thank You, nice How To. i was just planning on tak... May 6, 2009 - 9:40 AM Iceman22 Is it possible in a smart way to remove the headli... Apr 17, 2012 - 9:09 AM rave2n QUOTE (Iceman22 @ Apr 17, 2012 - 9:0... Apr 17, 2012 - 9:15 AM Iceman22 Then I have a BIG problem, I can not remove my fro... Apr 17, 2012 - 9:41 AM mak5603 That's rough man! Apr 17, 2012 - 10:43 AM rave2n Aw that does suck...
I would redo the spats befor... Apr 17, 2012 - 10:52 AM mkernz22 How dare you even think about breaking those proje... Apr 17, 2012 - 2:13 PM Iceman22 Sorry, I was desperate and in bad mood, I will not... Apr 17, 2012 - 3:07 PM jordisonjr I think cuttin a line right down the splitters wou... Apr 17, 2012 - 4:50 PM rave2n QUOTE (jordisonjr @ Apr 17, 2012 - 4... Apr 18, 2012 - 10:50 AM mkernz22 QUOTE (rave2n @ Apr 18, 2012 - 11:50... Apr 18, 2012 - 12:12 PM jordisonjr I'd much rather cut two splitters and risk mes... Apr 18, 2012 - 11:27 AM rave2n QUOTE (jordisonjr @ Apr 18, 2012 - 12... Apr 18, 2012 - 2:01 PM jordisonjr Another thing is the TRD skirts are much harder to... Apr 18, 2012 - 3:05 PM rave2n Well not trying to one up or anything here, but ju... Apr 18, 2012 - 3:53 PM mkernz22 Yeah there is. Those two nuts right in front of yo... Apr 18, 2012 - 5:02 PM rave2n meh...we'll see tomorrow. Apr 18, 2012 - 7:04 PM mkernz22 QUOTE (rave2n @ Apr 18, 2012 - 8:04 ... Apr 18, 2012 - 7:27 PM rave2n QUOTE (mkernz22 @ Apr 18, 2012 - 7:2... Apr 18, 2012 - 7:48 PM richee3 I'd personally just break the molding then san... Apr 18, 2012 - 8:52 PM Bigblock Bumping it up.
Seems the subject is on a rise lat... Feb 8, 2013 - 4:20 PM Topaz95GT Here we go. Wish me luck. Just fixed my tabs.
... May 24, 2014 - 9:52 PM
Batman722 QUOTE(dustin15brown @ Apr 8, 2006 - 11... Apr 8, 2006 - 10:30 PM dustin15brown QUOTE(Batman722 @ Apr 9, 2006 - 3:30... Apr 9, 2006 - 9:10 AM bigal004321 Good write up! that will help me alot in the c... Apr 8, 2006 - 11:13 PM lingham QUOTE(Batman722 @ Aug 28, 2005 - 10... Jun 10, 2006 - 4:14 PM Tech9ine good timing, I'm planning on doing this very s... Jun 11, 2006 - 7:40 PM mzztoyota This is going to be such a huge help when I replac... Aug 21, 2006 - 1:13 PM My2Celi man that was a pita. especially that one bolt unde... Sep 21, 2006 - 2:34 AM Rayme If I were to remove teh low beams, would that give... Sep 22, 2006 - 12:58 PM l19tly thanks for that batman i was wondering how to get ... Sep 22, 2006 - 4:23 PM 94_c3lica_gt This is very awesomely helpful, if you ever do a f... Jan 10, 2008 - 11:46 AM thespacepanda Nice write-up man. It helped us out. But I have a ... Jan 25, 2008 - 10:19 PM D-Man Good Job Batman! Now all you gotta do is send ... Mar 25, 2008 - 7:24 PM aspen QUOTE(thespacepanda @ Jan 25, 2008 - 10... Mar 25, 2008 - 7:18 PM njccmd2002 break them, then get replacement parts from autopa... Mar 25, 2008 - 7:32 PM GotToyota QUOTE (njccmd2002 @ Mar 25, 2008 - 7... May 19, 2008 - 11:07 PM ej8ferio702 very helpful just what i was looking for=] thanksf... May 27, 2008 - 3:18 AM mcsteamy Where did you get the clear headlamps been looking... May 5, 2009 - 4:29 PM ledge Thank You, nice How To. i was just planning on tak... May 6, 2009 - 9:40 AM Iceman22 Is it possible in a smart way to remove the headli... Apr 17, 2012 - 9:09 AM rave2n QUOTE (Iceman22 @ Apr 17, 2012 - 9:0... Apr 17, 2012 - 9:15 AM Iceman22 Then I have a BIG problem, I can not remove my fro... Apr 17, 2012 - 9:41 AM mak5603 That's rough man! Apr 17, 2012 - 10:43 AM rave2n Aw that does suck...
I would redo the spats befor... Apr 17, 2012 - 10:52 AM mkernz22 How dare you even think about breaking those proje... Apr 17, 2012 - 2:13 PM Iceman22 Sorry, I was desperate and in bad mood, I will not... Apr 17, 2012 - 3:07 PM jordisonjr I think cuttin a line right down the splitters wou... Apr 17, 2012 - 4:50 PM rave2n QUOTE (jordisonjr @ Apr 17, 2012 - 4... Apr 18, 2012 - 10:50 AM mkernz22 QUOTE (rave2n @ Apr 18, 2012 - 11:50... Apr 18, 2012 - 12:12 PM jordisonjr I'd much rather cut two splitters and risk mes... Apr 18, 2012 - 11:27 AM rave2n QUOTE (jordisonjr @ Apr 18, 2012 - 12... Apr 18, 2012 - 2:01 PM jordisonjr Another thing is the TRD skirts are much harder to... Apr 18, 2012 - 3:05 PM rave2n Well not trying to one up or anything here, but ju... Apr 18, 2012 - 3:53 PM mkernz22 Yeah there is. Those two nuts right in front of yo... Apr 18, 2012 - 5:02 PM rave2n meh...we'll see tomorrow. Apr 18, 2012 - 7:04 PM mkernz22 QUOTE (rave2n @ Apr 18, 2012 - 8:04 ... Apr 18, 2012 - 7:27 PM rave2n QUOTE (mkernz22 @ Apr 18, 2012 - 7:2... Apr 18, 2012 - 7:48 PM richee3 I'd personally just break the molding then san... Apr 18, 2012 - 8:52 PM Bigblock Bumping it up.
Seems the subject is on a rise lat... Feb 8, 2013 - 4:20 PM Topaz95GT Here we go. Wish me luck. Just fixed my tabs.
... May 24, 2014 - 9:52 PM |
8 User(s) are reading this topic (8 Guests and 0 Anonymous Users)
0 Members:
| Lo-Fi Version | Time is now: February 18th, 2025 - 4:38 AM |