 Jul 6, 2012 - 5:38 PM Jul 6, 2012 - 5:38 PM
|
|
 Enthusiast    Joined May 13, '06 From Kaimuki, HI Currently Offline Reputation: 10 (100%) |
All of the below information is from supraforums.org. All credit to user "Ishii".
Toyota Radio Information Ok, Hopefully this will help everyone see how Toyota Radioís work and what you can do to install different radios in your Toyota. This will be a rather long post and Iíve been known to leave out information that seems important to some people, so please try to understand what I think is implied. There are basically 2 types of Toyota Stereos: 1. Internally Amplified (the amplifier is in the Stereo) 2. Externally Amplified (the amplifier is a separate component) For the Internally Amplified Stereos Iím only going to discuss the most common type which is the 10pin 6pin Stereo. 10pin 6pin This set up is pretty much used on almost all Toyota cars except for the upper end models. You will find many different 10pin 6pin type stereos, they are available in a single din or double din sizes and different combinations of drives. The back of a Toyota 10pin 6pin radio looks like this. 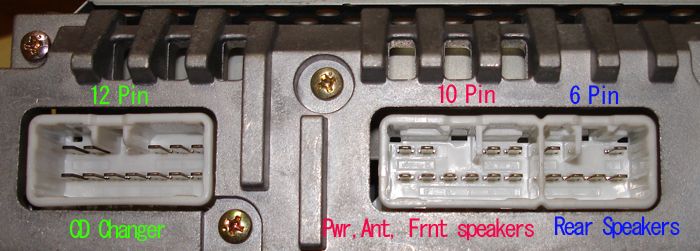 The connections you should be looking at are the ones Labeled 10pin and 6pin, I will discuss the 12pin connection later. Here is the wiring pin out of the 10pin connector:  1: FR+ 2: FL+ 3: ACC 4: +B 5: FR- 6: FL- 7: GND 8: ANT+ 9: AMP+ 10: ILL+ Here is the 6pin connector pinout  1: RR+ 2: RL+ 3: RR- 4: (usually unused) 5: LL- 6: RL- Here is a picture of the connectors that plug into the 10pin 6pin Stereo 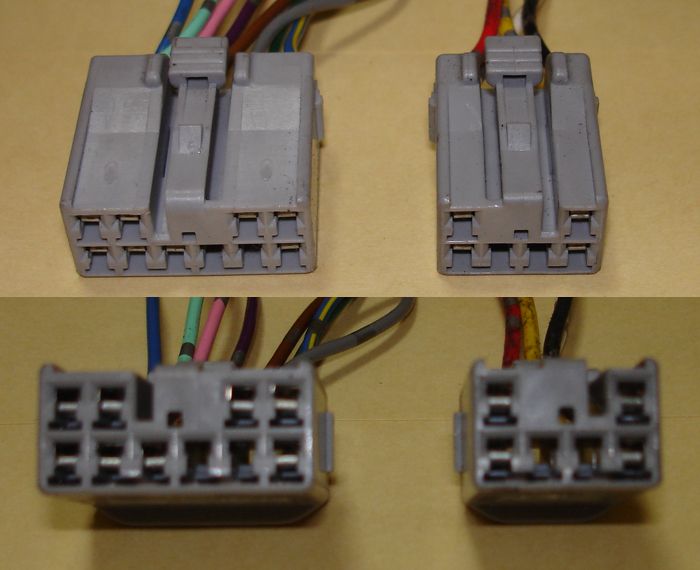 Now, if you were going to install a aftermarket radio into a car that has the above 10pin 6pin connectors you would wire these connectors into your aftermarket radio to plug into the above connectors (they mimic the back of a 10pin 6pin stereo) 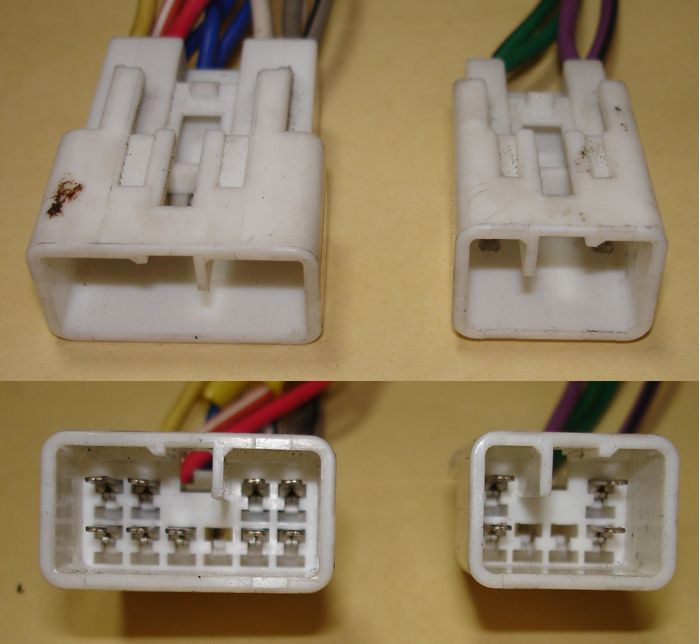
-------------------- -Jay
95 GT conv. project car: Manual, Gen III 3sgte, JN pisons, Eagle rods, overbore, crank knife-edged, crank scraper, ARP head/main/flywheel, Autronic EMS, Haltech Dual Wideband O2 controller, Audi 1.8T individual coils, FMIC and SSQV BOV, 3" downpipe, 3" ultra-high-flow cat, 2.5" Borla muffler, +other 01 S2000: FMIC, Haltech EMS, Haltech wideband, 570cc inj, forged pistons/rods, sleeved block, 5 angle valve job, ported and polished 02 R6, all stock, except for braided stainless brake lines, frame sliders, and adjustable brake/clutch leve |
 |
Replies
 Jul 6, 2012 - 5:56 PM Jul 6, 2012 - 5:56 PM
|
|
 Enthusiast    Joined May 13, '06 From Kaimuki, HI Currently Offline Reputation: 10 (100%) |
CD Changers
CD changers can be added to most newer Toyota Stereos that use the 12 pin connector Here is a picture of the back of a radio with the 12 pin connector  And here is a picture of the connector from the CD changer that plugs into the 12pin connector  Basically, any Toyota CD changer, weather itís a trunk mount, glove box mount or a indash that has a 12pin connector can be plugged into a Toyota stereo that has a 12pin input. (unsure if a indash 6-disc stereo can control a external CD changer even though it has a 12pin input as I have never tried or been given confirmation that it will) Now, the cool thing about stereoís that have a 12 pin connector is that you can buy and aftermarket black box that connects an I-pod directly to the stereo, I have never tried it but here is a link to what Iím talking about. (Note: you canít use a CD changer if you use this device, itís one or the other) http://www.discountcarstereo.com/detail.aspx?ID=842 You can also get this neat device that lets you plug in other auxiliary devices directly: http://www.discountcarstereo.com/detail.aspx?ID=705 Basic Navigation unit Here is a picture of the back of a basic navigation unit: 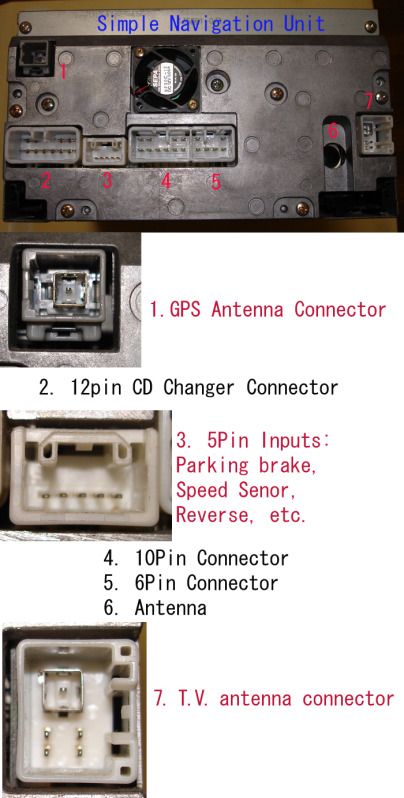 The only wiring that you might need to know for this unit is the 5pin Navigation input connector. Here is a pinout for it:  1: Parking brake 3: Speed sensor input 5: Reverse input 3 and 4 you will not need to wire. You will most likely need to buy this connector if you are adding a nav unit in a vehicle that didnít come with Nav. The 5pin connector part # is: 90980-11909 And you will need 3 wires with this Part #: 82998-12690 About interchanging externally amplified Stereos The 14pin, 15pin, 20pin all operate the same. If you have one type of connector in the car, you can change the end to a different one. I have made an adapter for a car that originally has a 15pin connector to plug into a 20pin connector. But, it has been hard to find parts to do this at a reasonable price. Recent availability of some parts may change this. I will add information about this as it comes closer to being worked out. (I know a lot of you have been waiting for this for years, Iím sorry Iíve been busy) You can also add a factory amplifier to a vehicle that originally was only a 10pin 6pin. You can find Toyota factory amplifiers that you simply plug in the harness side connectors (10pin and 6pin) into the amplifier and then plug the 14 or 15 or 20pin connector from the amplifier into the corresponding stereo. You can find these amplifiers on Ebay sometimes. So depending on which connector the amplifier has you will need the a stereo with a same connector. Meaning if you get a 15pin amplifier, you will need and externally amplified 15pin connector Stereo also. For example, a unit like this: 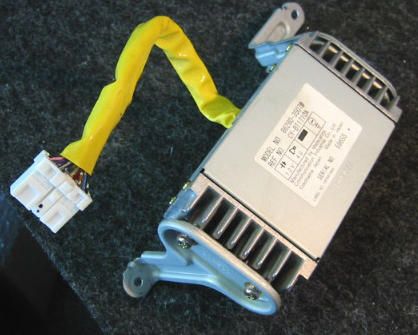 Stereo Width and illumination color You must be careful when purchasing a different factory stereo. It must be the same width. So look at the pictures in the ads you find. For any Supra, the stereo must be 7Ē wide. You can tell when you look at a picture of the stereo, If the face is the same width as the body of the stereo than it is the 7Ē wide unit. If the face is wider than the body than it is not a 7Ē unit. You must also be careful of illumination color. Most are green, but stereos that came out of newer Tacoma Trucks for example mostly illuminate red. -------------------- -Jay
95 GT conv. project car: Manual, Gen III 3sgte, JN pisons, Eagle rods, overbore, crank knife-edged, crank scraper, ARP head/main/flywheel, Autronic EMS, Haltech Dual Wideband O2 controller, Audi 1.8T individual coils, FMIC and SSQV BOV, 3" downpipe, 3" ultra-high-flow cat, 2.5" Borla muffler, +other 01 S2000: FMIC, Haltech EMS, Haltech wideband, 570cc inj, forged pistons/rods, sleeved block, 5 angle valve job, ported and polished 02 R6, all stock, except for braided stainless brake lines, frame sliders, and adjustable brake/clutch leve |
Posts in this topic
 match220 Toyota pinouts: cd changers, radios, nav units Jul 6, 2012 - 5:38 PM
 match220 Next is the 14pin Externally amplified Stereo
Here... Jul 6, 2012 - 5:48 PM
 ricochet1490 EFFING OUTSTANDING!!
This lack of informa... Jul 17, 2012 - 3:53 PM
 trdproven good info Jul 19, 2012 - 12:40 AM
  |
1 User(s) are reading this topic (1 Guests and 0 Anonymous Users)
0 Members:
| Lo-Fi Version | Time is now: November 30th, 2024 - 2:28 PM |


