
 Jun 26, 2009 - 9:38 PM Jun 26, 2009 - 9:38 PM
|
 
|
|
Enthusiast  Joined Jun 16, '07 From Vancouver, Canada Currently Offline Reputation: 14 (100%) |
A DIY FOR CHANGING YOUR LED IN YOUR MASTER WINDOW SWITCH
I have lately started playing with LEDs. So I got bored and decided to change this LED and make a writeup too. Also because you need to sign up for celicatech to see the writeup plus its for a 5th gen soo.... =S, Well enjoy and I hope it helps! TOOLS & PARTS LIST (look at picture one) - phillips screwdriver - flat head screwdriver - *working* solder pen - rosin core solder - 3mm LED (color of your choice) - needle nose pliers REMOVAL 1. remove master window switch panel with the help of a flat head screw driver, pry the part facing towards the end of the car first 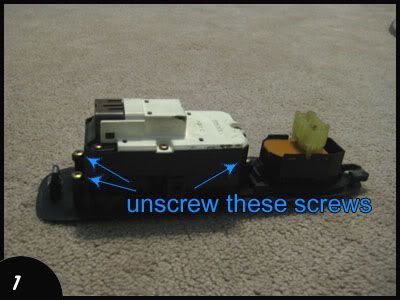 2. unscrew the three screws in picture 1 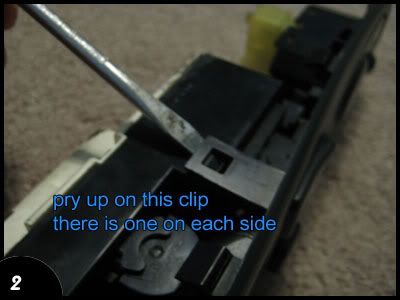 3. carefully pry up on these tabs, there is one on each side to remove the switch from the panel 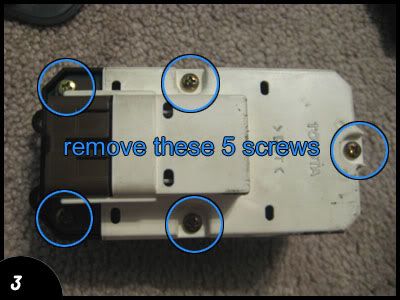 4. remove these five screws and than flip over to remove the nob 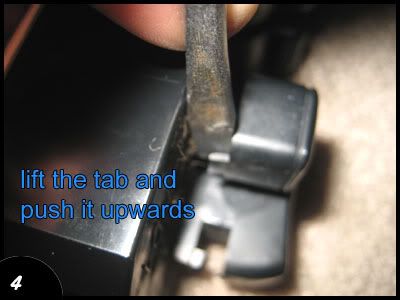 5. lift the tab and than pry up to remove locking window nob from the assembly, carefully pull apart to get to the circuit board 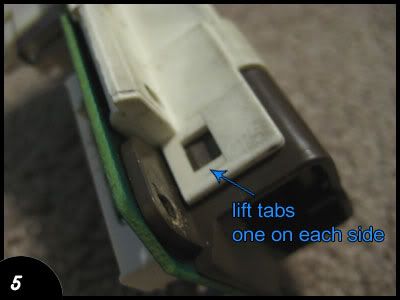 6. lift tabs, there is one on each side. remember to do it carefully to detach the circuit board cover from the remaining assembly 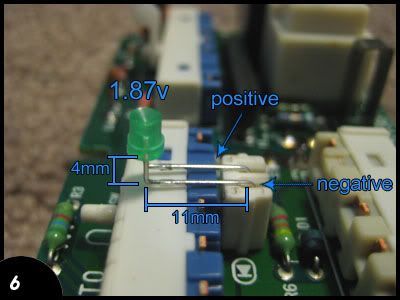 7. voila! there is the LED. the white plastic that the LED is sitting beside is removal (bend the new LED according to these lengths) 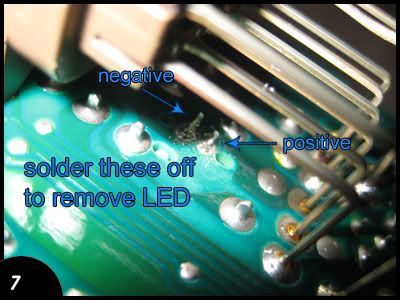 8. to remove old LED solder these joints off, they are tricky to get to. use a good solder pen! 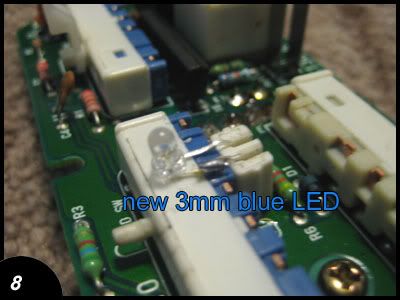 9. I couldn't solder the damn thing off so I instead cut the old LED legs and solder the new LED to cut legs (see picture 8) INSTALLATION 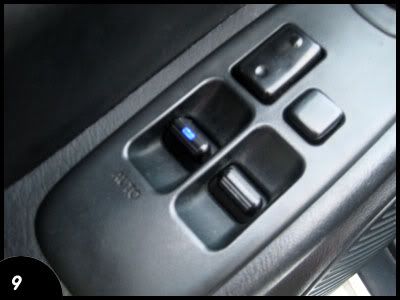 10. install the master window switch and look at your nicely done work! CONGRATULATIONS! YOU JUST CHANGED YOUR LED IN YOUR MASTER WINDOW SWITCH This post has been edited by vile_v: Jul 1, 2009 - 8:00 PM --------------------  |

Posts in this topic
 vile_v DIY: Window Switch LED mod Jun 26, 2009 - 9:38 PM
 njccmd2002 wow, perfect diy. this needs to replace the old l... Jun 26, 2009 - 10:04 PM black13 damn very nice DIY. Excellent pictures and everyth... Jun 26, 2009 - 11:06 PM Fastbird OUTSTANDING job on the DIY. THAT is how it's ... Jun 26, 2009 - 11:19 PM r1chie Very very good post. Just wondering is it ok to do... Jun 27, 2009 - 5:22 AM njccmd2002 no resistor, the circuit already has one. Jun 27, 2009 - 5:40 AM pittfirefighter just a little tip... get an inverted top LED or fl... Jun 29, 2009 - 4:01 AM presure2 great write up.
added to the sticky. Jun 30, 2009 - 6:40 AM Neil_Y i did it last month . Jun 30, 2009 - 1:02 PM vile_v Thanks guys!
A dedicated Celica owner jus... Jul 1, 2009 - 7:57 PM
njccmd2002 wow, perfect diy. this needs to replace the old l... Jun 26, 2009 - 10:04 PM black13 damn very nice DIY. Excellent pictures and everyth... Jun 26, 2009 - 11:06 PM Fastbird OUTSTANDING job on the DIY. THAT is how it's ... Jun 26, 2009 - 11:19 PM r1chie Very very good post. Just wondering is it ok to do... Jun 27, 2009 - 5:22 AM njccmd2002 no resistor, the circuit already has one. Jun 27, 2009 - 5:40 AM pittfirefighter just a little tip... get an inverted top LED or fl... Jun 29, 2009 - 4:01 AM presure2 great write up.
added to the sticky. Jun 30, 2009 - 6:40 AM Neil_Y i did it last month . Jun 30, 2009 - 1:02 PM vile_v Thanks guys!
A dedicated Celica owner jus... Jul 1, 2009 - 7:57 PM ChfNix Good stuff! I just did it the other day and it... Apr 9, 2010 - 10:46 AM
  |
2 User(s) are reading this topic (2 Guests and 0 Anonymous Users)
0 Members:
| Lo-Fi Version | Time is now: February 20th, 2025 - 4:22 AM |