 Mar 7, 2016 - 7:12 PM Mar 7, 2016 - 7:12 PM
|
|
 Enthusiast      Joined Dec 22, '06 From Columbia, MD Currently Offline Reputation: 13 (100%) |
STILL UNDER CONSTRUCTION!!!!
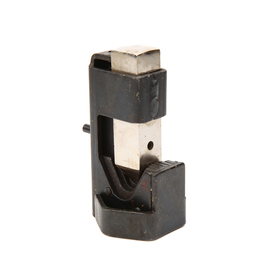
So You Want To Relocate Your Battery Here is an informative guide to follow for the budget conscious AND money baggers on how to do a bad ass battery relocation. PLEASE READ THROUGHLY FOR BEST RESULTS ****As always I am no genius so let me know if you see any mistakes or improvements that can be made**** Pro: Free-up Engine compartment space for other goodies (i.e. intake piping/oil catch cans) Weight distribution Con: Running large important wires through the cabin Drilling holes into chassis to restrain wires/mounts Potential Loss of rear storage space It costs money, unlike not relocating Precautions: ***PLEASE DONT TAKE THIS MOD LIGHTLY, IF POORLY APPLIED IT COULD CAUSE SERIOUS ISSUES TO YOU OR MORE IMPORTANTLY YOUR CAR*** Lead Acid batteries should be (required in most Motorsports) mounted in a battery box These batteries emit toxic fumes that can harm occupants if not kept in a battery box or properly vented to the exterior Coupes must abide by this same logic unless if their trunks bulkhead is completely sealed off (rear seats still in their place somewhat counts as sealing off the bulkhead but fumes can still seep through so get a box!) AGM(absorbed glass mat) and Gel batteries (i.e. Optima, Braille, Odyssey) are SEALED batteries that emit no (or trace) fumes and do not require a box for ventilation and can be mounted in virtually any position (except upside down!) Although the wires being used for the relocation are much thicker than stock and have very low resistance, due to the added length of wire to the system there still is a chance start ups may take a few more cranks compared to the OEM setup. Materials Needed with Additional Info: Materials listed vary from store bought to online some of the material links provided are with a focus on North Americans. Equivalent materials can be found overseas Make sure you make a comprehensive list of what you need during the planning stage to prevent having to make multiple online orders from the same shop! Battery: Any battery can be used for a relocation. Be sure you identify which type you will be using as some have different requirements than others Lead Acid  AGM/Gel  Battery Box/Mount: A battery box is STRONGLY suggested for Lead Acid Batteries.  A regular battery tie-down can be used for AGM/Gel Batteries.  Wire: ALL wires used should be pure copper wire Welding cable is a cheap and easily found solution but for those of you who want a bit more quality, a couple suppliers listed below have very good quality cable Prowire Double Walled Jacket Copper Wire https://www.prowireusa.com/c-20-battery-cable.aspx CE Auto Electric Supply’s Pure OFC (Oxygen Free Copper) and tinned for corrosion resistance wire http://www.ceautoelectricsupply.com/batterycable.html AWC Primary Wire http://www.awcwire.com/producttoc.aspx?id=automotive-primary-wire POSITIVE CABLE 1AWG or 1/0(also referred to as 0) gauge is recommended Others have noted no issue with 4AWG and 2AWG (after deciding where you plan to mount your battery and the route you plan to take the wire, take some string, you shouldnt need more than 20ft, and use it to estimate how many Ft of wire you will need. Add on an extra ft if you feel like you underestimated the amount) NEGATIVE CABLE 1AWG or 1/0 The thicker the better. You want to ensure you have a REALLY good ground. Also make sure the ground connecting isnt more than 2ft away from the NEG post. The shorter the wire the less resistance to ground. 0 Gauge wire is 1/0AWG AMERICAN WIRE GAUGE TABLE http://diyaudioprojects.com/Technical/American-Wire-Gauge/ Termination Lugs: Tin Plated Copper lugs 3/8" hole In most cases these can be soldered as well as crimped, I recommend crimping. If you want to take it further, you can tin the wire, crimp the lug on and torch the connection to adhere the solder but tinning such large gauge wire can be a pain and torching the lugs could melt the wire jacket. Below is a picture of the lug placed next to the wire. This is done to know how much of the jacket needs to be stripped.  placed on terminal uncrimped  Make sure you match the battery terminal size with the wire size. It is common to see a lug support both 1&2AWG A 1AWG lug will in most cases not fit a 1/0AWG Wire. You will need a 1/0 lug. *TIP*Putting in a 1AWG wire into a 1AWG terminal can be a pain, its a very tight fit and it is best to get every last wire in the lug, if a few strands dont make it in that is fine. I usually use a twisting and pushing motion to feed the wire into the lug http://www.mcmaster.com/ has a great stock of electrical connectors  Distribution Block: There are a few methods to connect the starter wire/alternator wire/fuse box wire together. A junction stud is a simple method but not the cleanest, and requires more terminal lugs and would need some sort of cover to avoid accidental short circuiting. A set screw distribution box is one of the easiest methods. The RockfordFosgate one listed below can accept a few different sizes of wires and comes with a cover to prevent accidental shorting. http://ceautoelectricsupply.com/index.html has a few distribution blocks on their site   Circuit Breaker: Protect your investment with a circuit breaker! 150-200amp circuit breaker These should be placed as close to the positive terminal as possible. These can be bought from multiple sites  Battery Terminals: Tin Plated Copper Battery Terminals http://www.mcmaster.com/ has a great stock of electrical connectors There are many styles of battery terminals to choose from, none are bad as long as it is tin plated copper and secure. Choose what you think is best for you and your application. Crimpless Style (most commonly found at autoparts stores) Quick Solder Style(a pain to work with but can hold great if done properly Crimp/Solder Style Screw On Style  Battery Terminal Boot Grab a terminal boot for the Positive Terminal on the battery to prevent accidental shorts http://ceautoelectricsupply.com/index.html has some great boots  Special Tools Recommended/May Be Needed: Lug Crimp Hammer This tool is inexpensive very easy to use and can crimp from 8-4/0 AWG. I highly recommend it over a hammer and a screwdriver  Hydraulic Hex Crimper Tool A little more expensive than the hammer crimper but you get a bit more quality crimps    Torch In the case that you got solder on battery terminals a Butane of Map torch will work Solder Iron/Solder In the case that you want to add a little solder to stripped cable ends Dremel Using a grinding bit on a dremel will make quick work of removing paint off of metal for a good grounding spot. Sand paper does work but takes a bit longer Special Materials Recommended: Heat Shrink I recommend using a couple inches of heatshrink around each terminal lug for added protection against short circuiting and corrosion. Sealant Lined Heatshrink would further corrosion resistance, a picture below shows glue lined shrink used on a terminal end  Braided Wire Cover If you feel as if the liner of the wire you are using is a little soft you can cover it to protect it from getting cut Adel clamps (hello!) Keep your wire from flopping all over the place in the cabin by tying it down with some adel clamps. These are great as they dont cut into the wire jacketing. 1/0AWG wire is usually 5/8" OD  Kapton Tape This is not really needed but its handy to have if you plan to service your connections every now an then. The tape prevents all the gooey adhesive from electrical tape or adhesive lined heatshrink from sticking to the wires. Pictured below is my use of the tape on my cut off terminals   Hand Tools Needed: Your Brain and common sense. Battery Mounting location: IMAGINATION!!! Lead Acid batteries are usually MUCH larger than AGM or Gel batteries so the mounting options for them are fewer. Be mindful of where you drill holes in the chassis to mount the battery or cable tie downs. Always check to make sure that you arent drilling into any important items (gas tank/ brake lines etc) Also try to avoid drilling into seam joints. here are a few examples of places where people mounted the battery Mine  Presure2's  Wiring Diagrams: I am still going back and forth between many diagrams but here are a few to work from as well as a couple additional ones for setups with battery cutoffs and external charging terminals Wire Routing: There are a couple avenues that the cable can take without having to cut any holes. If you want to route it through a specific area through the firewall, grab a bulk head connector or just cut a hole and line it with a grommet to protect the cable. Drivers Fender This is probably one of the easiest and most cost effective routes in terms of saving money on with less wire used. This route has the cable run on the drivers side of the car, the battery could mount on either side of the rear but the passenger side would require a few more feet of POS cable. From the original battery position there is a space behind the headlight that you can feed the wire into the fender alongside the wire harness and airbag wire harness. Cut a small hole in the boot for the airbag harness and feed the POS wire through there into the cabin. After the wire was secured to the harness in the fender and interior, and no further adjustments are needed, seal the cut hole with some weatherseal caulk or similar product.     After feeding the wire through it should all end up around the drivers footwell. At that point you can lift off the door sill plastics and feed the wire under that and along and behind the rest of the interior plastics to the rear of the car. NEG/Ground Wire Connection: First in the engine bay replicate the Stock Battery ground by running a 4AWG or thicker wire from the transmission to the chassis. For the Negative terminal on the battery to chassis you can use an existing hole or stud nearby where you mounted your battery. Be sure to sand or grind off any paint/primer around the hole or stud so that the terminal lug has a good connection to bare metal. You want the best ground connection you can get.  POS Connections: The easiest was to connect your new positive battery cable to the power system would be to add a terminal lug to the end of the new wire and bolt it to the old POS battery terminal that is in the engine bay. BUT we are better than that! The cleaner way would be to get a distribution block and connect the Starter wire, Alternator Wire and Fuse box wire (the two wires that are connected to the original positive battery terminal). USEFUL Links from past 6gc Discussions: http://www.6gc.net/forums/index.php?showtopic=63649 http://www.6gc.net/forums/index.php?showtopic=53764 http://www.6gc.net/forums/index.php?showtopic=29444 http://www.6gc.net/forums/index.php?showtopic=80191 USEFUL Part Supplier Links: http://www.mcmaster.com/ - fast shipping/extensive library of products http://www.ceautoelectricsupply.com/ - provide alot of supplies for battery relocations http://www.awcwire.com/ - great stock of wire https://www.prowireusa.com/ - awesome stock of milspec products http://www.summitracing.com/ - fast shipping and free returns! This post has been edited by Tigawoods: Mar 25, 2016 - 10:32 AM --------------------  1995 GT::::Diffusing the Situation エキサイティングカーレーシングチーム! march 2010 COTM : 6GC feature 2014 : january 2015-2016-2018 COTM |
Posts in this topic
  |
1 User(s) are reading this topic (1 Guests and 0 Anonymous Users)
0 Members:
| Lo-Fi Version | Time is now: November 23rd, 2024 - 10:08 AM |


