  |
 Dec 6, 2011 - 4:54 PM Dec 6, 2011 - 4:54 PM
|
|
|
Enthusiast      Joined May 22, '03 From NOVA Currently Offline Reputation: 16 (100%) |
So I've been asked this a few times and figured I'd set yall up a GUIDE. This means it is not exact, this gives you the overall larger aspects of what is needed to be done. Many of the exact smaller pieces I cannot provide for you simply because I don't have those pieces in my car anymore. I'm not going to provide how to remove your motor or your dash or some of the smaller things.
TAKE YOUR TIME, MEASURE ONE HUNDRED TIMES, I'M NOT RESPONSIBLE IF YOU SCREW UP OR BREAK SOMETHING. I DO NOT have air conditioning or heater units installed on my car, i'm also not running the same wiring harness as USDM cars, You're responsible for checking compatibility and if wiring harness modification might be needed. make sure you read STEP 13 on this issue This how to is effectively an in progress right up, I'll try and get a few more detailed pictures in there and add in additional information as requested/needed. I did this 3 years prior to actually writing this so I may miss 1 or 2 minor things. If you see something let me know I'll include/fix what needs to be done. Most of Tools Required: Engine Hoist Mig Welder Standard Hand Tools Power washer (optional) Electric Drill Grinder various attachments tackweld drill bit 3M "Fast N Firm" Seam Sealer Parts: RHD DONOR RHD subframe RHD steering rack with hoses RHD dash, steering column, AC heater core/Fan/ect, RHD AC lines (engine bay) RHD Heater hoses Most anything that was attached to the donor firewall LHD steering rack New tierod (ends suggested) RHD converted Configuration: RHD Dash & components LHD steering Column (this is going to present wiring issue as the stalk controls are switched, you can use an RHD column and try to switch the ignition cylinder) RHD Steering Rack with LHD tie rod arms and ends RHD K-FRAME (subframe) RHD AC Hardlines RHD brake lines Step 1) Remove all parts from the DONOR RHD clip, sort and box all your parts and KEEP THEM ORGANIZED! 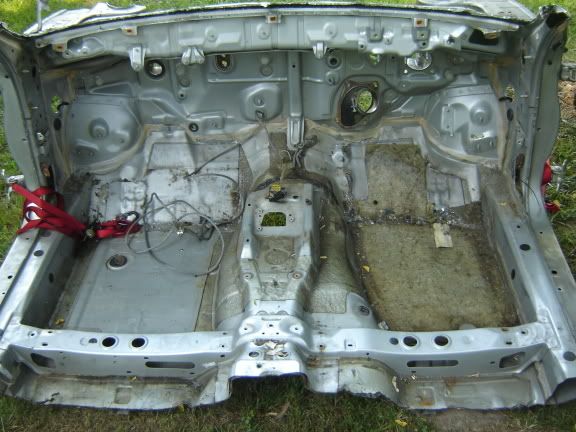 Step 2) Now that your clip is all clean its time to remove the pieces. You will need to remove the Joint Sealer and drill out the spot welds. Use a spot weld cutter (i used a normal drill bit but don't suggest it) http://www.blairequipment.com/Spotweld_Cut...ld_Cutters.html I've HIGHLIGHTED in YELLOW where the spot welds are that you'll need to drill. (Note the wiper motor mount is in yellow also, you'll need to cut that out and swap it, there are no spot welds). You'll need to use a wire brush attachment or some other method to remove all the joint compound. I've HIGHLIGHTED in GREEN the mounting tabs you'll need to remove and swap over as well. NOTE: that you will have to go INTO the tire well to remove part of the firewall. 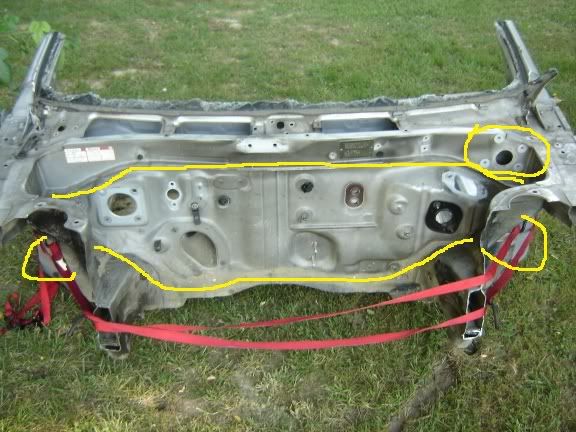 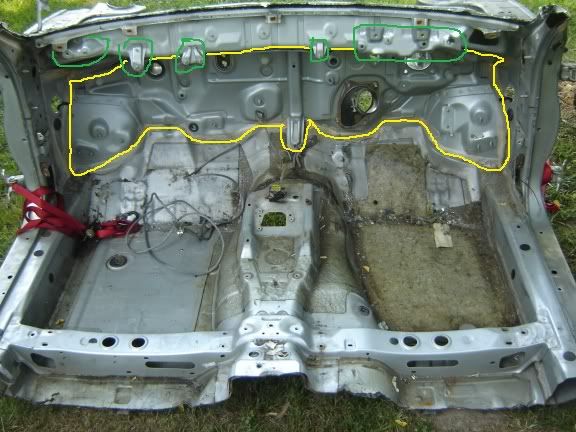 Step 3) Now that you've cut all the spot welds the firewall should come out (might have to use a bit of force) This is what you should be left with. Use a sanding disk to clean up the areas where the spot welds are because thats where you'll be welding later on. 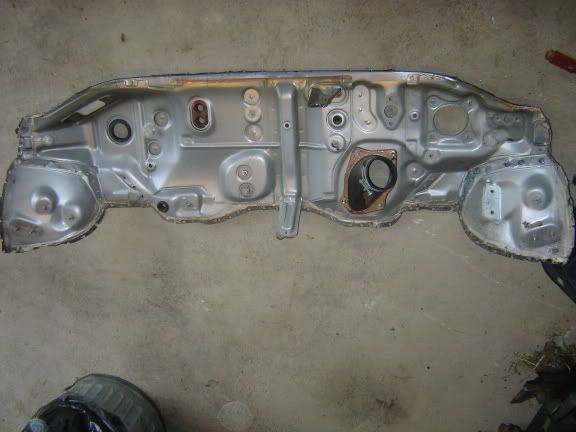 NOW ON TO YOUR ACTUAL CAR (make sure you felt comfortable cutting/drilling and removing on your donor clip cause once you start this you can't go back) Step 4) Remove the engine from your car (This includes DETACHING the AC hard lines and removing them) Step 4b) power wash engine bay (Optional) Step 5) Remove the SUBFRAME and Steering rack (seperate from subframe) from your car and set aside Step 6) Remove your Dash, steering column, AC/HEAT components and all Interior pieces Step 7) Remove your firewall, using the same information posted above for the donor, but realize its on the opposite side this time) 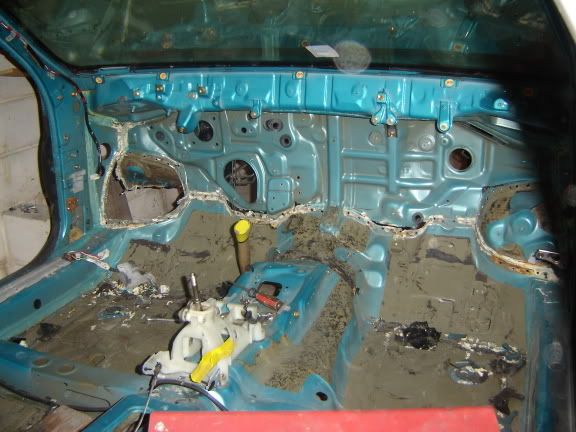 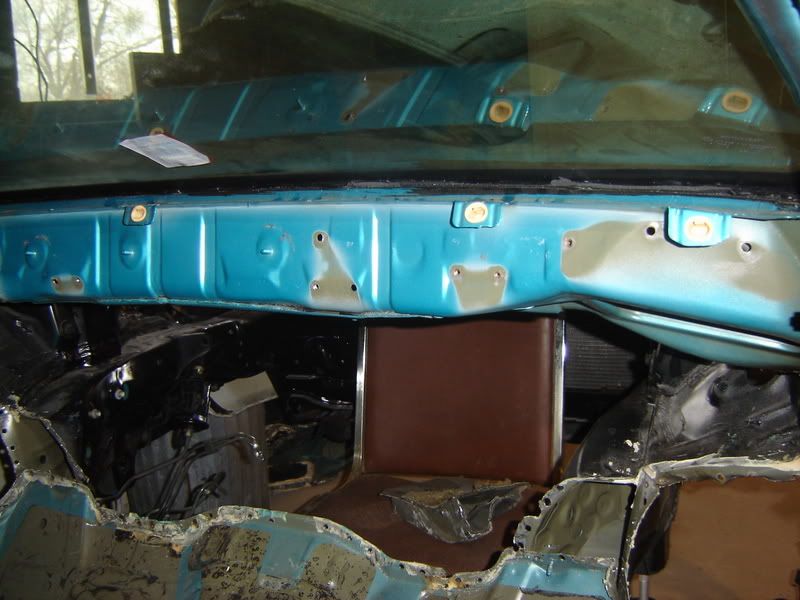 You can see the tabs have been removed in the second pic. Step 8) Clean the mess that has been made inside your car, use a brush attachment or sanding attachment to clean the edges where the spot welds are to prep for welding. Step 9) Put the RHD firewall into your car, this will take some effort as its tight. Make sure everything lines up and is in order. Step 10) weld that sucker into place. Step 11) Take all the tabs you removed from the donor (they were circled in green) and weld them into their respective spots on your car. There are pretty much spots existing on your car for them to go, make sure you measure accordingly and ensure they line up correctly. Your AC/HEAT, Steering column ect all depend on this being correct. Step 12) Apply Joint sealing compound to all the joints inside and outside. 3M "Fast n FiRM" works well here 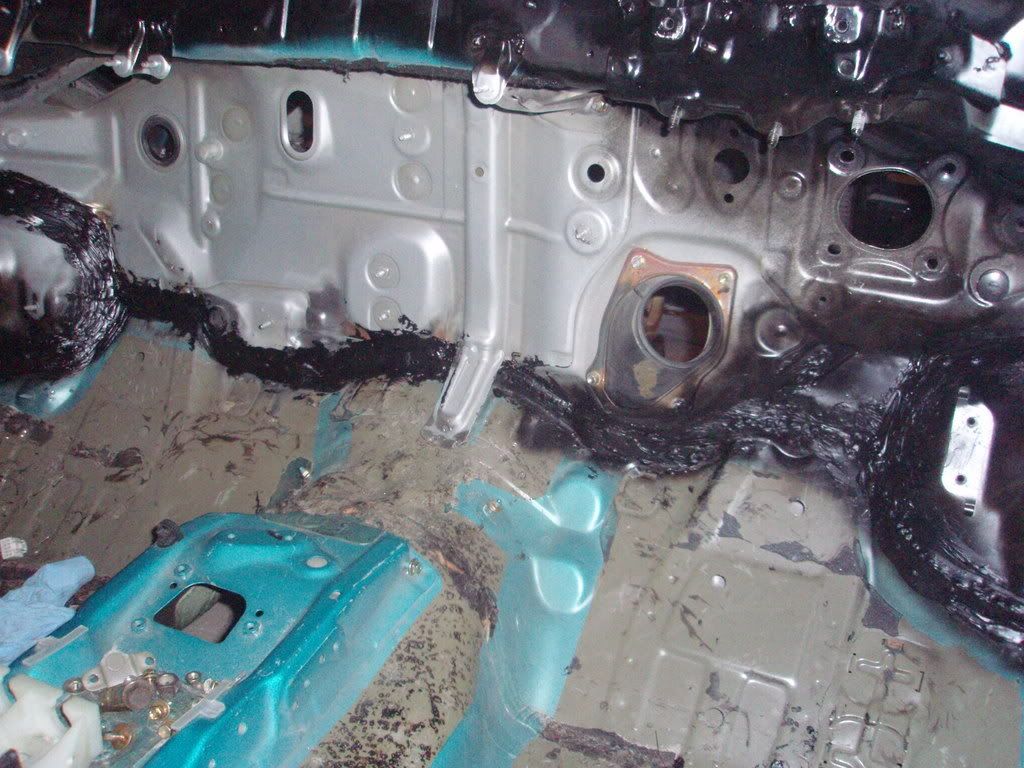 Step 13) You can now install all the RHD interior pieces into your car and anything that mounted on the firewall in the engine bay. AC hardlines, wiring harnesses, brake lines, ect. IMPORTANT THINGS TO NOTE: RHD AC control units can have different connections than LHD ones you need to check the electrical connections before starting ANY OF THIS You might have to make wiring extensions/modifications to reach connections on the motor. (I don't know as i'm not running a USDM harness) Many RHD dashboards DO NOT have a passenger side airbag, this is a severe issue as it will throw a fault in your system for a missing air bag, I have no solution for this at this time. DO NOT install an airbag under a dash with no cut out for it this is extremely dangerous. Step 14) CREATE a HYBRID steering rack. (if your RHD clip has SSS, if it had mcpherson no need to modify) TOP: RHD rack Bottom: LHD rack As you can see I've removed the clamps holding the boot on the rack. Remove your tie rods from each rack and trash them (you should replace these while you're here, unless you have newer ones already on there). Now remove the tie rods, there is a "cup" with a flat washer holding it and then the interior of the rack. bend the flat washer out and then use two wrenches to turn them apart. You'll see 2 flat impressions on the pieces. Do this to BOTH racks. Put the LHD rods on the RHD rack, tighten and clamp the washer down. Install new tie rod ends.  Step 15) Mount Steering Rack that you made (or RHD Mcpherson type) to the RIGHT HAND DRIVE SUBFRAME (Kframe) Step 16) install subframe and rack, connect. Step 17) put motor back in step 18) go get an alignment AGAIN, this is a general GUIDE on how to get to RHD. I haven't put a motor in my car, I haven't connected AC/HEAT, I haven't put airbags in it. These are all things that you'll need to research, look at your parts to check for compatibility. Ask questions, I'll try to answer as best I can. I know i skipped some things. |
 Dec 6, 2011 - 7:05 PM Dec 6, 2011 - 7:05 PM
|
|
 Enthusiast      Joined Dec 26, '09 From Albuquerque, NM Currently Offline Reputation: 19 (100%) |
Sticky!
This post has been edited by HectortheRican: Dec 6, 2011 - 9:52 PM -------------------- taking too long to mod since '09
June '12 COTM '95 AT200 |
 Dec 6, 2011 - 9:48 PM Dec 6, 2011 - 9:48 PM
|
|
|
Enthusiast     Joined Nov 30, '04 From Atlantic City Currently Offline Reputation: 21 (100%) |
well done sir, thank you.
-------------------- |
 Dec 7, 2011 - 12:02 AM Dec 7, 2011 - 12:02 AM
|
|
 Enthusiast     Joined May 3, '11 From Ohio Currently Offline Reputation: 8 (100%) |
I will try to elaborate on this as I go as well because I will be doing heating and A/C lines as well as airbag stuff. I plan on using every wire and bolt from the clip. However the suspension had me worried. Thanks for clearing that up!
--------------------  |
 Dec 7, 2011 - 9:25 AM Dec 7, 2011 - 9:25 AM
|
|
|
Enthusiast      Joined May 22, '03 From NOVA Currently Offline Reputation: 16 (100%) |
I will try to elaborate on this as I go as well because I will be doing heating and A/C lines as well as airbag stuff. I plan on using every wire and bolt from the clip. However the suspension had me worried. Thanks for clearing that up! If you are lucky, you got the airbag control module with the clip and its fine. If not you'll have issues. However, in theory you should be able to make a jumper connection to close the loop and not have a light. A/C hardlines should all bolt in without an issue, hurdles here are removal (you need to have the R134 reclaimed as its an environmental hazard and toxic). and the interior electric connections. Good luck and keep us informed! |
 Dec 7, 2011 - 9:56 AM Dec 7, 2011 - 9:56 AM
|
|
 Enthusiast     Joined May 3, '11 From Ohio Currently Offline Reputation: 8 (100%) |
No airbag control module. But not having the module plugged in will actually keep the light off. So I guess it's a win win.
And just a food for thought bit of info. Does anyone know why we reclaim r134a? Because it has a "global warming factor" of something like 1300 (with CO2 being a base of 1) But I'm pretty sure the a/c has already leaked all the refrigerant out in this case...... Back to the topic at hand. ^^ That was really nicely put together. --------------------  |
 Dec 7, 2011 - 10:06 AM Dec 7, 2011 - 10:06 AM
|
|
|
Enthusiast      Joined May 22, '03 From NOVA Currently Offline Reputation: 16 (100%) |
I guess yes technically you can not connect the system all together, but if you want a road legal car..I'm not sure if they scan our cars?
I haven't gotten a celica inspected in 6 years I consistently struggle with how legitimately I want my car to be able to pass VA inspections...without try titling it as a "kit car" This post has been edited by playr158: Dec 7, 2011 - 10:07 AM |
 Dec 7, 2011 - 11:39 AM Dec 7, 2011 - 11:39 AM
|
|
|
Enthusiast      Joined May 10, '10 From MA Currently Offline Reputation: 37 (100%) |
Being that my car is a '95, it doesn't have the OBDII so they cannot fully scan the system nor anything in general haha
Since my accident, I never had airbags. When I did my transmission swap, I replaced the whole front end with '94 wire harnesses (because of the non-ABS) and while I had those laying around, I fully deleted the whole airbag system out of my car. It's fairly simple to do since it runs in its own harness and there are only a few wires. |
 Dec 7, 2011 - 12:23 PM Dec 7, 2011 - 12:23 PM
|
|
|
Enthusiast     Joined Jun 25, '06 From Box Elder, South Dakota Currently Offline Reputation: 2 (100%) |
Im guessing that the point in using a hybrid steering rack was due to not having or not wanting to use the SS Struts/steering knuckle, correct? Or was there another reason??
-------------------- (\__/)
(='.'=) This is bunny. Copy and paste bunny into your (")_(") signature to help him gain world domination. |
 Dec 7, 2011 - 12:48 PM Dec 7, 2011 - 12:48 PM
|
|
|
Enthusiast      Joined May 22, '03 From NOVA Currently Offline Reputation: 16 (100%) |
I do have full SS suspension setup in my garage, however do to the amount of maintenance it takes and part availability and weight.
I decided to go with the Mcpherson setup. |
 Dec 7, 2011 - 1:49 PM Dec 7, 2011 - 1:49 PM
|
|
|
Enthusiast     Joined Jun 25, '06 From Box Elder, South Dakota Currently Offline Reputation: 2 (100%) |
Fair enough...thanks for that reply and also thanks for the writeup. On a side note though, what do you plan on being the end result for your car playr?
-------------------- (\__/)
(='.'=) This is bunny. Copy and paste bunny into your (")_(") signature to help him gain world domination. |
 Dec 7, 2011 - 2:59 PM Dec 7, 2011 - 2:59 PM
|
|
|
Enthusiast      Joined May 22, '03 From NOVA Currently Offline Reputation: 16 (100%) |
End result, as in function? My view has really been changing since i started this 5 years ago. However the larger concepts have stayed the same.
I wanted the curren and RHD to be unique, i wanted the 3sgte and awd for performance. I really just wanted something that would be really fun to drive, handle well, and be what I made to reflect myself. So weekend/track day car. |
 Dec 7, 2011 - 3:00 PM Dec 7, 2011 - 3:00 PM
|
|
|
Enthusiast      Joined May 22, '03 From NOVA Currently Offline Reputation: 16 (100%) |
_
This post has been edited by playr158: Dec 7, 2011 - 3:00 PM |
 Dec 7, 2011 - 3:33 PM Dec 7, 2011 - 3:33 PM
|
|
|
Enthusiast     Joined Jun 25, '06 From Box Elder, South Dakota Currently Offline Reputation: 2 (100%) |
Cool stuff man...just got through reading through half of your thread and yea 5 years....lol talk about a labor of love!! Anywho I mostly read through to see your plan of attack on the rear subframe. If you were going to do something totally custom to accomodate it, or if you were going to do a cut and weld job on with a gt4 subframe?
-------------------- (\__/)
(='.'=) This is bunny. Copy and paste bunny into your (")_(") signature to help him gain world domination. |
 Dec 9, 2011 - 11:36 PM Dec 9, 2011 - 11:36 PM
|
|
|
Enthusiast     Joined Oct 18, '06 From cincinnati Currently Offline Reputation: 10 (100%) |
Awesome HOW-TO!!
NOW who wants all the parts you'd need to complete this?! I have them and willing to sell CHEAP. PM me. -------------------- proud =3sgte SWAPPED= '95 Celica ST owner [calling it the GT2 or half-trac]
309,000 miles n' .... |
 Dec 10, 2011 - 3:16 PM Dec 10, 2011 - 3:16 PM
|
|
|
Enthusiast      Joined Feb 1, '05 From Charlotte NC Currently Offline Reputation: 14 (100%) |
great write up dan! im wondering where pipes is? surely he'll have some info to share!
-------------------- |
  |
1 User(s) are reading this topic (1 Guests and 0 Anonymous Users)
0 Members:
| Lo-Fi Version | Time is now: November 30th, 2024 - 12:10 AM |


