  |
 Jun 21, 2014 - 7:49 AM Jun 21, 2014 - 7:49 AM
|
|
|
Enthusiast   Joined Apr 24, '14 From Durham, NC, USA Currently Offline Reputation: 0 (0%) |
"Excuse the crappy welding but it was the first thing I ever welded in my life."
You've got to be kidding, Nial. . . I've read your complete story four times, so I know you taught yourself how to weld because you HAD to weld in order to move your build along. I can't weld even though I want to and have some welding equipment sitting around and, for some reason, believe I need someone to teach me. . . quite different than you; puts me to shame. I must tell you how very much I admire your work, so you know where I am coming from with my questions. You are an inspiration to me. You've learned by trial and error at times, but look at all that practical knowledge you have gained and the level of skill you have gotten yourself up to at this point, not to speak of doing all that in such cramped quarters! BTW: Did you do all of your work by yourself, alone, or did you have a friend (or friends; or loved ones) who gave you at least moral support, if not technical advice? Your story doesn't mention anybody else, so a reader could get the impression that it was just you, all by yourself. That conveys a somewhat lonely image, considering the months and months of grinding it out, yet makes your work all the more admirable. |
 Jun 21, 2014 - 8:41 AM Jun 21, 2014 - 8:41 AM
|
|
 Enthusiast    Joined Aug 25, '08 From England Currently Offline Reputation: 1 (100%) |
Unfortunately I have had no help
-------------------- |
 Jun 21, 2014 - 9:48 AM Jun 21, 2014 - 9:48 AM
|
|
|
Enthusiast   Joined Apr 24, '14 From Durham, NC, USA Currently Offline Reputation: 0 (0%) |
Unfortunately I have had no help Thinking of you dropping that engine by yourself gave me a major sense of real back pain! Well, at least you have a bunch of hungry readers constantly waiting to see the results of each next step you take on your journey. Should be come consolation. Maybe this kind of work is supposed to be solitary -- thinking of your grinding away with wire wheels for days on end when working on the underside of your shell. . . |
 Jun 21, 2014 - 11:08 AM Jun 21, 2014 - 11:08 AM
|
|
 Enthusiast    Joined Aug 25, '08 From England Currently Offline Reputation: 1 (100%) |
cheers bud, in a strange way it's good to know people are interested in what I do, I know it shouldn't matter but somehow it helps
Back to the rotisserie......this is the front, you can see how the box sections fit together and hold the car 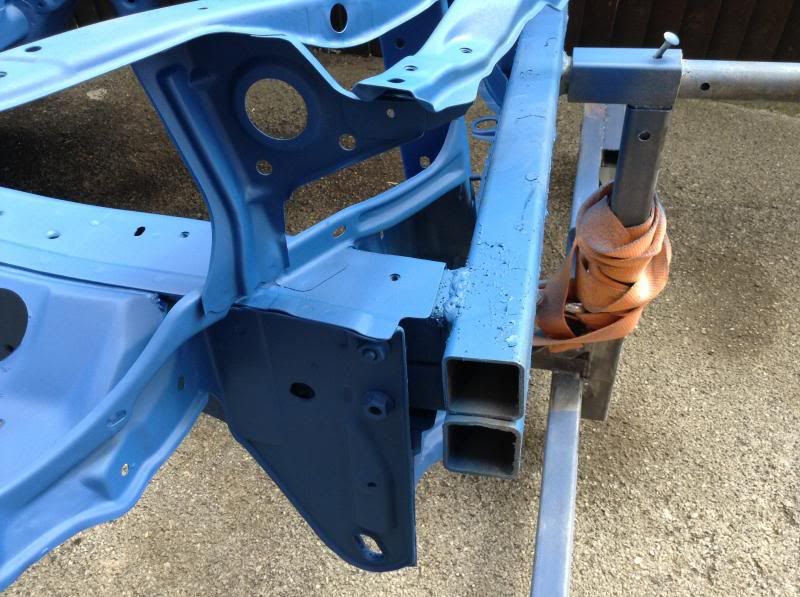 The front again, 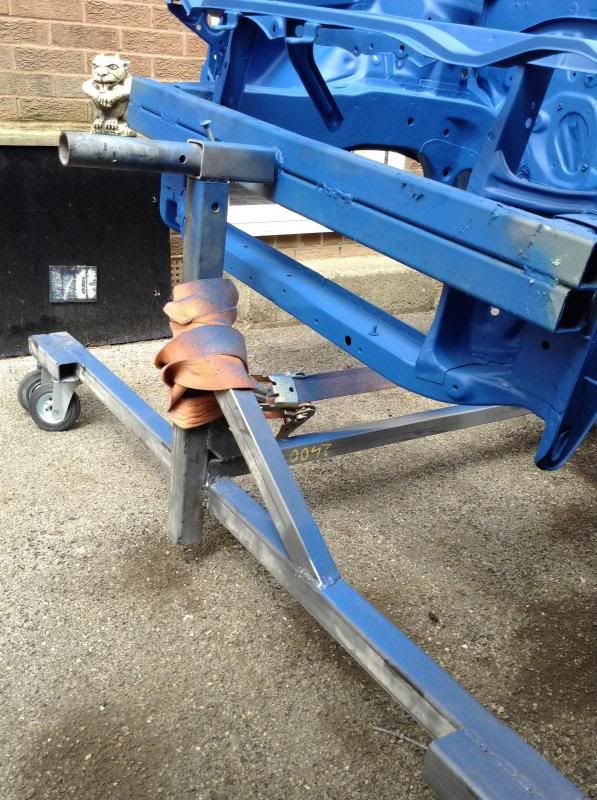 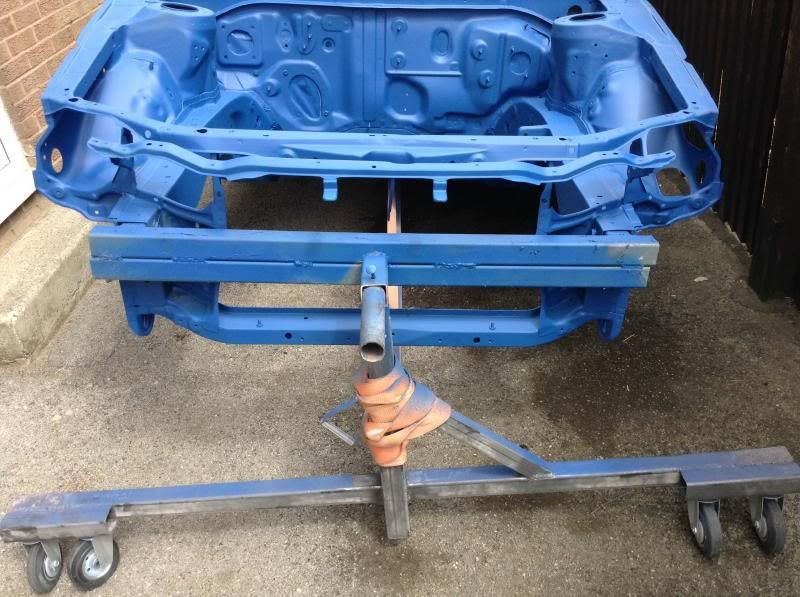 And the rear, I needed to do this so the pivot point was at the cars centre of balance 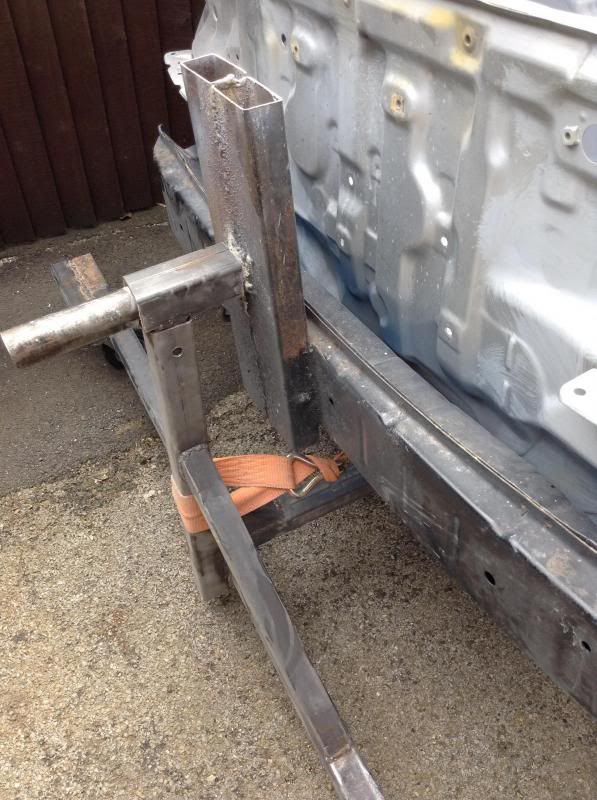  And what I am doing right now  -------------------- |
 Jun 21, 2014 - 11:58 AM Jun 21, 2014 - 11:58 AM
|
|
|
Enthusiast   Joined Apr 24, '14 From Durham, NC, USA Currently Offline Reputation: 0 (0%) |
Superb photos of your rotisserie, Nial!
What I think I see on the front is that, on each end, you have welded a pair of box section lengths together and then welded them to the double boxes of the rotisserie. Then all you did was slide both into openings on frame ends you made when you took off the bumper supports. But, then you bolted them securely. On the back it looks like you have done something similar, except the double boxes of the rotisserie are oriented perpendicular to their equivalent in the front, and they are much shorter in length. To achieve balance, you welded your rotisserie double boxes to what you call the crash bar, but at a point that is offset from the center of the length of the double boxes. Looks like they are welded to the crash bar some 6" to 8" below the rotisserie axis. Then, you must have made two similar dual box attachment short lengths (just like in the front) and welded them to each end of the crash bar. Then, I suppose, you simply inserted the whole thing into rear frame member ends and bolted them down exactly as in front. That is what I see. . . but could be wrong. . . How did you determine the longitudinal axis of symmetry (longitudinal center of gravity) of the vehicle so you could know exactly what offset was required? Can you rotate the vehicle about its axis a full 360 degrees? Does it take much effort? How much weight does your rotisserie carry when your current vehicle is loaded on? Do you know the maximum capacity of the rotisserie, or did you "eye-ball" it? If I remember correctly, you had some holes in the rotisserie frame below and I think there were some on the uprights, maybe just at the back? Were these to somehow permit you to raise/lower and extend/retract so you could re-use the device on some other car in the future? Or am I simply mistaken about seeing holes? I haven't looked for one, but I guess somebody sells a product that performs the same function? Are they expensive? You have done quite a bit of complex thinking and doing on this long project, Nial, and I congratulate you on your accomplishments. Have you thought of writing a book about your journey once you are finished? I would read it; don't know how many others would also. But, anyway, thanks for showing me what you did to make your rotisserie. Maybe just driving your perfectly crafted and lovingly "hand-built" Celica around the country will be its own reward. There is still just a little left to do. You are now sipping on a delicious glass of wine. I'm some 5 hours earlier than you, so I've still got to finish my day of work before I can join you. |
 Jun 21, 2014 - 12:38 PM Jun 21, 2014 - 12:38 PM
|
|
 Enthusiast    Joined Aug 25, '08 From England Currently Offline Reputation: 1 (100%) |
It sounds like you pretty much have it figured out
To figure out the centre of gravity I guessed to be honest, it was spot on until I added the roll cage, now it's slightly top heavy. It's easy to turn, you can do it with one hand, the only time it gets difficult is when you get past vertical, then the car wants to fall on it's back, but it's still possible to control with little effort. Thanks for the kind words. My next task is figuring out a way to vacuum all the sand out of the various holes, internal voids etc, some 12mm tubing attached to a vacuum cleaner might do it, but that's tomorrow's task And I am on the lookout for an air compressor so I can learn to spray paint.....and perhaps do some media blasting? Oh, and yes you were right about the holes, various holes have been drilled so I can adjust the height and length of the rotisserie. This post has been edited by Nial: Jun 21, 2014 - 12:41 PM -------------------- |
 Jun 21, 2014 - 2:09 PM Jun 21, 2014 - 2:09 PM
|
|
|
Enthusiast   Joined Apr 24, '14 From Durham, NC, USA Currently Offline Reputation: 0 (0%) |
I've had a little Campbell Hausfeld 8 Gallon, 125 psi max air compressor that I have used for the past 6 years or so mostly for carpentry applications but more recently to die grind on metal when doing the car work. I've used it with a air ratchet on the car, but it cannot break free anything that is stuck. Of course it is great to keep tire inflation set properly, and so nice to blow stuff out of hard to get at places (like your blasting media, for example). It's been so nice to have and use. There are so many air tools today you cannot believe!
Still, I've wanted to sand blast for a long time (first old port holes I brought back from sunken ships in the Pacific, now rusted car parts), and spray paint (the house, the fence, whatever else), as well as use powerful pneumatic impact drivers on the car. My 8 gallon compressor just cannot come close to keeping up with those kinds of tasks. I've been looking as well, but for something around 30 gallons, which when watching YouTube videos about using the Harbor Freight enclosed sand blasting cabinets (don't know if you have any over there; its a cheap tool company; Chinese) have come to believe is necessary from the get go. The problem is for those applications (sand blasting, paint spraying, mechanics impact drivers, etc.) you need a lot of air flow at a sustained pressure (over time), else all the compressor does is stay running continuously, or cannot do the job, period. Constant running is what I get whenever I die grind. The air storage (gal) is one parameter you need to worry about, but then you must know maximum pressures (psi) and what flow rates you will need for your applications (cfm). Once you tie those down, it is just a matter of learning about the quality of the various makers. Finally, I don't know about your climate, but if you have much humidity the compressor will make water for you inside its tank (you need to empty it frequently). There are moisture filters and the such that you can investigate. Hope this is useful to you. |
 Jun 21, 2014 - 2:24 PM Jun 21, 2014 - 2:24 PM
|
|
 Enthusiast    Joined Aug 25, '08 From England Currently Offline Reputation: 1 (100%) |
Very helpful thanks
-------------------- |
 Jul 6, 2014 - 8:21 AM Jul 6, 2014 - 8:21 AM
|
|
 Enthusiast    Joined Aug 25, '08 From England Currently Offline Reputation: 1 (100%) |
Well, I have managed to sort myself out with a compressor. Got myself a reasonable compressor to start off with and a few bits n bobs.
First off because I have no space in the garage I built a little shed to house the compressor. 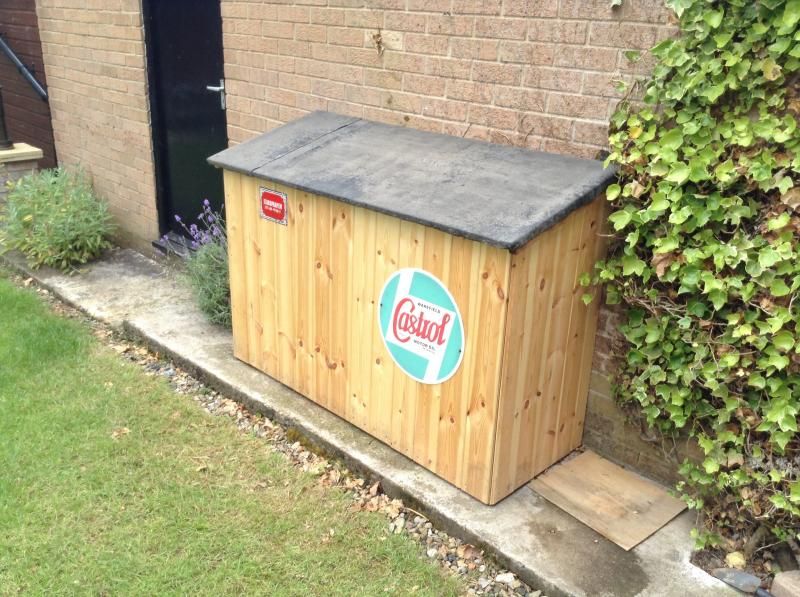 It is well ventilated and sound proofed so it dosnt annoy the neighbours too much. 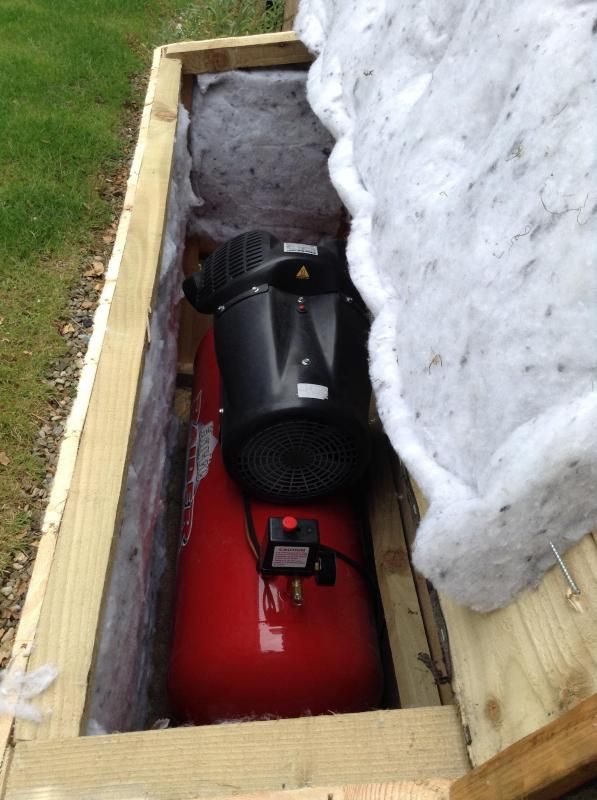 Feeds through to a filter and extendable hose 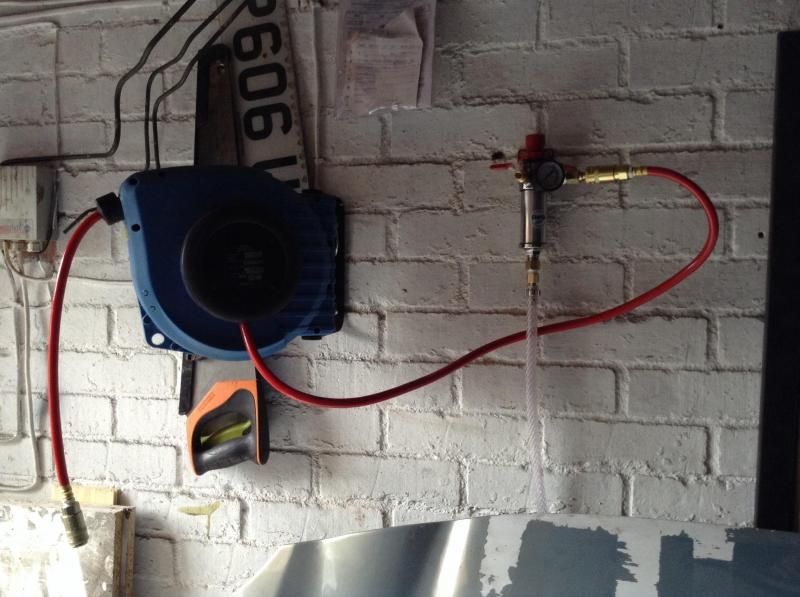 I need to add more filters though as the one I have dosnt remove all the moisture out of the airline. I went back to the good old epoxy mastic 121 from rustbusters, thinned out the full 15% it goes on quit nicely and easily. I am sure Manny will take one look at this and shake his head with shame with the conditions I have to work in, but there is an Old Scottish Expression which goes........"You can only piss with the cock you've got" 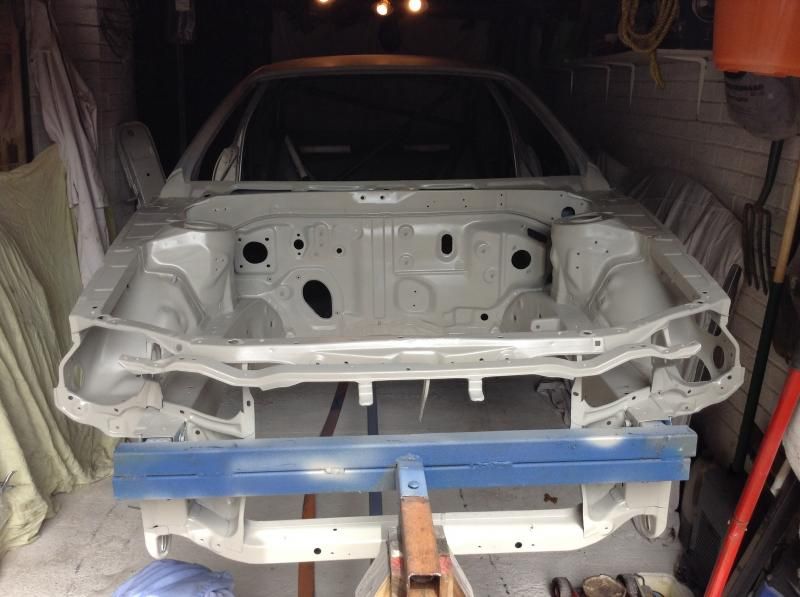 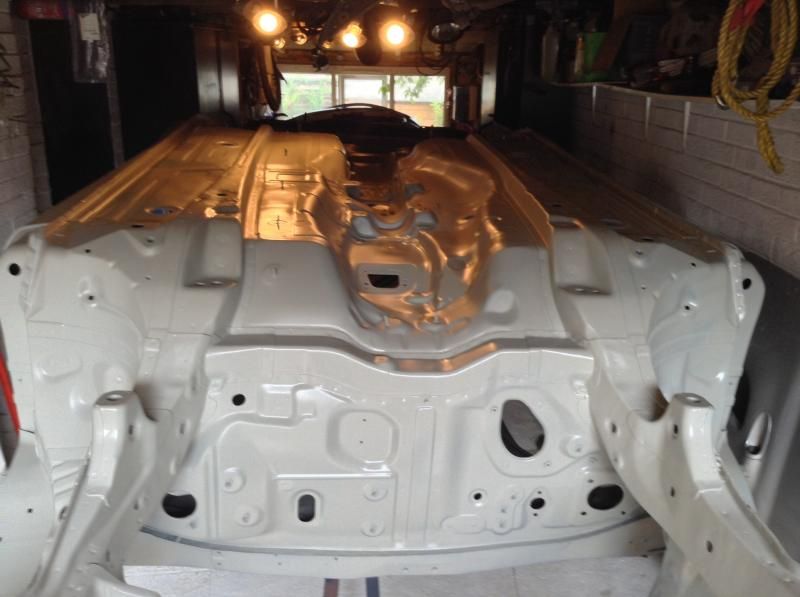 As its the first thing I have ever sprayed in my life (with a proper air gun, done plenty with aerosols) I will plastic sheet out the garage when it comes to applying the top coat but as all I am doing is the underside it dosent matter too much, I will leave the top side to the professionals 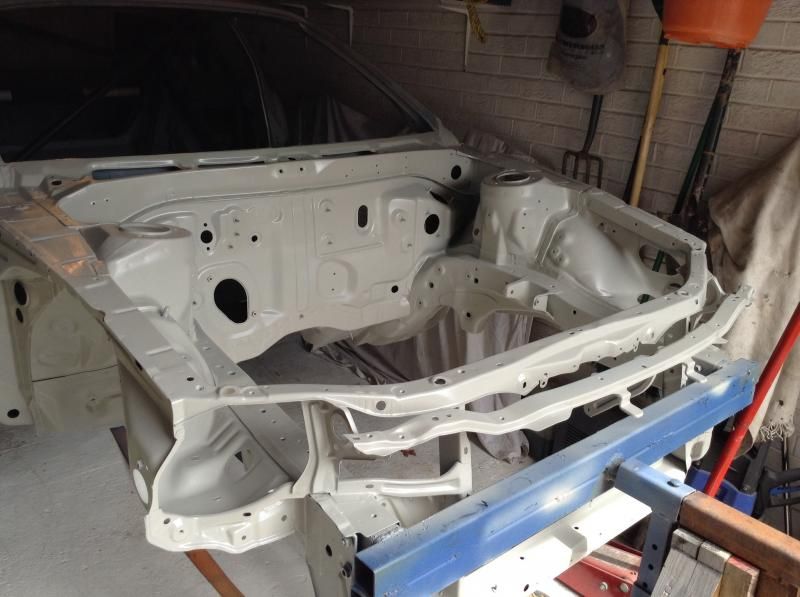 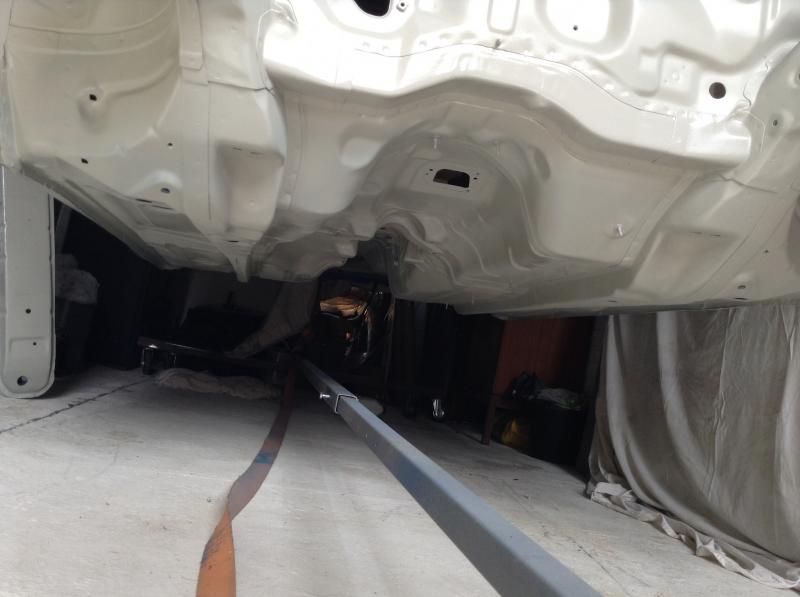 This needs to dry now for at least a week This post has been edited by Nial: Jul 6, 2014 - 8:23 AM -------------------- |
 Jul 6, 2014 - 10:24 AM Jul 6, 2014 - 10:24 AM
|
|
|
Enthusiast      Joined Dec 8, '03 From Lancaster CA Currently Offline Reputation: 6 (100%) |
once again, total awesomeness in your build. I cant wait to see the final product. im going to do the same thing with my st185
-------------------- 2001 Celica GT-S Turbo
1997 Supra TT 6speed 1997 Celica 3MZ/1MZ swap 1990 Celica All-Trac |
 Jul 6, 2014 - 11:49 AM Jul 6, 2014 - 11:49 AM
|
|
 Enthusiast    Joined Aug 25, '08 From England Currently Offline Reputation: 1 (100%) |
Thanks
I have certainly learned a lot about paint and how it's quality effects the job, I certainly won't be buying cheap paint anytime soon. I can't wait to see the final product either -------------------- |
 Jul 6, 2014 - 9:02 PM Jul 6, 2014 - 9:02 PM
|
|
|
Enthusiast   Joined Apr 24, '14 From Durham, NC, USA Currently Offline Reputation: 0 (0%) |
Nial, you are, indeed, an impressive "man of action." Seems when stopped by anything you just go to school and then build your way to the next level. You started by extending your garage, you taught yourself how to weld, how to paint, how to remove anything from metal surfaces, how to utilize what little space you had. My god man, what can't you do when you set your mind to it? That's a lovely, and almost complete, solution to the air compressor problem, so now you are on your way again!
When you get the time, could you say a little more about the air compressor you acquired, and could you say more about how you are going about spray painting with the new compressor. I would like to know details (specific apparatus and parameters) because I am on the cusp of attempting to learn how to be good at spray painting, and also want to sand blast, but have not yet upgraded my air compressor. You are giving me ideas (if I can charm my wife). I am certain that you are enjoying your new tool; it's a WORKHORSE! |
 Jul 6, 2014 - 9:07 PM Jul 6, 2014 - 9:07 PM
|
|
|
Enthusiast   Joined Apr 24, '14 From Durham, NC, USA Currently Offline Reputation: 0 (0%) |
Thanks I have certainly learned a lot about paint and how it's quality effects the job, I certainly won't be buying cheap paint anytime soon. I can't wait to see the final product either I imagine it is going to be similar to the "Mona Lisa." Hope I won't need to pay to get in to see it! |
 Jul 7, 2014 - 12:28 AM Jul 7, 2014 - 12:28 AM
|
|
 Enthusiast    Joined Aug 25, '08 From England Currently Offline Reputation: 1 (100%) |
Thanks
The air compressor I got is this one http://www.machinemart.co.uk/shop/product/...twin-compressor It's a twin cylinder 14.5cfm with a 100 litre tank. I am having one problem with the set up as it stands, and that's there is too much water in the system, I need another filter, in fact I think I am going to need more than one, I am going to add another three, two more filters in line with the one I already have, then another mini filter just before the gun. If you are going to spray paint from what I have gathered so far, getting the water out the compressed air is going to be the hardest obstacle to overcome, eventually and before I do anymore spray painting, I will have the compressor, a good few meters of airline, then two filters, then another good few meters of airline, then another filter, then feed that to the main airline, then the mini filter at the paint gun, hopefully that will do the trick. Oh and buy some anti vibration feet for the compressor, I was surprised how noisey the thing is. I sware if it wasn't boxed in it would vibrate it's way across the garden. This post has been edited by Nial: Jul 7, 2014 - 12:33 AM -------------------- |
 Jul 11, 2014 - 9:40 AM Jul 11, 2014 - 9:40 AM
|
|
|
Enthusiast   Joined Apr 24, '14 From Durham, NC, USA Currently Offline Reputation: 0 (0%) |
Thanks The air compressor I got is this one http://www.machinemart.co.uk/shop/product/...twin-compressor It's a twin cylinder 14.5cfm with a 100 litre tank. I am having one problem with the set up as it stands, and that's there is too much water in the system, I need another filter, in fact I think I am going to need more than one, I am going to add another three, two more filters in line with the one I already have, then another mini filter just before the gun. If you are going to spray paint from what I have gathered so far, getting the water out the compressed air is going to be the hardest obstacle to overcome, eventually and before I do anymore spray painting, I will have the compressor, a good few meters of airline, then two filters, then another good few meters of airline, then another filter, then feed that to the main airline, then the mini filter at the paint gun, hopefully that will do the trick. Oh and buy some anti vibration feet for the compressor, I was surprised how noisey the thing is. I sware if it wasn't boxed in it would vibrate it's way across the garden. https://www.youtube.com/watch?v=A8JwN0l-_pA Does anybody make a water filter that removes water from the compressor input air, so it never gets into the tank in the first place? Maybe that is as lame a thought as trying to cool down my garage using house A/C by opening the door to the garage? I'm always bad about emptying water from the compressor tank. I should do it regularly, but leave it in the tank too long; have to reduce the pressure to zero first. But, when the air gets compressed, I wonder if it might be that the pressure separates the air and water, which if true means that water is normally sitting on the bottom of tank? Then when that air is expanded through your air lines going to your tool, that's when some of the water turns back into water vapor? I'm not at all sure of the physics involved, but I'm trying to imagine a better way to handle moisture in compressed air than how we normally do it, mainly because I think it could be shortening the life of the tank. When I empty my tank, I exhaust the compressed air, then bleed with a screw on the bottom of the tank. I then jiggle the tank and raise and lower the whole thing several times, until water no longer comes through the valve. So, at least when the air inside the tank has returned to ambient, whatever excess water vapor that has been condensed into water during long term operation is on the bottom. What you are doing with your in-line filters is eliminating excess moisture than what collects in the tank, so the total amount of water entering the tank would be the sum of the two filters (tank and in-line). Maybe you can correct my thinking. |
 Jul 11, 2014 - 12:23 PM Jul 11, 2014 - 12:23 PM
|
|
 Enthusiast    Joined Aug 25, '08 From England Currently Offline Reputation: 1 (100%) |
Ok I will try......The vapour in the tank is caused by the compression process, it's basically removing humidity from the air, a combination of heat and pressure. There's physics behind it but I just looked it up
I empty the tank every time I use it, I leave it with about 3 bar inside then I open the tank drain, this helps blast out the water from the tank, I also open the valve on the water traps, this blasts air through them helping to dry them out, I leave the valves open until next time I use them so any liquid remaining can evaporate naturally. Seems to do the job, the best thing I got was the mini filter attached to the gun, this removes loads of water, I got a cheap one from amazon which was plastic, the plastic is starting to crack already so I will get a metal one to replace it. Well worth the investment. -------------------- |
 Jul 11, 2014 - 5:28 PM Jul 11, 2014 - 5:28 PM
|
|
|
Enthusiast   Joined Apr 24, '14 From Durham, NC, USA Currently Offline Reputation: 0 (0%) |
How about that water separator in the YouTube video?
https://www.youtube.com/watch?v=A8JwN0l-_pA That seemed to remove water pretty efficiently. |
 Jul 12, 2014 - 1:40 AM Jul 12, 2014 - 1:40 AM
|
|
 Enthusiast    Joined Aug 25, '08 From England Currently Offline Reputation: 1 (100%) |
I have a similar one fitted, seems to do the job. I might get another one just to make sure.
The trouble with stuff like this is, unless you are going to do a lot of spraying, is it worth all the expenditure? It's kind of one of those dilemmas, you need to remove the moisture to do any spraying really as you could end up with micro blisters in the paint or whatever you call them. But if you only spray one or two things it's expensive! One thing I am going to do is have another line for air tools as you need to include a lubricator (adds oil into the air) to help preserve the air tools insides but the last thing you want in a paint line is oil. It's a good job the lines aren't expensive. -------------------- |
 Jul 20, 2014 - 8:25 AM Jul 20, 2014 - 8:25 AM
|
|
 Enthusiast    Joined Aug 25, '08 From England Currently Offline Reputation: 1 (100%) |
A bit of an interlude from working on the car all the time.......a mornings driving through the forrest in an Evo.
 Although you can't see, I am driving, great fun, can't wait to do it again. This post has been edited by Nial: Jul 27, 2014 - 2:53 PM -------------------- |
 Jul 20, 2014 - 7:09 PM Jul 20, 2014 - 7:09 PM
|
|
|
Enthusiast   Joined Apr 24, '14 From Durham, NC, USA Currently Offline Reputation: 0 (0%) |
I have a similar one fitted, seems to do the job. I might get another one just to make sure. The trouble with stuff like this is, unless you are going to do a lot of spraying, is it worth all the expenditure? It's kind of one of those dilemmas, you need to remove the moisture to do any spraying really as you could end up with micro blisters in the paint or whatever you call them. But if you only spray one or two things it's expensive! One thing I am going to do is have another line for air tools as you need to include a lubricator (adds oil into the air) to help preserve the air tools insides but the last thing you want in a paint line is oil. It's a good job the lines aren't expensive. A good friend uses air tools all the time doing handy-man work. He puts several drops of special air tool oil in the air inlet of the tool both before and after working with any of his air tools, to prevent rusting of the tool's insides. He's never had a problem that could be traced to moisture. I had been putting oil in before working w ith my tools, but will change to his before/after technique. I really don't know if this is better or worse than running oil continuously. |
  |
3 User(s) are reading this topic (3 Guests and 0 Anonymous Users)
0 Members:
| Lo-Fi Version | Time is now: October 26th, 2024 - 6:24 PM |


