  |

 Feb 16, 2005 - 2:12 AM Feb 16, 2005 - 2:12 AM
|
 
|
|
Enthusiast  Joined Aug 19, '04 From Maine Currently Offline Reputation: 0 (0%) |
Angel Eyes Mod
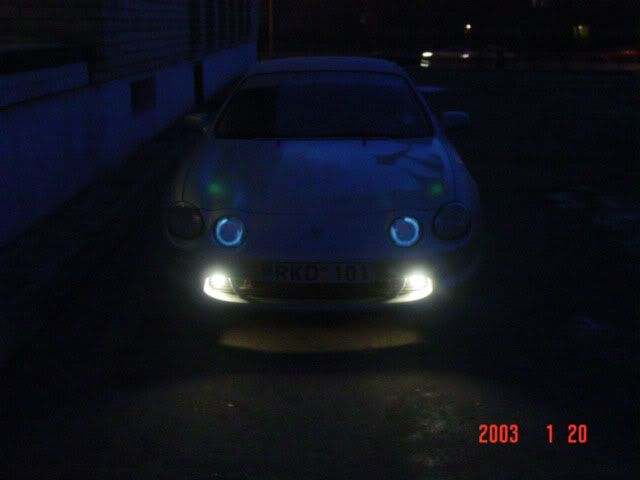
Angel Eye? What is that? 'Angel Eye' is a cool headlight feature found on the new BMW 5 Series (2001+) and BMW 7 Series (2002+). The ellipsoidal/projector headlamp unit on the BMW 5 series has a pair of circular shape rings that, when lit up, produce a pair of halos. BMW calls these luminous rings 'Angel Eyes'. They are also referred to as 'Demon Eyes' and they look very nice on the BMW. They dont serve any purpose other than for the nice and aggressive look, and to distinguish the newer 5 and 7 Series from older models. Great design for an already great looking car! Would definitely look great if BMW also used them on the 3 Series. This page shows the general process of creating the 'Angel Eyes' and can be applied to most vehicles. Creating Angel Eye Rings Instead of a round glass rod used by BMW, I used a clear acrylic/plastic rod. You can buy them for $1.97 at Home Depot, or other home improvement stores. The rod is actually made for your window blind to open/close the blind when you turn it left/right. It is about 30 inches long with a diameter of 8mm, and you can create two Angel Rings out of it. The rod has a hex-shape structure, not a round shape like the BMW, but it will do just fine. The first thing we did was to create a circular ring out of it. To determine the circumference of the ring, we measured the diameter of our high-beam projector housing, which somes out to be 4" (or 2" radius). You will have to cut your rod about 12" long. We suggest cutting it 15" long, and use the extra inches as handles to help in the modling process. Next, we found an aluminum can or jar that has about the same diameter as the ring (we used a peanut jar). After heating the rod in a small toaster oven for about 5-7 minutes at 300 degrees, we held the two ends of the now flexible rod with a pair of pliers, and wrapped them around the peanut jar with one end crossing over the other end. For better control, you can wear your winter gloves or use your socks. The flexible rod will harden within 30 seconds. So, you may have to repeat this step 1 more time to mold it into a perfect ring. As you wrap the rod around the jar, make sure that one of the flat sides is facing down. This is important in a later process. This can be done by putting the rod on a flat smooth surface. With one of the sides facing down, wrap the rod around the jar. As you wrap, make sure you dont twist the two ends. Once done, you can use a Dremel Tool to cut the extra handles that were used during the molding process . You will end up with one end above the other, as shown. Don't worry, later when you wrap electrical tape around the rod to hide the LED bulbs, the two open ends will re-align themselves. If you like to be perfect, you can simply put it back in the oven one last time and allow the ends to soften and flatten To test out how it lights up, we put a small halogen bulb between the open ends of the ring. "Wait a minute here, youg man, or woman" It doesnt look like an 'Angel Eye'. No halo ring effect! Yes, we know. That is because light goes in a straight line, and it takes the shape of whatever object it goes through. In this case, it goes through one end of the rod and out the other end, like fiber optic cables. Making the Angel Rings Light Up In order to make it light up like the true 'Angel Eye', we had to retract the light as it goes through the rod by making multiple cuts (scratches) along the rod, using a Dremel or RotorMatic tool. Each cut/groove allows the light to 'escape' the ring. Each cut is about 2 ~ 3mm appart and 1mm deep. Don't make the cuts too close to one another. This will make your ring look like a continuous band of light. In our opinion, the rings look better and more sophisticated with the cuts evenly spaced out. It will take about 2 minutes to make the cuts using a dremel tool. If you dont have a dremel tool, you can use a small saw or a butter knife, but it will take you longer. A Dremel tool set will cost about $30 USD. It has many uses, such as cutting, sanding, carving, buffing, etc. Good tool to have for hobbies. You can also buy the new RotorMatic tool set for only $19.99. It works the same way as the dremmel. Hint: To get the cuts to look perfect, you can do the cuts ahead of time before making a circular ring out of it. You only need to make the cuts along 1 of the 6 sided rod. Doing 2 or more sides will make your ring look dimmer, because most of the light has escaped before it reaches the other end of the rod. Also, let the cutted side be the back side. When you turn it over to the front, the cuts will be multiplied by the hex shape which acts like mirrors, and they are brighter to compared to the back. The light appears to be refracted inward. Light is being refracted as it hits surface Create the cuts with a dremel tool Cuts along the back-side of the rod On the front side, cuts multiplied by hex shape. Full view of angel eye rod Angel eye with some foreground light Closeup of light being refracted through cuts Cuts 2 sides vs. 1 side. LED Light For the Angel Eyes We suggest you use LED light for your Angel Eyes. Unlike halogen bulbs, LED bulbs are very efficient, last very long (no filament to burn out), and produce very little heat. The LED bulb along with the resistor use less than 1watt of power, compare to a 35 watt halogen bulb used in the real BMW Angel Eyes. LED bulbs are bright too even though they are only 1 mcd. If you ever pointed a keychain with LED light toward your eyes, you would know what we mean. Besides, the purpose of Angel Eyes is for look and style, not to light up the road. LED bulbs are used in street signal lights, jumbo television, car alarm indicator etc., for their efficiency and reliability. They are bright in the day too. Hence, they are now being use in tail-lights and stop-lights, as found on new Mercedes S Class, Infiniti G35 and other luxury cars. One distinctive feature of LED bulbs is that they come on/off instantly. Next time when you follow an S430 or a G35, you will notice that as the driver steps on or realeses the brake, the stop-light comes on and off instantly. It doesn't dim in and out light halogen lights. LED light comes in many different colors, red, blue, orange, yellow, green, and white. Red is really nice and will definitely make your car stand out, but we used white LED in compliance with state laws. They even come in multi-blinking colors too, and we think cops probably love them. They'll be happy to turn on their version of multi-blinking light! Angel Eye with Yellow LED Angel eye with Blue LED Angel Eye with Red LED Angel Eye with White LED They cost about $4 to $5 each at your local Radio Shack store. Note that LED bulbs are not like halogen bulbs where you can just connect positive and negative wires for them to light up. You must use a resistor. The purpose of the resistor is to limit/resist high current going through the LED bulbs. LED bulbs require only a small amount of current to light up. Hence the efficiency. Resistors should cost about $1 for a set of 5. Very Cheap! Resistors have different resistance which is measured in OHM's. To get the correct resistance for your LED lights use the following format. When you buy the LED bulb it will tell you the voltage and amp used. In our case we have a 12V car battery and a 3.6V LED with 20mA (or .02A). So, we used a resistor of 420 ohms [(12V - 3.6V)/.02A] You can use a lower ohms resistor, eg 220 ohms, to light up your LED. In fact, it will make your LED brighter because a low resistance allows more current to go through the bulb. We have been doing this for over 5 months now and still have not had a problem. A white LED bulb, positive is the longer terminal. A 1100 vs. a 2000 mcd LED bulbs. mcd (milli-candela) measures brightness. 220ohms resistor. Restrict current going through a bulb. Resistor connected to positive lead, which is the longer one. Securing LED Bulbs Inside Angel Eye Rings To secure the LED bulbs into the Angel Eye rings, we drilled a hole in both ends of the ring, about 6mm wide and 5mm deep. We used 2 white LED bulbs and parallely paired them together. After soldering foot-long wires to the positive and negative legs of the LED bulbs, we wrapped black electrical tape around the legs to keep them appart. We will attach the resistor to the end of the wire later when we connect the wire to our parking light. Next, we inserted the bulbs inside the holes of the ring, and wrapped black electric tape around it to hide the LED bulbs. This will also hold the bulbs and the two ends of the rod in place. DO NOT paint the rod black. For some reason, the black paint will absorb the light and will make your angel ring look dim. If you plan to wrap the black tape around the uncut/unused part of the ring, make sure you wrap some aluminum foil around them first before wrapping the black tape. The aluminum foil will reflect the escaping light back into the ring, making the ring brighter. Angel Ring with 5mm hole. LED bulbs inside ring. Use black electrical tape to secure and hide the bulbs. This post has been edited by d3monc3lica: Feb 16, 2005 - 9:22 PM |

|
Feb 16, 2005 - 2:13 AM
|
|
|
Enthusiast Joined Aug 19, '04 From Maine Currently Offline Reputation: 0 (0%) |
Enjoy!!!
|
|
Feb 16, 2005 - 2:22 AM
|
|
|
Enthusiast Joined Jul 10, '03 From Appleton,WI Currently Offline Reputation: 0 (0%) |
Awesome find.

--------------------  A Jaws4God Creation... |
|
Feb 16, 2005 - 2:33 AM
|
|
 Enthusiast Joined Mar 8, '04 From Newport, RI Currently Offline Reputation: 63 (99%) |
that was just like (same pics) the how to that was linked in Doggy's how-to. It is a good how to but kinda a hassle. I tried this how to a while back. I am good with stuff like this and it was a big hassle, they just didn't look right. I bought some new pre-made ones from ebay for $30 and they are perfect.
-------------------- |

|
Feb 16, 2005 - 2:40 AM
|
|
 Enthusiast Joined Nov 13, '02 From So Cal Currently Offline Reputation: 3 (100%) |
and exactly how do u get this inside the headlights...........?
--------------------  |
|
Feb 16, 2005 - 2:47 AM
|
|
|
Enthusiast Joined Mar 8, '04 From Newport, RI Currently Offline Reputation: 63 (99%) |
http://www.6gc.net/index.php?action=howto&itu=57 in the how-to articles. That is what I used and it was easier than it looks. see profile for pic
-------------------- |
|
Feb 16, 2005 - 11:46 AM
|
|
|
Enthusiast Joined Aug 20, '03 From Annapolis, Md Currently Offline Reputation: 5 (100%) |
imo I thought it always look chessy unless it was stock like the real bimmer ones. maybe its just me.
|
|
Feb 16, 2005 - 3:31 PM
|
|
|
Enthusiast Joined Oct 24, '03 From fort smith, ar Currently Offline Reputation: 0 (0%) |
QUOTE(Digndoug @ Feb 16, 2005 - 10:46 AM) imo I thought it always look chessy unless it was stock like the real bimmer ones. maybe its just me. [right][snapback]246782[/snapback][/right] unlike you, not all of us are all about BMW's. -dstrb --------------------  former celica owner. |
|
Feb 16, 2005 - 4:33 PM
|
|
|
Enthusiast Joined Aug 20, '03 From Annapolis, Md Currently Offline Reputation: 5 (100%) |
QUOTE(dstrbcelica @ Feb 16, 2005 - 8:31 PM) QUOTE(Digndoug @ Feb 16, 2005 - 10:46 AM) imo I thought it always look chessy unless it was stock like the real bimmer ones. maybe its just me. [right][snapback]246782[/snapback][/right] unlike you, not all of us are all about BMW's. -dstrb [right][snapback]246882[/snapback][/right] I didnt mean onyl bmws, I dont even really like them on bmws. I just think its wierd. |
|
Feb 16, 2005 - 6:51 PM
|
|
|
Enthusiast Joined Aug 16, '03 From Bay area Currently Offline Reputation: 0 (0%) |
it doesnt look that bad.. I like it.. Thos rings just need to be bigger.
This post has been edited by Hanyo: Feb 16, 2005 - 6:52 PM |
|
Feb 17, 2005 - 8:34 AM
|
|
|
Enthusiast Joined Aug 19, '04 From Maine Currently Offline Reputation: 0 (0%) |
honestly i think u people just need to see the real potential of this post, it wasnt just for angel eyes, yes its cool that we dont have to pay Uber amounts of money, but also you can make other things as well. Think of the possibilities, all this deals with is light refraction and to me, being able to utilize this cheaply is kickass....... I was kind of hoping someone would be like HEY i can use this to make neon glow tubes for my custom stereo box, or HEY i could use this as a custom light in my glove-box (pffft I dunno!?)......anyways just open your eyes and think of what u can do with this other than thinking its JUST angel eyes...and for BMW's???...thats not why I posted this.
This post has been edited by d3monc3lica: Feb 17, 2005 - 8:36 AM |
|
Feb 17, 2005 - 9:23 AM
|
|
 Enthusiast Joined Oct 28, '02 From Europe, Lithuania Currently Offline Reputation: 8 (100%) |
No this was a replay of the YEAR. I was almost one step from writing somthing like this...
Way to go man. If you have imagination, you can look at simple metal bar and imagine there you can use it... This goes the same with all the Angel eyes thingy. QUOTE(d3monc3lica @ Feb 17, 2005 - 6:34 AM) honestly i think u people just need to see the real potential of this post, it wasnt just for angel eyes, yes its cool that we dont have to pay Uber amounts of money, but also you can make other things as well. Think of the possibilities, all this deals with is light refraction and to me, being able to utilize this cheaply is kickass....... I was kind of hoping someone would be like HEY i can use this to make neon glow tubes for my custom stereo box, or HEY i could use this as a custom light in my glove-box (pffft I dunno!?)......anyways just open your eyes and think of what u can do with this other than thinking its JUST angel eyes...and for BMW's???...thats not why I posted this. [right][snapback]247193[/snapback][/right] -------------------- Ex celica owner - just a guy from other side of the pond...
Full custom Projects from restoration to performance builds <<<<<< DCw / JDMart >>>>>>> |
|
Feb 17, 2005 - 9:24 AM
|
|
|
Enthusiast Joined Oct 28, '02 From Europe, Lithuania Currently Offline Reputation: 8 (100%) |
Wow....
 i dont even have this foto i dont even have this foto  QUOTE(Hanyo @ Feb 16, 2005 - 4:51 PM) it doesnt look that bad.. I like it.. Thos rings just need to be bigger. [right][snapback]246966[/snapback][/right] -------------------- Ex celica owner - just a guy from other side of the pond...
Full custom Projects from restoration to performance builds <<<<<< DCw / JDMart >>>>>>> |
|
Feb 17, 2005 - 4:39 PM
|
|
|
Enthusiast Joined Aug 16, '03 From Bay area Currently Offline Reputation: 0 (0%) |
haha.. i didn't even recognize that was your car doggy...
I photochopped what it will look like if you made the angel eye ring as large as possible. I should try to do this... hey doggy how hard was it to re-use the old glue? i dont have a heat gun.. would a hair dryer work? |
|
Feb 18, 2005 - 12:36 AM
|
|
|
Enthusiast Joined Mar 8, '04 From Newport, RI Currently Offline Reputation: 63 (99%) |
Once the glass is off, the install of the ring takes 5 min and the glass is still warm and the glue is still very soft. I just added some silicon glue to seal and prevent moisture.
My rings are as big as they can be for the housing. pic in profile -------------------- |
|
Feb 18, 2005 - 4:54 AM
|
|
|
Enthusiast Joined Jan 1, '05 From rapid city, SD Currently Offline Reputation: 0 (0%) |
Wow looks nice man.......wonder if i can do that to my curren
|
|
Feb 18, 2005 - 9:29 PM
|
|
|
Enthusiast Joined Aug 19, '04 From Maine Currently Offline Reputation: 0 (0%) |
Don't "wonder" just do it , give er a try

|
|
Feb 18, 2005 - 9:32 PM
|
|
|
Enthusiast Joined Aug 16, '03 From Bay area Currently Offline Reputation: 0 (0%) |
curren with angel eyes = HAWT!!!
|
|
Feb 18, 2005 - 9:34 PM
|
|
|
Enthusiast Joined Aug 16, '03 From Bay area Currently Offline Reputation: 0 (0%) |
hey batman,
you used white 5mm LED's for your angel eyes? and did you use those plastic folder tabs for your blue clock? |
|
Feb 19, 2005 - 2:20 PM
|
|
 Enthusiast Joined Jul 16, '04 From Los Angeles Currently Offline Reputation: 8 (100%) |
 those are mine. This post has been edited by urbandork: Feb 19, 2005 - 2:23 PM |
|
1 User(s) are reading this topic (1 Guests and 0 Anonymous Users)
0 Members:
| Lo-Fi Version | Time is now: February 23rd, 2025 - 10:44 AM |