  |
 Jun 18, 2006 - 1:34 PM Jun 18, 2006 - 1:34 PM
|
|
 Enthusiast   Joined Nov 3, '05 From Chicago Suburbs Currently Offline Reputation: 1 (100%) |
Today i started taking my car apart for some maintenance work, and to hopefully resolve few common issues with cheap ssac downpipes. So here is my DP with spiderweb welded as advised per Jeff:
 I believe I have read somewhere that these pipes are not 100% stainless, so now im worried about rusting of the welds Another issue people experience with this DP is boost creep related to the wastegate getting stuck half way open:  What i am going to do is copycat this guy from mr2oc who used some ink+vaseline combo on the WG flapper and messed with actuator while the DP was bolted on so he can see where the gate is getting stuck on the DP. Then I am going to grind the hell out the DP wherever I see ink marks. I also ordered KO racing support bracket because ssac did not send me mine even after multiple requests... Should i use ssac gaskets or reuse toyota gaskets? Any tips on DP installation are welcome! EDIT - topic changed for search purposes This post has been edited by CilverSeliST205: Jun 19, 2006 - 8:04 PM -------------------- QUOTE(tufy @ Jul 19, 2006 - 7:40 AM) [snapback]458074[/snapback] i dont drive fast, i just fly low |
 Jun 18, 2006 - 1:51 PM Jun 18, 2006 - 1:51 PM
|
|
|
Enthusiast      Joined Mar 17, '05 From The Netherlands Currently Offline Reputation: 0 (0%) |
Rather have the Aussie when hearing all these nasty stories. Driveby also had problems with this DP and a few others.
-------------------- JDM Powerplant installed, BPU coming very soon!
|
 Jun 19, 2006 - 9:31 AM Jun 19, 2006 - 9:31 AM
|
|
 Enthusiast   Joined Nov 3, '05 From Chicago Suburbs Currently Offline Reputation: 1 (100%) |
OK let me rephrase my questions
1. Is XS performance DP 100% stainless? 2. If not, should I powdercoat it so it doesn't rust? 3. If so, is there any cheaper method of rust prevention thats cheaper/easier than powdercoating 4. Reuse OEM gaskets or use XS gaskets 5. Anything else I should do while changing DP ? Thanks in advance guys ! -------------------- QUOTE(tufy @ Jul 19, 2006 - 7:40 AM) [snapback]458074[/snapback] i dont drive fast, i just fly low |
 Jun 19, 2006 - 10:04 AM Jun 19, 2006 - 10:04 AM
|
|
 Moderator      Joined Apr 17, '03 From Rockland NY Currently Offline Reputation: 15 (100%) |
1. its not 100% stainless, its coated
2. You can go to autozone and buy header paint. I used it and its holding up very well. 3. see above. You'll only need to paint the outside of the pipe 4. use OEM gaskets only 5. Change the hose from hell located directly behind the down pipe. DEF --------------------  I will return one day. |
 Jun 19, 2006 - 10:46 AM Jun 19, 2006 - 10:46 AM
|
|
 Enthusiast   Joined Nov 3, '05 From Chicago Suburbs Currently Offline Reputation: 1 (100%) |
QUOTE(defgeph @ Jun 19, 2006 - 11:04 AM) [snapback]446248[/snapback] 1. its not 100% stainless, its coated 2. You can go to autozone and buy header paint. I used it and its holding up very well. 3. see above. You'll only need to paint the outside of the pipe 4. use OEM gaskets only 5. Change the hose from hell located directly behind the down pipe. DEF Few more questions Should I reuse old OEM gaskets or order them new from the dealer ? Whats wrong with xs performance gaskets? Did you ever check for WG clerance ? -------------------- QUOTE(tufy @ Jul 19, 2006 - 7:40 AM) [snapback]458074[/snapback] i dont drive fast, i just fly low |
 Jun 19, 2006 - 10:48 AM Jun 19, 2006 - 10:48 AM
|
|
|
Enthusiast    Joined Jan 9, '05 From Under the car Currently Offline Reputation: 0 (0%) |
Fitting a Down pipe / DeCat pipe
1- liberally coat all the bolts with WD40 or GT85, whichever you prefer. Now the whole job will have been made a lot easier by the fact that not long ago (less than a week) I had a Full stainless system fitted so the down pipe to exhaust bolts shouldnt be too hard to shift, the rest however look like age and water have joined forces to rust the bolts solid and could be a right pain in the arse. 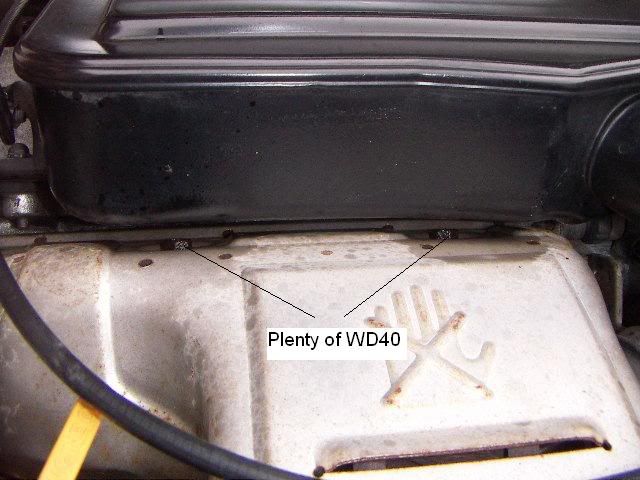 Dont forget down the front either 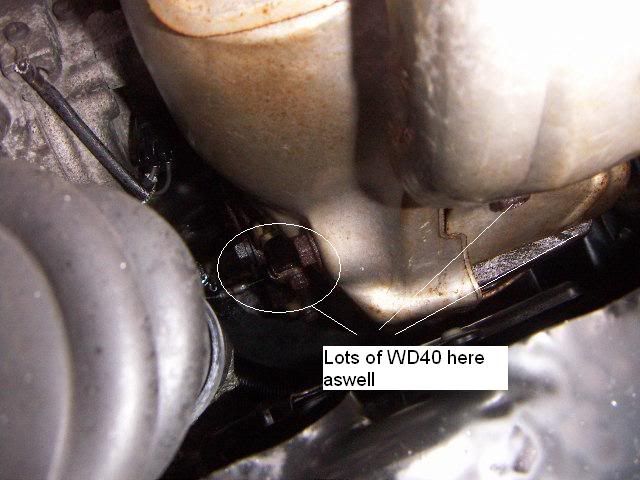 Whilst your at it, you could use this opportunity to paint/polish the heat shield as well Right after a few days of letting the WD40 do its stuff (WD40 produces a lot of smoke on the manifold when you forget that its soaked in the stuff, can also be quite scary too) First job was to drain the charge cooler, did this by removing one of the feed pipes from the back. Undo the 3 bolts that secure the CC to the engine, undo the vacuum pipes and level sensor wires and undo the jubilee clips on the intake. Now getting this off is a nightmare, I found the best method was to pull the front up out of the rubber `charge cooler to turbo` connector then pull towards you. While its off you may as well clean it out internally and lag the underneath, I used alloy tape from Halfrauds and several layers of fibreglass matting, costs next to nothing and is a good insulator. Put it somewhere safe out of the way. Next I removed the airbox to turbo pipe and cleaned it out, cleaned the compressor side of the turbo with some carb cleaner and blocked of the holes to prevent forign object damage to the blades etc. Now its time to remove the turbo heat shield, one of the several that there is, It is held on by 3 bolts, one right at the front and two on the top, the front one came undone no trouble at all, both the top ones sheared off. (I drilled and retapped them) With the heat shield removed I used this opportunity to polish it up, after trying several methods I decided that the best was to use a wire brush fitment for an electric drill, worked in a diagonal direction at a constant angle, this gives a really good brushed steel effect and looks quite smart, not as bling as the chromed efforts. (not sure how long it will last before it goes rusty? Only time and bad weather will tell. 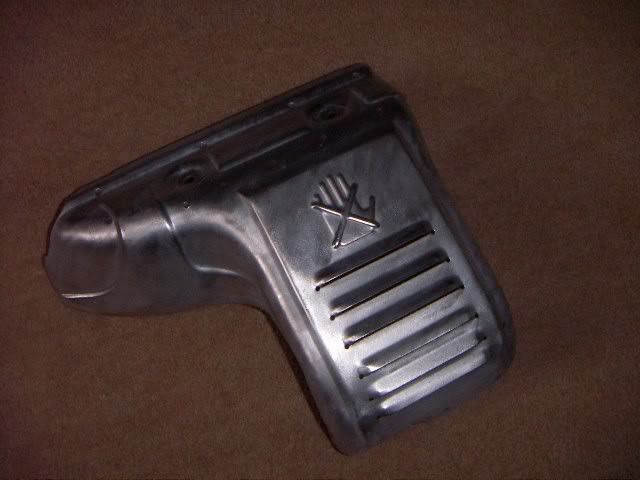 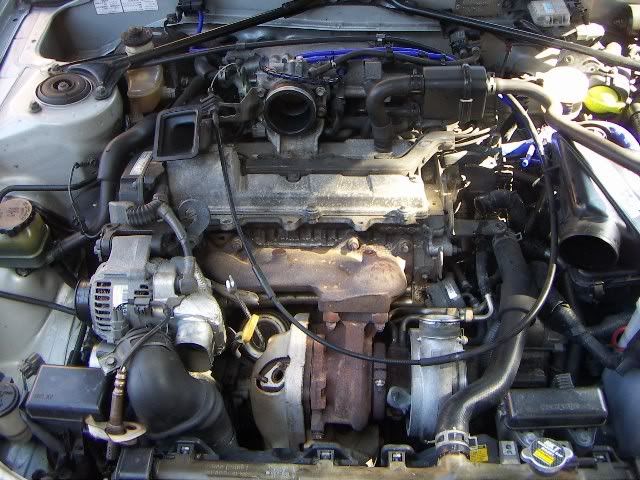 Next job was to remove the radiator, I`m sure its not essential to do this but it makes working a lot easyer and adds a suprizing amount of room to the workspace. Catch all the water/coolant that comes out, as you`ll be working under the car next and its not nice stuff to lie in for several hours. To remove the radiator, start by jacking the car up, both sides and supporting on good axel stands. Remove the drivers side undertray, its held on by about 6 bolts/self tapping screws two of which are behind the front wheel, but are accessable without removing the front wheel. Here too you will find the Oil filter which is suprizingly small (if you wanted you could change the oil at this point as the filter is very easy to remove etc and everything ia at hand.) Now drain the rad, the drain plug is on the drivers side corner of the rad or you could do what I did and just remove the bottom feed pipe (you`ll require at least 4L of coolant to refill the engine later) Remove the remaining feed pipes, unclip the two fan power supplies (one on each side). Remove the small fuse box on the left of the rad (held on by 2 10mm bolts if I remember correctly) Undo the two top brackets that hold the rad in place. Now simply pull the radiator upwards, you might catch the battery tray a little on the fan housing, but its soft and gives way pretty easily. Store somewhere very safe (we all know how easy it is to damage a radiator.) To aid reoving the rad you can also remove the snorkel to the altinator, (throw this a long way away as it’s the most pointless piece of crap I have ever seen in a car engine bay) Next remove the Lambda sensor and put it somewhere safe (they are expensive) Remove the dipstick Sit back have a beer or a coffee at this point as this is where things start getting annoying. As you can see, a fare amount of space has been created to work in. Next job is to remove some more of the heat shielding to the left of the CAT held in place by about 4 bolts, getting the bolts off wasn’t a problem, gatting the heat shielding away was a proper pain in the ass, took me about 30 mins of cussing, swearing, bending and hammering to get this thing away. Be very carefull as there is a sensor near the dipstick that could be damaged by this process. 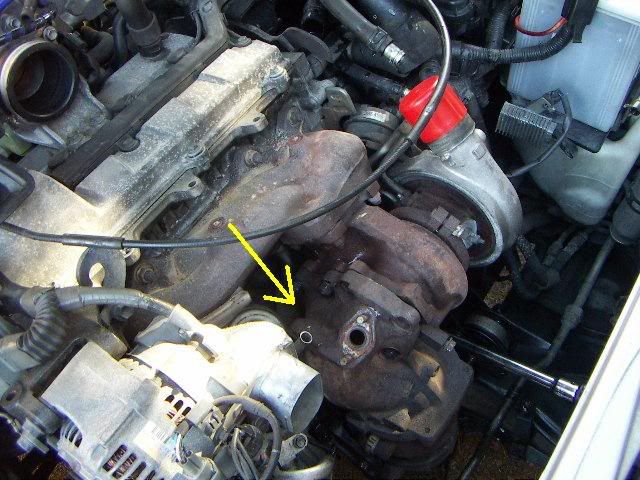 Now that the heat shielding is off it is time to start the process of removing the CAT itself, start by undoing the CAT to turbo bolts. There is one down the back that is a pain in the butt to get to, I had to make a special tool to remove it. Now I aint no expert at tool making so it was nothing flash but the access to the bottom most stud is very limited, couldn’t get a ring spanner or and open spanner onto it, not enough room for a socket and ratchet, after half an hour or so of head scratching and feeling like I should jack this in for a bad job, I discovered one of my old sump plug tools (from my Peugeot 205 Gti owning days) It was basically a big alan key, ground down so that the little end has a square head, this happened to fit perfectly into one of the quarter inch drive sockets that I had lying around (the 14mm one to be precise) I fashioned a little extension bar (good old bench grinder) slotted the three together and hey presto, the perfect tool to access the bottom most nut…….success. Also there are 4 14mm bolts that screw into the engine block, they hold the supporting arms of the CAT in place, they wernt hard to undo, a liberal squirt of WD40, a socket and rachet will get to them all with a 10inch extension bar fitted. No worries. Before removing there nuts you have to disconnect the exhaust and remove the sensor from the CAT, now mine was stuck solid, I had to disconnect the cable end from the loom and remove it later, lots of WD40 and a pipe wrench needed. Now I was ready to disconnect the CAT from the car…………..bugger me this thing weighs a tonne, without a word of a lie it must weigh in at 20Kg`s if not more……..this is what you`ll be removing 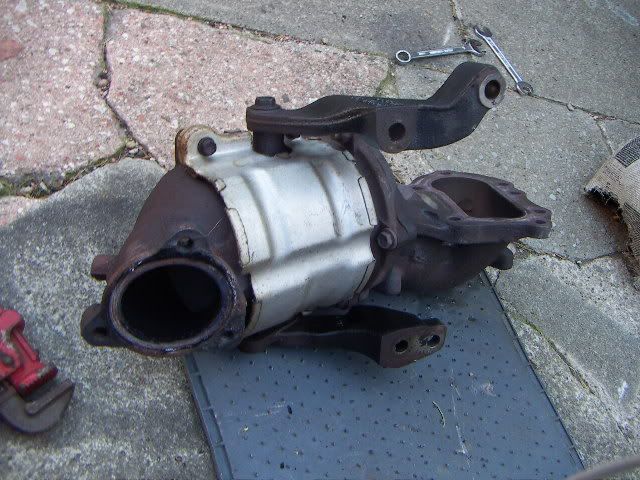 Carefull of them fingers when your removing it from the car. Not sure about anyone else but the CAT Conv material inside the CAT was not discoloured or damaged at all, it looks almost brand new, anyway, it`ll be kept to one side ready for reversing this job come MOT time, unless I fit a sports high flow CAT, which will be the most likely option. I don’t wanna have to do this job again. Heres the big void that`ll be left behind, don’t worry, you`ll soon fill it 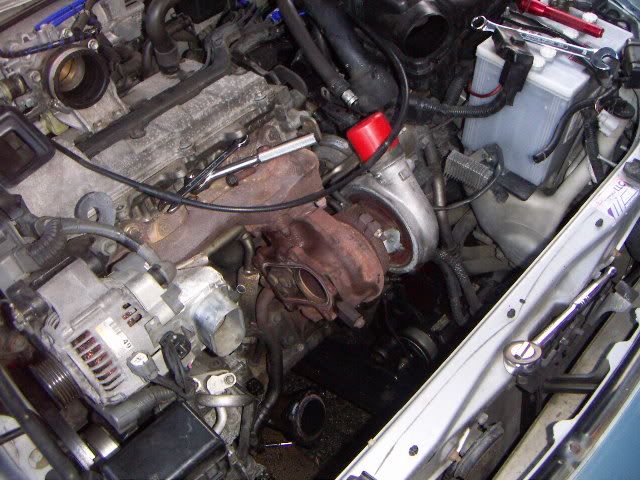 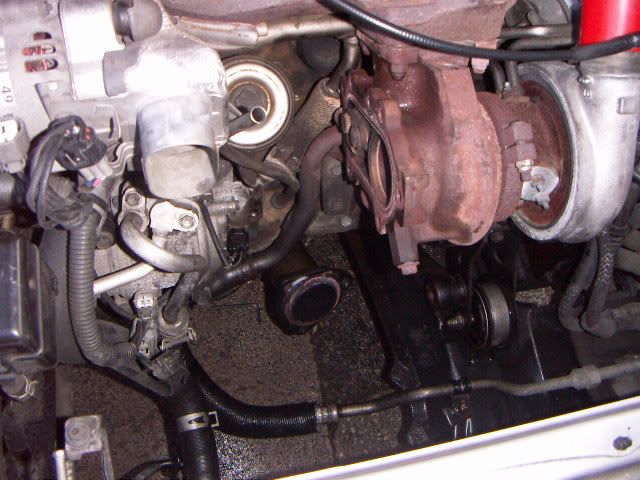 Now your ready for the good stuff, putting on the bling and getting it all back together again. Time for another beer. Right, as I found, putting this thing back together was a right pain in the arse. First of put the studs onto the turbo manifold, put the supporting braket onto the right side lower most bolt that secured the origional DP to the engine block but dont tighten any of the bolts up (you will probably need to modify the holes in the braket, I enlarged the right side one by about 4mm to get it to fit. Next put the downpipe on to the turbo along with its gasket, put the bolts onto the DP to exhaust flange (with the exhaust in place too) dont forget the gasket, but again, dont tighten them up. Right, now tighten up the turbo manifold studs, then the exhaust bolts and finally the braket bolts. It will probably take a bit of giggery pokery but it will fit eventually. Now your all ready to start putting everything else back together. Put the radiator back in and secure it back up, Dont foget the little fuse box. Fill it up with coolant. Put the sensor back into the bottom of the DP, I had to use a little exhaust sealant cause it `blew` ever so slightly. Connect it back up. Now carefully put the Lambda sensor back on and secure it, You`ll need to remove the little heat shield that goes around it as it obstructs the main heat shield from fitting back correctly. Put the main heatshield back on, and the Chargecooler, connect up the pipes (the two on the right hand side, and fill with more coolant. Not forgetting the little vacume pipe at the back of it. Now your pretty much ready to go. Reset the ECU as I got an error code at first. Jobs a good un. Kinda rushed through the last bit, If anyone requires any help then feel free to PM me and I`ll go through in more detail what to do. Happy downpipe fitting...Insanity. 8) The finished article 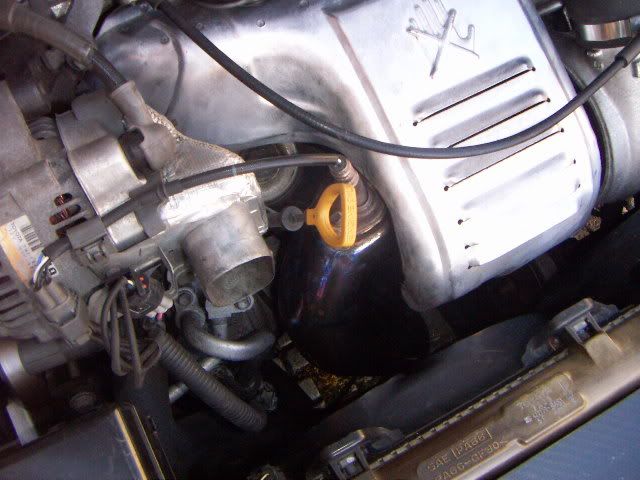 |
 Jun 19, 2006 - 10:51 AM Jun 19, 2006 - 10:51 AM
|
|
|
Enthusiast    Joined Jan 9, '05 From Under the car Currently Offline Reputation: 0 (0%) |
The worst Issue with the XS downpipe is alignment with the exhaust...dont forget to lag it either, as stainless gives off alot of heat into the engine bay, lag it and most of the heat should dissapear off down the exhaust. The XS downpipe is nowhere near the caliamed 2.2mm thick stainless so wont last forever but for the price its worth replacing ever 2 years or so...saying that mines been on over a year and has been as good as gold.
|
 Jun 19, 2006 - 12:50 PM Jun 19, 2006 - 12:50 PM
|
|
 Enthusiast   Joined Nov 3, '05 From Chicago Suburbs Currently Offline Reputation: 1 (100%) |
Very nice writeup exacly what i needed + pics Thanks insanity! -------------------- QUOTE(tufy @ Jul 19, 2006 - 7:40 AM) [snapback]458074[/snapback] i dont drive fast, i just fly low |
 Jun 19, 2006 - 1:11 PM Jun 19, 2006 - 1:11 PM
|
|
|
Enthusiast      Joined Mar 17, '05 From The Netherlands Currently Offline Reputation: 0 (0%) |
Yeah, nice info. Especially the removal of the Radiator part. I was wondering how I could fit my tools between there but removal is the easiest methode.
Still 2 months before I get my DP tho. -------------------- JDM Powerplant installed, BPU coming very soon!
|
 Jun 19, 2006 - 1:44 PM Jun 19, 2006 - 1:44 PM
|
|
|
Enthusiast    Joined Jan 9, '05 From Under the car Currently Offline Reputation: 0 (0%) |
QUOTE(CilverSeliST205 @ Jun 19, 2006 - 6:50 PM) [snapback]446297[/snapback] Thanks insanity! No probs bud...its a write up I did about a year ago...hope it makes life a bit easier for you |
 Jun 19, 2006 - 7:01 PM Jun 19, 2006 - 7:01 PM
|
|
 Moderator      Joined Apr 17, '03 From Rockland NY Currently Offline Reputation: 15 (100%) |
QUOTE(CilverSeliST205 @ Jun 19, 2006 - 11:46 AM) [snapback]446260[/snapback] Should I reuse old OEM gaskets or order them new from the dealer ? Whats wrong with xs performance gaskets? Did you ever check for WG clerance ? I like OEM gaskets better. OEM is metal, the XS is paper. I reused my stock gasket it was in good shape. I forgot to mention that, grind out the flange for wastegate clearance !!!!!!!!!!!!!!!! Do it now or you'll be kicking yourself in the rear later. The gate WILL get stuck. --------------------  I will return one day. |
 Jun 19, 2006 - 8:00 PM Jun 19, 2006 - 8:00 PM
|
|
 Enthusiast   Joined Nov 3, '05 From Chicago Suburbs Currently Offline Reputation: 1 (100%) |
QUOTE(defgeph @ Jun 19, 2006 - 7:01 PM) [snapback]446463[/snapback] QUOTE(CilverSeliST205 @ Jun 19, 2006 - 11:46 AM) [snapback]446260[/snapback] Should I reuse old OEM gaskets or order them new from the dealer ? Whats wrong with xs performance gaskets? Did you ever check for WG clerance ? I like OEM gaskets better. OEM is metal, the XS is paper. I reused my stock gasket it was in good shape. I forgot to mention that, grind out the flange for wastegate clearance !!!!!!!!!!!!!!!! Do it now or you'll be kicking yourself in the rear later. The gate WILL get stuck. 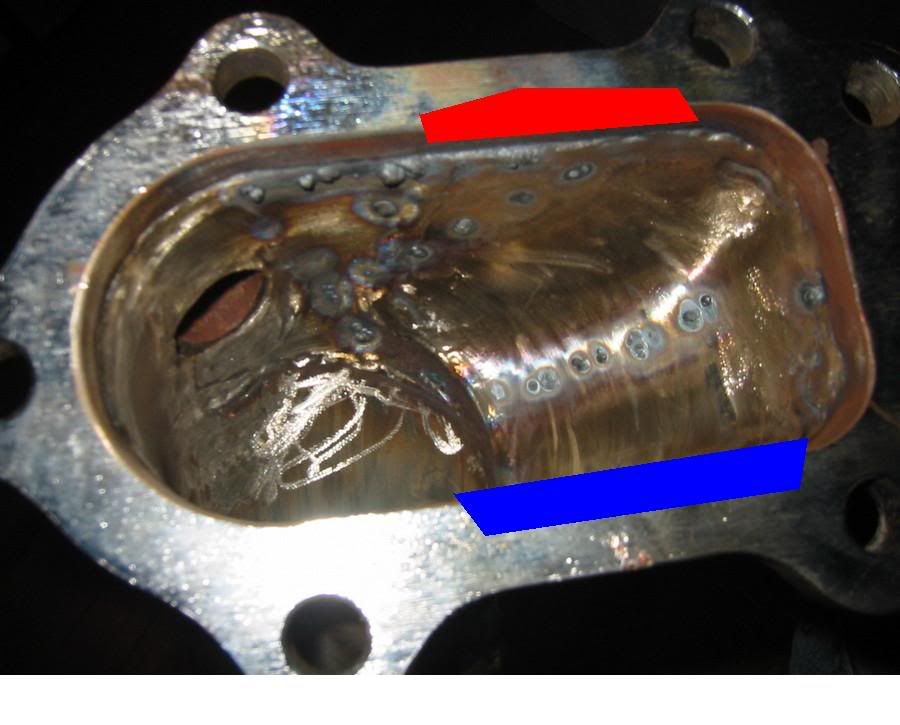 i assume that i need to grind in the red area and not the blue correct? do you know how much do i need to take off ? -------------------- QUOTE(tufy @ Jul 19, 2006 - 7:40 AM) [snapback]458074[/snapback] i dont drive fast, i just fly low |
 Jun 19, 2006 - 10:11 PM Jun 19, 2006 - 10:11 PM
|
|
 Moderator      Joined Apr 17, '03 From Rockland NY Currently Offline Reputation: 15 (100%) |
 You can do the bottom and the side I have circled. and you should be ok. --------------------  I will return one day. |
 Jun 22, 2006 - 4:21 PM Jun 22, 2006 - 4:21 PM
|
|
|
Enthusiast    Joined Sep 9, '02 From Scranton, Pa Currently Offline Reputation: 7 (100%) |
my pipe just cracked on my too lol. i still need to grind it up for my WG anyways.
as for rusting, when welding id advise backpurging when welding for the best results. (capping and filling the inside with argon) |
 Jul 10, 2006 - 1:22 PM Jul 10, 2006 - 1:22 PM
|
|
 Enthusiast   Joined Nov 3, '05 From Chicago Suburbs Currently Offline Reputation: 1 (100%) |
Checked autozone, advanced, carquest, lee auto parts etc. Noone has the gasket that goes between flexi and DP, you know the one with 3 bolt holes... I really don't want to use the paper one from xs, so can someone help me out with the part# for that gasket ? Ill go through the dealership.
Thanks in advance ! -------------------- QUOTE(tufy @ Jul 19, 2006 - 7:40 AM) [snapback]458074[/snapback] i dont drive fast, i just fly low |
 Jul 10, 2006 - 1:35 PM Jul 10, 2006 - 1:35 PM
|
|
|
Enthusiast      Joined Aug 31, '02 From Philadelphia, PA Currently Offline Reputation: 8 (100%) |
QUOTE(CilverSeliST205 @ Jul 10, 2006 - 2:22 PM) [snapback]454105[/snapback] Checked autozone, advanced, carquest, lee auto parts etc. Noone has the gasket that goes between flexi and DP, you know the one with 3 bolt holes... I really don't want to use the paper one from xs, so can someone help me out with the part# for that gasket ? Ill go through the dealership. Thanks in advance ! you mean a normal 3in 3bolt flange gasket? the one that connects the downpipe to the midpipe? you can get them here http://stores.ebay.com/Verocious-Motorspor...8QQftidZ2QQtZkm -------------------- 15PSI - 30MPG - Megasquirt Tuned
|
 Jul 11, 2006 - 3:06 PM Jul 11, 2006 - 3:06 PM
|
|
 Enthusiast   Joined Nov 3, '05 From Chicago Suburbs Currently Offline Reputation: 1 (100%) |
QUOTE(lagos @ Jul 10, 2006 - 1:35 PM) [snapback]454108[/snapback] you mean a normal 3in 3bolt flange gasket? the one that connects the downpipe to the midpipe? you can get them here http://stores.ebay.com/Verocious-Motorspor...8QQftidZ2QQtZkm I hate you -------------------- QUOTE(tufy @ Jul 19, 2006 - 7:40 AM) [snapback]458074[/snapback] i dont drive fast, i just fly low |
  |
1 User(s) are reading this topic (1 Guests and 0 Anonymous Users)
0 Members:
| Lo-Fi Version | Time is now: December 1st, 2024 - 3:59 PM |


