  |
 Mar 6, 2007 - 12:42 PM Mar 6, 2007 - 12:42 PM
|
|
|
Enthusiast      Joined Mar 11, '06 From Way South Chicago Currently Offline Reputation: 0 (0%) |
a spring is good for bending brake lines, the kind you put on a spring door thats got tightly wound coils. ive also used metal round stock or wooden dowels to bend around, but i think ive used my own 2 hands the most.
a friend of mine is looking to get a 6th gen celica and is thinking about going the same way you've gone with the ITB, hes the one whos REALLY interested in a video. -------------------- |
 Mar 6, 2007 - 2:15 PM Mar 6, 2007 - 2:15 PM
|
|
 Enthusiast      Joined Jun 1, '03 From WV Currently Offline Reputation: 2 (100%) |
It's looking good, man. I honestly liked the dark grey engine bay better than the yellow though. I know it will most likely look better yellow when it's all together. I'm excited to see how this looks. I've been working on my own little projects that I felt were pretty cool, but they are dwarfed compared to yours.
-------------------- Live Free, Be Happy
 |
 Mar 6, 2007 - 4:56 PM Mar 6, 2007 - 4:56 PM
|
|
 Administrator      Joined Aug 23, '02 From Seattle, WA Currently Offline Reputation: 14 (100%) |
I got some work done today. I got the proportioning valve and T-fitting for the brake lines installed and bent the rear lines so that they go to the new position. That's about it though. I got my tubing cutter, tap and drill bit, and three five-foot brake lines for me to bend today as well. No pics because I forgot my camera, but I'll get some later this week or this weekend.
-------------------- New Toyota project coming soon...
|
 Mar 6, 2007 - 5:12 PM Mar 6, 2007 - 5:12 PM
|
|
|
Enthusiast      Joined Mar 11, '06 From Way South Chicago Currently Offline Reputation: 0 (0%) |
-------------------- |
 Mar 6, 2007 - 9:08 PM Mar 6, 2007 - 9:08 PM
|
|
 Administrator      Joined Aug 23, '02 From Seattle, WA Currently Offline Reputation: 14 (100%) |
QUOTE(Bitter @ Mar 6, 2007 - 2:12 PM) [snapback]533606[/snapback] I'd rather have a few straight pieces, so that I don't have to unroll and straighten the line myself. Also, none of my lines are over five feet so I won't need to splice anything together. -------------------- New Toyota project coming soon...
|
 Mar 6, 2007 - 9:11 PM Mar 6, 2007 - 9:11 PM
|
|
 Enthusiast      Joined May 15, '05 From Toronto Currently Offline Reputation: 4 (100%) |
Hey coom, b4 u pulled your car apart..what did you paint ur firewall with?? Just rattel can stuff?? or did you use like a high heat rattel can?
|
 Mar 6, 2007 - 9:21 PM Mar 6, 2007 - 9:21 PM
|
|
 Administrator      Joined Aug 23, '02 From Seattle, WA Currently Offline Reputation: 14 (100%) |
QUOTE(Valo666 @ Mar 6, 2007 - 6:11 PM) [snapback]533688[/snapback] Hey coom, b4 u pulled your car apart..what did you paint ur firewall with?? Just rattel can stuff?? or did you use like a high heat rattel can? I used the Duplicolor high temperature paint. It's held up pretty well. -------------------- New Toyota project coming soon...
|
 Mar 12, 2007 - 12:00 AM Mar 12, 2007 - 12:00 AM
|
|
 Administrator      Joined Aug 23, '02 From Seattle, WA Currently Offline Reputation: 14 (100%) |
Today I got quite a bit done. I pressure washed the bay and began sanding and grinding.
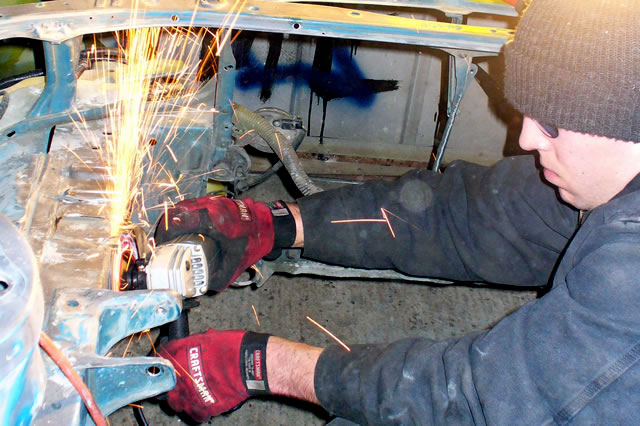 Me with the angle grinder...that battery tray probably took a good two hours to remove. 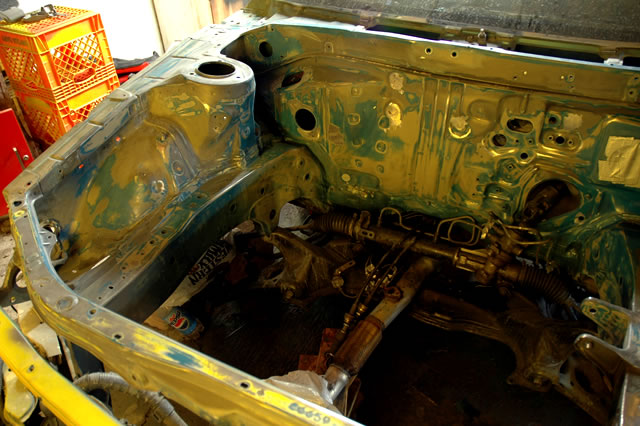 Passenger side...notice the lack of any studs on the firewall and the removed power steering reservoir bracket. 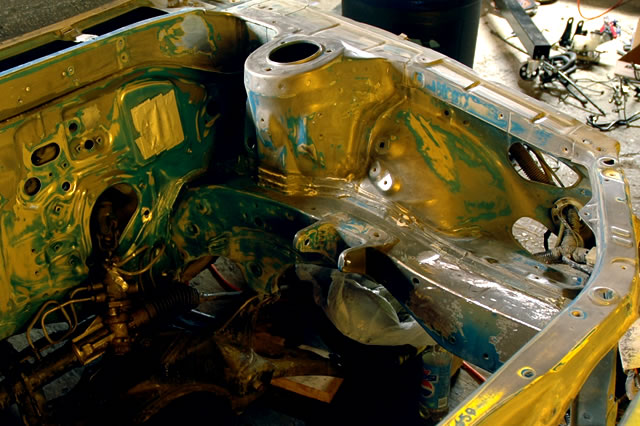 Drivers side...no more studs or battery tray. 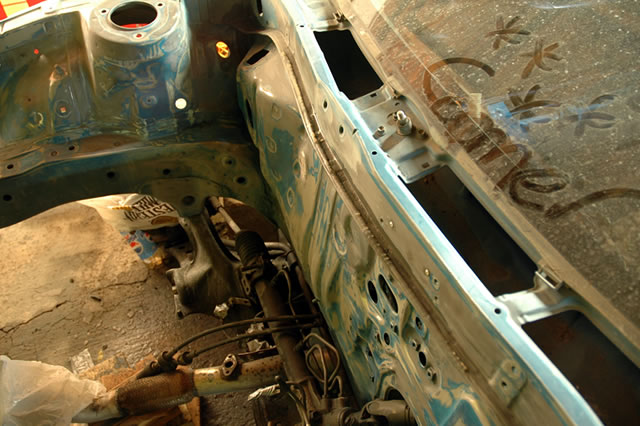 Firewall...nice and smooth. Now I have to get the holes filled, do some bodywork, and then the bay will be ready to paint. -------------------- New Toyota project coming soon...
|
 Mar 12, 2007 - 12:05 AM Mar 12, 2007 - 12:05 AM
|
|
|
Enthusiast      Joined Jul 7, '03 Currently Offline Reputation: 55 (100%) |
And to think I was freaking out after drilling a couple holes to fit skirts.hahaha
You're a madman, I can't wait to see this thing finished.: ) This post has been edited by 97lestyousay: Mar 12, 2007 - 12:06 AM -------------------- JDM guy made me do it.
|
 Mar 12, 2007 - 12:18 AM Mar 12, 2007 - 12:18 AM
|
|
 Enthusiast      Joined Nov 12, '02 From Webster Ma. Currently Offline Reputation: 1 (100%) |
thats where its at man! going all out!
-------------------- |
 Mar 12, 2007 - 2:48 AM Mar 12, 2007 - 2:48 AM
|
|
|
Enthusiast Joined Feb 10, '07 From LA COUNTY CALIFORNIA USA Currently Offline Reputation: 0 (0%) |
when you put your motor back in the car make sure you place the map sensor sitting up right with the vacuum port facing straight down it made a difference on my black top 20valve in my 85 corolla. it ran smoother
|
 Mar 12, 2007 - 10:57 AM Mar 12, 2007 - 10:57 AM
|
|
|
Enthusiast  Joined Jan 28, '07 From Bentonville, AR Currently Offline Reputation: 1 (100%) |
that is some awesome work man. I love clean engine bays. The less stuff there the better and I think you are going to have one of the most perfect engine bays you can have.
-------------------- img]http://i8.photobucket.com/albums/a32/MtyMseHarmer/captainsignature2.jpg[/img]
|
 Mar 12, 2007 - 11:58 AM Mar 12, 2007 - 11:58 AM
|
|
 Enthusiast      Joined Oct 28, '02 From Europe, Lithuania Currently Offline Reputation: 8 (100%) |
 Kinda familiar look Btw - just in case Chris - instead of usinf bondo all the way on the engine bay, just smooth all the big inperfections, and then spray the Liquid filler (2 component one), spray one thick layer all over the bay - and let it dry for atleast 12 hours. it will cover most of the inperfections all around and it is easy to sand it. After this just shoot out the primer and you will be ready for paint -------------------- Ex celica owner - just a guy from other side of the pond...
Full custom Projects from restoration to performance builds <<<<<< DCw / JDMart >>>>>>> |
 Mar 13, 2007 - 9:38 AM Mar 13, 2007 - 9:38 AM
|
|
|
Enthusiast      Joined May 22, '03 From NOVA Currently Offline Reputation: 16 (100%) |
looking good chris, really interested in seeing how the shaved look will come out!
but just food for thought, next time you want to remove a metal component, i'd suggest drilling out the tack welds with a drill, you'll save A LOT of time and your back |
 Mar 13, 2007 - 11:05 AM Mar 13, 2007 - 11:05 AM
|
|
 Administrator      Joined Aug 23, '02 From Seattle, WA Currently Offline Reputation: 14 (100%) |
QUOTE(midengine3sgte @ Mar 11, 2007 - 11:48 PM) [snapback]535468[/snapback] when you put your motor back in the car make sure you place the map sensor sitting up right with the vacuum port facing straight down it made a difference on my black top 20valve in my 85 corolla. it ran smoother Thanks for the advice. Do you know if it needs to be above the intake manifold? I'd like to hide it below the ITBs if possible. QUOTE(doGGy @ Mar 12, 2007 - 8:58 AM) [snapback]535547[/snapback] Kinda familiar look Btw - just in case Chris - instead of usinf bondo all the way on the engine bay, just smooth all the big inperfections, and then spray the Liquid filler (2 component one), spray one thick layer all over the bay - and let it dry for atleast 12 hours. it will cover most of the inperfections all around and it is easy to sand it. After this just shoot out the primer and you will be ready for paint Do you have a link to this liquid filler stuff Romas? I don't think I've seen it. QUOTE(playr158 @ Mar 13, 2007 - 6:38 AM) [snapback]535844[/snapback] looking good chris, really interested in seeing how the shaved look will come out! but just food for thought, next time you want to remove a metal component, i'd suggest drilling out the tack welds with a drill, you'll save A LOT of time and your back I considered that for the battery tray, but decided I didn't want my frame rail to look like swiss cheese. -------------------- New Toyota project coming soon...
|
 Mar 13, 2007 - 11:34 AM Mar 13, 2007 - 11:34 AM
|
|
|
Enthusiast      Joined May 22, '03 From NOVA Currently Offline Reputation: 16 (100%) |
haha swiss cheese....just think of it more like ummmm...a light weight mod
jp keep it up |
 Mar 13, 2007 - 12:46 PM Mar 13, 2007 - 12:46 PM
|
|
 Administrator      Joined Aug 23, '02 From Seattle, WA Currently Offline Reputation: 14 (100%) |
QUOTE(playr158 @ Mar 13, 2007 - 8:34 AM) [snapback]535873[/snapback] haha swiss cheese....just think of it more like ummmm...a light weight mod jp keep it up Haha will do. I got your PM, and figured I'd post up this information for all. Since the Club4AG Forums are down, I get most of my information from the following places: http://www.club4g.com (The tech reference section is still up) http://www.mr2oc.com/forumdisplay.php?f=57 http://www.padandwheels.com/mr2/ http://home.clear.net.nz/pages/phil.bradshaw/Index.htm http://www.toymods.net/forums/ http://www.20vmki.com/ -------------------- New Toyota project coming soon...
|
 Mar 13, 2007 - 1:17 PM Mar 13, 2007 - 1:17 PM
|
|
|
Enthusiast      Joined May 22, '03 From NOVA Currently Offline Reputation: 16 (100%) |
thanks chris
|
 Mar 14, 2007 - 2:06 AM Mar 14, 2007 - 2:06 AM
|
|
 Enthusiast      Joined Oct 28, '02 From Europe, Lithuania Currently Offline Reputation: 8 (100%) |
Dont have a link Chris - but will get you few brand names and product names who produce them. Its a nice stuff to use
-------------------- Ex celica owner - just a guy from other side of the pond...
Full custom Projects from restoration to performance builds <<<<<< DCw / JDMart >>>>>>> |
 Mar 14, 2007 - 11:06 AM Mar 14, 2007 - 11:06 AM
|
|
 Enthusiast      Joined Oct 28, '02 From Europe, Lithuania Currently Offline Reputation: 8 (100%) |
Ok, heres the info that i could dig out about this polister liquid filler:
Manufacture is UPOL product is called REFACE, or you can look for another manufacture HB BODY they mane Polister Liquid Filler too. DINITROL has to have this Liquid filler in they line of product, and i think i saw DupliColor filler too. -------------------- Ex celica owner - just a guy from other side of the pond...
Full custom Projects from restoration to performance builds <<<<<< DCw / JDMart >>>>>>> |
  |
1 User(s) are reading this topic (1 Guests and 0 Anonymous Users)
0 Members:
| Lo-Fi Version | Time is now: November 24th, 2024 - 1:56 AM |


