  |
 Apr 25, 2007 - 9:04 AM Apr 25, 2007 - 9:04 AM
|
|
 Enthusiast    Joined Mar 28, '04 From St.Louis Currently Offline Reputation: 15 (100%) |
looking great Coomer, just keep us updated, we are all dying to see the finished results. btw, i was wondering where you got your remote battery terminals from? because i am looking at moving my battery to the trunk. Thanks for the info. and keep up the amazing work.
--------------------  1994 GT Hatchback 1994 ST Coupe 1988 Corolla Wagon All-Trac 1999 Corvette 2008 Cobalt SS Turbo |
 Apr 25, 2007 - 9:35 AM Apr 25, 2007 - 9:35 AM
|
|
 Administrator      Joined Aug 23, '02 From Seattle, WA Currently Offline Reputation: 14 (100%) |
QUOTE(94celicadude @ Apr 25, 2007 - 7:04 AM) [snapback]550502[/snapback] looking great Coomer, just keep us updated, we are all dying to see the finished results. btw, i was wondering where you got your remote battery terminals from? because i am looking at moving my battery to the trunk. Thanks for the info. and keep up the amazing work. I got them from SummitRacing.com. They were $16 I think. -------------------- New Toyota project coming soon...
|
 Apr 25, 2007 - 1:12 PM Apr 25, 2007 - 1:12 PM
|
|
 Enthusiast      Joined May 15, '05 From Toronto Currently Offline Reputation: 4 (100%) |
sooo close. Cant wait to see it all back together.
|
 Apr 25, 2007 - 6:36 PM Apr 25, 2007 - 6:36 PM
|
|
 Administrator      Joined Aug 23, '02 From Seattle, WA Currently Offline Reputation: 14 (100%) |
So far today I just have been working on a few minor things.
First I got my speed sensor and reverse switch wired up. 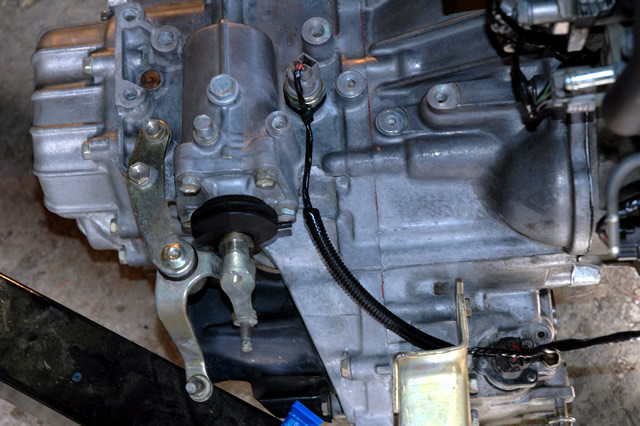 There you can see how the wiring is ran. My goal was to keep the reverse switch wiring as hidden as possible. 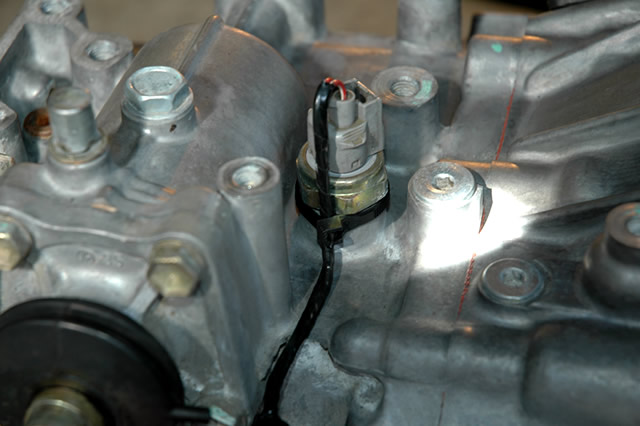 Zipties FTW! 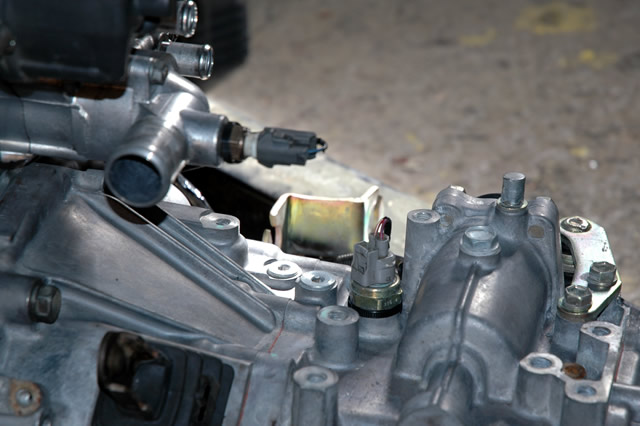 And there's the view from the front. Should look nice when it's in the car. 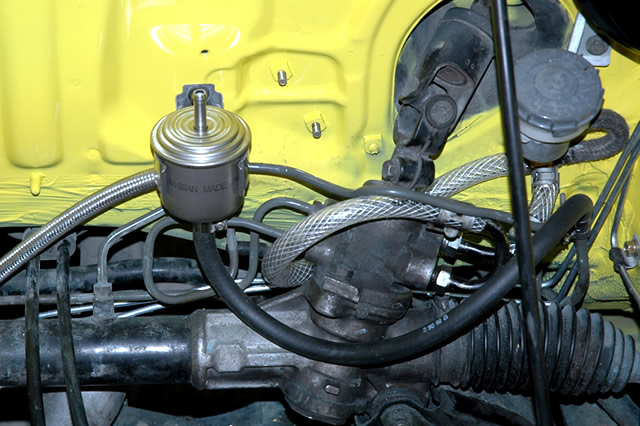 I also installed my fuel filter. The stainless line connects to the car's hard fuel return line. On the intake manifold, I bent the fuel return line so that it faces down towards the firewall and ground, so that hose will be quite a bit more hidden. Also, I don't know if I mentioned this earlier, but I'm going to run the brake booster from the cylinder #4 vacuum port instead of from cylinder #1. This will result in a much shorter brake booster line. I'm going to go finish up a couple more things, and then when my dad gets home we're going to try to drop the motor back into the car. -------------------- New Toyota project coming soon...
|
 Apr 26, 2007 - 2:11 AM Apr 26, 2007 - 2:11 AM
|
|
 Administrator      Joined Aug 23, '02 From Seattle, WA Currently Offline Reputation: 14 (100%) |
Tonight I got the motor back in with the help of my brother and my dad. I began putting things like fuel lines and such back on, but I'm not happy with my fuel line/fuel filter setup, so I may change it at a later date.
Here's a couple pics: 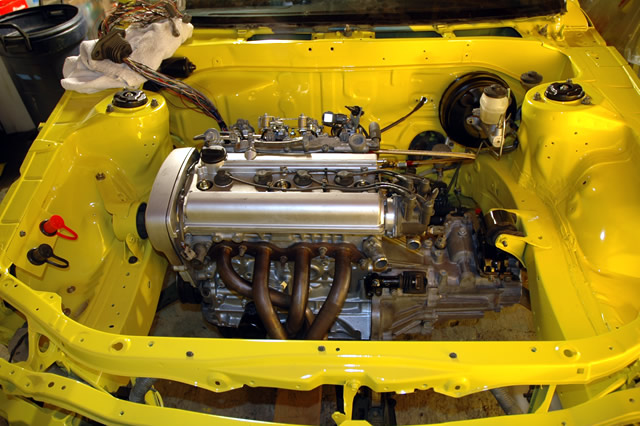 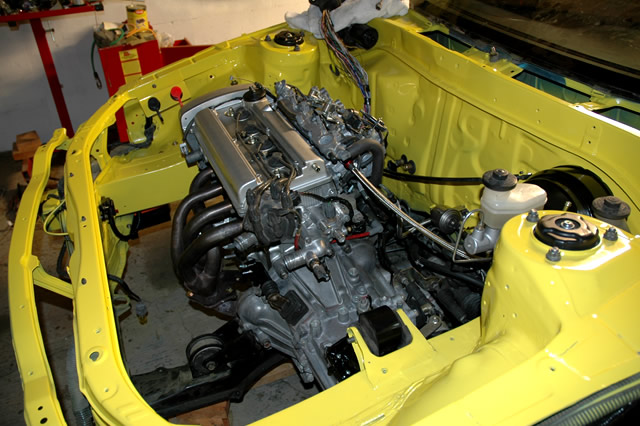 It's midnight and I'm running on 2.5 hours of sleep, so I'm gonna go pass out. Oh yeah, does anyone know of a good way to cut stainless steel braided hose (5/8", 3/8", and 1/4")? I tried a tubing cutter, hacksaw, tin snips, wire cutters, dremel with cutoff disc, and finally another wire cutter before I finally got one line cut. And when I cut it it was all frayed and a big mess. -------------------- New Toyota project coming soon...
|
 Apr 26, 2007 - 2:16 AM Apr 26, 2007 - 2:16 AM
|
|
 Enthusiast   Joined Dec 3, '04 From torrance, ca Currently Offline Reputation: 0 (0%) |
I usually use a dremel with the cutting disk. Try wrapping where you're gonna cut with electrical tape. That should prevent the braiding from fraying. Hope this helps.
Btw, your car is turning out fantastic. Keep up the awesome work. This post has been edited by hellsyphon: Apr 26, 2007 - 2:19 AM |
 Apr 26, 2007 - 2:55 AM Apr 26, 2007 - 2:55 AM
|
|
 Enthusiast      Joined Nov 4, '02 From Hecho en la Republica Dominicana/Living in NJ Currently Offline Reputation: 0 (0%) |
QUOTE(Coomer @ Apr 26, 2007 - 3:11 AM) [snapback]550870[/snapback] WOW thats just a beautiful shot of an super clean engine bay ... Coomer you have to take some Hi res shote of these .. maybe set them up as background -------------------- |
 Apr 26, 2007 - 12:17 PM Apr 26, 2007 - 12:17 PM
|
|
 Administrator      Joined Aug 23, '02 From Seattle, WA Currently Offline Reputation: 14 (100%) |
QUOTE(hellsyphon @ Apr 26, 2007 - 12:16 AM) [snapback]550871[/snapback] I usually use a dremel with the cutting disk. Try wrapping where you're gonna cut with electrical tape. That should prevent the braiding from fraying. Hope this helps. Btw, your car is turning out fantastic. Keep up the awesome work. Oh, I forgot to mention, I did wrap the hose with electrical tape. The end still frayed. QUOTE(macavely @ Apr 26, 2007 - 12:55 AM) [snapback]550875[/snapback] WOW thats just a beautiful shot of an super clean engine bay ... Coomer you have to take some Hi res shote of these .. maybe set them up as background Thanks. I'll take some high-res shots when I'm done. -------------------- New Toyota project coming soon...
|
 Apr 26, 2007 - 12:24 PM Apr 26, 2007 - 12:24 PM
|
|
 Enthusiast      Joined Nov 12, '02 From Webster Ma. Currently Offline Reputation: 1 (100%) |
i used a hack saw with a metal blade in it for cutting my steel braided stuff.
i used a table vice for holding the tubing. its coming out great btw. And i just bought some ceramic coating on ebay, that you brush on yourself and it cures from the heat of the exhaust. http://cgi.ebay.com/ebaymotors/Black-Satin...sspagenameZWDVW maybe something you'd be into. -------------------- |
 Apr 26, 2007 - 12:49 PM Apr 26, 2007 - 12:49 PM
|
|
 Administrator      Joined Aug 23, '02 From Seattle, WA Currently Offline Reputation: 14 (100%) |
Thanks for the tip John. I don't think I'm going to bother coating my header though. I can live with how it is now, plus I don't want to wait any longer.
I'm hoping to have the car started Friday night. I'm a bit worried because of all the wiring changes I've made, but I think it'll start right up. Then it's just finishing up the bay, putting the body parts back on, and putting the interior back in. It's possible that I may actually have it done by my birthday like I planned. -------------------- New Toyota project coming soon...
|
 Apr 26, 2007 - 2:33 PM Apr 26, 2007 - 2:33 PM
|
|
 Administrator      Joined Aug 23, '02 From Seattle, WA Currently Offline Reputation: 14 (100%) |
So I'm thinking about re-doing my fuel line and doing some shopping, and I think I'm going to scrap my Nissan fuel filter idea and run an inline billet fuel filter, like this or this.
Does anyone have any good ideas on how I could easily fabricate a bracket to hold one of those in place low on my firewall? They sell some online, but they won't fit any of the filters I want to use. I could use U-Bolts like this I suppose if I go with a round fuel filter: 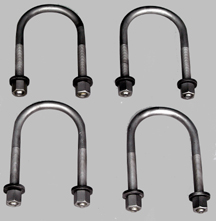 The only problem with that is that I'd have to get to the nuts from inside the car, and I'd probably be positioning the fuel filter behind the ECU, so removing the fuel filter to clean the filter element would be a pain. But I guess I'll only do it every 15,000 miles or so, so it would be tolerable. But I'd prefer a different solution, so if anyone has any good ideas you should let me know. -------------------- New Toyota project coming soon...
|
 Apr 26, 2007 - 7:37 PM Apr 26, 2007 - 7:37 PM
|
|
|
Enthusiast      Joined Mar 11, '06 From Way South Chicago Currently Offline Reputation: 0 (0%) |
use studs, then a flat cross bar since its a Hex shaped part. i think you know what i'm describing. you can double nut the studs to the firewall with nylock nuts so they wont spin and just use a good stainless nut on the other end to hold the cross bar down that holds the filter in place. maybe put some rubber between the filter and firewall so that the sound of the pump doesnt transfer to the chassis through the front of the car.
This post has been edited by Bitter: Apr 26, 2007 - 7:39 PM -------------------- |
 Apr 26, 2007 - 8:16 PM Apr 26, 2007 - 8:16 PM
|
|
 Enthusiast    Joined Mar 28, '04 From St.Louis Currently Offline Reputation: 15 (100%) |
QUOTE(Coomer @ Apr 25, 2007 - 2:35 PM) [snapback]550512[/snapback] QUOTE(94celicadude @ Apr 25, 2007 - 7:04 AM) [snapback]550502[/snapback] looking great Coomer, just keep us updated, we are all dying to see the finished results. btw, i was wondering where you got your remote battery terminals from? because i am looking at moving my battery to the trunk. Thanks for the info. and keep up the amazing work. I got them from SummitRacing.com. They were $16 I think. thanks for the info man. Looking great. This post has been edited by 94celicadude: Apr 26, 2007 - 8:16 PM --------------------  1994 GT Hatchback 1994 ST Coupe 1988 Corolla Wagon All-Trac 1999 Corvette 2008 Cobalt SS Turbo |
 Apr 26, 2007 - 11:31 PM Apr 26, 2007 - 11:31 PM
|
|
 Administrator      Joined Aug 23, '02 From Seattle, WA Currently Offline Reputation: 14 (100%) |
QUOTE(Bitter @ Apr 26, 2007 - 5:37 PM) [snapback]551214[/snapback] use studs, then a flat cross bar since its a Hex shaped part. i think you know what i'm describing. you can double nut the studs to the firewall with nylock nuts so they wont spin and just use a good stainless nut on the other end to hold the cross bar down that holds the filter in place. maybe put some rubber between the filter and firewall so that the sound of the pump doesnt transfer to the chassis through the front of the car. That's a good idea. Thanks. -------------------- New Toyota project coming soon...
|
 Apr 27, 2007 - 12:40 AM Apr 27, 2007 - 12:40 AM
|
|
|
Enthusiast     Joined Oct 18, '06 From cincinnati Currently Offline Reputation: 10 (100%) |
is it legal to be that clean?
-------------------- proud =3sgte SWAPPED= '95 Celica ST owner [calling it the GT2 or half-trac]
309,000 miles n' .... |
 Apr 27, 2007 - 3:38 PM Apr 27, 2007 - 3:38 PM
|
|
 Administrator      Joined Aug 23, '02 From Seattle, WA Currently Offline Reputation: 14 (100%) |
So I got paid today and I'm considering purchasing a set of velocity stacks that are longer than my previous ones. Before, the ones I had were 2.5" high, and my car hesitated and bogged. Changing back to factory velocity stacks (which have a longer area for air to travel through, and a perfectly matched hole where they meet the intake manifold) solved this problem.
Now, I'm wondering why the hesitation and bogging was going on. I prepared a Microsoft Paint drawing to help explain things. 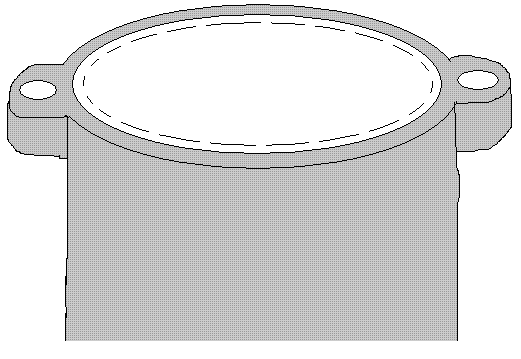 The silver is an intake manifold runner. The velocity stacks that I originally installed had an inner diameter that was smaller than the runner diameter, like the size of the inner dashed ellipse. They were also shorter that factory velocity stacks. Do you think this smaller diameter was causing some sort of turbulent air condition that was causing my hesitation, or do you think it was because of the shorter distance that the air was traveling once it entered the velocity stack? I'm basically trying to determine if I should purchase new velocity stacks, and if so, trying to decide between 4" or 6" lengths. Both will fit just fine. Any input would be appreciated. -------------------- New Toyota project coming soon...
|
 Apr 27, 2007 - 3:48 PM Apr 27, 2007 - 3:48 PM
|
|
|
Enthusiast      Joined May 22, '03 From NOVA Currently Offline Reputation: 16 (100%) |
do you have an AFC system or something to make minor changes for things like the velocity stacks?
cause that probably woulda solved ur hesitation problem, being able to make a few adjustments to help the ECU adjust to them |
 Apr 27, 2007 - 3:52 PM Apr 27, 2007 - 3:52 PM
|
|
 Administrator      Joined Aug 23, '02 From Seattle, WA Currently Offline Reputation: 14 (100%) |
QUOTE(playr158 @ Apr 27, 2007 - 1:48 PM) [snapback]551620[/snapback] do you have an AFC system or something to make minor changes for things like the velocity stacks? cause that probably woulda solved ur hesitation problem, being able to make a few adjustments to help the ECU adjust to them No I don't. I just want to run all OEM electronics at this point, as I can't tune it myself and can't afford to have it dyno-tuned. -------------------- New Toyota project coming soon...
|
 Apr 27, 2007 - 3:53 PM Apr 27, 2007 - 3:53 PM
|
|
 Enthusiast      Joined Nov 12, '02 From Webster Ma. Currently Offline Reputation: 1 (100%) |
id say it was the length more than diameter. the longer the runner the more velocity the air will have. normally runner length is determined by the intake manifold and the plenum. the runners length will determine rpm power bands and intake air pulse colliding with each other.
got this from mr2oc : The runner length affects the RPM at which the tuning peak is most effective. In most cases, the runner length is tuned to coincide with the engine's natural torque peak because the tuning is most effective at this point. Sometimes the runners are tuned to peak elsewhere in order to flatten things out. (thats why some engine run staggered. to flatten out the power band, spreading it out, making it less peaky) The rule of thumb is to use 7 inches @ 10,000rpm (from the back of the valve to the plenum) and add 1.7 inches for each 1000rpm below this (or subtract for above). So for a 3SGTE, a manifold tuned for the engine's natural torque peak around 5krpm will yield a runner length of 15.5". Getting more aggressive would probably bring this down to the 10" - 14" range. These numbers include the length to the back of the valve so the actual manifold would be a couple inches (EDIT: a few inches) shorter. This post has been edited by x_itchy_b_x: Apr 27, 2007 - 3:54 PM -------------------- |
 Apr 27, 2007 - 5:04 PM Apr 27, 2007 - 5:04 PM
|
|
 Administrator      Joined Aug 23, '02 From Seattle, WA Currently Offline Reputation: 14 (100%) |
Thanks for the info John. I may just go with the 6" stacks, but I'm not sure.
Also, I'm debating whether or not I want to vent the rear of my hood, like this:  I think it would allow the ITBs to breathe in cooler air, but I'm concerned about water getting into the bay and stuff. I think I'll just have to try it. -------------------- New Toyota project coming soon...
|
  |
1 User(s) are reading this topic (1 Guests and 0 Anonymous Users)
0 Members:
| Lo-Fi Version | Time is now: November 27th, 2024 - 11:58 AM |


