  |
 Oct 2, 2007 - 12:21 PM Oct 2, 2007 - 12:21 PM
|
|
 Enthusiast  Joined May 10, '06 From El Paso, Texas Currently Offline Reputation: 1 (100%) |
are the valve seals the same in the exhaust and intake sides? im doing the same job to my head but i recieve 16 valve seals and all are the same...
|
 Oct 2, 2007 - 2:28 PM Oct 2, 2007 - 2:28 PM
|
|
|
Enthusiast      Joined Mar 3, '04 From Portsmouth, RI Currently Offline Reputation: 33 (100%) |
no, the part numbers are different. the rubber part is where the main difference is.
the exhaust seals will be grayish and actually look cleaner than the intakes, the rubber part will also be darker in color. the intakes are a sort of dirty-ish metal color with a grayer rubber part. they are all the same size though. -------------------- |
 Oct 2, 2007 - 4:33 PM Oct 2, 2007 - 4:33 PM
|
|
 Enthusiast  Joined May 10, '06 From El Paso, Texas Currently Offline Reputation: 1 (100%) |
damn cuz i put all the same valve seals in the intake and exahust, do i need to change it? i don't want leaks thats the reason why i take my head of and port and polish it
|
 Oct 2, 2007 - 5:38 PM Oct 2, 2007 - 5:38 PM
|
|
|
Enthusiast      Joined Jan 17, '04 From Illinois Currently Offline Reputation: 0 (0%) |
QUOTE(hurley97 @ Sep 28, 2007 - 1:22 PM) [snapback]599885[/snapback] I plan on keeping the car for a long time. the motor coming out of my car will be my backup, I'm planning to beat the crap out if the rebuilt turbo 7A. and the fact that it will be pretty much all stock inside I'm not sure how long it will last. I'm not rebuilding this one just to keep it for a little while, I'm going to use the rebuilt one until it starts getting tired again. As much as I hate to admit it, I have to agree with Dan on this one. It seems like alot of unneccesary work. Wouldn't you be better off just preping this motor for forced induction now and then going turbo with the same motor later? The 200,000 mile motor will make a nice door stop...or maybe some modern yard art. Kudos to you for undertaking the project. -------------------- QUOTE(lagos @ Jul 10, 2006 - 1:55 PM) [snapback]454118[/snapback] i know your trying to do the right thing for your motor, but this is one of those times where you should just trust the guys who have had their swaps for a while and have done a ton of research into this. |
 Oct 2, 2007 - 7:05 PM Oct 2, 2007 - 7:05 PM
|
|
|
Enthusiast     Joined Aug 9, '06 From Ma Currently Offline Reputation: 1 (100%) |
Damn kid, looks GOOD.
You didn't mention any of this at CSP.... When Dustin does his we'll let you do all the work while we watch. It's probably a good thing you didn't touch the valve seats. Unless you have the right machine [read: a drill isn't the right way] you can screw it up. If the seat isn't perfectly machined, and the valve ground correctly you can burn the valve and/or have it not seat [won't seal]. Also, normally when the seats are reground the valve tips have to be cut, which is another time consuming PITA that requires ANOTHER special machine. Yay for engines. Use assy lube for the cam. The lobe/shim contact has alot of pressure. It's not quite as important as if it were a new engine/cams, because they're already broken into each other. But still a good idea. Personally, I use it for bearings too. I don't use it on pistons because it's so thick, and the hone will hold the residue [the rings scrape it all off anyways every time they go up and down]. QUOTE(hurley97 @ Sep 12, 2007 - 6:28 PM) [snapback]595549[/snapback] QUOTE(ILuvMyCelica95 @ Sep 12, 2007 - 10:49 AM) [snapback]595394[/snapback] Also- did they figure out why his was burning oil? yes. things that were wrong with the engine: 1. the oil control rings were just old and worn and got gummed up with oil so they sunk into the piston and since they didn't sit where they should oil just went right past them and got burned on the cylinder walls. the oil control rings... 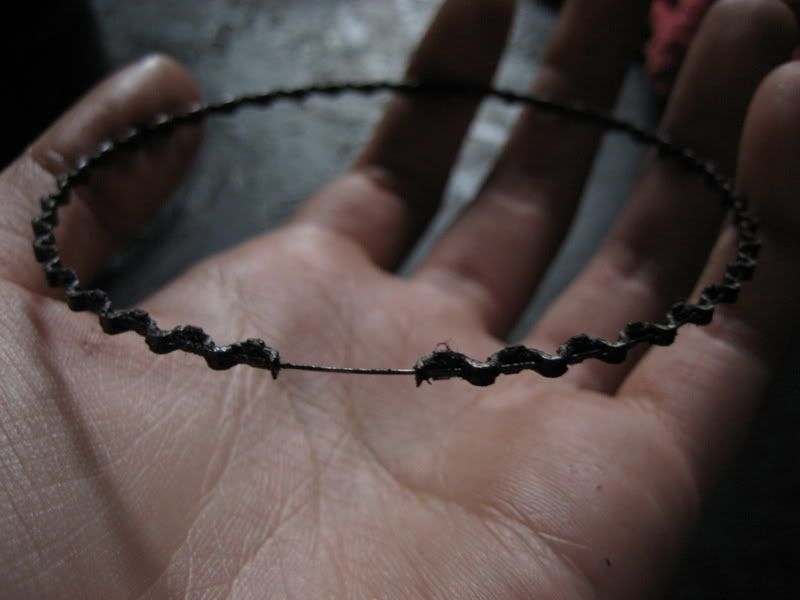 Probably the same reason yours is burning oil. It's the usual cause in Toyota engines, not from worn piston rings as is normally stated. High RPM driving throws extra oil onto the cylinder walls, which makes it harder for the oil control rings anyways. And if they're clogged up, they really can't clean it off. --------------------  |
 Oct 2, 2007 - 10:16 PM Oct 2, 2007 - 10:16 PM
|
|
|
Enthusiast      Joined Mar 3, '04 From Portsmouth, RI Currently Offline Reputation: 33 (100%) |
we re-shimmed the valves today. I have no pictures... it was very easy.
I'll take some of the feeler gauge and everything if anyone is interested. -------------------- |
 Oct 3, 2007 - 6:47 PM Oct 3, 2007 - 6:47 PM
|
|
 Enthusiast    Joined Mar 28, '04 From St.Louis Currently Offline Reputation: 15 (100%) |
i like the port jobs youve done on the head, it looks really good, but if you remember i suggested extrude hone, i just got my head done, and they are shipping it back to me soon, so i will try to take pics and show u what i meant. otherwise everything is amazing, this is a really good post about a rebuild. Keep up the good work.
--------------------  1994 GT Hatchback 1994 ST Coupe 1988 Corolla Wagon All-Trac 1999 Corvette 2008 Cobalt SS Turbo |
 Oct 7, 2007 - 9:51 AM Oct 7, 2007 - 9:51 AM
|
|
|
Enthusiast      Joined Mar 3, '04 From Portsmouth, RI Currently Offline Reputation: 33 (100%) |
the head is back on the block, headgasket in place, cams in place and ready to be reassembled.
I cleaned up and gasket matched and polished up the intake manifold a little. I don't have pictures since my camera battery died but I'll get some next week. I ordered my oil return lines and fittings so we can drill and tap a hole for it as high as possible in the cast top part of the oil pan. -------------------- |
 Oct 7, 2007 - 8:13 PM Oct 7, 2007 - 8:13 PM
|
|
|
Enthusiast    Joined May 3, '06 From New Hampshire Currently Offline Reputation: 2 (100%) |
steph, How much boost are you going to put this practically new 7A through?
--------------------  Darin H. |
 Oct 7, 2007 - 10:01 PM Oct 7, 2007 - 10:01 PM
|
|
|
Enthusiast      Joined Mar 3, '04 From Portsmouth, RI Currently Offline Reputation: 33 (100%) |
probably only about 6-10psi
it should last a pretty long time, be reliable and much quicker -------------------- |
 Oct 8, 2007 - 9:33 PM Oct 8, 2007 - 9:33 PM
|
|
|
Enthusiast  Joined Feb 17, '04 From michigan Currently Offline Reputation: 0 (0%) |
i just read the entire thread, great work. and i love girls that can work on cars....
omg i rebuild my head before and it was a bitch getting to those keepers and putting it back on is liek hell! gluck -------------------- 94 celica GT
92 honda prelude si<h22 swap> 93 eagle talon TSI <4G63 powered>i wish it was AWD 90 mitsu eclipse GSX<4G63 powered>SOLD LEXUS IS300< im looking for one! |
 Oct 9, 2007 - 10:41 PM Oct 9, 2007 - 10:41 PM
|
|
 Moderator      Joined Apr 17, '03 From Rockland NY Currently Offline Reputation: 15 (100%) |
I demand pics !
--------------------  I will return one day. |
 Oct 9, 2007 - 10:53 PM Oct 9, 2007 - 10:53 PM
|
|
|
Enthusiast      Joined Mar 22, '07 From Houston, TX Currently Offline Reputation: 4 (100%) |
ok well the mod said it. you must do it
it will actually help since some ppl might plan a 7a rebuild.. -------------------- QUOTE "And, as always, your friendship, help, and dedication to the advancement of Texas Celica dominance is GREATLY appreciated. Thanks bro." -DEATH 1994 GT: V6 swap, 5speed E53 W/ LSD, All Power, now RED 1995 ST: SOLD @273k miles, Auto, all power, CarPC, White 1994 ST: Totaled, 5spd, all power, Red RIP 07/09/09 @ 241,810 1994 Lexus LS400: This is my new DD |
 Oct 10, 2007 - 6:46 PM Oct 10, 2007 - 6:46 PM
|
|
|
Enthusiast      Joined Mar 3, '04 From Portsmouth, RI Currently Offline Reputation: 33 (100%) |
sorry, I haven't had time to upload and explain things.
someone asked about re-shimming the valves so I took some pics before the valve cover went on today. first you hand tighten the cams in (no need to torque them at this point) and turn it to top dead center. starting with one side first and using a feeler gauge... 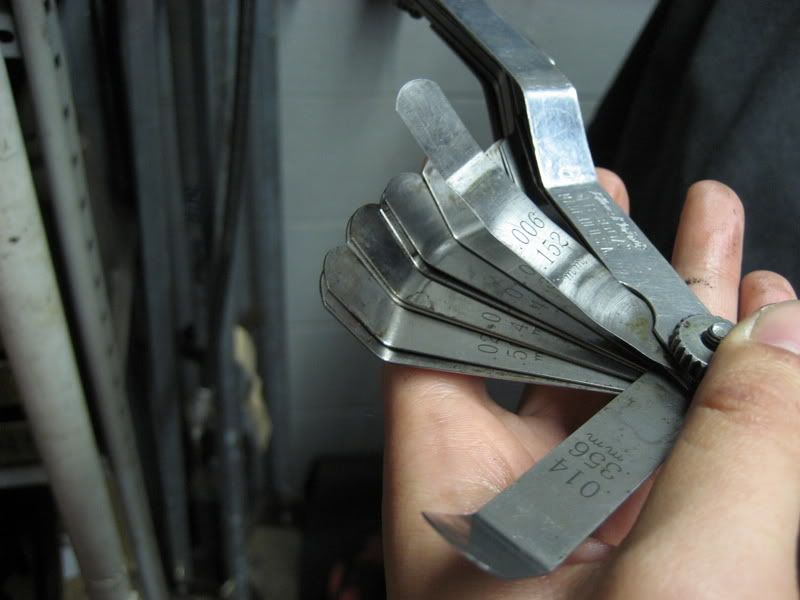 do only the valves where the lobes are facing up. pull out the min and max sizes on the feeler gauge. the minimum should fit between the shim and the cam lobe... 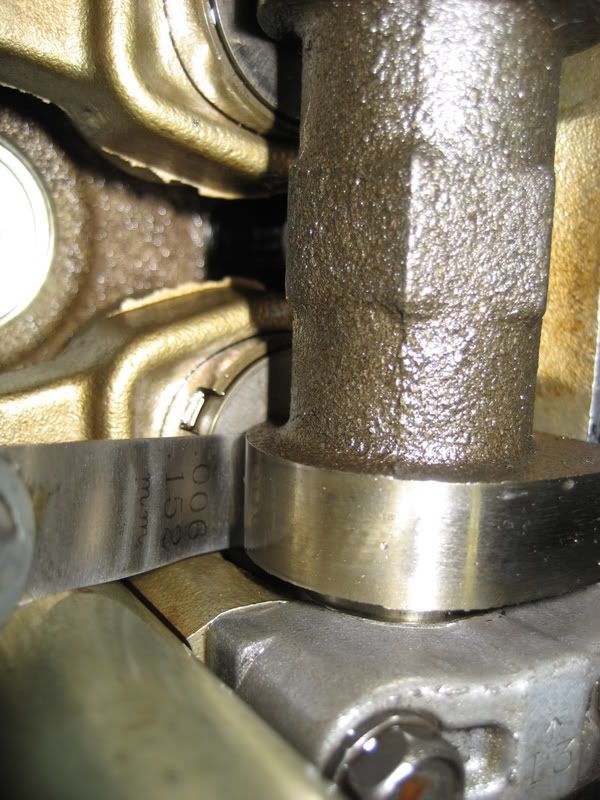 and the maximum should not fit all the way under the lobe at all... 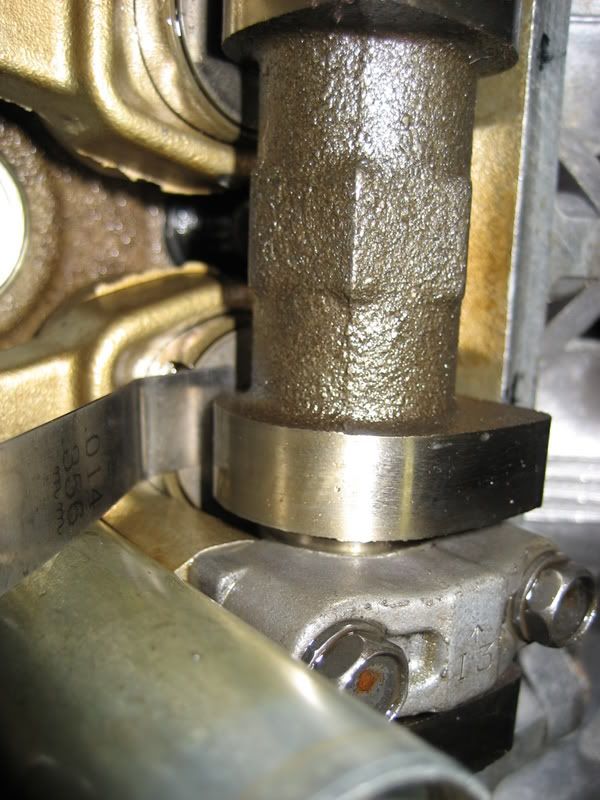
-------------------- |
 Oct 10, 2007 - 7:01 PM Oct 10, 2007 - 7:01 PM
|
|
|
Enthusiast      Joined Mar 3, '04 From Portsmouth, RI Currently Offline Reputation: 33 (100%) |
then turn the cams half a revolution (there is a little dowel pin that goes into the cam gear that faces up when at TDC, just make that face down this time) and repeat the steps for the rest of the valves.
mark on the ledge of the valve cover which ones are in spec and which ones are out. also make sure to remember if the ones that are out of spec are too tight or too loose. at that point you have to take the cams back out. any valves that are in spec, leave alone. to take out the shim, in the second picture you can see a little notch in the cap, just pry the shim out with a little screw driver. now measure it with a micrometer like this...  and put in a shim that bigger or smaller depending on your clearance measurement with the feeler gauge. then put the cams back in and torque them down. note: in case anyone didn't know, the intake cam is spring loaded so you have to put a bolt in the threaded hole before you remove the dependent cam otherwise it will spring out of alignment. -------------------- |
 Oct 10, 2007 - 7:07 PM Oct 10, 2007 - 7:07 PM
|
|
|
Enthusiast      Joined Jul 7, '03 Currently Offline Reputation: 55 (100%) |
QUOTE(hurley97 @ Oct 10, 2007 - 4:01 PM) [snapback]603776[/snapback] driver. now measure it with a micrometer like this...  LOL thats not a micrometer, but a very nice set of dial calipers.( I have 2 pairs identical to that) Very good write up. This post has been edited by 97lestyousay: Oct 10, 2007 - 7:10 PM -------------------- JDM guy made me do it.
|
 Oct 10, 2007 - 7:22 PM Oct 10, 2007 - 7:22 PM
|
|
|
Enthusiast      Joined Mar 3, '04 From Portsmouth, RI Currently Offline Reputation: 33 (100%) |
GETTING CLOSE!! just putting little things back on now, there are a few things I'm going to transfer over from the motor that is in my car right now (i.e. fuel rail, alternator, power steering pump, and a few other small things)
we test fitted the turbo exhaust manifold the other day, it does need to be shaved down a little to clear the alternator bracket. I also brought my turbo into work that day to see how it sat, we did end up having to re-set the orientation of the turbo but now its perfectly the way I want it. 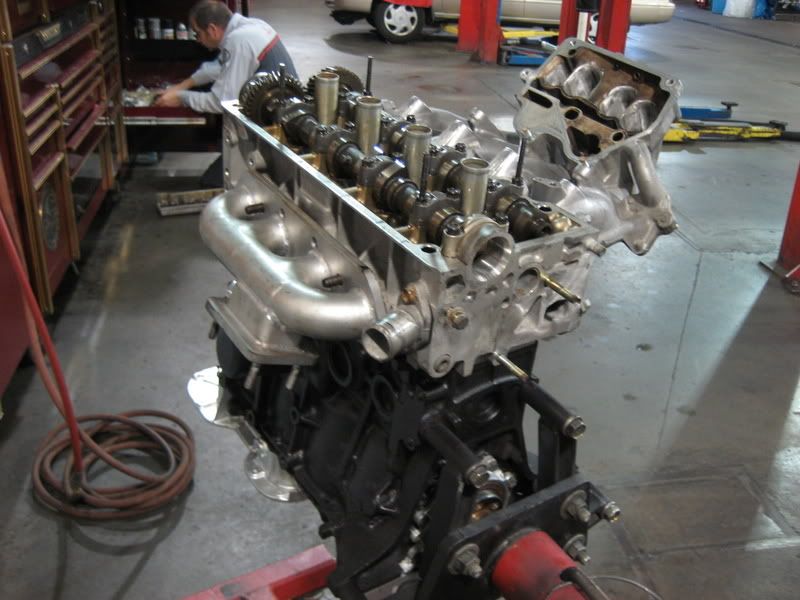 So now what you've all been waiting for, what I've been waiting for anyway, its pretty much done... Peter (the tech thats helping me with this) painted the valve cover, put the water pump and timing belt on for me the other day when I was late. Today we changed the distributor O-ring, put the valve cover on (with the help of a little FIPG in the sharp corners), spark plugs in, distributor, plug wires back on, put all the EGR stuff back on, cleaned up the IAC (which was stuck btw) and throttle body and put those back on, little things like that.... and heres how she sits right now..... 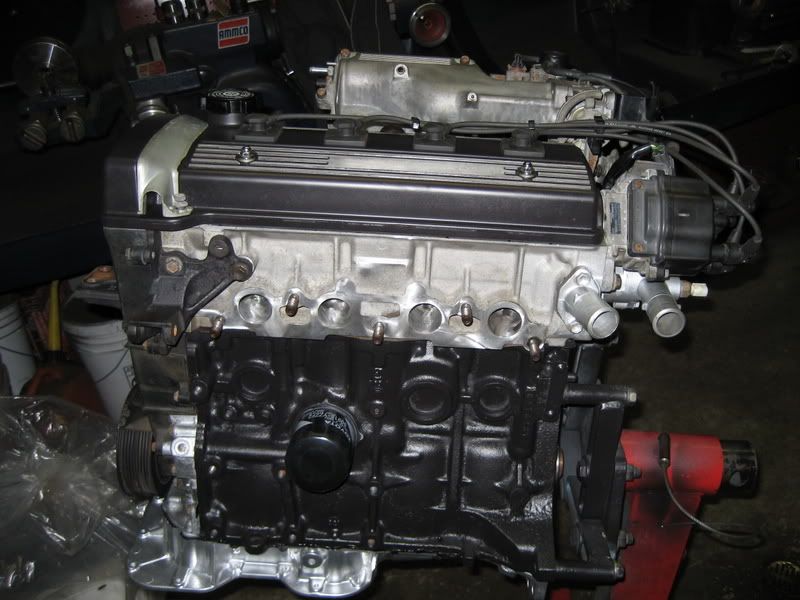 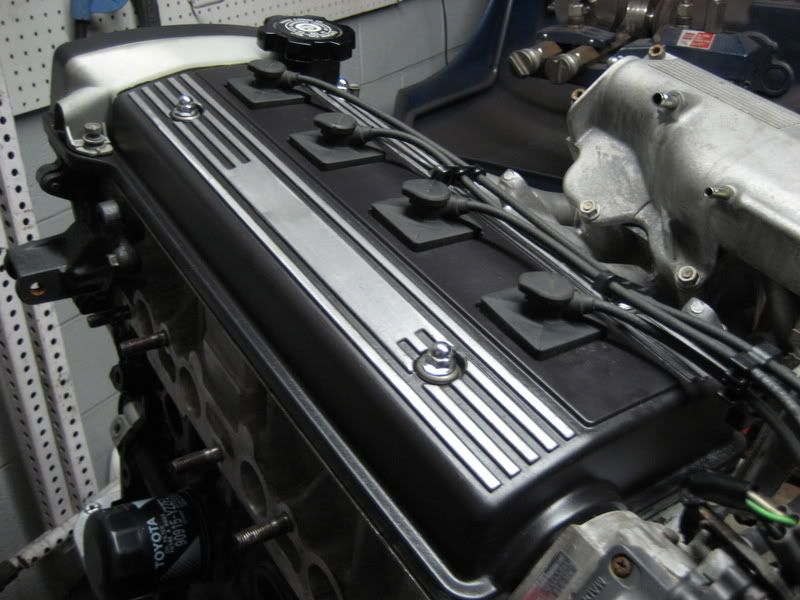 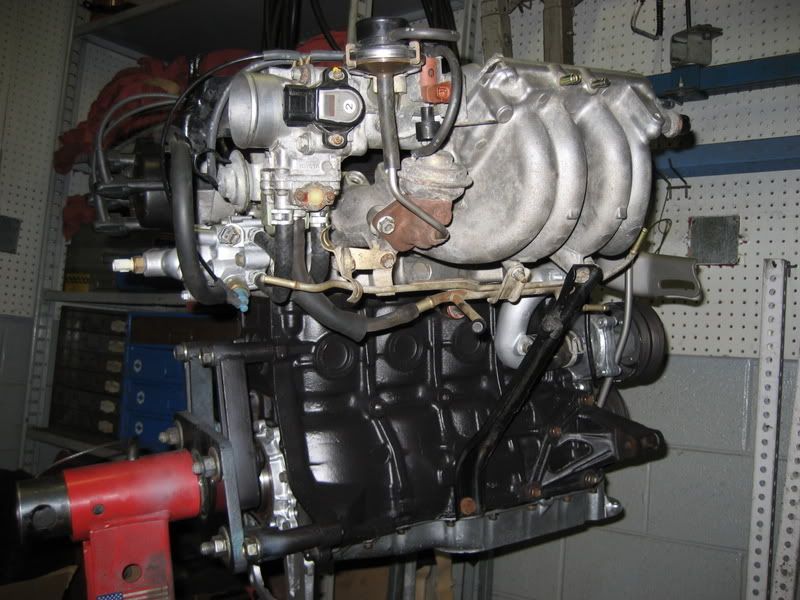 I know there are a few things on the back we didn't clean but thats ok, nobody is going to see them, except you guys... 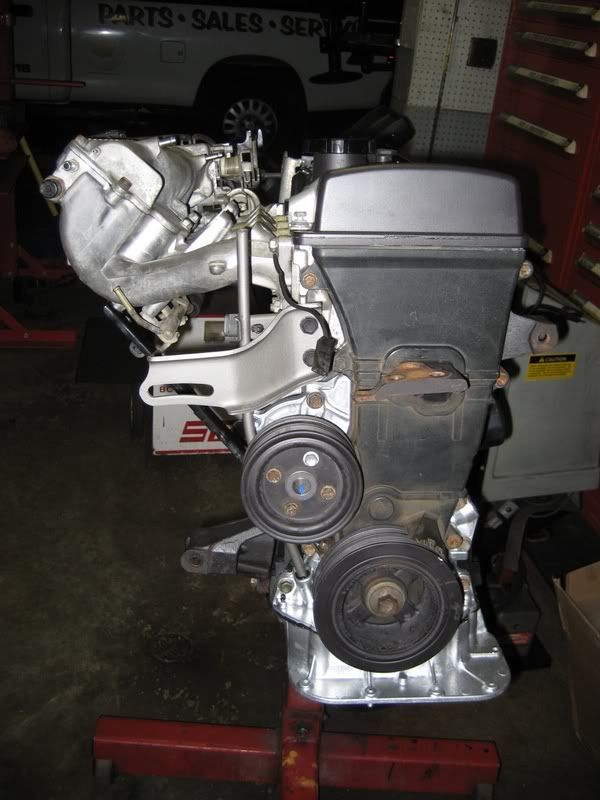 So I'm pretty happy with all this, I'm excited to get this motor in. I almost want to re-think the whole waiting until 200k miles and just give in and do it at 195k.... hmmm -------------------- |
 Oct 10, 2007 - 9:00 PM Oct 10, 2007 - 9:00 PM
|
|
 Enthusiast      Joined May 15, '05 From Toronto Currently Offline Reputation: 4 (100%) |
looks like every things coming along great there stef. I love the look of that valve cover. You gonna do your I/C piping in black too? or silver??
|
 Oct 11, 2007 - 8:26 AM Oct 11, 2007 - 8:26 AM
|
|
 Enthusiast      Joined Apr 20, '06 From Florida Currently Offline Reputation: 44 (100%) |
good work stef, can't wait to see this in your car!
|
 Oct 11, 2007 - 8:31 AM Oct 11, 2007 - 8:31 AM
|
|
 Enthusiast      Joined Nov 12, '02 From Webster Ma. Currently Offline Reputation: 1 (100%) |
it turns me on that you know so much. knowledge is power. i like the whole black and silver scheme.
-------------------- |
  |
5 User(s) are reading this topic (5 Guests and 0 Anonymous Users)
0 Members:
| Lo-Fi Version | Time is now: November 27th, 2024 - 3:54 PM |


