  |
 Jun 17, 2007 - 5:12 PM Jun 17, 2007 - 5:12 PM
|
|
|
Enthusiast     Joined Aug 17, '04 From California Currently Offline Reputation: 20 (100%) |
A few weeks ago I had to replace my wheel bearing so i decided to take a few pictures and do a write up of what i did. It was an easy project which took about an hour to take off, hour to put back on. Youll probably have to wait longer for the machine shop to do the pressing. These steps are good for either side in the front. I only replaced the pass. side so thats all i have here: (please bare with me its my first how to
1) Here is a picture of the tools that i used for the job, not pictured is a hammer. One thing to note is that i have V6 camry axles which have bigger ends so a 30mm socket will be too big, find the right size for your car before starting. 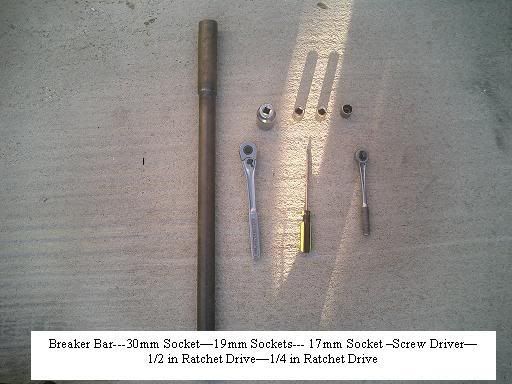 2) This is a picture of what you are basically trying to take off. This is the Steering Knuckle which contains the wheel bearing in the center. Ive labled the parts that need to be removed in order for the Steering Knuckle to come out. I will go futher into detail as to how to remove everything in the following steps. 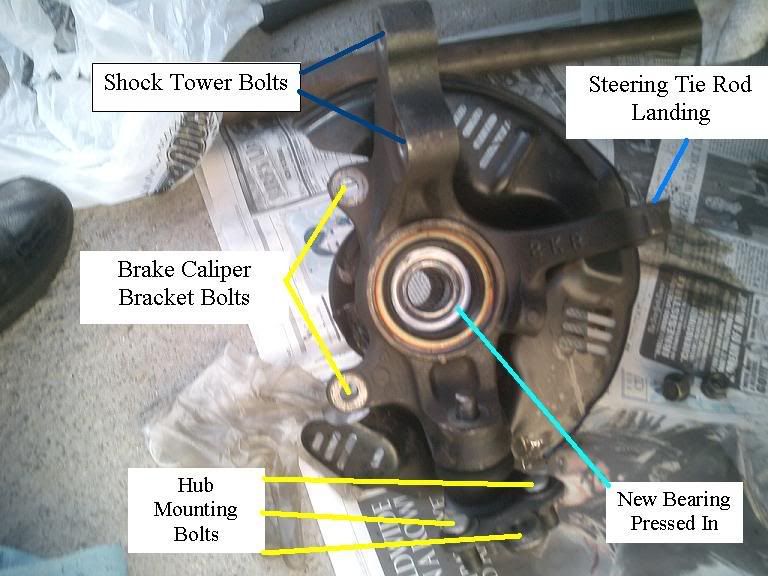 3) The First thing you need to do is get the car in the air with proper jackstand supports and then take off the wheel. Once the wheel is off, your first step will be to remove the axle nut as pictured here. I used my 1/2 inch drive with a 30mm socket, and 3 foot breaker bar. Make sure when you use the bar, that the socket is on straight with the nut so you dont strip it. 2nd, notice how i turned the wheel to the left a little, this is to avoind hitting the fender with the bar when you go to turn it. Also, you will notice the screw driver in the rotor. This is not the best way to keep the rotor from spinning but i was alone and had no one to hold the brakes for me. 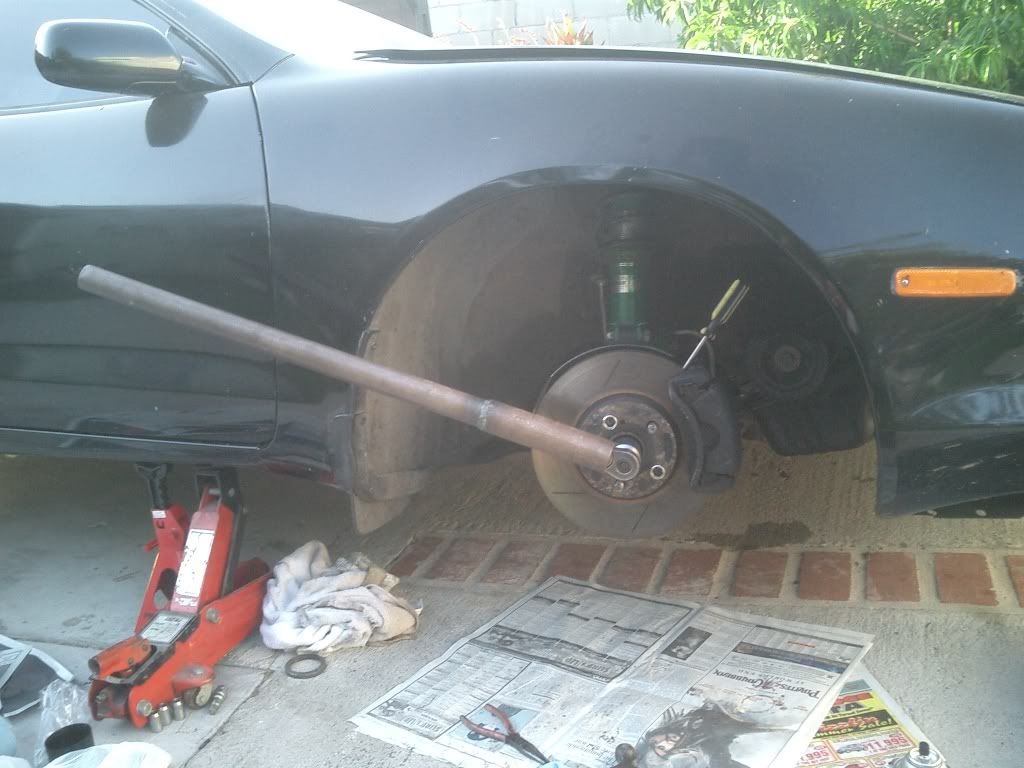 4) Once the axle nut is removed, your next step is to take the axle out of the hub. It just slides right out, you may have to play with it a little by turning the brake assembly one way or the other. *Then, as you see in the picture you will need to remove the brake caliper, with is very easy. Just as you see in the picture, remove the bottom shock bolt, (This gives you clearance for top caliper bolt) and loosen but dont remove the top one. (19mm) *2nd you will remove the caliper bracket bolts (17mm x2) once they are off, the whole caliper comes off with the pads still in place. LEAVE THE BRAKE LINE ON and just hang it from your spring with a wire or a coat hanger so its out of your way. 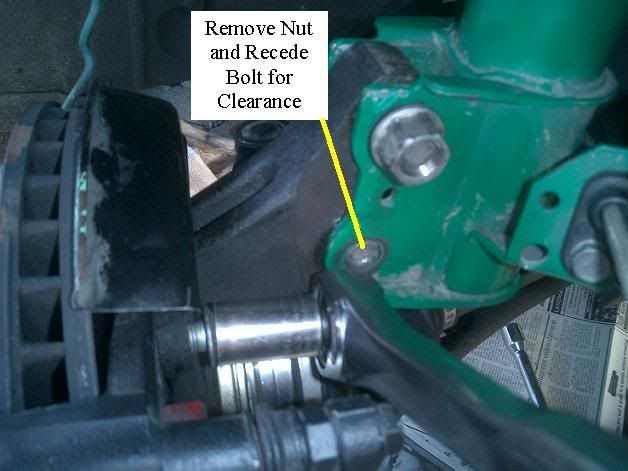 5) Once the Caliper is removed you could slilde off the rotor and it should look like this now. 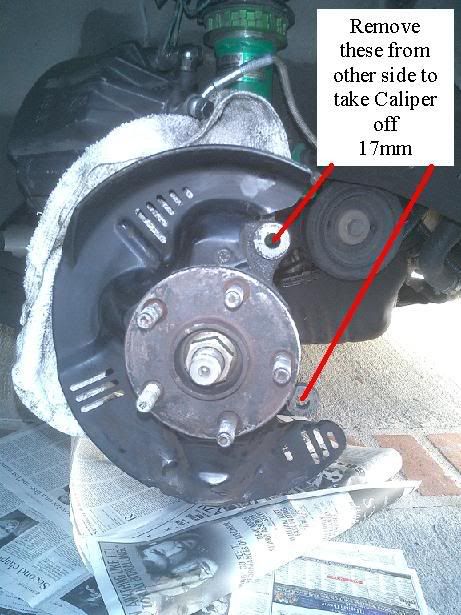 6) Your next step will be to remove your steering Tie rod. In the manual it says you need a puller for this step and you may do so if you feel more comfortable. I'll show you my way, which worked out great and didnt harm anything. 1st- You will need to remove the cotter pin from the castle nut on the tie rod. Then you will loosen the castle nut (17mm) and turn it so that it is ALMOST of the bolt. 2nd- Now you can get a hammer, and give the castle nut a good hit with your hammer in the ^ upwards direction. It doesnt need to be that hard, it should pop the tie rod loose, now you can remove the castle nut.  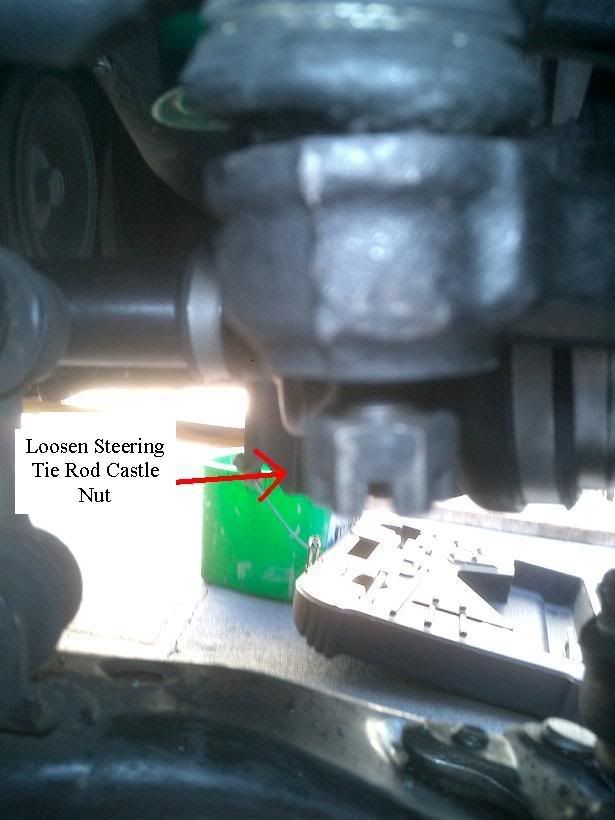 7) Your next and final step in the removal of the steering knuckle is to take off the the two nuts, and one bolt that hold the hub onto the lower control arm. (17mm I believe) You will need to take these off from under the control arm. (Once these are off, you can take the shock tower bolts completely off and take the hub out) * These 2 nuts and bolt will be on pretty strong, so i again used a 1/2 in. ratchet drive and the breaker bar to remove them. Here are two pictures of what you will be removing. 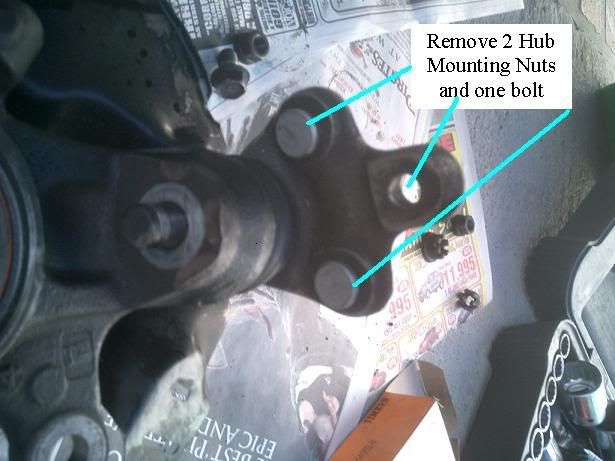 Steering Knuckle Removed: 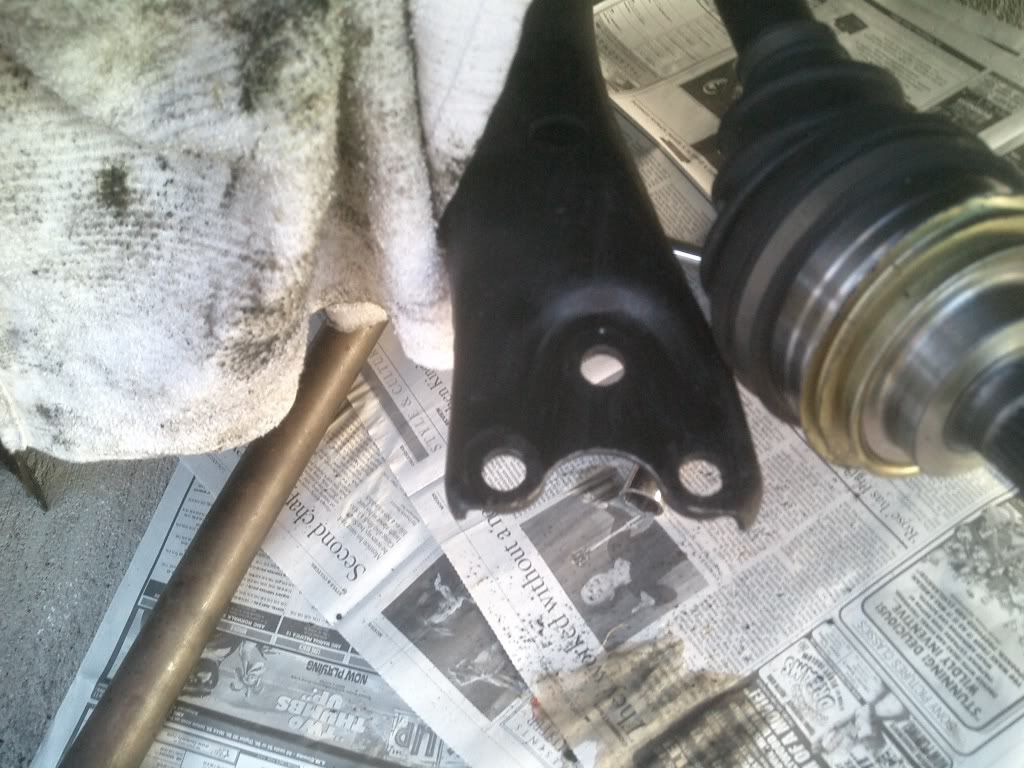 8) Once you remove the two nuts and bolt the hub will come right out. You will then need to take your Steering Knuckle, along with the new bearing and new seals and take them all to a local machine shop to press everything in. I was charged $35 at carquest for the job which was a great deal. Prices will range between $35-$65 per hub. I bought the new bearing and seals at autozone for $52! so combined, this job only cost me about $85. Which is way better than what some shops charge for doing it for you. I was quoted $350 on labor alone! This will save you a lot of money, and its not hard to do at all with the correct tools. 9)Here is my old bearing which look like its been through a lot in its lifetime: 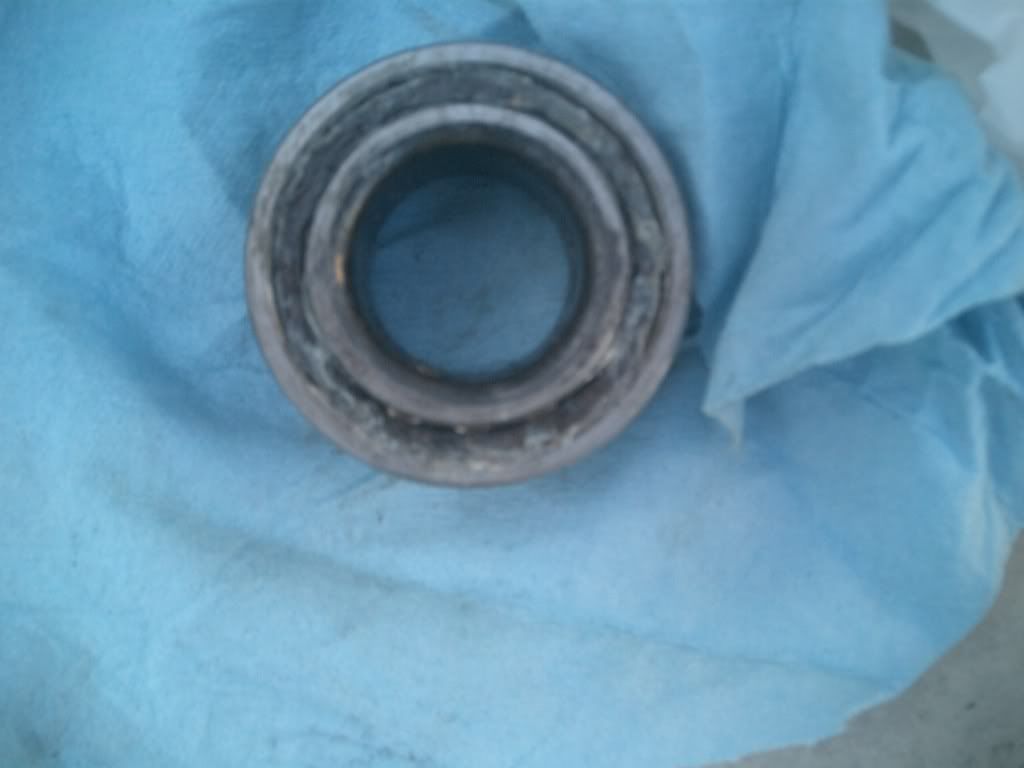 See the 2nd pic above, it has the new wheel bearing and seals pressed it. (Looks way better now) 10) Once your get your Steering Knuckle back put everything back on in reverse order. Heres a little tip when you go to put your Brake caliper back on: First of all, by removing the caliper from the bracket, It should have kept the pads in place, therefore there will BE NO NEED to push the brake cylinder back in with a "C" clamp. The caliper should slide right over the rotor. BUT in order to do so... the Rotor has to be perfectly flat and as far back as possible. I used my lug nuts for this as you can see in this picture: 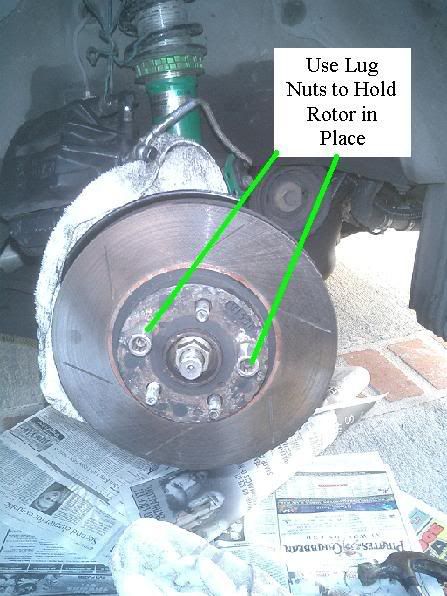 Here is the finished product once everything it put back on: 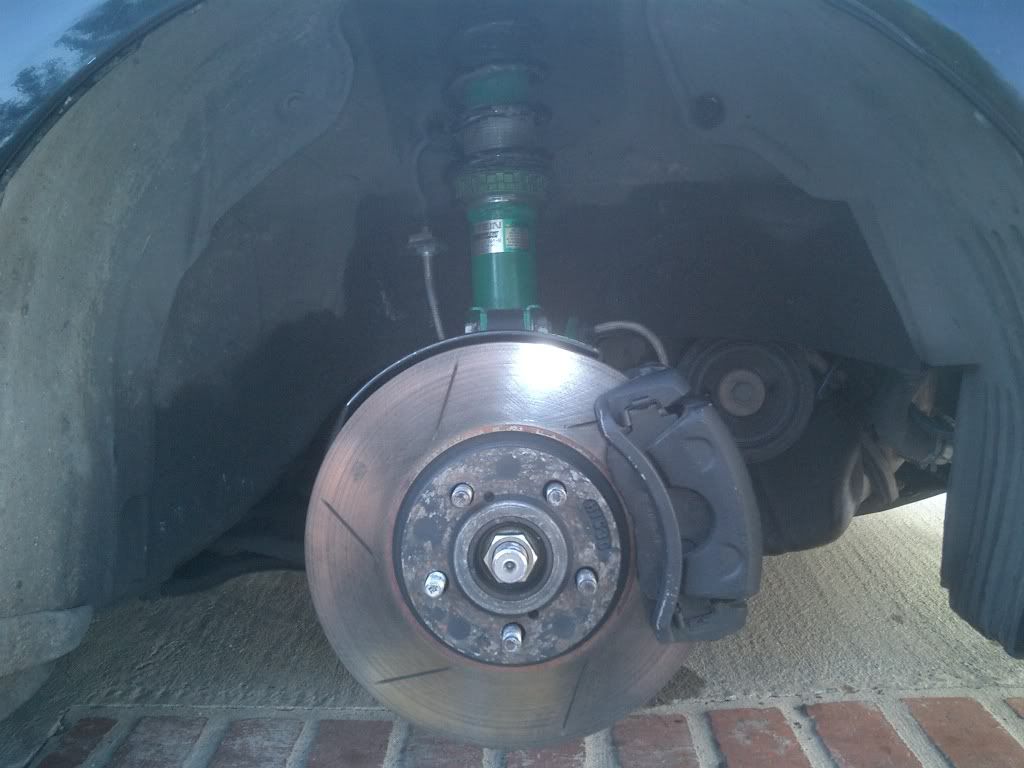 So there you have it, my first How To, I hope someone finds it usefull one day. If you have any questions feel free to ask. If any parts are unclear, please let me know and ill try to clarify as well as edit the post. Thanks! This post has been edited by eggman40: Jul 19, 2007 - 1:24 AM |
 Jun 17, 2007 - 7:17 PM Jun 17, 2007 - 7:17 PM
|
|
|
Enthusiast    Joined Jul 28, '06 From Delaware Currently Offline Reputation: 0 (0%) |
Awesome write-up
|
 Jun 17, 2007 - 11:01 PM Jun 17, 2007 - 11:01 PM
|
|
|
Enthusiast     Joined Jan 25, '06 From MN Currently Offline Reputation: 19 (100%) |
Wow thanks alot for the write-up I need to replace my bearings too never did it on a celica, now it'll be much easier with this thanks eggman.
-------------------- "To Protect And To Serve The Wealthy" -POLICE
|
 Jun 18, 2007 - 2:25 AM Jun 18, 2007 - 2:25 AM
|
|
|
Enthusiast     Joined Aug 17, '04 From California Currently Offline Reputation: 20 (100%) |
Glad I could help guys! It'll save you lots of money on labor
|
 Jun 18, 2007 - 4:03 AM Jun 18, 2007 - 4:03 AM
|
|
|
Enthusiast      Joined Mar 25, '05 From Sydney, Australia Currently Offline Reputation: 0 (0%) |
good stuff man
I went and got a quote today to get my wheel bearing and flange replaced So I'll be attempting this myself this weekend --------------------  98 ST204 ZR - Black Beauty - Roaming the streets of Sydney 73 TA22 LT - Tiffany Blue - Mint Classic Weekend Cruiser 75 TA22 LT - Snow White - Mint Classic Weekend Cruiser 77 RA28 LT - Flubber Green - Mint Classic Weekend Cruiser 94 MX-5 NA8 Clubman - Red Racer - Looking for corners WIP Project: 69 RT40 Corona, 2nd WIP Project: 66 RT40 1600s Corona 86 Corona RT142 - Daily Driver 6GC 4 Life Baby!!! |
 Jul 10, 2007 - 9:37 PM Jul 10, 2007 - 9:37 PM
|
|
|
Enthusiast   Joined Oct 19, '02 From Spring Valley, NY Currently Offline Reputation: 1 (100%) |
nice write up...how could you tell if you need to change it??
|
 Jul 11, 2007 - 8:54 PM Jul 11, 2007 - 8:54 PM
|
|
|
Enthusiast     Joined Aug 9, '06 From Ma Currently Offline Reputation: 1 (100%) |
If it's making noise or has play in the wheel.
It's awesome you took the time to do this, and you did a excellent job for the most part, I just want to correct and add a few things. Mainly for safeties sake. First off, hitting the tie rod stud like that can damage/weaken the ball joint inside. Hit the side of the steering knuckle not the stud, like so.  While it might not make sense, it WILL come out. This is especially important for most of you. He has had his out semi recently at least, judging from his suspension upgrades and how easily his axle slid out. Usually it takes quite a few hard whacks. The part I circled is actually your lower ball joint, which is attached to your axle carrier. The hub is the part that is pressed into the center of the bearing and has the wheel studs in it. Also, you should have a nut there. I really hope you just removed it to replace the bearing [you don't have to, the bearing will come out with it on the knuckle] and it's not on your car like that..... If it is, you need to fix it NOW.  Also, usually the axle doesn't want to come out of the hub [it slides in on splines]. If it won't easily slide out, PUT THE NUT ON THE END OF THE THREAD SO YOU DON'T DAMAGE IT and whack it with a hammer. A brass hammer or brass drift is HIGHLY recommended so you lessen the chance of damaging the threads. When you reinstall you can put some antiseize on the splines so it will come out easier next time. --------------------  |
 Jul 11, 2007 - 9:01 PM Jul 11, 2007 - 9:01 PM
|
|
|
Enthusiast     Joined Aug 9, '06 From Ma Currently Offline Reputation: 1 (100%) |
One more thing to add.
If you're going to replace something like a wheel bearing that takes a bit of time and effort to replace and you're going to use aftermarket parts, I HIGHLY suggest you don't go to autocrap or advanced auto. They tend to stock the cheaper parts there. NAPA tends to have higher quality parts IMO. Timkin and Federal Mogul are good brands. Also, look for bearings that have a plastic "seal" between the outside of the inner and outer races. This will help keep dust and debris out that gets past the rubber seals. --------------------  |
 Jul 12, 2007 - 4:53 PM Jul 12, 2007 - 4:53 PM
|
|
 Enthusiast      Joined Sep 28, '03 From Bloomington, IN Currently Offline Reputation: 0 (0%) |
Nice write up, but your jack stand poisitioning is wrong. Try to put it on the spot where the two frame rails intersect.
-------------------- NASA/SCCA RX-7....currently under the knife
92 Civic hatch B16 - Sold 10th anniv RX-7 - RIP The Slow Celica - Sold...and then crushed crushed due to street racing. Quote from Seinfeild: George's Boss reading a magazine: "People magazine's most beautiful people. Oh and a Celica...nothin wrong with that!" |
 Jul 14, 2007 - 4:13 PM Jul 14, 2007 - 4:13 PM
|
|
 Enthusiast      Joined Feb 7, '03 From Northern Virginia Currently Offline Reputation: 23 (100%) |
$160 from a shell gas station. supplied my own bearing.
|
 Jul 19, 2007 - 1:30 AM Jul 19, 2007 - 1:30 AM
|
|
|
Enthusiast     Joined Aug 17, '04 From California Currently Offline Reputation: 20 (100%) |
QUOTE(alltracman78 @ Jul 11, 2007 - 6:54 PM) [snapback]577577[/snapback]   Thank You very much alltrac man for pointing these things out... i dont know what i was thinking by calling the knuckle a hub. As for the missing nut, i have and it was there, but since it was my first time i took it of only to find out 5mins after this pic was taken that it coulda stayed in there. as for the steering tie rod, i did hit it from the side like you said, and it didnt come loose. I gave it a really soft tap upward and it came out, i coulda almost just muscled it out. And lastly, since ive done my swap, (over a year ago) the axles have always come out very easily, thats why i said you have to play with it a little. It will vary for people but im sure theyll figure it out. It was juse easy for me. Thanks again for your input and your corrections, thats exactly what i asked for at the end of the write up. This post has been edited by eggman40: Jul 19, 2007 - 1:38 AM |
 Aug 2, 2007 - 9:42 PM Aug 2, 2007 - 9:42 PM
|
|
|
Enthusiast     Joined Aug 17, '04 From California Currently Offline Reputation: 20 (100%) |
QUOTE(purplegt4 @ Jul 14, 2007 - 2:13 PM) [snapback]578579[/snapback] $160 from a shell gas station. supplied my own bearing. $80 in my back yard about 1 /2 hour of my labor... not bad i think. Those extra $80 are going into some other goods |
 Oct 19, 2007 - 10:46 AM Oct 19, 2007 - 10:46 AM
|
|
|
Enthusiast      Joined Mar 15, '07 From Tennessee Currently Offline Reputation: 52 (100%) |
can anyone supply parts # for the bearing and seal?
-------------------- Learned a lot in 10 years... I hardly log in anymore, last login Today Sept 6 2019, and I was forced just to clarify a post. LOL
If you PM me and I dont respond, dont fret or cry. Im alive, better post your questions in the thread below, maybe I log back in 2grfe Swapped... Why I chose the 2GR, before you ask read here... A great civilization is not conquered from without until it has destroyed itself from within. @llamaraxing in Instagram is the best way to find me. I hardly log here anymore. |
 Oct 23, 2007 - 3:01 PM Oct 23, 2007 - 3:01 PM
|
|
|
Enthusiast  Joined Sep 6, '04 From Canada Currently Offline Reputation: 0 (0%) |
what if you just replacing the bearing and not the hub. Is it the same thing?? do I have to remove the hub from the cv shaft.
|
 Sep 25, 2008 - 3:29 PM Sep 25, 2008 - 3:29 PM
|
|
|
Enthusiast     Joined Aug 17, '04 From California Currently Offline Reputation: 20 (100%) |
what if you just replacing the bearing and not the hub. Is it the same thing?? do I have to remove the hub from the cv shaft. thats what i did here... i didnt replace the hub, just the bearing. you have to take it off, take it to a shop to press the new bearing in, then put it back on in reverse order. |
 Sep 25, 2008 - 3:50 PM Sep 25, 2008 - 3:50 PM
|
|
|
Enthusiast      Joined Jan 17, '08 From JB MDL, NJ Currently Offline Reputation: 30 (100%) |
TM514002B - thats the P/N for the Timken bearing. We use Timken bearings in almost all of our gear at work and they hold up pretty well for the abuse this stuff goes through.
|
 Dec 27, 2009 - 7:01 PM Dec 27, 2009 - 7:01 PM
|
|
|
Enthusiast  Joined Sep 14, '09 Currently Offline Reputation: 1 (100%) |
is the timkin wheel bearing better than oem bearings under racing conditions? does anyone know?
TM514002B - thats the P/N for the Timken bearing. We use Timken bearings in almost all of our gear at work and they hold up pretty well for the abuse this stuff goes through. is that part number for GT four celicas with the superstrut hubs? i'm assuming that the mc pherson hubs use a different size of wheel bearing. |
 Dec 28, 2009 - 3:59 AM Dec 28, 2009 - 3:59 AM
|
|
|
Enthusiast      Joined Apr 24, '08 From Orange County, CA Currently Offline Reputation: 33 (100%) |
yo eggman can you get those pics to work?!!
-------------------- Group buy to replicate Narrow E series transaxle parts
http://www.6gc.net/forums/index.php?showto...p;#entry1107514 |
 Dec 28, 2009 - 8:19 AM Dec 28, 2009 - 8:19 AM
|
|
 Enthusiast      Joined Apr 18, '05 From Calgary Currently Offline Reputation: 20 (100%) |
the wheel bearing for both superstrut and mcpherson suspension are the same. in fact, celicas since 86 as well as most corolla's and camry's share the same wheel bearings.
part number: 90369-38003-77 -------------------- -------------------------------------------------------------------------------- -------------------------------------------------------------------------------- |
 Dec 28, 2009 - 11:21 AM Dec 28, 2009 - 11:21 AM
|
|
|
Enthusiast      Joined Apr 24, '08 From Orange County, CA Currently Offline Reputation: 33 (100%) |
My car currently has 121,000 miles. Would you guys suggeest that i change them at 130,000 miles? Even if they are not lose or have no sign of wear and tear??
-------------------- Group buy to replicate Narrow E series transaxle parts
http://www.6gc.net/forums/index.php?showto...p;#entry1107514 |
  |
1 User(s) are reading this topic (1 Guests and 0 Anonymous Users)
0 Members:
| Lo-Fi Version | Time is now: December 3rd, 2024 - 2:04 PM |


